You are using an out of date browser. It may not display this or other websites correctly.
You should upgrade or use an alternative browser.
You should upgrade or use an alternative browser.
Isn't that a lot more work?
- Thread starter Dustin07
- Start date
You could get a 3/4 to 1” pvc coupler.
For hose clamps near SW, I prefer the plastic ones.
Two Little Fishies 1 inch plastic hose clamp set - (6 per pack)
Ratchet Clip - Plastic Hose Clamps - 6 Piece Kit. Simply snap on to hose. Quick removal one piece design. For securing standard aquarium hose.premiumaquatics.com
I'm gonna order one and make it redundant I hit home Depot today but they didn't have any. I knew metal was bad but I had so much stainless on my boat and the old system came with stainless as well.
I picked up an extra 80lbs of live sand today and threw out my old sand. It was just so bad and I realized that the 5g bucket my kids had used when the tank first crashed may have been at one pointed used for something oily. Nope! Not worth the risk.
So 100lbs of live sand today.
I'm just taking a little bourbon break before I resume filling. The leveling mat seems to be doing well, any tiny imperfections that existed are looking better.
This was last night. took about 3.5hrs to get the salt all mixed and set up. 100lbs of live sand, mostly dead rock, but maybe 10lbs or so of live rock my my hospital tank to help get things going, and a bottle of Dr Tims. Currently running just two redsea 90w lights and I'll decide over time if I want to run the 3 that I have, upgrade to 160s, or replace them entirely (or just keep it at 2... right now the two seem OK).
This morning I could tell before the lights came on at 5am as I was getting ready for work that the water has already cleared so we'll get better pics tonight hopefully.

You know I hadn't even thought about that. When I had picked up the used system last fall, it was already setup with stainless so I just defaulted to that same solution. I went ahead and ordered those plastic ones Griss had posted (I went back to HD yesterday and really just could not find any solutions). I'll replace the stainelss with those, and for the sake of redundancy we'll see, might add a zip tie as well...
It took quite a bit of tinkering between the drain tubes and the water flow of the return pump to get the drain dialed to a point that it didn't sound like someone pulled the drain on a bath tub but I think I have it pretty quiet now with good flow.
My mind is blown that none of my electronics failed when the last tank crashed. I have both of my nero power heads in the new tank, 2 heaters (redundancy) tied in with the ink bird currently sitting at 78.7F. fingers crossed, as of right now it seems like we are off and running!
This morning I could tell before the lights came on at 5am as I was getting ready for work that the water has already cleared so we'll get better pics tonight hopefully.
NO steel hose clamps in saltwater. Stainless or otherwise. Especially the cheap Home Depot ones. You can use large cable ties if you cinch them with pliers.
One day you will do an ICP and ask on the internet why are all these weird metals in my tank and how do I remove them, It isn't the iron that is a problem. Its the alloys that make iron into steel or stainless.
You know I hadn't even thought about that. When I had picked up the used system last fall, it was already setup with stainless so I just defaulted to that same solution. I went ahead and ordered those plastic ones Griss had posted (I went back to HD yesterday and really just could not find any solutions). I'll replace the stainelss with those, and for the sake of redundancy we'll see, might add a zip tie as well...
It took quite a bit of tinkering between the drain tubes and the water flow of the return pump to get the drain dialed to a point that it didn't sound like someone pulled the drain on a bath tub but I think I have it pretty quiet now with good flow.
My mind is blown that none of my electronics failed when the last tank crashed. I have both of my nero power heads in the new tank, 2 heaters (redundancy) tied in with the ink bird currently sitting at 78.7F. fingers crossed, as of right now it seems like we are off and running!
Thought of the day as I get this tank cycled and into a routine:
a. keep the factory sock filteration system
b. modify sump to accomodate the reefmat500 I already have
c. get a different filter roller.
I'll probably post in the eshopps group and see if there is a direct fit filter roller. I'm sitting on this $300-400 reefmat 500 right now that I can't use. I like it, and I like that it will go into the app with my lights, ATO, and potentially wavemaker down the road but I want to think about best solution since I did buy this tank new and have a fair $$ into it at this point. I'm trying to get away from my formerly do everything on the cheap perspective and be a little more reasonable when considering the existing investment...
Well according to Dr Tims, you can pretty much immediately start adding so we added a small bio load last night at just after 24hrs. I have 2 juvenile clowns, my 2 ruby scooters, 4 chromis. So far everything seems to be functioning mechanically. I'm really on the fence with lighting. I think I'll have a better idea once I see nitrates and start to add some coral.

This is the first time I've ever liked my rock work, lol. I'll get better pictures of that later.

This is the first time I've ever liked my rock work, lol. I'll get better pictures of that later.
Paul B
Premium Member
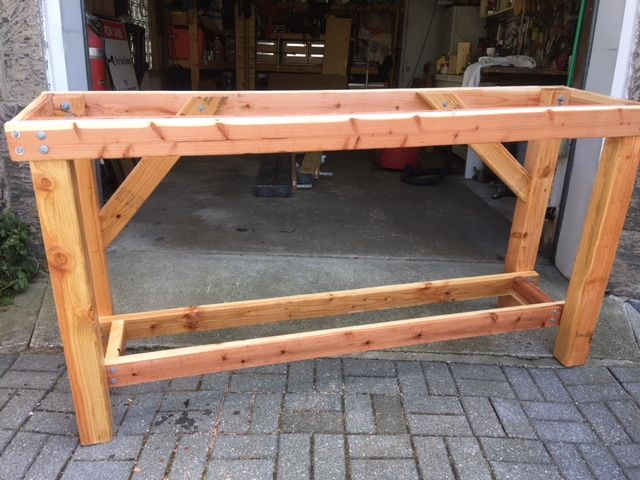
If that is actually 3/4" marine grade plywood it should be fine. I can't see the fasteners but if it was built as a tank stand I would "assume" they are either hot dipped galvanized or stainless steel. I would worry more about the "formica" or whatever thew sheeting is. It should be fine as long as it is not against the floor because water, especially salt water will get under it and if it stays wet, the bottom the sheathing will peel off. But it looks great. 
I overbuild those things also. I used redwood because it doesn't warp and is moisture resistant. I also have very little wood on wood because any water that gets between two pieces of wood never dries and rots. All my hardware is hot dipped galvanized and all the supporting pieces are bolted through.
The top rails are cut into the uprights so they are sitting on the wood and not just bolted on so all the weight is on the upright 4X4s
My last stand was under my 100 gallon tank for 40 years.
If you can't see the picture, click on the X
If that is actually 3/4" marine grade plywood it should be fine. I can't see the fasteners but if it was built as a tank stand I would "assume" they are either hot dipped galvanized or stainless steel. I would worry more about the "formica" or whatever thew sheeting is. It should be fine as long as it is not against the floor because water, especially salt water will get under it and if it stays wet, the bottom the sheathing will peel off. But it looks great.
I overbuild those things also. I used redwood because it doesn't warp and is moisture resistant. I also have very little wood on wood because any water that gets between two pieces of wood never dries and rots. All my hardware is hot dipped galvanized and all the supporting pieces are bolted through.
The top rails are cut into the uprights so they are sitting on the wood and not just bolted on so all the weight is on the upright 4X4s
My last stand was under my 100 gallon tank for 40 years.
If you can't see the picture, click on the X
I think I had so much going on that week I wasn't thinking clearly, plus the recent take leak on my mind made me hyper paranoid. There are feet all around the main cabinet bottom brace that are adjustable to level the system.
What I totally somehow either forgot or missed, even though I built the thing, was that the two outside panels that I thought were "floating" also had a number of feet on them so they have weight of the tank being driven straight down to the floor, basically making the tank stand about four times stronger than I had thought about on my head

So far everything is going well. My hippo is happy, starting to socialize and eat and swim around again and that makes me probably happiest of all!
I decided I did not like the 2 light setup, so I added my third one back in. It paired up via bluetooth pretty much immediately with one attempt so that's nice. I finally got a glare free picture to highly my rock scape a bit. I'm going to make a couple small adjustments but I'm actually pretty happy with how it turned out. I have about a full race track around the rock for both me to be able to clean and the fish as they grow to swim. I also have a bridge in the middle that for some reason has always been really important to me... lol
I added a firefish goby, chromis (bringing us to 5, which is what we wanted) a coral banded shrimp, and snails this weekend. My nitrates are finally going up, sand is getting red, so I'm happy to have what seems like enough nutrients and detritus present to feed the CUC and start adding some corals I think!

Also I cannot say enough about eshopps. they messaged me on Facebook, and emailed me separately over the weekend to let me know that my replacement doors shipped and should arrive by Wednesday. I think this week I'll work on the lighting system I want to install in the cabinet, I might fire up the protein skimmer. I still need to figure out an ATO solution though so I should be shopping probably for a second small cabinet I want.
I added a firefish goby, chromis (bringing us to 5, which is what we wanted) a coral banded shrimp, and snails this weekend. My nitrates are finally going up, sand is getting red, so I'm happy to have what seems like enough nutrients and detritus present to feed the CUC and start adding some corals I think!
Also I cannot say enough about eshopps. they messaged me on Facebook, and emailed me separately over the weekend to let me know that my replacement doors shipped and should arrive by Wednesday. I think this week I'll work on the lighting system I want to install in the cabinet, I might fire up the protein skimmer. I still need to figure out an ATO solution though so I should be shopping probably for a second small cabinet I want.
Added some corals finally last night, 5 new zoa frags (4 I've never had before, including rastas, captain americas, etc and a devils hand). This weekend there is a local coral show so I'm cautiously optimistic because I see people posting pictures of high end corals that they get for a song all the time but I've never been to one of these shows. I'll likely have my eyes on euphyllia mostly.
I am getting a lot of micro bubbles though and I'm wondering if anyone has any trouble shooting tips on that. My system drains down into chamber one, overflows into socks, runs across a large second chamber which essentially has been nothing but live rock, through a sponge, into chamber three where the hygger return pump returns everything to the DT.
I can't tell what adjustment to make where to combat these bubbles because I'm not sure what's creating them. I did finally turn on my skimmer last night since we are a couple weeks into the tank, I've increased bioload substantialy to 11 fish and we're getting a good diatom outbreak. I'm not concerned about it, just tells me it's time to make some adjustments.
Diagnosing the microbubble issue may be difficult (at least for me) without being able to inspect the system physically.
Are you seeing bubbles in your sump? Specifically that return pump chamber? If not, I'd hazard a guess that you might have a very small hole in your return plumbing and it's sucking air in like a venturi.
Are you seeing bubbles in your sump? Specifically that return pump chamber? If not, I'd hazard a guess that you might have a very small hole in your return plumbing and it's sucking air in like a venturi.
no not at all, I turned down the Hygger return pump though and the next day the bubbles were substantially reduced... I did finally turn on my skimmer too now that we are fully into the ugly portion of the cycle but the bubbles started before that and coincidentally started cutting down when I lowered the return pump's volume and added the skimmer.Are you seeing bubbles in your sump? Specifically that return pump chamber? If not, I'd hazard a guess that you might have a very small hole in your return plumbing and it's sucking air in like a venturi.
wvned
Well-known member
Is the drain splashing. At the top weir or the bottom going into the sump. That will do it but they should not get by the sponge unless some water can bypass it.
Is there air trapped in your lines. The water flowing by will rip off Microbubbles that enter the flow. Eventually they will stop when the air is used up until you turn the pump off and let more air enter.
A pin hole or bad joint. This is a tough one. A hole that doesnt leak water but acts as a venturi and makes the tiny bubbles. Hard to find. May weep water very slowly and plug itself with salt. Usually in your return line.
Microbubbles make the water look white. Trying to see where the water is the most opaque and white may help locate where they are being made. In the chamber where the drain is? In the return flow from the pump flowing into the tank.
I find it hard to believe a tiny return pump is cavitating enough to make Microbubbles but anything is possible.
There are dire warning about bubbles on many websites. There is or was a thing called bubble scrubbing where you make microbubbles in a tank on purpose to assist dirt getting to the overflows.
Both are incorrect from my experience. I aerate my tanks with a fitting you place on a Maxijet pump that makes microbubbles. I have never had any tank occupant harmed by it when used several days.
If you have wave makes as well you can stop the return pump and let the bubbles clear. The wave makers will keep your animals happy for an hour or 2. Start the pump again and you see them start and can diagnose it a little better. No bubbles in the sump, water is clear? Then it is in the return plumbing somewhere. Whitish water in sump. Bubbles are being made in the drains.
So turning down the hygger return pump lessened the bubbles to about zero, it did require some tinkering with the drain valves, and once bubbles were gone I added a tiny bit of flow to the hygger.
Algae bloom is strong enough that water got cloudy so I added some phosguard to the socks and some clarify which worked almost instantly.
We have two neros. I had one turned waaaaay down low to protect juvenile chromis and clowns and the past week I had the other one on during the day, off at night (so they don't get sucked into it at night which I've had happen) and now I have both going 24/7 without issue.
Spoke with my LFS about a way to add the reefmat still so I haven't given up hope. For now I'm running the skimmer and I do have the reactor running but only a couple hours in the middle of the night on a timer.
My third 90W light has been such a pain I moved two 50w lights into the middle for some symmetry and so far..... It seems ok!
We hit our first coral show ever yesterday and got a couple fantastic frag. I don't have pics of them yet but this two headed frogspawn had flesh band all the way down to the plug, incredible compared to what we've had before.
We have a zoa garden started again, one torch, the frogspawn, grimace acropora, and a devils hand. Fingers crossed but right now it feels like we are back finally!
New doors came in from Eshopps Friday but I just haven't had a chance to install them yet. I'm actually at the airport now on my way to Arizona for a few days so next weekend I'll be doing the doors and maybe playing with plumbing to get the reefmat in and possibly remove the macro reactor for good.
It's been a long journey but it's getting there. Realizing quickly how much we had accumulated over the last five years when we noticed how bare this tank seems now.
Only running the skimmer and socks right now, can't even afford to try the reactor, it would just destroy nitrates. I need to find a new home for it.


Only running the skimmer and socks right now, can't even afford to try the reactor, it would just destroy nitrates. I need to find a new home for it.
Similar threads
- Replies
- 12
- Views
- 456
- Replies
- 24
- Views
- 848
- Replies
- 3
- Views
- 337