It begins... 345-gallon Starphire in-wall system

mrcrab

In Memoriam
Started a thread on this on 8/23/06 but moved some pictures around in photobucket which aren't showing up in the old one so...I'll start again.

Here it is ladies and gentlemen. The build began Monday. Here's the first pics. I'll keep you updated. I'll have lots of questions as this goes along so I appreciate any and all feedback.

I'd like to thank everyone that's answered questions so far and the folks that I've been following over the last year especially Melev, Sanjay, jnarowe and more.
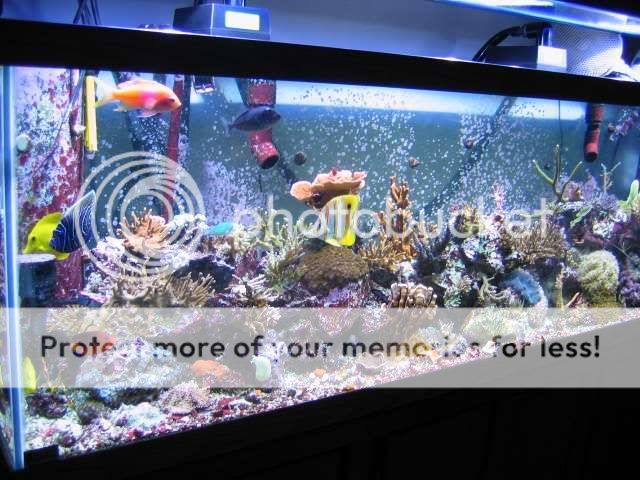
Tank Dimensions:
96" X 30" X 30"
Front Panel, Eurobracing and Cross Bracing: Starphire

And so it begins...

Full length, outside overflow 96" X 5" X 8" with 4 X 1 1/2" bulkheads
Overflow.jpg


Side View
TankSideView.jpg


Front View
TankFrontView.jpg
 
For all the experts out there...

This is the back of the wall that the tank is going into. It's in the garage.

Opinions please. Do you thing I can start the build as is or do you think maybe it could be a bit more organized?

If more organized...what would you suggest?


IMG_6200.jpg


I'm thinkin' front end loader and 60 yard dumpster here! :lol:
 
originally posted by FishyBiz 8/25/06:

Did you build the tank yourself?
reply:
FishyBiz

No. I like working with my hands but find it's much easier, faster and less frustrating hiring professionals. The money I would save doing it myself is not worth my time or my sanity.

originally posted by mcox 8/26/05:

What glass thickness was used for the sides and bottom panels? Thanks mc
reply:
Bottom is 3/4" sides are 1/2"
 
Last edited:
originally posted 8/26/06:

Well since the tank won't be here for at least a week I'll post where this came from, is now and then we'll get on to where it's going. I know you voyeurs love pics, so here goes.

My current tank is an all glass 120 RR. I bought this used about 6 years ago and it was a FO tank until September of '05. I was having lots of stability problems mainly my fault as I would get into it and take good care of it and then I'd get po'd with it and let it lapse. During the lax times fish would perish and I would get frustrated. Then I found this site and started doing research.

I also started to spend more time at my LFS talking with them. They sell saltwater stuff but are honest when they don't know the answer and try to find out. They also introduced me to a local reefer CR0220. Chris has been great with all my questions and has helped me tremendously on this journey. This is what the tank looked like when I put the lighting on to start the conversion to reef tank.

FO9_23_05.jpg


Stunning isn't it? :lmao:

As time has progressed I've bought up a few setups from other Reef Central members that were breaking down and had equipment and/or livestock I was interested in.

A shot of the tank in February of this year.
WholeTank2_17_06.jpg


And finally shots of where we're at today. Everything is stable and the inhabitants are fat and happy with not a lot of intervention from me.

I realize that it's not the best aquascaping or anything else, things have just been added willy nilly as acquired. That's one of the reasons for the new tank.

The current tank was an experiment to make sure I would be able to care for a larger system without having to spend a great deal of my life maintaining it but much time enjoying the view.

Front Left
FrontLeft8_24_06.jpg


Front Right
FrontRight8_24_06.jpg


Center
Center8_24_06.jpg


Left View
Leftsideview8_24_06.jpg


Right View
Rightsideview8_24_06.jpg


Next entry... philosphy of the new tank as well as equipment.
 
originally posted by steve the plumb 8/26/06:
Doesn't the koran angel nip at your corals
reply:
It's actually a juvenile emperor that's in the process of changing to it's adult coloration and no I've never seen it touch the corals

originally posted by Shnabbles 8/26/06:
That's 30 inches wide? From the side it looks about 8 inches wide... unless im missing something.... but really nice frontal shots
reply:
No, those are pics of my current tank a 120 which is 18" wide. It's got corner overflows which makes it look less wide. New tank, pics at top is 30" wide.
 
Last edited:
originally posted 8/30/06:

Tank's done and curing. Pickup the end of next week. Hopefully no more storms between now and then!

Here's some new pics of the completed build. Still needs to be cleaned up. And yes the cross bracing is not evenly spaced, that's by design. I'm putting my 6' Marisatr unit over it and didn't want the halides over the glass.

Tank Done Rear
Tank3.jpg


Tank Done Front
Tank4.jpg
 
originally posted 9/9/06:

Since I'm heading south tomorrow to pickup the tank, I'll post some pics of the equipment I've been collecting over the past year and using on the new system. As usual... all constructive comments are appreciated.

Skimmer. I'll be using a ASM G4X that's been modded with an extra Sedra 9000 recirc pump

IMG_6206.jpg


Lighting: Sunlight Supply 6' Maristar unit. I'm running Ushio 14K 250W DE's and I'll be swapping out the actinincs in the unit for more white lights and adding 4 X 54W T-5's for my actinic. The T-5 retros will be 2 on the front and 2 on the back of the main unit. And no...it's not that blue actually a very crisp white. That pic was taken when the actinincs only were on.

IMG_6204.jpg


I probably have nearly 400lbs of LR that's been cooking for at least 6 months. Mixed stuff I bought from reefers breaking down their setups. I plan on doing pillers of rock that will have shelves sticking out for putting corals on. I want to keep the system as open as possible. No rock walls here.

IMG_6202.jpg


I didn't want to drill the tank for a CL because the guts of the tank will be in that garage and I didn't want my 9 year old banging into plumbing. Flow will be generated by 2 X Ecotech Marine Vortechs and the returns of 2 X 1262 Eheims connected to 2 X 1" Seaswirls that will be in the rear corners. I'm also thinking of using some modded MJ's to blow from back to front on a wavemaker.

This should alow not only for plenty of flow but should be very economical power usage wise.

Flow will be going through 3 X 40 Gal breeders. 1 will be the skimmer the next will be a frag growout tank also lit by T-5's and the last will have the return pumps.

Last but not least an ER RS8-2 will run the 120 while the new tank is getting ready.

IMG_6201.jpg
 
I picked up the tank on 9/10 as scheduled and it had been sitting on furniture dollies in the garage for the past 2 months.

The problem was, I was going to have a steel stand made like Sanjay's, the cost of the steel wasn't a problem it was the welders. I called and got a number of quotes and they wanted a ridiculous amount of money, $1200 for 2 days work and I was supplying the steel as well as cutting it for them.

I've got a buddy about 4 hours away who's an engineer and a pretty darn good carpenter who agreeed to help design and build it. We were going to build it onsite but he was having a problem with a rotator cuff and at 72 years old I wasn't going to ask him to pack up his tools, come to me and build the stand. I finally dragged the wood to his shop and we got to work.

I wanted the openess of the steel stand as I only had the one wall to work with. He decided the best course of action was to manufacture a beam that we wouldn't have to support in the center. We took 2 2 x 6's and sandwiched a 3/4" piece of plywood together using fiberglass mat, resin then finally through bolting it with 5/8' carriage bolts every 18"

Here's the build:

I missed a couple of the initial pictures so I'll try and fill in the blanks. First we checked the 2 X 6's with a straight edge and got our best true edge. Then we ripped the other edges down so we had good straight edges to work with. Then we ripped the 3/4" plywood to the same width as the 2 X 6's. We laid one 2 x 6 on it's side and cut the fiberglass mat to size. We mixed the epoxy resin with hardener and coated the 2 x 6 put down the fg mat coated again with resin, placed the 3/4" ply on top, made sure the edges were lined up, put a few screw in to hold it and clamped it up to cure. Then we did the same with the second 2 X 6 after first was cured sandwiching the plywood between the 2 X 6's.
LaminatingBeams.jpg


While the beam cured we made a 10' catwalk to go along the back of the tank that will be hinged to the stand and fold up behind the tank as well as 2 X 2' catwalks that will be attached on the sides as the tank sits nearly 46" above the garage floor. Catwalks are 12" wide.

Catwalk.jpg


Catwalk2.jpg


Catwalk3.jpg


Catwalk4.jpg


Catwalk5.jpg


Catwalk6.jpg
 
After the beams were cured it was back to the table saw to trim everything down to the same size.

BeamTruing.jpg


TruedBeam.jpg


One down...3 to go.

BeamsDone.jpg
 
Once the beams were all cut to size we clamped them together to make sure everything was square and true.

Squaringleveling.jpg


We took it apart, drilled pocket holes then glued and pocket screwed the top of the framework together and clamped it all together.

PocketHoles2.jpg


Gluedscreweddrying.jpg


When it dried we screwed the top, a 3/4" piece of marine ply to the top of the frame, flipped it over and pocket screwed the bottom of the frame.

All together we put the stand together in a day and a half.
 
stand looks great. I had the same problem with welders for a loadinig ramp at my store and I ended up building it myself like a very over-built deck. Just rolled 2900 lbs. plus pallet jack on it and not even one creak! yay for me! :D
 
WOW. Nice work :)

how are you going to move that piece?... it must be very heavy.

Also...paying that much for 2 days of welding labor is ridiculous. Nice move doing it yourself...even though steal stands are nice. :)

Nonetheless...that is one serious stand top!
 
I sympathize with picture of your garage ( first pic ) . :( Nice to have a garage setup for some woodworking!! :D Nice stand too!!
 
All this work has been done in the past 8 days...we're moving along nicely. Tank is nearly full I just need to get the thread caught up, so here we go.

11/6/06 the hole was outlined on the wall and the boys cut out the drywall in the garage getting ready to make the header. They stopped there as we weren't sure where we were going to run the electrical panel.

To give you some perspective, the inside dimesions of the tape are 7' X 2'2". The concept of the tank is a living picture.
IMG_6582.jpg


The tank itself is 96" X 30". I didn't want to see the sides or the top of the water line. I also didn't want light hitting the glass on the sides so those areas will be darker and should give it more depth, like looking through a window at the sea. It should also help with coraline growth on the tank. The front panel is starphire.

I will be building pillars like Sanjay's though at least one or two of mine will actually break the surface of the water.

This is the garage side.
IMG_6583.jpg
 
No work done on the 7th.

On the 8th the header was installed and the stand fitted and legs measured. The stand was then painted with 3 coats of polyeurathane.

IMG_6589.jpg


The boys hard at work leveling making legs etc.

IMG_6590.jpg
 
Back
Top