Maroun 150g Build Thread

I was so busy with the baby stuff lately that I could not catchup with the updates on the built. Now that I'm on a 4 days business trip I have the time to do it.
Ok so got the tank stand and 60 G sump. It was very easy to level the tank thanks to those "leveling wheels"

DSC_7043.jpg


I got the stand level in 10-15 min

DSC_7046.jpg


checked it at the for corners and in the middle and all was fine. This litlle water level is the one that attached on the hotshoe of the camera flash. I felt more at ease using it than the big professional level tool.
Leveling the tnak was actually the major part that made me go with a metallic stand as I hear it's very hard to level a wooden stand... Also I believe getting a metallic stand to eb perfectly level would be easier than wood. Also I couldn't see any wooden stand lasting long enough before being affected by teh water I spill...
 
confirmed it with some water in the tank:

DSC_7078.jpg


DSC_7080.jpg


and the good news is that I could still change the level till around half the tank full of water. I used a small lever to push the stand a bit up and was able to rotate the wheel. after a certain volum of water I was afraid to do it more as I was afraid that pressure could crack the tank... Also I ahd already managed to level the slight front tilt I still had.

To move to plumbing. As I previously said I had not calculated for the metal brace in the lower part of the stand which made me loose 4 inches. Also with the plumbing attached to the bulkheads there was not enough space for the skimmer as the cup was hitting the plumbing. In m initial plan the overflow should have been in the back part and the pumps box in the front this way the skimmer would not be under the plumbing, however the metalic stand was done 2 inches thinner than the tank and we had to add a 2 inch metal brace which I described above to make it same size with the tank. this metal brace had to be in the back part so the holes for the bulkheads were not possible to be in the back part as they will be over metal. bottom line I had no other choice than turning the sump so that the skimmer would eb in the opposite side. then it collided with a horizontal stand support so I had two remiaing solutions:
cancel teh frag tank next to the sump and move it more to clear the skimmer cup from the metal or have the skimmer inside the sump. I did post pocs of this in page one in case It's not really clear.
So in the end the sump had to be rotated, to this position

DSC_7080.jpg


which in turn caused two more problems:
The bubble tower that I had siliconed on the back side where the draining tubes would reach was now in the front.
the hole for Top off was in the front now.
I didn't care about the top off for hte time being as it was for a future plan and I can always have teh tubing go to the back
Addng a 2nd bubble tower would kill the space in the skimmers section and my second skimmer will not fit. tried removing the bubble tower but could not dissassemble it even after excessive pressure and lots of blades that I tried to run along the silicon lie with no sucess. so in the end it was clear that I wil lhave to redo my plumbing from scratch which was a pain in the first place cause with the bulkheads I used any rotation of the tube to take it out was casuing the bulkhead to go loose and the bulkheads were so close that if one became loose all three had to eb taken out and they had to be installed back from back to front.
 
your kids=very cute.

Thanks

thanks for the balcony shot that is a serious view you have there

Well after 3 years in Dubai with a balcony that you rarely use because of heat and dust I had to get something better when I got back home.
Can't wait for the tank to be finished to enjoy both views together.


Can i ask what Nuclear Medicine is? is it Chemotherapy?

Its mainly a type of medical imaging where instead of having a machine that produces the radiation for imaging we deal with Short lived isotopes (radioactive material) that we mix with different pharmaceuticals to target different organs or diseases and take images of this with a Gamma Camera or a PET scanned if you heard of those. It's not Chemotherapy although we do sometimes use higher energy/longer lived isotopes and inject them in the boodstream or sometimes place them inside some lesions that cannot be surgically removed to "burn" those lesions from inside. in those applications it's more similar to Radiotherapy.
 
So back to plumbing I decided not to dissassemble everything for the 3rd time and added several 45 degrees elbows to direct on tube towards the bubble tower and another one to the back then along the side of the sump to the bubble trap and it finally worked. Skimmer did not fit inside the skimmer section so I put it inthe return section receiving water and outputting it in the skimmer section so only difference was a bit less space in the return section which is big enough anyway. I also believe will have space to put my Turbofloater 750 SL (that I'm musing in my 8o gallons) in the skimmers section. that skimmer should be used submerged anyway. so in the end I have this plumbing.
DSC_7795.jpg


DSC_7798.jpg


DSC_7800.jpg


DSC_7801.jpg


I did overtighten the bulkheads a bit in the end so that they would stop going loose each time I hit a tube and caused minor rotation. I did check the plumbing and the tanks for 2-3 days to make sure nothing was leaking. the waterflow was very noisy however I didn't pay any attention to that as I always hear that the tubes need to slime and saltwater is more heavy and causes less noise...
DSC_7103.jpg


DSC_7089.jpg


So at that stage I had the plumbing from the tank to the sump done and tested, also the 24 G frag tank that I bult myself was also connected to the skimmer section. I was unsure if I will supply water to it from the tank drain or from a pump in the sump and then have waer flow back by gravity. then I decided to go with supply from a pump. to my surprise the two 1/2 inch holes in it connected to a 1/2 inch hole in the skimmer section, were not able to drain back the flow from a 300 L/H 80G/H small pump. and in the end water was going to overflow. I tried making it higher by disassembling the connection and adding one foam sheet under it still it didn't make much more difference. redid the connection and rose it two foam sheets now it was good and able to handle the flow up to 250 GPH. but that made me loose around 5 inches fromt eh height as water would keep at the same level of the water in the skimmer section.
Finally i understood that the problem was a 2 part problem:
the valves I was using to be able to shut the water off were reducing the flow to 1/4 inch so i took them out.
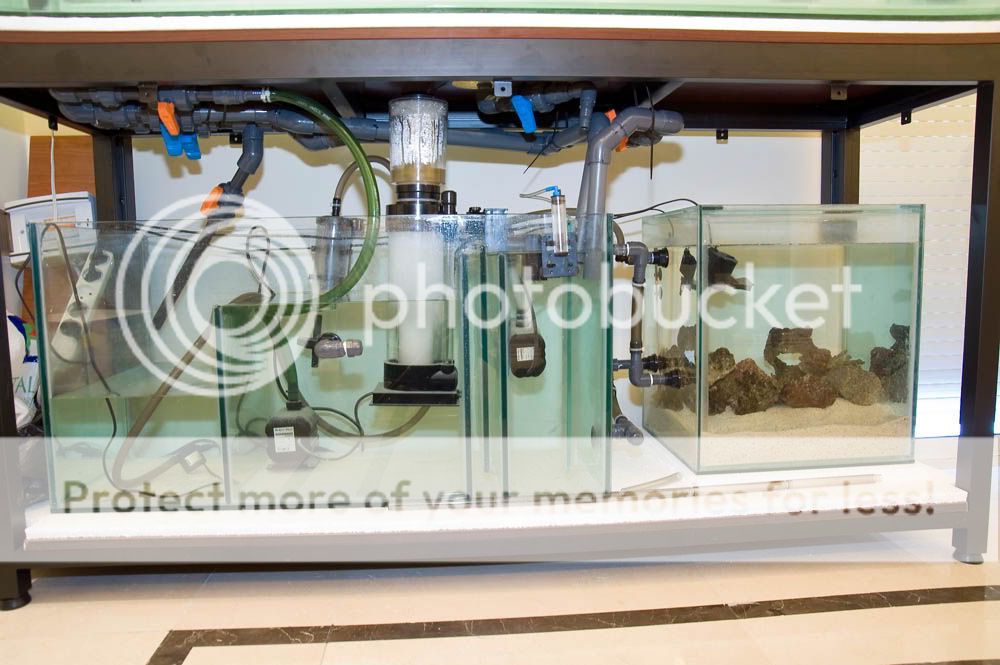
in the end I had only one 1/2 inch hole inthe skimmer section getting the water back and it seems not to be able to handle this much flow. I had made two holes for return in the frag tank and though that one would act as backup in case the other was blocked but had only one hole in the skimmer section. so I cancelled the idea of having a spare hole in the skimmer section to connect to a future Calcim reactor and used the upper hole that you see in teh picture as a 2nd drain. water drains from one lower hole in the frag tank to one lower hole in the skimmer section of the sump and from a second hole down in the frag tanl to an HIGH hole in the skimmer section. it does not have as much presure as the low hole drain but does a good job... If I was doing it again I would have gone for 2 holes high in both tanks??? any suggestions or explanation here would be appreciated.
With this setup I was able to only have one additional foam sheet under the tank. water would rise 1inch max if I have 250 Gph pump. still I will only be using a 500 L/H 135 Gph to be on the safe side if any snail or anyother thing blocks the return. I could always add to the circulation by adding a pump to the frag tank as it will not be seen anyway.
so the plumbing for the tank to the sump was done 3 times and the connection from the sump to the frag tank more than 7 times and this was very difficult as I had limited space so no matter how soft the tubing is the tub has t be exactly the same length to avoid pressure on bulkheads and avoid having the tube get compressed and close. PVS tubing was out of question as space was too limited.
in the end it is working and it seems water level is always at a safe margin. do yo uthing this will cause a risk in the future? in this case should I discard the idea of the frag tank? the main interest is that it acts as more space for teh water to rise when the pump is shot and also adds water volume in addition to be a good place for introducing corals... As I said any input is critical as I hate to have to uninstall it when the wood covers are here.
I decide to get some sand and got 45 pounds of fine coral sand rinsed it 2-3 times and added it to the frag tank it gave me around 3 inches deapth (tank is 20x18x20). I topped it with 3-4 cups of live sand from my tank and got few LR pieces that were in my ld tank refugium with 2 gallons of old tank water and added them put everything in the frag tank and ran the lower part of the system: water flowing from refugium on left to frag tank and getting back by gravity from frag tank to skimmer section-return sectin and then to refugium. I also ran my skimmer as the water loowed a bit cloudy. amazingly after one day I had lots of skimmate smelling ilke sand. water was a bit cleaner but not crystal clear. following day I had 1/4 cup of very nasty smelling skimmate. and that's only from some rocks and water from old tank that was transported in less than 30 min. I wonder how bad it'll be when I move all my sand bed. Cause for running the system is that I have now some place to put my corals (in addition to old tank refugium) while transporting all my stuff. I will have till then a cycled frag tank that can handle some corals and fish and maybe boost the filtration of the main tank when started.
 
Last edited:
ok talked alot time for some pictures of the frag tank start.
Rocks from old tank:

DSC_7544.jpg


DSC_7545.jpg


Frag tank with sand and rocks. you can see the delineation between new and old sand on top

DSC_7539.jpg


closer look

DSC_7535.jpg


connection to the sump, looks a bit weird but it the initial plan had to be modified.

DSC_7802.jpg


this is how it looked when water settled:

DSC_7814.jpg


Skimmate I got in the first 2 days:

DSC_7594.jpg


DSC_7603.jpg


DSC_7536.jpg


I really like this skimer as it seems to be doing a good job. it's got 2 flow regulators that I can manipulate to get dryer or wetter foam which seems to work very nice. on the first day it was returning too much microbubbles inthe water but my bubble trap took care of those after that all the bubble traps that it produces are traped in it's built in bubble trap tower that you can see in back in the skimmer section. Guess I couldhave made it without the bubble trap.
Finally a whole picture of the sump and frag tank running

DSC_7816.jpg


Any input on plumbing would be greatly appreciated at this stage as I can still redo it.
 
Looks like its coming along well. Thank you for the pictures of the braces, and the wonderful view from your balcony!
 
In the mean time I got a RO system from the LFS. Unfortunately only chinese ones are available here and cost of shipping and tax if I wanted to get one by mail order would make it very expensive. At least the inserts are made in USA.
it's built is not very good and as I was turning aknob that supposebly regulated the flow of water to drainage it broke off very easily. don't know why would one restrict the flow of drainage water. It was prodicing a ratio of 1/5 or even less of RO water compared to waste don't know if that broken knob casued it, unfortunately I'm still not able to find a replacememnt, son't know if I should just get any valve that attaches on the piping and close it a bit. In the endI had to install it in my parents house where water is free and pressure is much higher, which meant transporting the total volume of water in 20 litres (around 5.5 gallons) buckets and getting them to the second store on the stares as the elevator is still being installed (that's one installation slower then my tank build). also it took over 2 weeks to get the water produced.
DSC_7904.jpg


Got some salt (Crystal sea) the only other available one here is instant Ocean but the other LFS was out of it. anyway I heard there was a lot of bad batches of IO lately.
Could not find any salt buckets so got a pack of 3 bags
DSC_7100.jpg


DSC_7101.jpg

which were supposed to do 200 Litres each but only got me 1.018 for 200 Litres. so had to go get some more.
Also it did not dissolve very easily and even till now (10 days later) with two pumps in the tank (270 GPH and 150 GPH) did not dissolve. I needed to take those pumps to the lower compartment as water surface looked a bit think due tothe very slow water movement and I added a SEIO like pump doing 3200 L/h (close to 860 GPH) it's moving all the residues but they are not solving
DSC_7963.jpg


DSC_7964-1.jpg


Do you think i should siphon these out before adding the sand?
shoudl I put them in the frag tank on the sand or just discard them? I'm adduiming these should have calcium and other suplements in them right?
 
Also in the mean time got my Halide Fixtures,
These fixtures looked very nice as the part that shows from the top of the tank is not that bad. they're made in Italy and cost 350 usd for 2 sets without the lamps. don't know if that is a very high price or not bot other choices like the one I'm using on my old tank look really bad and are really big to put all under the canopy so you have to drill the top and fix them from up with half of them showing up. I'm still wondering if I should put them with the white part showing up from above or just drill them and attach them from inside to the top of the hood.
Also I went for two as there was only 2 available. I still can make my mind if I should have two or three on my 70 inch long tank. Iwill not be able to change afterwards as I will have the holes dones at 1/2 length interval if I go for two and then if i decide to add a 3rd I will need tewholes to be at 1/3 distance (hope it makes sense)
My plan for aquascaping would be rocks from the left part covering the pump section and maybe the overflow going till mid-3/4 of the tank where it goes down to an open swimming space.
Do you think putting2 halide one on the left third of tank and the second on the middle will lead to a nasty shadow on teh open space area? I will be suplementing them with ultrabright Arcadia Fluorescent lights (white and actinic) fo the time being and will be getting two white T5 when they are in stock (2 months from now) or if I go on a business trip to europe or USA in the mean time.
Input on this is urgently needed as canopy should be ready by end of this week and will be drilled afterwards.
DSC_7976.jpg


The nice thing in those reflectors is that they are directionable (spelling) so I can tilt them to the front or back. Guess I will drill them a bit in front of the middle and orient them a bit to the back this way I should et a nicer illumination on coral that are on the front of the rocks giong down and maybe less harsh lighting on the corals on top of the rocks under the halides. Also guess this is very nice when light acclimating the corals as I can move the light away from them and bring it back slowly over a could of weeks (this was the main reason I convinced myself to pay this much for them)
DSC_7980.jpg


And here it is tilted. I could remove the restraining screw and tilt it more if wanted.
DSC_7981.jpg


I wanted to get 20K halides as that's what I'm used to in my old tank but they were out of stock at the LFS and they only had few 14K left so I ended buying 2 14 K to avoid having to wait for 2 months for them to get new stock if these were sold.

DSC_7986.jpg


I'm hoping it's not going to be too white but guess it'll be easier to photograph from now on. will the shift from 20K to 14K affect my corals in anyway? will I ned to light acclimate in any sort? In case I add a 3rd MH which will be the old one I'm using will hving 2 14 K lamps and a 20K one cause much imbalance or will the fluorescents balance it out?
Thanks for any info you can give
 
Here are pics of the overflow

DSC_7789.jpg


And the DIY durso

DSC_7052.jpg


I might raise them a bit more if the water fall is too noisy, they're still not glues anyway and seem to be watertight.
I will try regulating the water flow by opening the close ends. if these get covered with water then I might either raise them with a tube extenion over the T or maybe drill a hole in them and insert an airline with a regulator. Advice is also needed here.
DSC_7790.jpg

Unfortunately I cannot try how the waterflow will be s I don't want to mix the already cycling lower part of the system with such a big volume of new water. (Or shoudl I?)
so basically testing on how water flow is goign to turn out will be directly after everything is moved inthe new tank.
 
Water return to the display tank is now through a 3/4 inch return line that splits in two 1/2 inch lines. for now I jst ut some nozles on them and this is how it will be till the cover is here and Ican start doing the closed loop above the tank. these were set with one being just at water surface this way it will suck air on power fialures or when return pump is turned off and I hope not too much water will flow back as I still don't know the level of water I can have inteh return section and can't check before system is running. I lowered the glass partition of the refugium and kep some space above the baffles to contain as much water as possible I'm hoping to be able to have a big water volum in teh return section as I travel a lot and would prefer to have a slight and gradual increase in salinity then have the pump run dry in case my wife or however is taking care of the tank forget to top it off.
here's a piture of the whole setup as it was when I traveled yeserday.
DSC_7805.jpg


DSC_7804.jpg
 
As I said the tank sits now as it is in above picture. My return plumbing, electrical setup, lighting are all stopped till the wooden stand cover and canopy are finished. I did add a FGCI and 2 circuit brakers in case anything happens while I'm working inthe tnak or if something happens while I'm traveling.
3 days before traveling I went and checked on the wood work asI'm hving it made by a professional. there were two setbacks:
1st one is that they built a bottom for the canopy!!!that was an easy one to solve as it was easily taken out.
second one is that they had to put a middle brace to support the doors of the stand. I went for a metalic stand to eb able to go without a ceter brace in teh stand to be able to take out the sump if needed and now I will have a wooden one. They proposed to have the whole standon weels and this way it could be taken out when needed. but the wheels will show and it'll look ugly so I guess I'll keep itlike it is and see if I can manage to pull the sump out. it is situated inthe middle of the stand and I guess I have space from the back and left to manouver the sump out if needed. If that's not possible they said that it'll be only a matter of unscrewing the screws that support it on the metal fram and take the whole thing out. we'll see how it goes.
Took some pictures of the stand and canopy (stand is on the canopy) but these were taken with my mobile phone camera so not great. the doors wit inside the stand.

IMAGE_514-1.jpg


This is the fitting on the metal frame (hope it will fit right)
IMAGE_512-1.jpg


This is how I sawit on Thursday. They promised to start staining it on monday and finish on Wed or Thursday. which is great as I'm getting back on wednesday evening. if it exceeds that then I will have to wait for mid next week as friday and monday will be off for Orthodox Easter (Luckily we get to take days off on Catholic and Orthodox Easter) I'm just hoping to get it on Thursday this way I will be able to work on it in the long weekend.
This is were I really need urgent info What shoudl they stain it with above the regular stain used to better resisit moisture and water spills? and should it be treted differently from the inside and outside?
Wood is (hetre in french) not sure what it is in English guess it is Beech.
Thanks for any info anyone can provide concerning the plumbing, frag tank connections lighitng and most urgently the wood stain (is that too much to ask for?)
 
Nice tank Maroun.c,I'm not Lebanese butt was born there.I love the country but had to move to California when the war got crazy,I was 10 at the time.I have allot of family there.My uncle has a FOWLR tank in Lebanon.When he came to California to visit last summer, he saw my tank and could not believe how i was growing SPS in the aquarium.
When i asked about the LFS in Leb,he said the same thing you did.
He also said people just order from Germany when they need a reactor.That aquamedic might be under powered for that tank.

Good luck on your tank build and god bliss Lebanon.
 
Hi Orangekush,
Its nice to see someone who has been here on the forum. Weirdly I lived in Lebanon throughout all the war, left when things got better and recently returned when things are headed for the worst...
AS for the LFS here it is a sad fact, no club meetings, no nothing. Most people keeping tanks are mostly ignorants on reefkeeping, they keep on adding fish after fish and coral after coral whenever they have reception or big occasions in their houses and things die quickly. I recently learned from a LFS owner that he has around 150 marine custumers mostly restaurants and hotels offices.... still it shocked me to see the number of fish and coral he gets every 1-2 months and to see everything go in few days.
I don't have to order from anywhere as I travel 2-3 weeks every month so I mostly bring stuff with me when I can. I do find the essentials in Lebanon however prices are ourageous.
The aquamedic is the only brand available here unfortunately I got it from a trip to holland. would have gotten another one however in case I needed spare parts I'd rather have the chance of finding them or ordering them locally. It is rated for 1000 Liters (270 Gallons) still I will be adding a second one (Turbofloater 750 which is a bit smaller and is used submerged so in between the two I guess it should be ok?) the other one is rated for 750 Liters 200 Gallons. So in total I have skimmers tht should be handling 470 gallons if this calculation is valid, and if they really handle what they state.
Would love to meet with your uncle and maybe share some ideas if he lives close by.
thanks for your kind words
 
i would deffinatlely raise your durso stand pipes alot higher! where they are now your going to have a water fall! very noisy! ive actually tried the home-made durso, and tried what your going to try with the screw on cap and it doesnt work. your better off drilling a hole in the top of the cap and inserting airline tubing with a valve. but depending on the capacity of yor return pump, you might have to drill a hole too large for airline.
 
Thanks Chrismunn. In that case would you suggest having two holes with two airlines with regulators in each or should I make a hole and continue to make it larger till it's good?
Also which is easier to tune one active Durso and another one higher that kicks in if the first one blocks or should I go for two and try to regulate them?
 
its better to be able to handle the entire water volume coming into the overflow through 1 standpipe. i think most people would drill a single hole in the durso cap, and keep drilling it bigger as needed. ive never heard of drilling 2 airline holes as needed, but i dont see why it wouldnt work? personally i think that regualting the air intake on the durso is going a little overboard, but if youde like to try it out and let us know the results, that would be very kind. :)

ill take a picture of my "stock" durso standpipe for comparison...
 
DSC03696.jpg


DSC03702.jpg


you can see how many holes there are in the stand pipe. there is not only the hole in the top (which is only 3/16") but there are 3 more holes that are about 3/8"
 
Hi maroun wanted to ask you where did you have your tank built and your home seems to be near mine mine maybe we can hook up and help each other since i'm having my 207G tank build start on the day after tomorow ,i'll be posting some pics of the build later. your view looks familiar to mine ,where's your new home???
 
Back
Top