Minimalistic multichip DIY LED build

Why not just go with the 16K only? Or are you looking at going more blue than that with this combo?

Flexibility is the key with me. There are times I'm not looking at my tank and having a predominantly blue tank is not going to bother me. If needed, with the Apex, I can dial down the hybrid and and bump up the 16000K. Again flexibility is what was important to me.

After reading through this thread I was absolutely sold on DIY multichips LED's. I sold my Kessil A150's because I wanted more power and flexibility. I got both. I'm glad I didn't buy the Kessil A350. This route was a much better alternative both in $ and flexibility.
 
This is definitely looking great, where can I find more info about Apex's VDM and how to set it up? I am confused about the 0-10v... does that mean it can only allow a max voltage of 10 to pass through to the LED?
 
This is definitely looking great, where can I find more info about Apex's VDM and how to set it up? I am confused about the 0-10v... does that mean it can only allow a max voltage of 10 to pass through to the LED?

0-10V is simply a method of controlling the output of the driver. It has nothing to do with directly driving the LEDs themselves. Just a way to control the driver by varying the input voltage to the controller of the driver.
 
Do a search on RC for a DIM4 controller it has some cool controlling capability for DIY builds and is cheap.

Ron, I agree the ability to be flexible is the way to go. The AC-RC leds seem to cost more, but I like that they can be driven to higher wattage if needed.
 
Got the Arctic Cooling Accelero L2 Plus 120W VGA cooler attached to the Kessil Gooseneck. It turned out pretty good.
 

Attachments

  • IMG_4932.JPG
    IMG_4932.JPG
    84.2 KB · Views: 5
  • IMG_4934.JPG
    IMG_4934.JPG
    76.8 KB · Views: 3
0-10V is simply a method of controlling the output of the driver. It has nothing to do with directly driving the LEDs themselves. Just a way to control the driver by varying the input voltage to the controller of the driver.

Actualy what you have internal to the driver is a current matching circuit. The 0-10 volts are run into a set resistance value of say 5,000 ohms. This means if you putting 10 volts into this resistor it is using 2 ma. if you input 1 volt it is using 0.2 ma. Now if the current matching circuit in the driver is set for max current to be say 5 amps at the reference current of 2 ma. As it retains this ration when the voltage is decreased to 5 volt the reference current will reduce to 1.0 ma and the output of the driver will try to match 2.5 Amps. At 1 volt the reference will be current will drop to .2 ma giving an output current 0.5 Amps.

These drivers do have an internal adjustment resistor that can be adjusted to change the ratio between the reference current and the output current. So if you check the specs on the individual driver it does give you the range that it is adjustable within when the reference voltage is at 10 volts.

Besides this most adjustable drivers also have a peak voltage setting that you can adjust. This is like a saftey setting where it the resistance of the circuit dropped only a set amount of voltage will be sent to the LED's. This should limit the possibilities of individual LED's in a chan from burnng out.
 
Looking at using these for a 29 gal frag tank... what would be my best choice's ?
I have 3 of the new GHL Mitras ordered for the main tank... Now I need led lighting on a budget for the frag tank...
 
Actualy what you have internal to the driver is a current matching circuit. The 0-10 volts are run into a set resistance value of say 5,000 ohms. This means if you putting 10 volts into this resistor it is using 2 ma. if you input 1 volt it is using 0.2 ma. Now if the current matching circuit in the driver is set for max current to be say 5 amps at the reference current of 2 ma. As it retains this ration when the voltage is decreased to 5 volt the reference current will reduce to 1.0 ma and the output of the driver will try to match 2.5 Amps. At 1 volt the reference will be current will drop to .2 ma giving an output current 0.5 Amps.

I don't have access to the meanwell driver schematics to make an accurate assessment.
 
I posted this in my club's forum for our members, but thought I should post it here also, as inspiration, as I have gotten much of it from this thread and the many posters here. What an awesome thread and so many great designs and ideas! Thanks for the inspiration!

Here is the info on my 100w LED chip build. I was considering finally ordering new Radium MH bulbs when i saw some of the posts on the DIY Multichip thread and though I'd try it out. The total for each of the chips + drivers + cooling fans would be comparable to buying two new Radium bulbs.

LED Chip from aallion2008 on Ebay. I asked for the 20K version.

Link HERE

Features:
Rated voltage: 30-36V DC Output power:100W
View angle: 120 degree
Lumen output: 9000Lm
Reflector efficiency: 90%
Light source: 1pcs 100w High Power HCC LED
LED working temperature: <65°C
Color temperature: 20000K
Source life: > 50,000 hours
CRI: >87
SIZE: 52mm(W)*56mm(L)

Optics

I used the optics provided by the seller that match the LED. These are plastic reflectors / holders that pop onto the LED using some pegs & holes. I used the thermal adhesive to bond the reflector to the LED. I then used more adhesive to bond the glass optic to the reflector. On ebay they call them Collimators.

Non-Dimmable Drivers from hiyaseller on Ebay

Link Here

Input Voltage: AC 100V-240V 50/60Hz
Output Voltage: 30V-36V
Current: 3A
Waterproof: IP67
Operating Temperature: -20~80
Storage Temperature: -20~80
Package Material: Aluminum
Dimensions: L18.1 xW7.0 xH4.3 cm
Weight: about 0.8kg

Cooling


I saw a lot of people were using those monster heatpipe and VGA coolers which, I personally thought was overkill. Using my experience from building many computers and many LEDS, I decided that something smaller would work just fine as long as it was rated for a 90+ watt cpu. These heatsink must wick heat away from a processor in a small, usually enclosed box, where ambient temps can be 90+ degrees. My ambient temperature in the fish room is around 75-78 degrees. This should allow me to get away with a smaller heatsink and fan. I choose the Arctic Cooling Alpine 64 Pro Rev 2. from Amazon for $15.99.

211zUf-10VL.jpg


Product Features

  • Alpine 64 PRO Rev.2 is one of the most cost-efficient coolers of its class.
  • The cooler features an optimized heatsink and a 92mm PWM controlled fan for efficient heat dissipation.
  • The Alpine 64 PRO Rev.2 is compatible with AMD Socket FM1, AM3+, AM3, AM2+, AM2 and 939.
  • The buffered-mounted 92mm PWM fan guarantees sufficient cooling at lowest noise.
  • With the combination of the patented fan case, low noise impeller and vibration absorption, the Alpine 64 PRO Rev.2 generates a maximum of 0.4 sone at full speed.

This heatsink's mounting area is perfectly sized for the LED's aluminum base.

You guys saw this at the meeting.

Mounting

I mounted the LED to the heatsink using Arctic Silver Arctic Alumina Thermal Adhesive. I also used this adhesive to mount the lens and reflector to the LED. Just make sure you clean the heatsink (wipe off the supplied compound) with rubbing alcohol or a small amount of acetone before bonding.

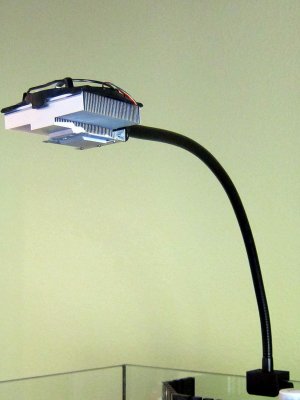
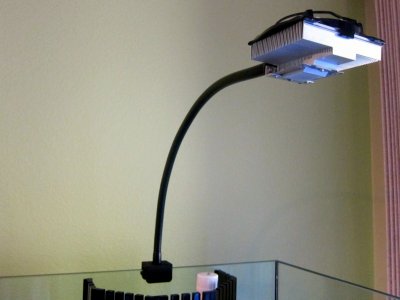
I could have just mounted the LEDS above the tank, however i did notice that even with the lens the light would still spread at a wider angle. To collect this light, I modified my Lumenarc Mini Wide pendants to accept the LEDS. I drilled out the rivets of the top plate and placed the LED through the top. I still need to find a way to mount them more permanently then just resting, however they fit quite well into the opening. This allows the excess light to be directed into the tank and cut down on some of the shadows you typically get with a more focused LED light.

Here is a pic.

243mhz9.jpg


97nwxv.jpg


I'll take some more pictures as I build the second one. For now I will be running this one along with the other 250w MH.

MH Off and LED on - Right Side.

33kauef.jpg


MH Off and LED on - Left Side.

2q8ws93.jpg


So for this build without the Lumenarc, you are looking at:

Driver - $33.00
LEd - $35.00
Heatsink & Fan - 15.99
12V Power supply - I had many laying around.

Performance

According to the Killawatt, The 100W LED is pulling 1.23 Amps and about 105watts.

Using my PAR meter, the numbers are almost exactly the same as my 250 Watt 20K bulbs. The top shelf gets around 450-500 PAR where my ORA Red Planet colony is.

Heatsink & Fan - While running with the fan, the heatsink plate on the LEd peaks at about 43-45 Celsius, with the heatsink running around 37 Celsius.

Not bad as I am saving about 150 Watts per side. As for the corals, I'll update their response as time goes by. I'll also take some pics with the MH on so you can compare. Although I did buy the 20K LED, it looks more like a 14-16K, still very nice and looks brighter by comparison. The spread looks to be about the same as my MH fixtures, as this is a 36" wide tank. I use the outsides for LPS and lower light corals and that has worked out well. On a 18" or 24" tank, this would be perfect spread.

Hope you guys find this useful and a potentially easier and cheaper alternative to the 3w chip builds (of which I still have a few of :) ).

Updates can be found in the ARKSC forum here: LINK
 
I loved the idea of the Kessils. They were small. They were compact. They were point source like lighting. They were easy to mount over a rimless tank with the gooseneck and clamps that Kessil sold. I just loved the idea of it all. The cost wasn't so bad either. Compared to the Radions, Mitras, and others, even the A350 offered superior value. It made perfect sense to me at the time to go with Kessil. I ended up buying two A150's and I was happy. Then I wondered if I had enough punch in my lighting for SPS. Then I started reading this thread. Then I sold the two A150's at a loss but still managed to build two multichip light sources with the money I made from the A150 sale... with more power and flexibility to boot.

At first I was worried about the aesthetics of mounting the heatsinks above the rimless tank. As you can see from my photos in a previous post, it looks pretty darn good.

Glad I read this thread.

Hypothetical Build Cost:

Kessil A350: $399.99
Kessil Gooseneck: $34.99
Total cost: $434.98

VS

DIY build that looks good on a rimless tank:
EPISTAR 100W 10000K: $125
Lens reflector: $13.80
Meanwell HLG-185H-36B (Dimmable driver): $72.41
ARCTIC COOLING ACCEL-L2-PLUS: $25.00
Wall plug: $4.00
Misc power cord and wiring: $10.00
Arctic silver thermal adhesive: $15.00
Connectors: $5.00
Andoized aluminum angle stock for mounting to gooseneck (0.5"): $7.00
Kessil Gooseneck: $34.99

Total DIY build cost: $312.20. Throw in margin for shipping and emergency runs to the hardware store and lets call it $330.

You're still saving over $100!

Not to mention the flexibility in power for the DIY build:

DIY build power output: 93.6W-187W.
Kessil A350 power output: ~90W max.

...and the DIY build looks good too!
 
Last edited:
Pictures

Pictures

I dont have a build thread yet as I am keeping a log of my build on facebook. But I got my drivers in and mounted them to what will be my control board.
403871_4369873095104_976825855_n.jpg

560919_4369872815097_170162702_n.jpg

403794_4369598728245_236581043_n.jpg
 
ok so i have been lurking around this thread for the past couple days and read all 45 pages. i went ahead and bought a 20watt blue led, a driver and heat sink all from ac-rc.

heres what i got.

http://www.ebay.com/itm/22077327295...X:IT&_trksid=p3984.m1497.l2649#ht_2064wt_1139

http://www.ebay.com/itm/27083150819...X:IT&_trksid=p3984.m1497.l2649#ht_3210wt_1139

http://www.ebay.com/itm/27086587693...X:IT&_trksid=p3984.m1497.l2649#ht_1606wt_1139

i email them and told them i want a 20watt blue chip and what heat sink and driver i should get and thats the kit they put toghether. 39.50 including the driver case. This is basically a guinea pig for me as this is my VERY FIRST attempt at anything DIY LED.

What do you guys think about that kit i got, i believe it should work fine. Im just going to use it as a atinic pop along side my 2 MH bulbs. With that driver is there any wires i need to get to connect it to power? Or will any power cable suffice? Not exactly sure how to connect the power to the driver and then the driver to the led. Any advice/pictures would be greatly appreciated. Thanks. If this comes out well and im please with the results i might replace my 2 250 radiums with a couple 100watt chips. Never know. :)
 
Back
Top