Multichip build for my 10'x3'x4' tank

garbled

New member
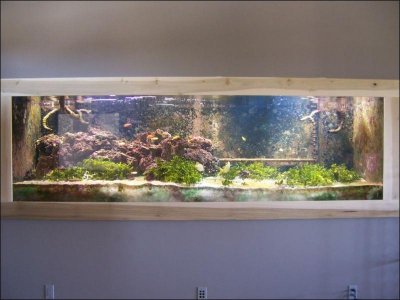
I've been mucking about with the multichip LED's for awhile now after seeing the great multichip thread here. I've fully taken the plunge, and this is my build thread. It's not done yet, (still waiting for parts to arrive). But, it is getting there.

The theory:

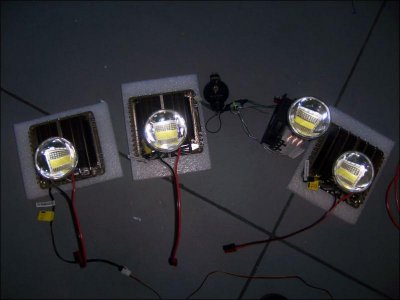
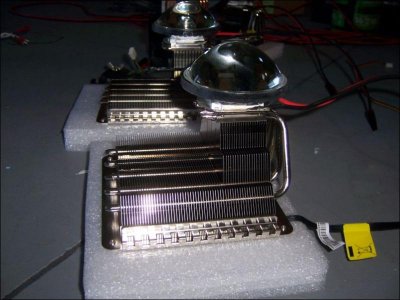
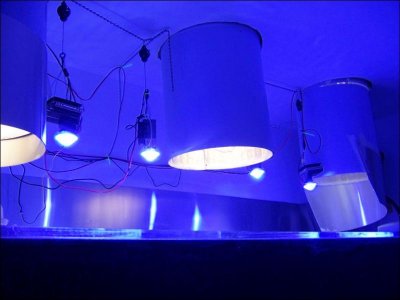
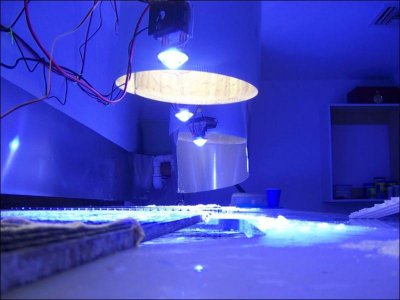
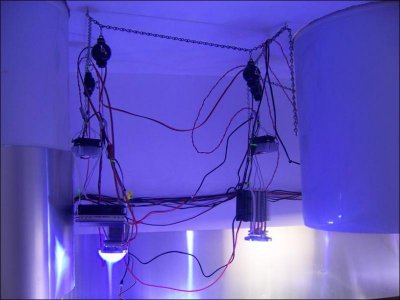
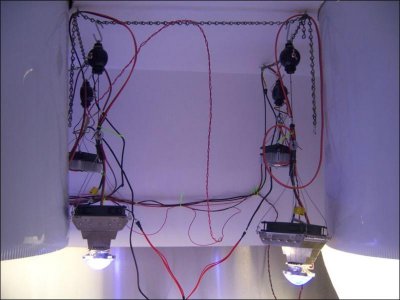
4 100w Epistar hybrid chips with large (82mm) lenses will provide the main light. They will be supplemented with 3 20w royal blue, and 2 20w UV chips, that will also provide moonlight. I wanted everything dimmable, and controlled individually via my Neptune Apex. I also want it to be very simple to replace parts if something goes awry.

First, a breakdown of the parts, and cost:

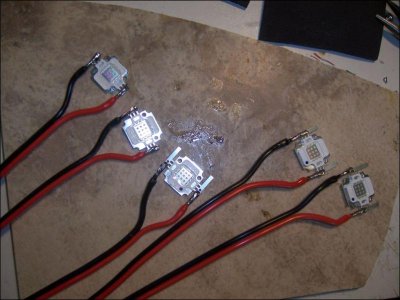
3x 20w royal blue - 9.45-10.8v 2100mA MAX $94
2x 20w UV - 9.45-10.8vv 1000-2100mA $54
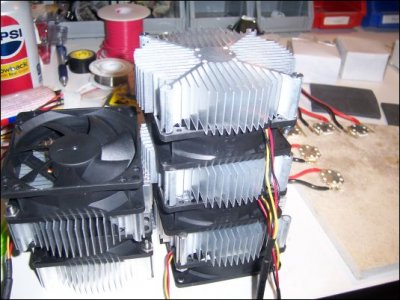
5x heatsink $27.50
5x 62mm lens $57.50
4x 82mm lens $29.97
4x 100w Epistar $500

Jameco parts - (4x185w + 1x80w meanwell) $476
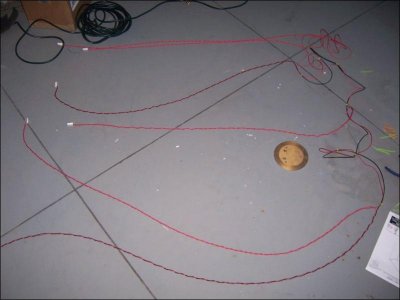
Anderson Powerpoles + wire $125
Fans+Heatsinks+Controller $164
Fan cabling $65
Neptune EB8+VDM $250
Adjustable Hangers -12 $30

Total cost, $1873 give or take a little.

The drivers are 4x HLG-185-36B, and 1x HLG-80-48B.

The Anderson powerpoles are these nifty little genderless connectors that are basically like electrical legos. Great for this kind of build, and they make it so I can easily swap parts in and out.

Yes, $1900 is alot of money, but, compare to the Orphek 100, or EcoXotic 100, which run about $600 each, 4 of those would be 2400-3000, and I'll be getting nearly twice the power from each one, and probably more control over the color.


Ok, so now the build.

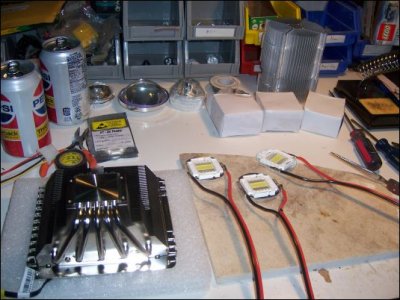
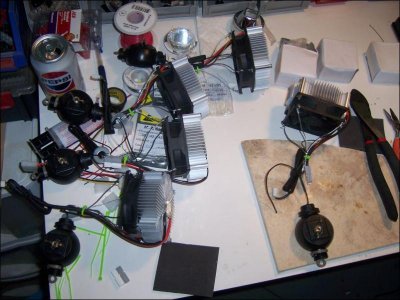
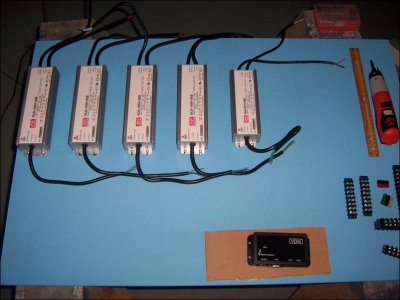
I decided to mount everything to a 2x3 sheet of MDF, to keep it all neat and clean, and allow me to just bolt the whole thing to the wall when done. I've also left a little space for additional drivers, in case this isn't enough light.

attachment.php


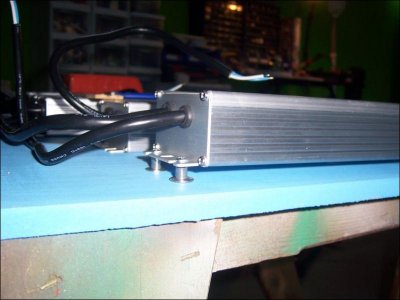
Each driver is mounted on small standoffs to provide a little air space underneath for cooling. I've noticed these things get pretty hot.

attachment.php


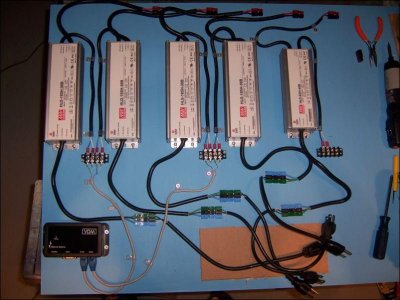
The drivers are all mounted:

attachment.php


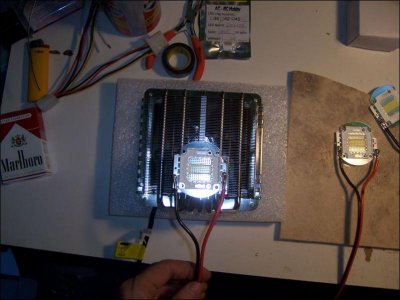
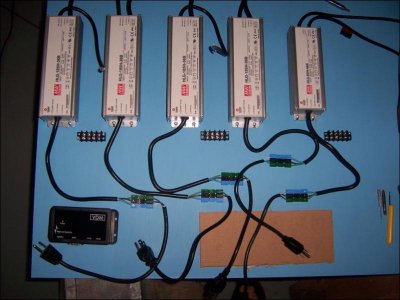
Power cords are all hooked up to the drivers via powerpoles. The bit of cardboard was used to emulate a Neptune EB8, which is still in the mail.

attachment.php


And most of the wiring is now complete. Just need to get some more cable straps to tie down some of the larger power cords and the driver outputs.


attachment.php


As more parts show up, I'll detail more of the build.
 

Attachments

  • led_build_001_Med.jpg
    led_build_001_Med.jpg
    45.3 KB · Views: 5
  • led_build_003_Med.jpg
    led_build_003_Med.jpg
    48.6 KB · Views: 6
  • led_build_004_Med.jpg
    led_build_004_Med.jpg
    50 KB · Views: 6
  • led_build_005_Med.jpg
    led_build_005_Med.jpg
    58.3 KB · Views: 5
  • led_build_007_Med.jpg
    led_build_007_Med.jpg
    65.4 KB · Views: 6
Subscribed. Can't wait to see what becomes of this as I've got a similar sized tank (96"X48"X30") which I'm currently working on build. What type of corals you planning to keep? (Mixed, SPS dominated, softie, etc...)
 
Looks like your off to a awesome start. One question, are you going to put your driver board in a cabinet of some sort or will everything be exposed? I assume it will be in a separate room but exposed wires would scratch at the back of my head.

Also not surprised Dustin found this post. If only he could get his stand figured out he could move on to lighting :)

Aaron
 
Dustin1300: The plan is for SPS dominated tank, and hopefully a few clams. Currently the tank has 2 400w MH lights (not nearly enough), and three 24" Solar Tubes above it. The solar tubes create great spotting and effects in the water, but can't illuminate the tank by themselves. However, if you catch the light at just the right time, it's spectacular. These LED's will replace the halides entirely, they are actually brighter too. I get more PAR on the bottom from them than from the 400's, right off the meter (no adjustment for blue). I posted PAR readings in the multichip build thread, but, for one of these LED's, its 1150, 400, 250, at 1", 18", 30" from surface, directly below LED.

kahkah: The board was simply mounted to the wall. It's in a tank room, as this is an in-wall tank. I guess the wires are "exposed", but really, the only ones that are actually exposed are the little blocks for the dimmer circuits. Everything high voltage is behind connectors and plugs, so I'm not really worried about it. I'm not sure what your fear is, it isn't any worse than a power strip with things plugged into it.

Minor update: The LED's arrived yesterday, got them mounted to the heatsinks, and the leads for them wired. (well, just the big ones, still haven't touched the little ones) Still waiting on the EB8 and the lenses for the big LED's to arrive. Hopefully they will show up this weekend, and I can get the whole rig fired up monday or tuesday.

Also, another thought on my cost breakdown. I was comparing the cost of $1900 to an equivilent system from someone else, but $1900 includes $250 for the neptune parts. Realistically, I'd need those either way, so, really, the cost of the light rig is $1650. Also worth noting, that includes all the little bits and bobs and multiple trips to the hardware store to buy a pile of screws or whatnot.

For reference, here is a picture of the tank taken back in march, to give you an idea of the current light output. Note that this is still an in-progress tank, so, it's not all complete yet. I'm adding components to the tank as I can afford them, so it's slow going. The lights are on the left and right sides only, the rest is sunlight. The tank looks brighter in that pic than it actually is. There are alot of dark areas in the corners, and the center is rather dim unless the time is just right and the sun is directly overhead.

attachment.php
 

Attachments

  • growth_014_Med.jpg
    growth_014_Med.jpg
    58.1 KB · Views: 6
Not really fear. I have a small led setup that I knocked into a tank and reached in and grab it so it would really becoming from fear. Just more what could happen with moisture or something getting thrown or knocked into it.

By looking at your setup the first thing that came to mind was a fram around the edge with a plexiglas shield and I was curious if there was anything more to the setup. I assume there might be heat issues though.

Anyway I look forward to your updates. Do you plan on running the hlgs at max on overdriving the LEDs or running them at 100w? Also looks like you are missing a few heat sinks on your list, I only see 5 for 9 LEDs? Final question, is there a reason you are wiring the 100s to dim individually? Are you going for the sunrise/sunset effect?
 
The board is off to the side of the tank, and up about 8' in the air mounted to a wall. Yes, in theory something could splash it, but I'd be more afraid that a plexi shield would cause overheating. The drivers run quite hot, thats why I have them on standoffs and mounted vertically like that.

I probably won't drive them at max just yet. I figure it will be run more in the 150W range, depending on how the light readings do. These are the hybrid Epistar LED's, so, they are good up to 252 Watts, not 100, so I'm not actually overdriving them. I do plan on creating a sunrise/sunset effect with the LED's, so yes, that's why they dim individually. The other reason is, these are bright, very bright. I am concerned that they might shock new corals. By dimming individually, I can set the max brightness on each one individually, and acclimate a new animal by fiddling the one above it.

Eventually, I'd like to get some red/yellow LED's with 15-30 degree optics, and mount them next to the tank firing at about a 30' angle into the tank, to create a real sunrise/sunset.

The 5 heatsinks are for the 20w LED's. The other heatsinks are included in the $164 for fans/heatsinks/fan controller. (newegg). Those are the big ones for the 100w chips, and ran about $30 each.
 
Update time. Spent all day yesterday hanging the 100w chips. It's not perfect yet, but it's looking pretty good. There are some dark spots I'm going to have to deal with.

bemenaker: I got the lenses for the 100w chips off ebay. Search for 82mm lens base, and you should be able to find a lens with base. Finding the one with the base is hard, but there are a ton of lens-only sales.

All the parts are in, arranged on my worktable:

attachment.php


Here is one of the heatsinks with an LED set over it to show how it will mount:

attachment.php


All the LED's ready to hang, with lenses mounted. There is one that is different, because that's the original one I bought to test the idea with before going all in.

attachment.php


Side detail of the heatsink

attachment.php


Quick shot of the tank lit up at full power. This is definately more blue in the picture than in real life, but there is a good mix of blue/white in these hybrid LED's. This is not the final pic, as I still have all the 20w UV and RB's to hang. I've noticed some dark spots in the tank, where the LED's spread just isn't enough to cover. I suspect a few more filler spots will be required after all is said and done.

attachment.php
 

Attachments

  • led_build_008_Sm.jpg
    led_build_008_Sm.jpg
    62.5 KB · Views: 6
  • led_build_009_Med.jpg
    led_build_009_Med.jpg
    56.7 KB · Views: 6
  • led_build_010_Med.jpg
    led_build_010_Med.jpg
    40.2 KB · Views: 6
  • led_build_011_Med.jpg
    led_build_011_Med.jpg
    62.1 KB · Views: 8
  • led_build_012_Med.jpg
    led_build_012_Med.jpg
    52 KB · Views: 6
Few more WIP pictures:

Here are the LED's hung next to the solar tubes.

attachment.php


attachment.php


And finally, a picture of the mounting board, mostly wired up. I still have a bunch of cable management to do, once I get everything where it needs to be.

attachment.php


Today's task: Mucking about with the 20w chips, and testing to see if the programming statements I wrote last night for the sunrise/sunset work.
 

Attachments

  • led_build_013_Med.jpg
    led_build_013_Med.jpg
    40.5 KB · Views: 6
  • led_build_014_Med.jpg
    led_build_014_Med.jpg
    46.4 KB · Views: 6
  • led_build_015_Med.jpg
    led_build_015_Med.jpg
    52.2 KB · Views: 7
Can you elaborate on the heatsinks. You mention they are from Newegg, but can you post a link. The other multichip LED thread has a lot of debate on the heatsinks. Do you fee after an hour of running, they are dispersing heat good enough?

Also, does your tank have a cover on it? It appears so with the one pic, just currious.
 
They are from newegg. I have one older "coolermaster" heatsink, that my roomie gave me from one of his (very) old overclocking projects. It has heatpipes, and is far more than adequate. I've never measured the temp on it above 37C. The other three are CoolerMaster Gemeni II S524. You can find them on newegg or amazon, or pretty much anywhere. They are absolutely dispersing heat, more than well enough. They barely register above room temperature. If you read the review of these on FrostyTech, you will see even when tortured by a 150w CPU, they are pretty decent, and only $30 a pop.

They have a big 120mm fan mounted on top, and the design is fin-vertical when hung, rather than horizontal like the other ones. I feel that vertical is better, because if the fan should ever break, natural convection will probably be more than enough to keep things cool.

Second big win for them, is that the fans blow down as mounted. This means a little bit of the air flows past the sink, and right onto the chip and lens, to cool them even more.

Finally, I liked that they have no exposed copper, all nickel plated, and have threaded mounting holes for 140mm fans, which provides a great place to wire up a 4-point hanger.

I have eggcrate over the tank currently. I'm waiting for a shipment of some nylon netting, and I plan to build a new cover with it, that will cause less striping effect.
 
Ok, more updates.

1) I hooked up the 5 20w chips yesterday (took all day). Fired them up while the main lights were on, and, hrmm, turns out, can't even see them. They have no lenses, so, they don't have the punch of the big ones, but yeah, even if I put one right on the water surface, you can't even tell it's on when the big lights are fired up.

That isn't to say they are useless. I bought them for moonlights, and hoped they would provide some additional color. No go there. I did test fire them at night though, and it is indeed perfect moonlight. Very happy with that. Full power is indeed too bright for moonlight, so I will probably try 50% max for now.

2) Currently I'm programming the Apex to handle all this new fun stuff. It's slow going, but progress is being made. Just working on dawn/dusk daylight and basic moon cycle. Once I have that setup, I might try for some cloud simulation. Not interested in lightning really. When I have a decent program, I'll paste it here for reference.

Ok, some new pics:

The 20w LED's all soldered up. The ones with blue dots are the RB's, and the other two are UV. It's impossible to tell them apart, so I marked them with blue dots.

attachment.php


A nice pile of heatsinks all wired up. These heatsinks are indeed perfect for the 20w chips, assuming you hook up the fan. Even better, they were pre-tapped for the 20w chips (both types), and the seller even included screws! The lights run ice cold at full power.

attachment.php


Wiring harness for the 20w chips. For reference, those squares on the floor are 4'x4'

attachment.php


Led's mounted, hangers installed, all ready to go. Worth noting, these hangers were not good for these LED's. They are too strong, and the LED's aren't heavy enough to keep them in place. I will have to buy alligator clips to use to position them. An alligator clip on the line is enough tension to keep them in place.

attachment.php
 

Attachments

  • led_build_016_Med.jpg
    led_build_016_Med.jpg
    58.7 KB · Views: 6
  • led_build_017_Sm.jpg
    led_build_017_Sm.jpg
    62 KB · Views: 6
  • led_build_018_Med.jpg
    led_build_018_Med.jpg
    37.7 KB · Views: 6
  • led_build_019_Med.jpg
    led_build_019_Med.jpg
    71.1 KB · Views: 6
Two more pics, this time of the 20w chips hung. Yes, the wires are a mess right now. I'm still adjusting positions and whatnot, so, it might be awhile before I tidy them all up.

attachment.php


attachment.php
 

Attachments

  • led_build_020_Med.jpg
    led_build_020_Med.jpg
    45.4 KB · Views: 6
  • led_build_021_Med.jpg
    led_build_021_Med.jpg
    46 KB · Views: 6
I've had it running for a few days now. More or less happy with everything. Still fiddling and tweaking with positions, light amounts, etc, but overall, very happy. Added a few test frags to see if things are more or less right.

I've also (finally!) finished the programming of the Apex for all this new stuff. I have a sunrise and sunset, a best-effort moon simulation, and some simple cloud cover. Right now I think the clouds occur too frequently, so I might adjust that.

I'll discuss each feature, and then show the code for it. I run my system at a 2 hour offset to sunrise/sunset, this way it runs a little bit into the night for evening viewing.

First, the moonlighting. The Apex can do moon rise/set, but cannot do intensity (which is stupid, because it has it builtin!). To emulate lunar phase as best as I could, I alter intensity by day of week, and basically make a 7 day lunar cycle. Meh.

Code:
VarSpd1_I1   (base_Var1)
  Set OFF 
  Fallback OFF 
  If DoW ---W--- Then MOON4
  If DoW --T-T-- Then MOON3
  If DoW -M---F- Then MOON2
  If DoW S------ Then MOON1
  If DoW ------S Then OFF 
  If Outlet LED_MOON = OFF Then OFF 

LED_MOON     (8_6)
  Fallback OFF 
  Set OFF 
  If Moon 120/120 Then ON 
  If Temp > 82.0 Then OFF

Profiles: (name, type, minutes, start, stop)

Code:
MOON1
ramp 
30  
0 
7

MOON2
ramp 
30  
0 
14

MOON3
ramp 
30  
0 
21

MOON4
ramp 
30  
0 
28

Now the Sunrise/Sunset. I have 4 main lights, going across the tank. Each one is individually dimmable. This allows me to create a sunrise/sunset that moves across the tank. I do this with three profiles (up, down, full on), and a number of virtual outlets. I have a 20 minute delay between each outlet, and each one ramps for 90 minutes.

The EB8 outlets:

Code:
LED_MAIN_1   (8_1)
  Fallback OFF 
  Set OFF 
  If Sun 120/120 Then ON 
  If Temp > 82.0 Then OFF 

LED_MAIN_2   (8_2)
  Fallback OFF 
  Set OFF 
  If Sun 140/140 Then ON 
  If Temp > 82.0 Then OFF 

LED_MAIN_3   (8_3)
  Fallback OFF 
  Set OFF 
  If Sun 160/160 Then ON 
  If Temp > 82.0 Then OFF 

LED_MAIN_4   (8_5)
  Fallback OFF 
  Set OFF 
  If Sun 180/180 Then ON 
  If Temp > 82.0 Then OFF

And the VDM outlets:

Code:
LED_MAIN_V1  (9_1)
  Fallback OFF 
  Set OFF 
  If Outlet VL1_MORN = ON Then SUNRISE
  If Outlet VL1_EVE = ON Then SUNSET
  If Outlet VL1_DAY = ON Then FULL_ON
  If Outlet VSTORM1_B = ON Then STORM_DN
  If Outlet VSTORM1_E = ON Then STORM_UP
  If Temp > 82.0 Then OFF 

LED_MAIN_V2  (9_2)
  Fallback OFF 
  Set OFF 
  If Outlet VL2_MORN = ON Then SUNRISE
  If Outlet VL2_EVE = ON Then SUNSET
  If Outlet VL2_DAY = ON Then FULL_ON
  If Outlet VSTORM2_B = ON Then STORM_DN
  If Outlet VSTORM2_E = ON Then STORM_UP
  If Temp > 82.0 Then OFF 

LED_MAIN_V3  (9_3)
  Fallback OFF 
  Set OFF 
  If Outlet VL3_MORN = ON Then SUNRISE
  If Outlet VL3_EVE = ON Then SUNSET
  If Outlet VL3_DAY = ON Then FULL_ON
  If Outlet VSTORM3_B = ON Then STORM_DN
  If Outlet VSTORM3_E = ON Then STORM_UP
  If Temp > 82.0 Then OFF 

LED_MAIN_V4  (9_4)
  Fallback OFF 
  Set OFF 
  If Outlet VL4_MORN = ON Then SUNRISE
  If Outlet VL4_EVE = ON Then SUNSET
  If Outlet VL4_DAY = ON Then FULL_ON
  If Outlet VSTORM4_B = ON Then STORM_DN
  If Outlet VSTORM4_E = ON Then STORM_UP
  If Temp > 82.0 Then OFF

Finally, the virtual outlets, which control the sunrise/sunset:

Code:
VL1_DAY      (Cntl:A1)
  Set OFF 
  If Sun 210/030 Then ON 

VL1_MORN     (Cntl:A2)
  Set OFF 
  If Sun 120/-120 Then ON 
  If Outlet VL1_DAY = ON Then OFF 

VL1_EVE      (Cntl:A3)
  Set OFF 
  If Sun 300/120 Then ON 
  If Outlet VL1_DAY = ON Then OFF 

VL2_DAY      (Cntl:A4)
  Set OFF 
  If Sun 230/050 Then ON 

VL2_MORN     (Cntl:A5)
  Set OFF 
  If Sun 140/-140 Then ON 
  If Outlet VL2_DAY = ON Then OFF 

VL2_EVE      (Cntl:A6)
  Set OFF 
  If Sun 300/140 Then ON 
  If Outlet VL2_DAY = ON Then OFF 

VL3_DAY      (Cntl:A7)
  Set OFF 
  If Sun 250/070 Then ON 

VL3_MORN     (Cntl:A8)
  Set OFF 
  If Sun 160/-160 Then ON 
  If Outlet VL3_DAY = ON Then OFF 

VL3_EVE      (Cntl:A9)
  Set OFF 
  If Sun 300/160 Then ON 
  If Outlet VL3_DAY = ON Then OFF 

VL4_DAY      (Cntl:A10)
  Set OFF 
  If Sun 270/090 Then ON 

VL4_MORN     (Cntl:A11)
  Set OFF 
  If Sun 180/-180 Then ON 
  If Outlet VL4_DAY = ON Then OFF 

VL4_EVE      (Cntl:A12)
  Set OFF 
  If Sun 300/180 Then ON 
  If Outlet VL4_DAY = ON Then OFF

And profiles:

Code:
SUNRISE
ramp
90
0
75

SUNSET
ramp
90
75
0

FULL_ON
ramp
1
75
75

Ok, so now I've got sunrise/sunset all dialed in, now it's time for cloud cover. Right now, the clouds move over the reef at semi-random-like start times, 195 minutes apart. IMHO, this is too quick, so I might do more programming, and extend them. My thoughts are to have a variety of different cloud programs, which all overlap. For example, a cloud moving over quickly, that happens every so often, or maybe one that happens more infrequently, but lasts longer. Right now, the clouds dim out to about 30%, could be more, dunno. Again, the clouds move across the aquarium, right to left, simulating a cloud moving overhead across the sky.

Also, recall that the cloud statements are void if the lights aren't on, or we are in sunrise/sunset mode. Because of this, you could set the period to an odd number, that will cause it to not occur every day. I haven't done the math fully yet, but, imagine if we had a 10 hour period on the clouds. Today, they go off at 10am, next, 8pm, then 6am (no-go, lights off), then 4pm, then 2am (no-go again). Depending on exactly when my sunrise/sunsets are, they might not go off at all on a given day. By using multiple cloud virtuals, we could set up multiple rotating cloud sets on large periods, that would cause pretty random-like behavior. Sometimes you'd get a long one, sometimes a short one, sometimes none at all. Just be sure that the minutes aren't evenly divisible into 24hrs, otherwise the apex will automatically line them up with midnight.

The handling for the variable speed outlets was up there in the sunrise sunset code. Look for the STORM_DN / STORM_UP statements. Most of this was taken from a post in the neptune forum for doing storms, but I didn't want lightning.

Most of the brains of this, is here, in the virtual outlets. Each "storm" has a B and E, begin, and end. The OSC statement adds up to 195, so, 195 minutes between them, and they never execute during sunrise/sunset. If you wanted to extend the period between the clouds, you could increase the third value of OSC, just make sure you add the same amount to both _B and _E, otherwise they will run out of sync. Note that there is a 2 minute difference between each storm, however, they still all add up to 195 minutes. This causes the storm to move across. Total cloud time is about 26 minutes.

Code:
VSTORM1_B    (Cntl:A13)
  Fallback OFF 
  Set OFF 
  OSC 030:00/015:00/150:00 Then ON 
  If Outlet VL1_MORN = ON Then OFF 
  If Outlet VL1_EVE = ON Then OFF 
  If Outlet VL1_DAY = OFF Then OFF 

VSTORM1_E    (Cntl:A14)
  Fallback OFF 
  Set OFF 
  OSC 045:00/005:00/145:00 Then ON 
  If Outlet VL1_MORN = ON Then OFF 
  If Outlet VL1_EVE = ON Then OFF 
  If Outlet VL1_DAY = OFF Then OFF 

VSTORM2_B    (Cntl:A15)
  Fallback OFF 
  Set OFF 
  OSC 032:00/015:00/148:00 Then ON 
  If Outlet VL2_MORN = ON Then OFF 
  If Outlet VL2_EVE = ON Then OFF 
  If Outlet VL2_DAY = OFF Then OFF 

VSTORM2_E    (Cntl:A16)
  Fallback OFF 
  Set OFF 
  OSC 047:00/005:00/143:00 Then ON 
  If Outlet VL2_MORN = ON Then OFF 
  If Outlet VL2_EVE = ON Then OFF 
  If Outlet VL2_DAY = OFF Then OFF 

VSTORM3_B    (Cntl:B1)
  Fallback OFF 
  Set OFF 
  OSC 034:00/015:00/146:00 Then ON 
  If Outlet VL3_MORN = ON Then OFF 
  If Outlet VL3_EVE = ON Then OFF 
  If Outlet VL3_DAY = OFF Then OFF 

VSTORM3_E    (Cntl:B2)
  Fallback OFF 
  Set OFF 
  OSC 049:00/005:00/141:00 Then ON 
  If Outlet VL3_MORN = ON Then OFF 
  If Outlet VL3_EVE = ON Then OFF 
  If Outlet VL3_DAY = OFF Then OFF 

VSTORM4_B    (Cntl:B3)
  Fallback OFF 
  Set OFF 
  OSC 036:00/015:00/144:00 Then ON 
  If Outlet VL4_MORN = ON Then OFF 
  If Outlet VL4_EVE = ON Then OFF 
  If Outlet VL4_DAY = OFF Then OFF 

VSTORM4_E    (Cntl:B4)
  Fallback OFF 
  Set OFF 
  OSC 051:00/005:00/139:00 Then ON 
  If Outlet VL4_MORN = ON Then OFF 
  If Outlet VL4_EVE = ON Then OFF 
  If Outlet VL4_DAY = OFF Then OFF

And the profiles:

Code:
STORM_DN
ramp
5
75
30

STORM_UP
ramp
5
30
75

And there we have it. Lots more to potentially do, but there is enough here that you could replicate it pretty easily.
 
nice build I to have a 50 watt multichip on my 20 gal hex nano with dimmable power supply running at about 80 %, my blues are 5 - 3 watt leds, good way to save on electricity.
 
Back
Top