You are using an out of date browser. It may not display this or other websites correctly.
You should upgrade or use an alternative browser.
You should upgrade or use an alternative browser.
My 500 + gallon system. Last 13 years to now. Build, Aquascaping & more. Lots of pics
- Thread starter slief
- Start date
slief
RC Sponsor
Awesome tank! Didn't I just see you on the episode of LA Fish Guys? Great episode! I also like the inexpensive winch idea to raise and lower the lights! Also why did you decide to replace your beckett with the cone skimmer? I would think the beckett would be a lot more powerful for your size system.
Marc
Yes.. That was my tank. I hope you are incorrect about the beckett! I have the same concern but we will soon see..
The sump and fuge are done as is the protein skimmer stand. The cover for the first sump with the skimmer is not done though the fuge cover is.. The cover that needs to be done is a 4 piece cover with a hinged access to the filter socks. It will wrap the upper part of the skimmer cone to help reduce evaporation and completely enclose the sump. Its pretty much a nightmare to layout but will be great when done. It should be done tomorrow. The cover for the fuge is 2 piece and completely encloses it. There are 2 cutouts for the fuge light fixtures lenses to sit into.
As a result of the timing I wont be doing the swap until next week. It will give me the weekend to layout and get the plumbing cut and assembled and ready.
Here are the cel phone pics I took today of the main sump. The filter sock trays each hold 2 socks and sit on shelves so they can be removed to simply the sock swaps.
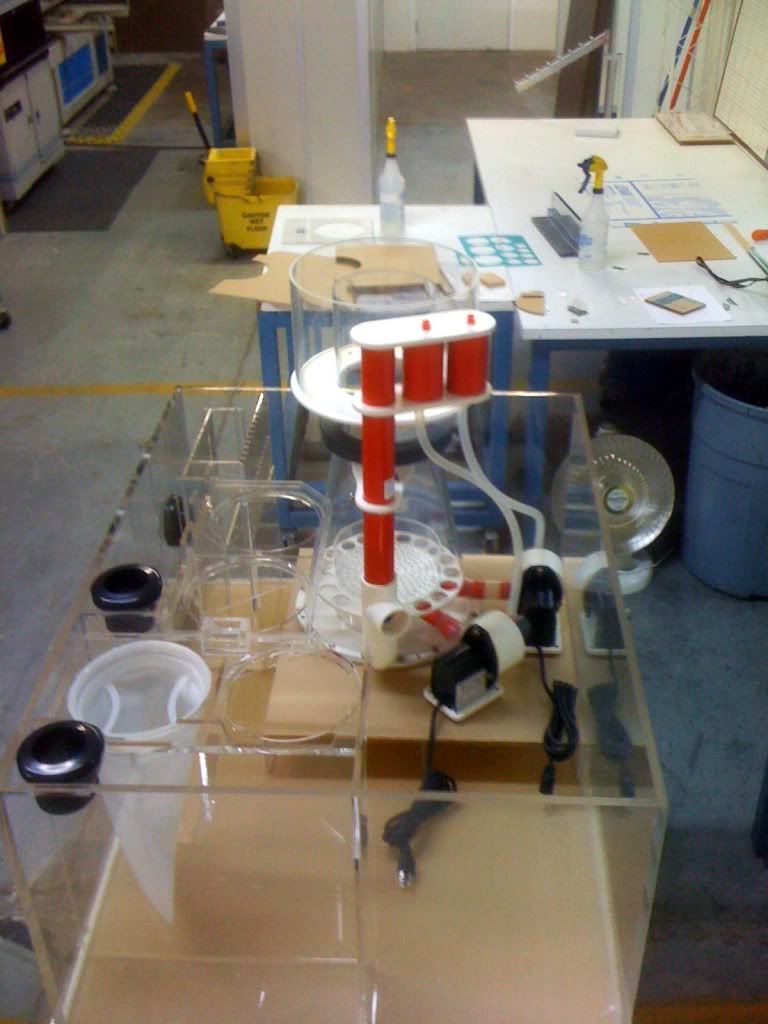


The air traps in the overflow box for sump one and sump 2 are removal in case I need to modify things.

Last edited:
slief
RC Sponsor
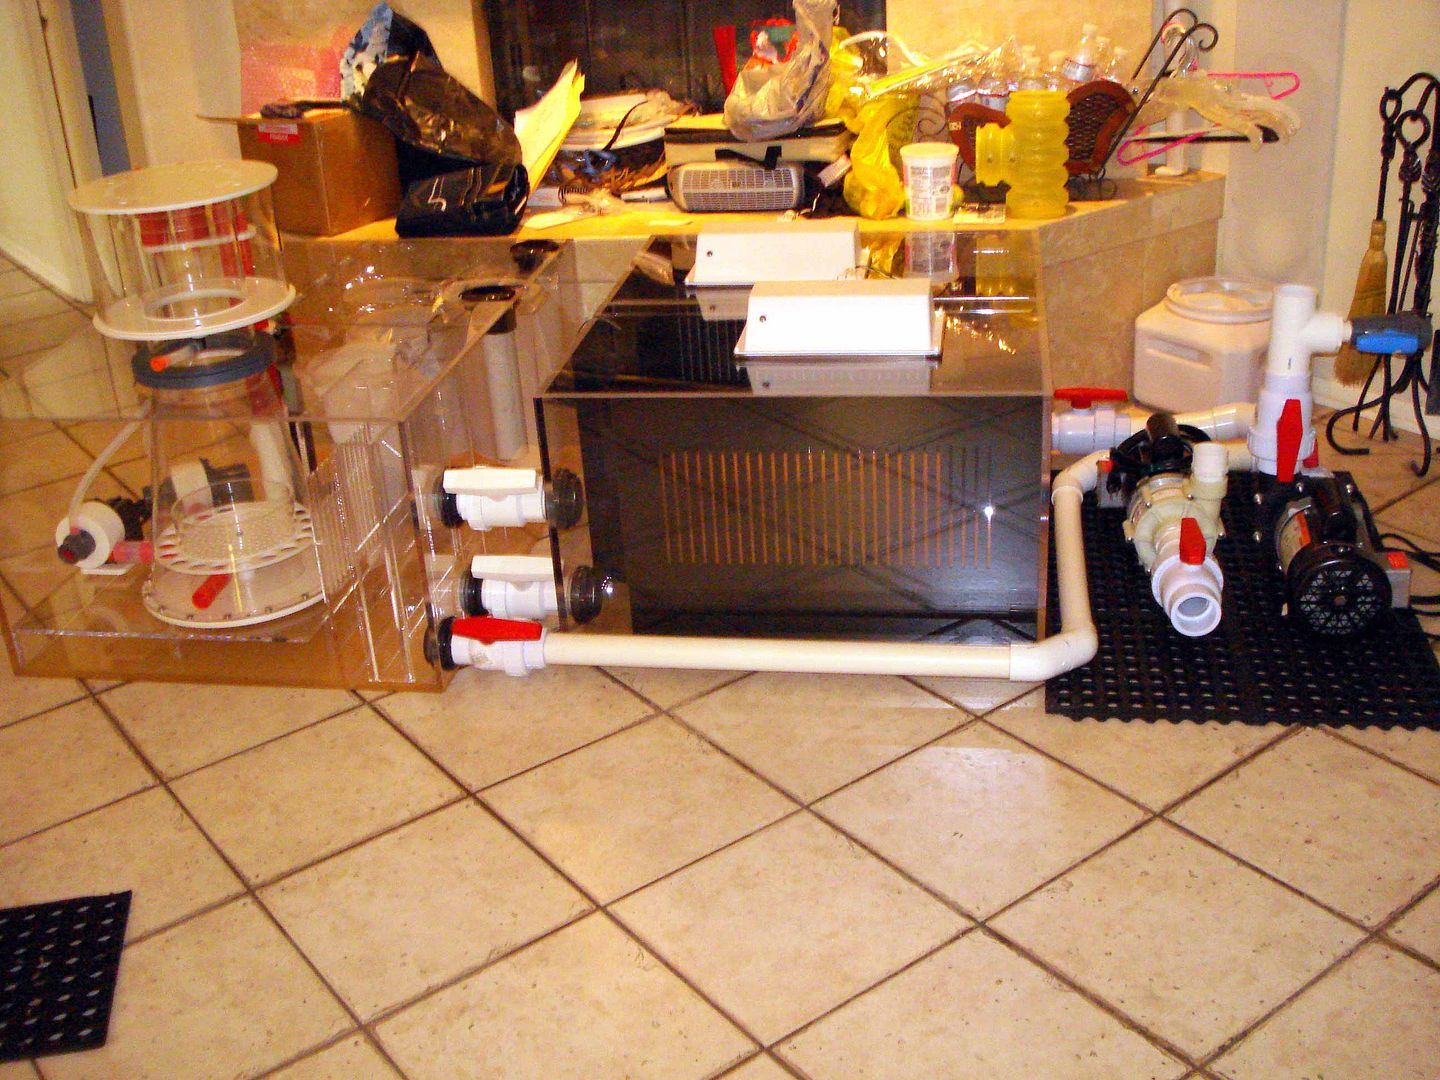
Time for some updates. I got the new sump and fuge home last night. I set them up on my livingroom floor so I can get cracking on the plumbing. I finished up the plumbing between the 2 sumps last night. Now I am working on the return pump plumbing.
I plan on having the rest of the plumbing laid out and glued up today so that when its time to install, all I will have to do is slide bulkheads into their holes and tighten them up and connect the return lines to the seaswirl plumbing as well as chiller and recirc. It will make the install very fast and easy. I figure no more than 2 hours once I am ready to slide them under the tank.
I do have one issue that I am really concerned/bummed about.. I had an ich breakout over the last week and a half and many of my fish are effected. I suspect in came from a powder blue tang that was introduced a month or so ago or my blue tangs which I have had for a few.
I started treading with Kick Ich a weeka ago but forgot to shut my carbon reactor off, so I am starting that over. I go through close to 1 liter per treatment and you have to treat several times over the course of 2 weeks. I hope this stuff works for me. I have read mixed reviews.
To help reduce the stress levels in the tank, I plan on removing the 2 blue tangs as well the powder blue. I am also going to remove my big henni as I think he is a major source of stress in the tank as he is a big hyper spazz and freaks the other fish out.. I am also going to remove my 2 brown hennis as they killed my hammer corals.
If this doesnt work, the options are unthinkable. I DO NOT want to put copper in my system! I have a friend who said he would loan me a 180G tank for my corals and anemones but I really dont want to do that unless I absolutely have to. The good news is that all the fish are eating very well still. Time will tell and the show must go on!!
Here are a few pics I took last night.
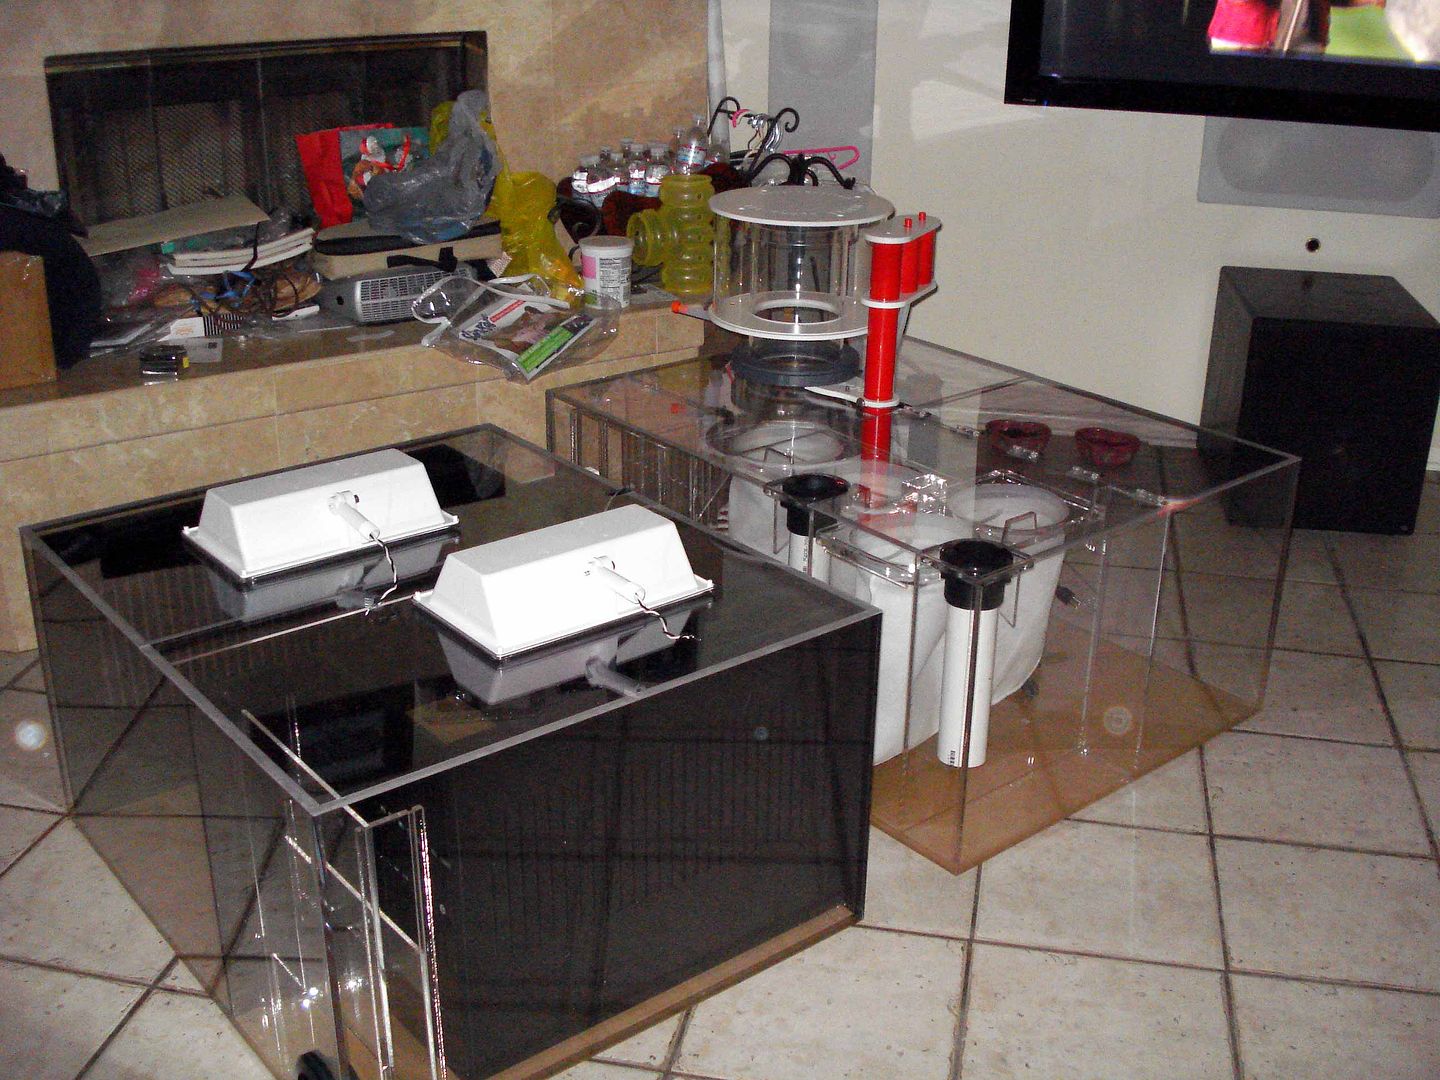
You will notice a square looking thing between the socks on the back (left) tray. I am having a tool made that will slide into that square to make it easy to get the back sock tray out. Since it will be under my tank and access is somewhat limited by my short arms, the tool will be a stainless pole with a flat end that will have a 2mm 90* bend. It will allow me to reach the tray from outside the tank stand and pull it right out with both socks. The other tray is close to the door opening under the tank so that one is easy to reach.

Sock tray

Removable adjustable bubble traps. Both sump and fuge exit boxes were done this way in case I need to make changes.

The lids seal the sumps up real well. The are routed along the edges so they drop in to the top. The seams are routed so the overlap eachother. The first sumps lid is 4 pieces. Its hinged to allow easy access to the sock trays and cutout around the skimmer neck.
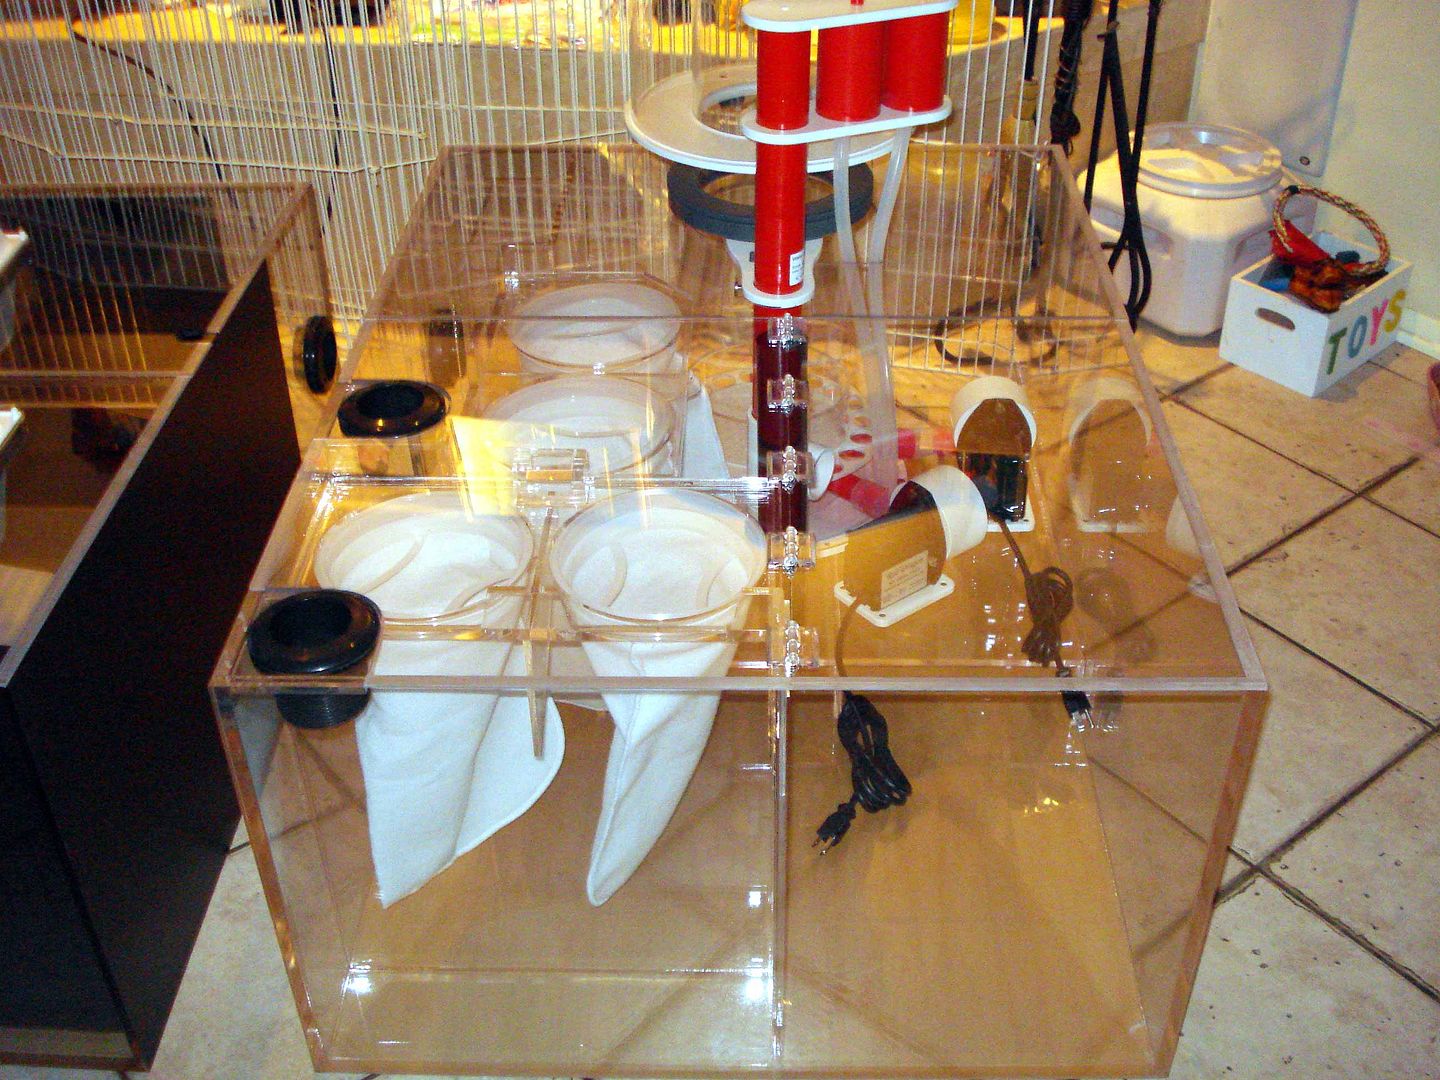


The probe holder which is located in the fuge is adjustable to allow for different water levels.

I plan on having the rest of the plumbing laid out and glued up today so that when its time to install, all I will have to do is slide bulkheads into their holes and tighten them up and connect the return lines to the seaswirl plumbing as well as chiller and recirc. It will make the install very fast and easy. I figure no more than 2 hours once I am ready to slide them under the tank.
I do have one issue that I am really concerned/bummed about.. I had an ich breakout over the last week and a half and many of my fish are effected. I suspect in came from a powder blue tang that was introduced a month or so ago or my blue tangs which I have had for a few.
I started treading with Kick Ich a weeka ago but forgot to shut my carbon reactor off, so I am starting that over. I go through close to 1 liter per treatment and you have to treat several times over the course of 2 weeks. I hope this stuff works for me. I have read mixed reviews.
To help reduce the stress levels in the tank, I plan on removing the 2 blue tangs as well the powder blue. I am also going to remove my big henni as I think he is a major source of stress in the tank as he is a big hyper spazz and freaks the other fish out.. I am also going to remove my 2 brown hennis as they killed my hammer corals.
If this doesnt work, the options are unthinkable. I DO NOT want to put copper in my system! I have a friend who said he would loan me a 180G tank for my corals and anemones but I really dont want to do that unless I absolutely have to. The good news is that all the fish are eating very well still. Time will tell and the show must go on!!
Here are a few pics I took last night.
You will notice a square looking thing between the socks on the back (left) tray. I am having a tool made that will slide into that square to make it easy to get the back sock tray out. Since it will be under my tank and access is somewhat limited by my short arms, the tool will be a stainless pole with a flat end that will have a 2mm 90* bend. It will allow me to reach the tray from outside the tank stand and pull it right out with both socks. The other tray is close to the door opening under the tank so that one is easy to reach.
Sock tray
Removable adjustable bubble traps. Both sump and fuge exit boxes were done this way in case I need to make changes.
The lids seal the sumps up real well. The are routed along the edges so they drop in to the top. The seams are routed so the overlap eachother. The first sumps lid is 4 pieces. Its hinged to allow easy access to the sock trays and cutout around the skimmer neck.
The probe holder which is located in the fuge is adjustable to allow for different water levels.
Last edited:
slief
RC Sponsor
Adjustable plates in the overflows of the sumps to allow for water level adjustment.

The fuge... I have a simple idea to allow for an 28"x12" algae scrubber tray to go in to the fuge.. I might just experiment with that as it will snap in and not require any modifications. Thats a subject for another day.

The fuge... I have a simple idea to allow for an 28"x12" algae scrubber tray to go in to the fuge.. I might just experiment with that as it will snap in and not require any modifications. Thats a subject for another day.
slief
RC Sponsor
I just finished up most of the plumbing. Both th sump and fuge are connected with all fittings glued. The return pump is plumbed to the sumps with all fittings glued. Only left to do is put the sumps in and finish the plumbing between the pumps tank and chiller. I already have most of that laid out so it should go like clock work. Now I get to wait a few days until I can schedule the carpinter to redo the drywall and hang the frp under the tank. Worst case, I will do it myself. I should have it done by mid next week... Stay tuned.
Here is the result of this mornings work.
Return pump plumbing.. The blue union ball valve attaced to the "T" fitting on the return line will feed the chiller. The other end of the "T" goes to the sea swirls.

Union Ball valves between the sump and fuge.
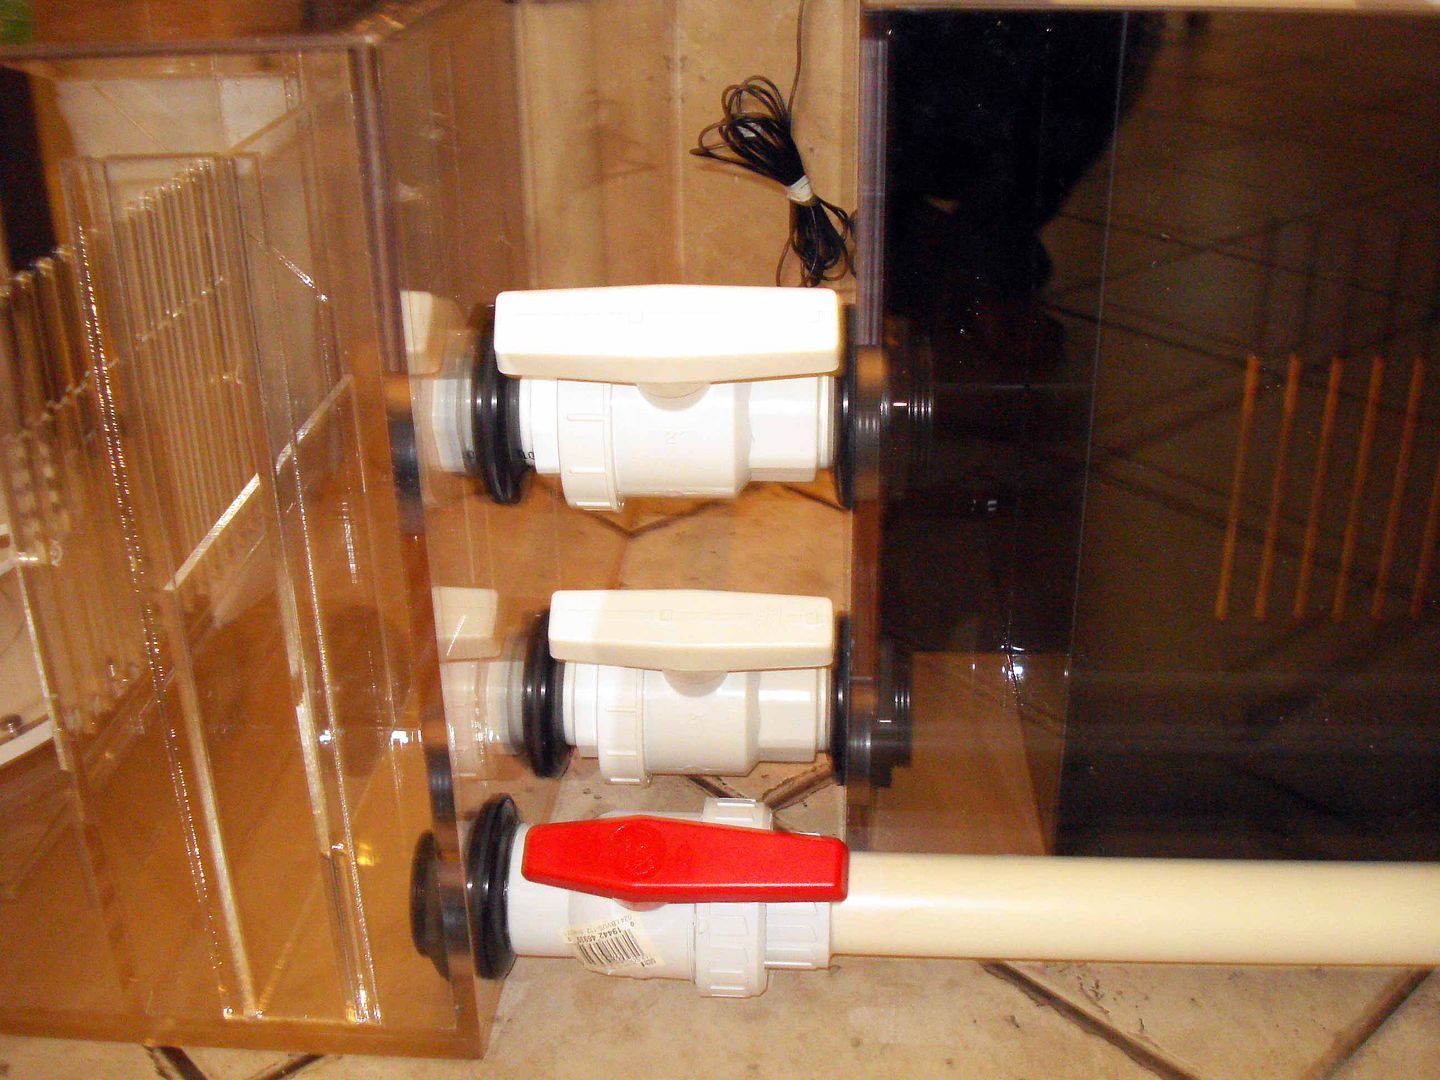
Sump and fuge plumbed. The pipe that runs between the sump on the left that connects to the return pump will allow me to shut down the fuge while keeping the return pump running. It will normally remain closed but by opening one valve and closing another, I can isolate the fuge from the system if I need to. I can only see doing that for maintenance or if I have too much flow through the fuge, I can draw from both.

Sump and fuge plumbed with recirc pump in its future location.
Here is the result of this mornings work.
Return pump plumbing.. The blue union ball valve attaced to the "T" fitting on the return line will feed the chiller. The other end of the "T" goes to the sea swirls.
Union Ball valves between the sump and fuge.
Sump and fuge plumbed. The pipe that runs between the sump on the left that connects to the return pump will allow me to shut down the fuge while keeping the return pump running. It will normally remain closed but by opening one valve and closing another, I can isolate the fuge from the system if I need to. I can only see doing that for maintenance or if I have too much flow through the fuge, I can draw from both.
Sump and fuge plumbed with recirc pump in its future location.
Last edited:
Awsome build so far!!
I'm using .220" lexan for my sump lids and they have warped on me .
I'm not sure if it has something to do with the humidity or just not thick enough. I thought about running strips on the edges and down the centers of them to keep them straight.
Just though I would let you know before you throw those under there.
slief
RC Sponsor
Awsome build so far!!
I'm using .220" lexan for my sump lids and they have warped on me .
I'm not sure if it has something to do with the humidity or just not thick enough. I thought about running strips on the edges and down the centers of them to keep them straight.
Just though I would let you know before you throw those under there.
Thanks!
The lids overlap and underlap eachother and are dadoed to lay flush on eachother. There are also 1/2" thick x1" tall strips mounted vertically to the undersides of the large sections to prevent warping as well. These lids should are pretty sturdy and I'm not expecting an issue. Fortunately, the tank manufacturer is less than a mile from my home so if there is an issue, the resolution is around the block and covered under warranty.
techreef
Premium Member
The craftsmanship on your sumps looks really, really nice. Wow.
Good luck with the impending move. And re: the ich, I've done the whole fishless display tank treatment to starve out ich, and I still periodically see white spots on my ruby headed fairy wrasse. My fish are healthy and the wrasse is back to perfect in a day or two. It's frustrating to know the parasite is still in my tank, but I've done all that I feel is practicable, and if my fish are healthy enough to get through infections, than I see little to worry about. I think fish known to be less sturdy, like Powder Brown tangs, probably wouldn't survive my current approach to dealing with ich. But I have a Tomini tang that is a Sherman tank and doesn't show any ich, even when the wrasse does.
Good luck with the impending move. And re: the ich, I've done the whole fishless display tank treatment to starve out ich, and I still periodically see white spots on my ruby headed fairy wrasse. My fish are healthy and the wrasse is back to perfect in a day or two. It's frustrating to know the parasite is still in my tank, but I've done all that I feel is practicable, and if my fish are healthy enough to get through infections, than I see little to worry about. I think fish known to be less sturdy, like Powder Brown tangs, probably wouldn't survive my current approach to dealing with ich. But I have a Tomini tang that is a Sherman tank and doesn't show any ich, even when the wrasse does.
slief
RC Sponsor
The craftsmanship on your sumps looks really, really nice. Wow.
Good luck with the impending move. And re: the ich, I've done the whole fishless display tank treatment to starve out ich, and I still periodically see white spots on my ruby headed fairy wrasse. My fish are healthy and the wrasse is back to perfect in a day or two. It's frustrating to know the parasite is still in my tank, but I've done all that I feel is practicable, and if my fish are healthy enough to get through infections, than I see little to worry about. I think fish known to be less sturdy, like Powder Brown tangs, probably wouldn't survive my current approach to dealing with ich. But I have a Tomini tang that is a Sherman tank and doesn't show any ich, even when the wrasse does.
Thanks! Seeing the sumps go from tape on the floor to paper to computer to the finished product is something. I have to admit that when it was done, I was truley surprised. They look better than I had imagined.
As for the ich, hopefully I dont need to take drastic measures.. I really dont want to. I have not had an ich problem in several years and having it now pains me. I will continue with the Kick Ich treatment and see how it goes. I just dont want to shut my skimmer down as the directions suggest. I really appeciate the feedback!
Things are now set. The swap will take place this Weds. The carpinter will be here at 7AM. My plan is to have the old sump and pumps out of there before he gets here. He will come by tomorrow night to go over the needed materials. I will start tearing things out Weds around 6AM.. It will be a long day but I am well prepared and I expect the sump swap to go like clock work once Dave the carpinter has done his job. Time will tell. I will take pictures and it will be video taped for another episode of LA Fish Guys.. Jim was by yesterday video taping the new sumps and having me explain things. I hate being on tape! :hmm3:
slief
RC Sponsor
I did manage to have some fun tonight. A few days ago I got a handful of the new Koralia Evo 1400's.. I am kind of experimenting with these things as I have eliminated a couple large 1/8HP recirc pumps over the last few months. In one of my first posts in this thread, I think I detailed my mods to my original K3's and K4's so that I could mount them in some bulk heads at the back of my tank.
I decided to add a couple more to some vacant 3/4" bulk heads I had on my overflows. These ones would need to point 45* away from their mounting surface. I decided to use 3/4" lockline to mount them to the overflow as the lockline would give me the bend I needed while hiding the wire.
Here is the step by step of my little project. I will mount them up tomorrow.
First, here is the new Evo 1400. It is MUCH smaller than the K4 and draws less power according to the specs. Notice the new vibration reduction mount which I will tear apart..


I remove the orings and separated the base. Then I removed the little rubber feet.

From the rear of the base, you twist the back.

Once you separte the back from the base, the ball is exposed along with another o-ring.

Here is my 3/4" lock line.

I cut the collar off a piece. It is attached to another piece which it will need to separated from. Having some extra pieces makes it easier to cut. The cut piece will be the cover for the ball.

I decided to add a couple more to some vacant 3/4" bulk heads I had on my overflows. These ones would need to point 45* away from their mounting surface. I decided to use 3/4" lockline to mount them to the overflow as the lockline would give me the bend I needed while hiding the wire.
Here is the step by step of my little project. I will mount them up tomorrow.
First, here is the new Evo 1400. It is MUCH smaller than the K4 and draws less power according to the specs. Notice the new vibration reduction mount which I will tear apart..
I remove the orings and separated the base. Then I removed the little rubber feet.
From the rear of the base, you twist the back.
Once you separte the back from the base, the ball is exposed along with another o-ring.
Here is my 3/4" lock line.
I cut the collar off a piece. It is attached to another piece which it will need to separated from. Having some extra pieces makes it easier to cut. The cut piece will be the cover for the ball.
Last edited:
slief
RC Sponsor
I then inserted the o-ring into an uncut piece.

Set the ball on top of it.

Pushed to cut piece over it until is snapped into place.

I then drilled a pilot hole into the joint after the ball. Once the pilot hole was drilled, I stepped the hole size up one size at a time and drilled backwards so it didnt break the lock line. I found this tip out the hard way.

I then cut the power plug off the evo. Ran the wire through the hole and and mounted the pump to the ball.
Here is the result.. I just need to add the threaded end to lock line for the bulk head.

I made 2 of these and will post pics when I get them installed tomorrow.
Set the ball on top of it.
Pushed to cut piece over it until is snapped into place.
I then drilled a pilot hole into the joint after the ball. Once the pilot hole was drilled, I stepped the hole size up one size at a time and drilled backwards so it didnt break the lock line. I found this tip out the hard way.
I then cut the power plug off the evo. Ran the wire through the hole and and mounted the pump to the ball.
Here is the result.. I just need to add the threaded end to lock line for the bulk head.
I made 2 of these and will post pics when I get them installed tomorrow.
Last edited:
slief
RC Sponsor
I am beyond the point of no return...... I removed the door frames for the tanks underside last night.
I woke up at 5AM. Started tearing things out at 5:30.
Here are a couple shots of what was coming out..


By 7AM, everything was out including the inside drywall.
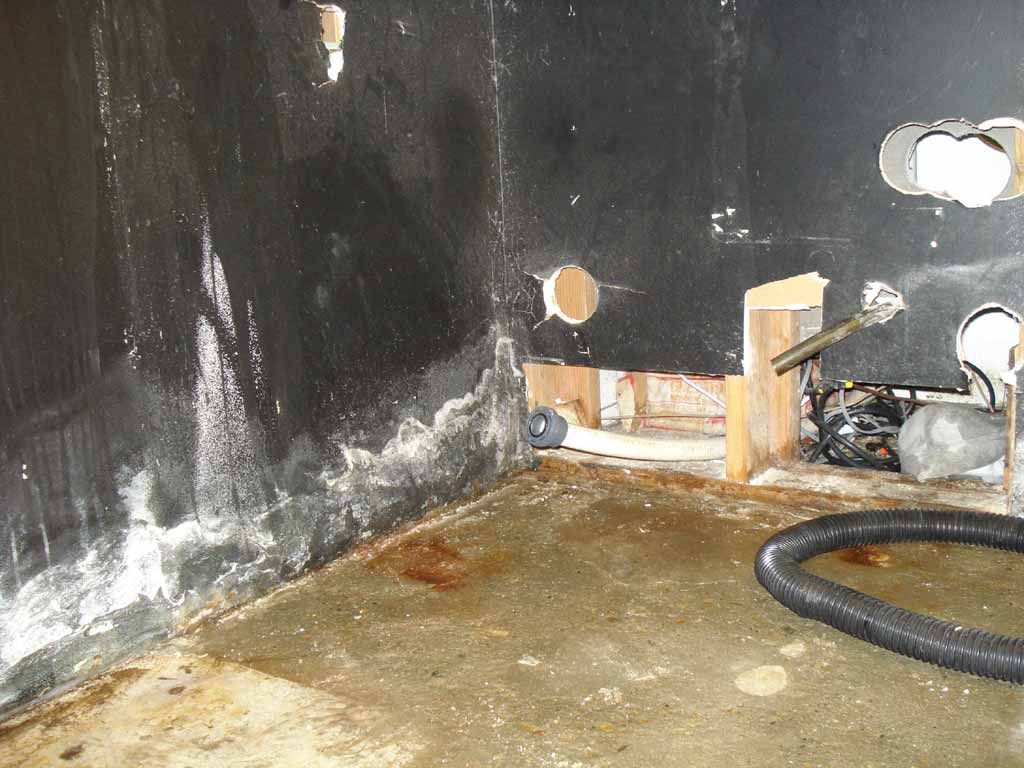
At 7:30 my carpinter arrived.. We had to remove some drywall on the outside so things can air out.
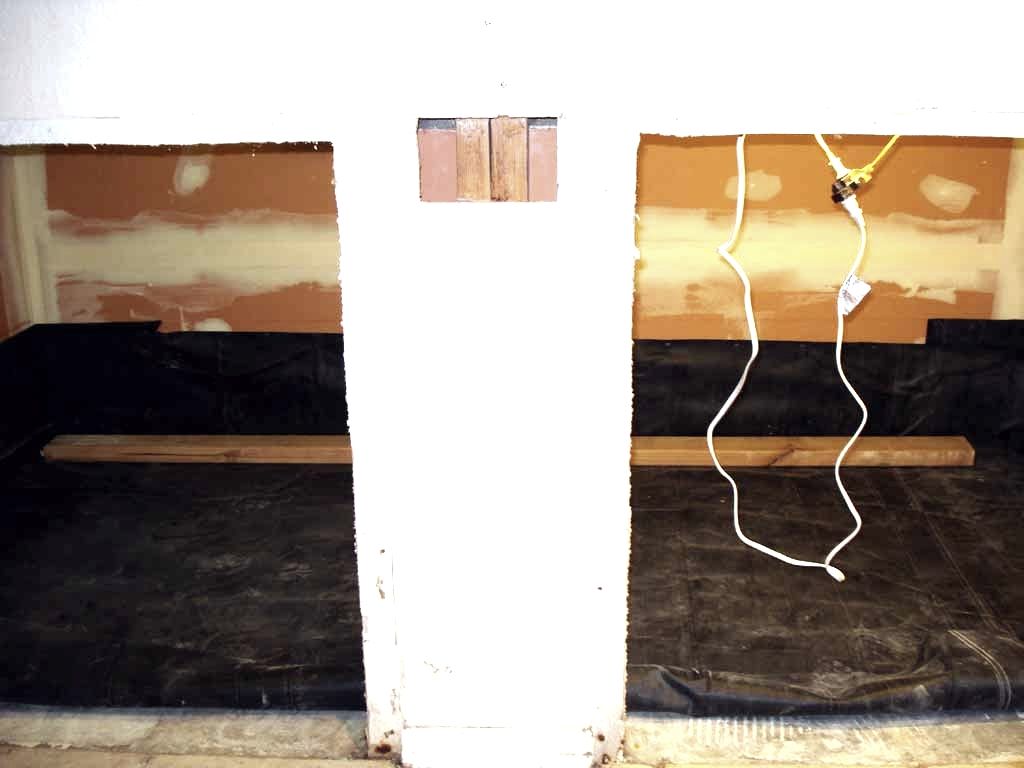
Insulation going in.

Sound proof drywall going in..


Its now 9:10AM. The drywall is almost done. Next will be the FRP and pond liner for the floor.. Stay tuned. Things are going like clockwork but its going to be a long day!
I woke up at 5AM. Started tearing things out at 5:30.
Here are a couple shots of what was coming out..
By 7AM, everything was out including the inside drywall.
At 7:30 my carpinter arrived.. We had to remove some drywall on the outside so things can air out.
Insulation going in.
Sound proof drywall going in..
Its now 9:10AM. The drywall is almost done. Next will be the FRP and pond liner for the floor.. Stay tuned. Things are going like clockwork but its going to be a long day!

Similar threads
- Replies
- 2
- Views
- 126
- Replies
- 2
- Views
- 308