You are using an out of date browser. It may not display this or other websites correctly.
You should upgrade or use an alternative browser.
You should upgrade or use an alternative browser.
My 500 + gallon system. Last 13 years to now. Build, Aquascaping & more. Lots of pics
- Thread starter slief
- Start date
slief
RC Sponsor
Scott this is exactly why I love Tunze products!!!
Corey
I'm with you there. These pumps are nearly impossible to kill. I will definitely use these pictures in the next Tunze/Jebao debate thread. Looking at them now and looking at these pics makes me laugh. I can't believe how bad I let them get. Given the effort involved in cleaning them yesterday, next time around I think I will be using muriatic acid instead of vinegar. Especially since I likely won't clean them again for several months or more and the acid will make much faster work of of the coraline than the vinegar. My only concern is using that stuff on top of the tank. I will likely get a small bucket/pail instead of using our pots and tupperware. That way it's deeper and more splash resistant.
That said, there is a noticeable improvement of flow as the water level change from the surge is certainly greater. Also the corals at the opposite end of the tank are swaying a bit more. As such, it was definitely worth the effort.
slief
RC Sponsor
A local friend of mine was doing some SPS trimming and I was fortunate enough to be the benefactor of several small and large frags. I really hate adding corals.. Especially those that need to be glued but I got it done.. Hopefull they do well. Here are some pics of some of them. There are others that are higher up or out of camera view that I couldn't get pictures of. I don't even know the names of half of them. LOL


pmrossetti
Active member
Wow, nice haul Scott. Good luck with them.
I still can't believe the skimmer incident. So weird.
Can't even picture it.
Talk about Murphy. sheeeesh
I still can't believe the skimmer incident. So weird.
Can't even picture it.
Talk about Murphy. sheeeesh
Scott, on your bubble King, couldn't you extend the drain line at the bottom of the collection cup? That's what I'm planning on doing with mine. Run the tubing right into the drain. Drill a hole in the back of the sump and let gravity just drain the skimmate. I also hooked up the auto wash down and wiper in the skimmer. Everything is now automatic and no skimmer maintainace necessary. Well almost- will likely have to get in there occasionally.
slief
RC Sponsor
Wow, nice haul Scott. Good luck with them.
I still can't believe the skimmer incident. So weird.
Can't even picture it.
Talk about Murphy. sheeeesh
Thanks!
On the skimmer incedent.. Yea, that was pretty crazy and a first as far as the results. In 28 years of being in this hobby, I've had my share of floods but this was a first. I've never had something like that happen as a result of my skimmer overflowing. That's not to say that I haven't had an overflow. Just not to the point that it wound up on the floor. Especially since moving to an in sump skimmer. Thankfully the pond liner did it's job and prevented a bigger mess.
Scott, on your bubble King, couldn't you extend the drain line at the bottom of the collection cup? That's what I'm planning on doing with mine. Run the tubing right into the drain. Drill a hole in the back of the sump and let gravity just drain the skimmate. I also hooked up the auto wash down and wiper in the skimmer. Everything is now automatic and no skimmer maintainace necessary. Well almost- will likely have to get in there occasionally.
While I could do that, the drain for my water change system is outside in the shed and with the crap that comes out of the skimmer, that would be a long way for it to drain and most of that would be horzantal with little to no incline. The chances of that line clogging would make it more trouble than it's worth. Plus the line would get in the way of removing my sump lids as it would have to go towards the back of the sump over the filter socks. Draining the cup isn't a big deal anyway. I have a 1.5 gallon jug that I drain into and a washdown as well that is fed by fresh water from a hose spigot. I only use the washdown once in a blue moon though.
Truth is that I prefer to have the valve in the collection cup closed as my skimmate tells me how my skimmer is performing and to a minor degree it also tells me what's going on in the tank. I check my skimmer daily anyways. Overflows with these skimmers are pretty rare. When properly tuned, they only happen if the venturi line gets plugged up from salt creep or if something gets into the skimmer pump. Both of which are pretty rare instances for me. Even on the very rare occasion that they do happen, I've never had it result in water on the floor as it would normally just drain back into the sump via the gaps around the sump covers and the skimmer neck. I must have had one of the lids around the skimmer misaligned or something for it to overflow and make it to the floor. Either way, I am planning on modifying my lids slightly and will either add some holes in them or make the skimmer cutout larger so the opening in the lid is wider and not covering the sump directly below the skimmer cup. If the hole for the skimmer cutout was about an inch or two larger in diameter, in the event of an oveflow this wouldn't be an issue as it would just drip back into the sump. Heck, I could even add a glued down acrylic half ring to each of the two lids that surround the skimmer and have those a bit larger in diameter than the collection cup. Those could serve as a dam and contain the water from a potential overflow and channel it back into the sump. Then again a float switch in the collection cup would shut if off before it ever became an issue and notify me via text. Decisions decision..
Here is the drain/jug setup. I only have to pull and dump the jug every few weeks. Not a big deal as it's just very quick part of my very minimal maintenance on this system.

Last edited:
slief
RC Sponsor
Skimmer overflows will never be an issue again. I got a really small Madison float switch. Tapped one of the vent holes in my skimmer lid so I could thread it in. I Solderd on a 2.5mm plug to the switch wires so I could connect it to my custom breakout box. Now my apex will shut the skimmer off if it ever overflows again and send me an email/text notification to notify me that the skimmer cup is overfull.


slief
RC Sponsor
Could you expand a bit on the Madison float switch? Which one did you choose? How does it operate? What sort of maintenance/cleaning is involved?
Thx.
Dave.M
It's a Madison M3326. I chose this one instead of the other float switches that I use because of it's narrow diameter. I needed one that could fit between the sides of the collection cup and existing holes in the lid which are very close to the sides of the collection cup. I only use Madison or Reef Fanatic foat switches because they are high quality unlike the cheap float switches that everybody gravitates towards. As for maintenance, because this switch is out of the way of the skimmer foam, it shouldn't really get dirty and there for only require cleaning when I clean my skimmer lid every 2-3 months. When I say out of the way of the skimmer foam, it sits between the clear acylic ring in the lid and the sides of the collection cup. That ring shields that are from the foam and forces the foam down into the cup. You can see that acylic ring on the lid in the pictures above.
Like any other float switch, it's either a normally open or normally closed switch. In this case it's a normally closed float switch meaning that when the float is in the down position, the two wire circuit is closed. There is a magnet inside the float that opens or closes the circuit within the float switch. When water raises the float, the circuit opens. The float switches in my sump for my ATO, Too High and Too Low level float switches operate the same way. If you aren't familiar with the Apex Breakout Box, it has 6 inputs that sense open or closed circuits and that is where you connect float switches to as well as any other open/close swithces. I use a garage door opener button in my aquarium shed to trigger my mixing pump. That switch connects to my breakout box. When I push the button, my mixing pump turns on for 1 hour.
This is the switch I chose for my skimmer shut off.
http://www.amazon.com/gp/product/B0090916TQ?psc=1&redirect=true&ref_=oh_aui_detailpage_o00_s00
slief
RC Sponsor
Maybe I'm understanding it wrong, but wouldn't you want your switch normally open, just so you don't cause an alarm when you unplug it from your 2.5mm plug (making it open) for maintenance?
LOL.... You have a VERY good point.. I never really thought about that. I was looking at both normally closed and normally open in these tiny switches and chose the one that I could get via Amazon Prime the quickest and cheapest. Then again, there is an upside to the normally closed switch. I won't have to shut the skimmer off when I remove the lid for maintenance. It will shut off automatically when I remove the lid and disconnect it from my BoB. The only downside is that I will get a text and email that I can just ignore. I think I can flip the barrel on this switch like I can with my other float switches and change it from normally closed to normally open though I need to test that to verify it to be the case with this switch.
slief
RC Sponsor
Thx for the details. The reason I asked is that I went to Madison's web site directly and was a little overwhelmed by their selection.
Dave.M
Glad to help!
awesome idea and fix! glad to see things weren't serious and you made another improvement. great idea adding the float switch in the cup to shut off the skimmer when full.
Thanks. I had seen this done before with other skimmers so i can't take credit for the idea. I just wanted to do it as clean as possible and find a quality switch that would fit in there with the washdown and use existing holes given the close proximity to the sides of the collection cup. Fortunately this switch had a threaded part that was very close to the hole diameter so no drilling was required. I just had to tap the hole out with my thread tapping kit.
slief
RC Sponsor
In light of the recent skimmer overflow I had decided to update my leak detection setup with my Apex. I was originally using a product called the Water Bug which is a leak detection device that plugs into the breakout box. I had a couple sensors setup on it but occasionally it false alarmed so I had it disabled in my alarm notification. When we had Black Friday I opted to get the Apex ALD Leak detection setup with 4 leak sensors. It arrived the other day and I just got through setting it up.
The ALD functions much like a breakout box. You have 4 normally open switches (example: Swx_1, Swx_2, Swx_3, Swx_4). Each switch corresponds to a plug on the ALD where you can add a sensor. When the sensor detects water, the circuit closes. There are 2 ways to deal with the notification/alarm programming. You can either a line in the email and alarm outlets that says:
If Swx_1 Closed Then ON
This would trigger the alarm.
Or you can create a virtual outlet that you name to correspond with the leak sensor location to make it more intuitive. Then add the If Swx_1 Closed Then ON to the virtual outlet
I used a seperate virtual outlet for each sensor and named them according to the sensor location so that if there is a leak, when I get my email/text alert, I know exactly where the leak is located based on which virtual outlet turns on. I added 4 sensors to the ALD. One under my pumps below the tank, one right next to the skimmer sump below the tank, one in the closet next to the tank and one in the shed next to my calcium reactor. I need to get an RJ11 extension for the one next to the skimmer which I will do this weekend. That sensor is a bit further from the ALD module than the senor cord will allow although I might just opt to move the ALD instead.
Once I got it all programmed I got a wet sponge and tested the three leak detection modules that are connected to verify that the system was working and I was getting email notifications that told me where the leak was located and it worked just as it should.
Here are some screen shots.
This is Leak_Pumps which tells me there is water on the floor by the pumps.

This is Leak_Closet which tells me there is water on the floor in the closet next to the tank where I have some water lines running through as well as my Dos pump which is used for feeding thawed but chilled frozen food.

And this is Leak_Shed which tells me that there is water on the floor in the shed where my calcium reactor and mixing tanks are located as well as my Renew AWC.

The ALD functions much like a breakout box. You have 4 normally open switches (example: Swx_1, Swx_2, Swx_3, Swx_4). Each switch corresponds to a plug on the ALD where you can add a sensor. When the sensor detects water, the circuit closes. There are 2 ways to deal with the notification/alarm programming. You can either a line in the email and alarm outlets that says:
If Swx_1 Closed Then ON
This would trigger the alarm.
Or you can create a virtual outlet that you name to correspond with the leak sensor location to make it more intuitive. Then add the If Swx_1 Closed Then ON to the virtual outlet
I used a seperate virtual outlet for each sensor and named them according to the sensor location so that if there is a leak, when I get my email/text alert, I know exactly where the leak is located based on which virtual outlet turns on. I added 4 sensors to the ALD. One under my pumps below the tank, one right next to the skimmer sump below the tank, one in the closet next to the tank and one in the shed next to my calcium reactor. I need to get an RJ11 extension for the one next to the skimmer which I will do this weekend. That sensor is a bit further from the ALD module than the senor cord will allow although I might just opt to move the ALD instead.
Once I got it all programmed I got a wet sponge and tested the three leak detection modules that are connected to verify that the system was working and I was getting email notifications that told me where the leak was located and it worked just as it should.
Here are some screen shots.
This is Leak_Pumps which tells me there is water on the floor by the pumps.
This is Leak_Closet which tells me there is water on the floor in the closet next to the tank where I have some water lines running through as well as my Dos pump which is used for feeding thawed but chilled frozen food.
And this is Leak_Shed which tells me that there is water on the floor in the shed where my calcium reactor and mixing tanks are located as well as my Renew AWC.
slief
RC Sponsor
Some updated shots of some of the new corals. The Birds Nest has a bunch of new tips on it.
This picture was taken two weeks ago when I got it.

This was taken two days ago and you can see that there are a bunch of new tips growing on the almost all the tips of it. It's also coloring up nicely.


This thing is doing really well too.

These Monti caps have grown insanely.


This one was two small frags about the size of a quarter each and an inch apart. In the few months since I added them, they have grown into once larger piece and is now a good six inches long.


This is a new Moni cap of some sort that was given to me last week. It seems to be doing well so far.

This picture was taken two weeks ago when I got it.
This was taken two days ago and you can see that there are a bunch of new tips growing on the almost all the tips of it. It's also coloring up nicely.
This thing is doing really well too.
These Monti caps have grown insanely.
This one was two small frags about the size of a quarter each and an inch apart. In the few months since I added them, they have grown into once larger piece and is now a good six inches long.
This is a new Moni cap of some sort that was given to me last week. It seems to be doing well so far.
Last edited:


FishTruck
Premium Member
How did you mount these Tunzes to the loc-line?
How did you mount these Tunzes to the loc-line?
Hey! How did you mount the Tunzes on the loc line? That would solve problems for me... since my tank walls are 1.25 inches thick (magnets don't work well).
Great tank and glad you survived your leak. I've had a few myself.
How did you mount these Tunzes to the loc-line?
Hey! How did you mount the Tunzes on the loc line? That would solve problems for me... since my tank walls are 1.25 inches thick (magnets don't work well).
Great tank and glad you survived your leak. I've had a few myself.
Yep.. Just vinegar. Just finished the last pump. It was much more stubborn. I started with hot vinegar diluted with some water. That worked reasonably well for the first two. I went to straight vinegar for the last one.
The other two pumps looking like new again inside and out. Obviously I didn't clean the clamps but that wasn't needed anyway.
slief
RC Sponsor
Hey! How did you mount the Tunzes on the loc line? That would solve problems for me... since my tank walls are 1.25 inches thick (magnets don't work well).
Great tank and glad you survived your leak. I've had a few myself.
Thank you very much! Leaks seem to be par for course. I've had a few over the last 20 years and have survived them all including one that completely drained the tank 17 year ago when I depended on check valves. That was a learning experience and I immediately redid my plumbing and ditched the check valves. Amazingly I didn't loose a single fish at the time. They managed to survive on their sides in the last remaining inch of water. Fortunately this last one really wasn't a leak but rather an overflow that was avoidable and easy to insure would never happen again. Just another lesson learned.
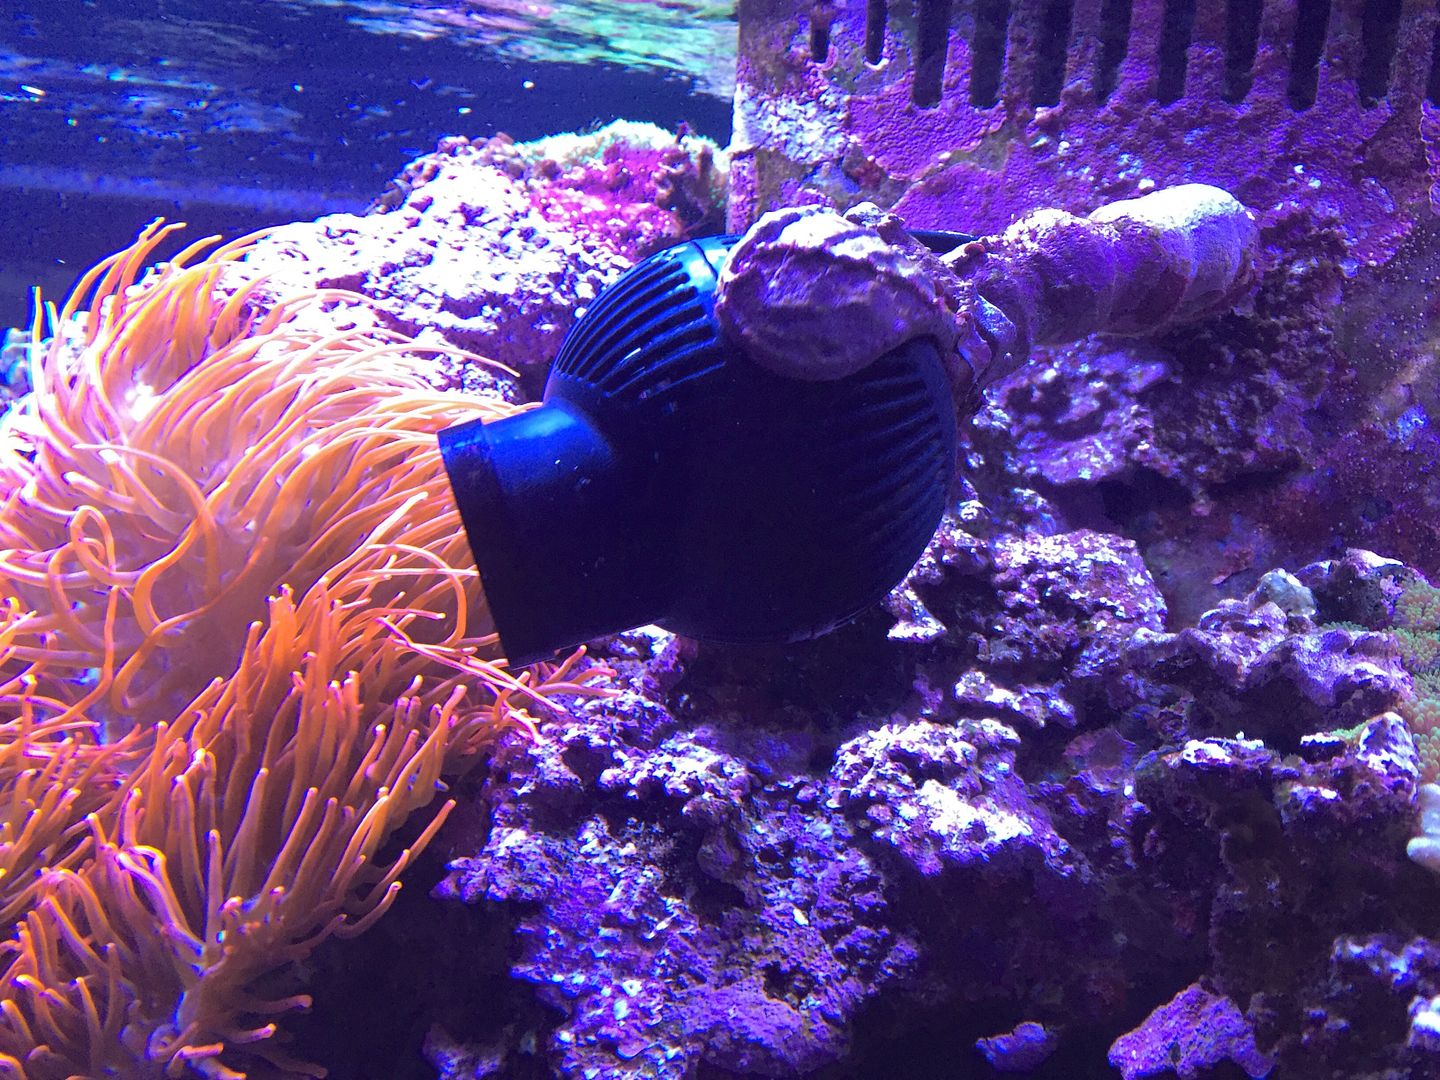
This was covered way back in this thread but here is a recap. Many years back I had several closed loop pumps on my system that I removed in favor power heads. Before I had Tunze's I had Koralia's mounted in the same locations via the same method.
I made some custom PVC mounts and mounted the Tunze silent clamps to them. When I removed my closed loop pumps, I plugged the lines from the inside of the tank using PVC plugs into the bulkheads as the tank was full and stocked.. I then cut the PVC lines on the back wall of the tank and rotated the remaining PVC upwards so the end of the lines were above the water level. My plan required me to desolder the little Tunze interface boxes from the wires so I could route the wires through the PVC and out the back of the tank. I then soldered the little boxes back onto the Tunze cables. This was 5 years ago and my Tunze's are still kicking butt. On the rare occasion that I need to clean them, I just pull them off their mounts, slide some of the cable through the PVC and soak them in a container with vinegar on top of the tank. Then rinse them and put them back in.
All of these pictures were taken over 5 years ago when I set these pumps up..
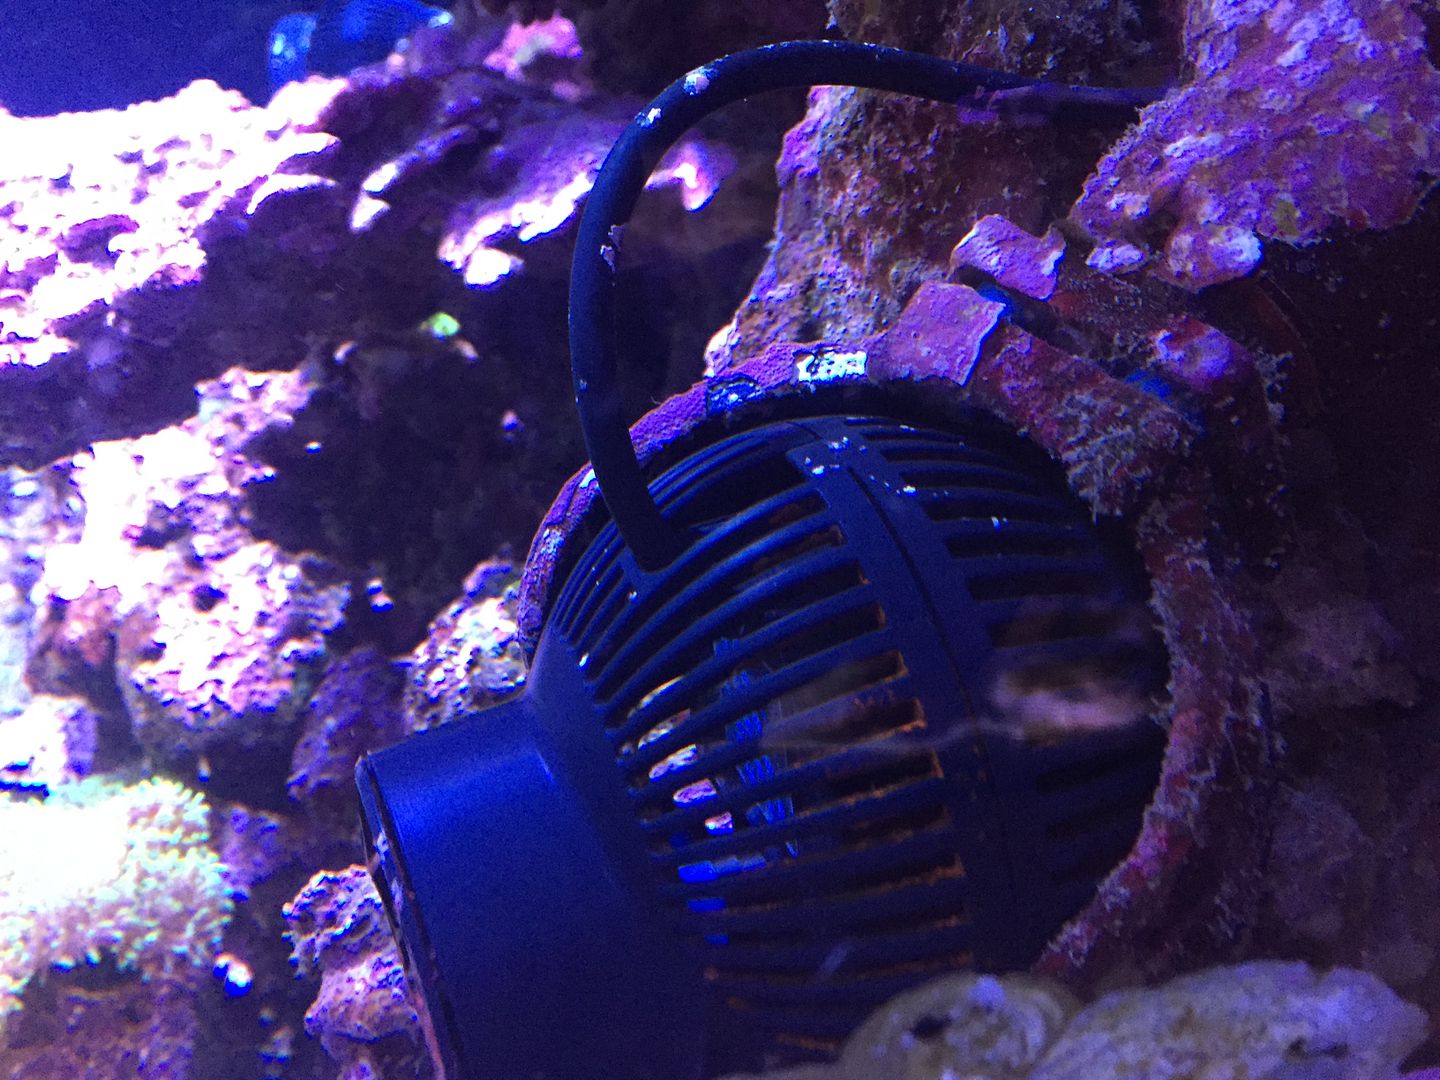
Here are two of the Tunze's that had to be mounted on some PVC extensions so they would clear the live rock that is glued to my back wall. The closed loop lines on this part of the tank were hidden in opening in the live rock. You can see the little control boxes that were de-soldered from the Tunze cables. If you aren't good with a solder iron, I'd advise against this. There are several that need to be desoldered and then resoldered and they are all in close proximity. It will also void the warranty.

Here they are mounted to the back wall.


I even mounted one to lockline on my overflow as you noted above.

This is how the lines come out the back of the tank through the orignal closed loop plumbing.

Last edited:
scubadan206
Member
Told you Scott. You need to do a (how-to) video. Get Jim to help. His new Tank Tech series.
Daniel.")
Daniel.
Similar threads
- Replies
- 3
- Views
- 254
- Replies
- 2
- Views
- 237
- Replies
- 2
- Views
- 455