Need help with an older setup given to us

Dweezilz

New member
Hello. This is my first post (2nd technically but one last week never showed up for some reason). My neighbor gave us the following setup about 10 years ago. It sat in the basement since then and now my 14 year old really wants to build a fish only tank (to start). I'm going to probably use dry rock or possibly 'Life Rock'. I've never done any saltwater tanks besides my super simple Opae Ula tank. Here is what we have:

Berlin Red Sea XL - no pump, no plumbing/tubes
wet/dry - no plumbing/tubes/pumps
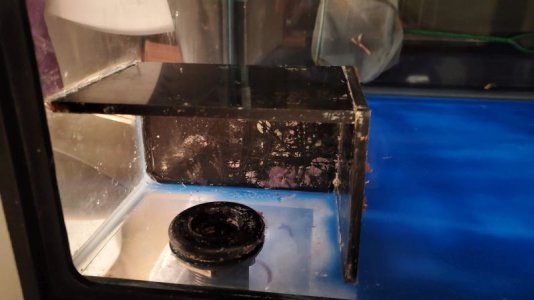
75 gallon aquarium (48x18x24) with two in-tank overflows (4x4x5) on the back right/left
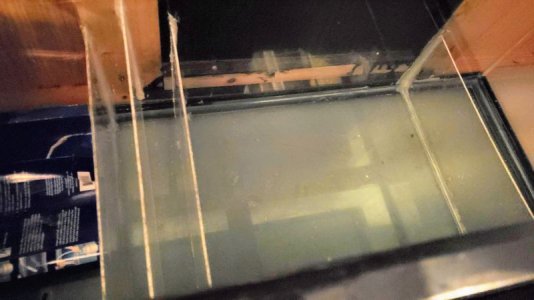
Sump 30 gallon (36x12x16) - divided areas are: 12" then bubble trap 8"/7"/8", then 16" then 5.5" divider, 6"

We have no other pumps at all as of now. I'm planning on not using the wet/dry at there is no room for it at all unless I build some sort of enclosure for it.

I've been reading and watching every video I can about everything. I think we probably should start more simple since we have never done it before but we have these items and if they are still serviceable, maybe it makes sense to start medium-easy.

My worries are as follows:

Overflows have only 1 drilled hole each and the boxes are small. I can't see how we can use any of the 3 preferred methods. They do not have any protection on top to stop fish/snails from falling in. I don't want to or feel comfortable drilling more holes in the tank.

Overflow Options: Use these in-tank built in boxes and diy some sort of protection for fish/snails if they are actually big enough. I could also try to cut the silicone, take them out, and purchase bigger ones if needed (that can't be too hard right?). I'm assuming the tank worked previously with the sump but I want the overflows to also be safe and not cause a flood.

Protein Skimmer - It's too big to fit in the sump under the tank (is it external anyway?) and for now, I'm not going to run lines to the basement to keep it down there. I could keep it next to the tank if it would perform as well as a new one but I'm guessing it wouldn't. I'd also have to buy a pump for it and have no clue which to get. If need be, I'd just buy a new in-sump skimmer.

Sump Tank - I'd like to build a refugium but the dividers seem very short to me, especially the last one before the return area. The return area being only 6" doesn't seem that big of a problem but that divider does. Not sure what to do there. I'd hope the first 12" area is ok for the sump if I was to buy a new one.


So these are my first items I'm worried about based only on the info I've watched and read over the last month. Thanks for any help you all can provide!!
 

Attachments

  • overflow1.jpg
    overflow1.jpg
    67.7 KB · Views: 1
  • sump.jpg
    sump.jpg
    53.7 KB · Views: 3
The sump looks huge if we are to compare it to the tank, no want of room. That pair of boxes with 'teeth' is not a skimmer. I'm not that sure what it is.
The downflow boxes should work, though small. The intake is shorter than the rim. The plumbing is a little antique, but looks sound, and a hose should connect to the sump's closed intake area. Just don't get fish that can go through the teeth of the intake.
When you set up with a pump make sure to install a gate valve (ask the hardware) in PVC in the 'up' hose, none in the 'down' hoses. This will let you rein back the power of your pump if it is filling faster than the downflow boxes can handle. You will need a skimmer in the middle chamber of your sump. A refugium would be nice, but not necessary. If your pump will not fit the last chamber of your sump, consider an exterior mount with a bulkhead connector. Has to be a pump both ok with salt water and able to cool itself without the water around it. You have to drill for it it, and seat a bulkhead connector, which your fish store is more apt to have than your hardware. They're not that high-sales an item.

I am mortally confused about that clear box that seems to have part of the plumbing in it. More pix might help. So would a ruler for scale.

Yeah, I definitely know the box with the teeth is not the skimmer. :hmm5: That is just an extra overflow he said he never used. I tried to edit the post to reflect that info but couldn't see how to edit. There is only one of those by the way, it's the inside part and outside part of a hang on back overflow, which I def won't be using. That clear box is the wet/dry. The box on the right was simply inside the other one when he gave it to me. He said he didn't use the wet/dry either after he got the sump tank. See new photo.
 

Attachments

  • 20200713_213254.jpg
    20200713_213254.jpg
    90.6 KB · Views: 2
By the way, I thought that was a smiley face, not a goofy face and now I can't edit my posts. ha!! Sorry about that one.
 
I also wanted to clarify that the sump isn't the wet/dry with the plumbing on it. It's a 30g tank shown in my 3rd photo. If I put a protein skimmer in the middle section of the 30g tank, that means the return would have to be the 2nd biggest 12" area on the left since the bubble trap is right after/before that 12" section. So then, I'd have an initial 6" area for the intake from the overflows which would seem very small and useless. I was thinking the protein skimmer in the 12", refugium in the 16" and return in the 6" areas but that short 5.5" divider to the 6" area is troublesome. That is just what I was thinking given the conundrum with the short divider and the bubble trap location. Otherwise, def can't have a refugium unless it's in that 6" area and that becomes the intake. Doesn't seem like that would be good, but admittedly I don't know given my newbie status! ha!
 
My sump inflow chamber is 3" wide, with a perforated slit to let water pass; the next chamber holds the skimmer and a rock pile, about a foot and some wide, then a 1.5" low wall faced with an
upside down wall that admits flow into the return chamber, about 8" wide. The over-under flow at the last keeps stray fishes out of the return pump intake. Or generally does. I've had a few get past it. It will also prevent moss from a refugium getting into the pump.

You could actually use that weird box thingie as a submersible refugium chamber. Or stick a new wall in to keep moss out of the skimmer intake. I do recommend a submerged skimmer, one that produces something like whipped cream froth, more than just bubbles. Mine is an Eshopps sump and Eshopps skimmer. The skimmer is one of the most important items in the whole system, so do not skimp on it. The good news is that used ones are often perfectly good: people size-upward when getting a new tank and sell off the old skimmer.
 
Thanks. I will look for a used one if possible on eBay or FB. Part of the problem I'm seeing with this sump tank are the dividers. Since recommended water depth for the protein skimmers are 7-9" it would be impossible with that 5.5" divider if I use the middle section. Plus the bubble trap is on the left side so I wouldn't be able to use all 3 chambers since water would flow towards the 5.5" wall and also skip the bubble trap.

I think the way these walls are setup, it has to go from 12" area first (over the 8" trap) to the 16" middle area (and over the now 5.5" wall) to the 6" area as the return. I'd probably have to remove that 5.5" divider before the return and put a 7.5" divider if I wanted to use the middle section for at least rubble and some blocks if not a full refugium. The skimmer seems to have to go in that 1st section that's 12" wide. Does that seem like it would work? Seems so as long as 8" high is good enough for a skimmer.
 
The overflow boxes are set to slightly lower than the water level to skim the surface water.
The box with the teeth is part of an overflow setup & not needed. The return water will have to come back over the top of the tank. A basement sump means a pump capable of pushing water up about 13', this is called head pressure. Pumps usually have a chart for this so you can see what you would need. It also means more water in the pipes that will have to drain into the sump on shut downs. Sumps usually run about 1/2 full to allow for this. You will need a auto top off device to replace evaporation that will only show in the return section of the sump.

I won't be doing a long basement return. Just from the sump tank which is stored under the main aquarium in the stand. I also wasn't planning for an auto topoff at first because we want to see how things go and start simple. We will have to do manual top offs.
 
A 75 gallon tank can evaporate a gallon and a half a day, and should. When planning your tank, you need to have a clever place to put not only your sump, but your autotopoff reservoir of, for this size tank, 10-20 gallons. An adjacent barrel end table can hide it, and give you a bit more room for your gear, but that autotopoff is pretty well sanity-saving, and among first items to get. All it does is use a float switch to tell when your sump has sunk a gallon or so, which turns on the pump which delivers a gallon of water to the sump, simple on-off, either power flows or it doesn't depending on that float switch. JBS makes a simple one, no controller, no array of readouts and switches, no connection to any other equipment. It just sits there in secret turning the pump on and off.
 
OK so I don't know how I messed that up but-- the principle remains the same.
There are no pictures of the skimmer for recommendations. Instead of in the basement (so that's where I saw it) but it can be used next to the tank if too big for the sump.
 
If an auto topoff is pretty much required for a 75g tank I'm probably going to have to keep the tank in our finished basement not in the familyroom. This thing is gonna end up being really expensive! I was hoping to do it on the cheaper side (say under $700) and then build up. It might be far cheaper to scrap the 75g tank for now and get a 30 or 40g starter kit to try things out.
 
You can get an 80 gallon reef ready aquarium for about 800.00 plus a good Eshopps sump for 300. New. Doesn't include the stand. ROugh prices, but fairly accurate. You need rock, which costs. A pump, which will last for years. Aragonite sand, not too pricey.

What I did: put two 1" holes through the floor to the basement. (Could have gone through the wall at baseboard level and right turn downward, but the floor was easier; and if you have to sell the house, an easy repair, especially if you've gone down via the wallboard. This lets me put the sump with all its mess into the basement. Only hoses emerge to and from the tank in the living room. This also means all possible watery mistakes are confined to the basement, where there is a floor drain. Every technical problem is solved in the basement. It *is* a pretty easy alteration to make if the upstairs and the basement align in a useable fashion. You just have to know where the hoses are going to be.

Your sump can be nudged into working order, so that's 300.00 saved. The tank itself is a little more problematic, and an old tank should also be tested for leaks, because seams can get stiff. Let it sit fully watered with 80 degree water for a week or so, to be sure. If you should decide to do a basement sump and topside tank, it's a real easy DIY with a 1.5" hole bit. You do need a stronger pump because of the height it has to drive.

NOt saying you can't do it all abovestairs. That topoff reservoir can be concealed in a side table, a wicker basket, or whatever. That frees the stand to hold the sump. We don't mean to be discouraging, here, just to work with you to end up with a system that can use the stuff you have but that will give you some modern advantages.

As an off the wall choice, there are also what you call all-in-ones for as little as 300-500 dollars, a much more compact and smaller tank, where skimmer and other gear has been miniaturized AND included within the price, and which work quite nicely as a place for fish whose adult size is 3" or less. Clowns and anemones. Small corals like zoas and mushrooms. Gobies, blennies, all fairly easy-care and personable fishes. Everything in one item. Some of our sponsors sell them.
 
Those are definitely some good options. I'm going to make a spreadsheet with costs and requirements and see where we are at. The spot upstairs where the tank would go is right above my basement closet where my home theater wall rig is. Haha. That would stink to leak into that! I suppose the sump tank could sit in that basement closet along with a top off reserve container of some sort. It's not near a convenient water source so we would have to fill it via a hose somehow from an RODI. Doable but some work for sure. If the tank leaks then it's a moot point. I saw an sc aquarium all in one with a protein skimmer, all pumps, small sump for $745 which looked pretty cool and got pretty good reviews. Might be an option if the tank is a no go. I'll look at others too.
 
You choose the system and we will help you make it work. Getting a system to get the water right is step one: getting it right and cycled is step 2; getting an ecosystem set up is three, and choosing a group of fishes and corals is step 4. After that, it can be smooth running if all the steps were done right.
 
The folks telling you to get an auto top off are spot on & have vast exp. My 20 gal nano reef tank uses almost a cup of top off a day & it has a 2-pc glass lid otherwise the evap would be much worse with my hot T5HO lighting. Im even running a fan now blowing across the lighting to keep tank temps stable at 78.
I didn't notice any mention on lighting but if fish only does not matter only for most types of coraline algae & corals is special spectrums needed if your even pondering lighting at the moment.
 
Other considerations: you will need a ro/di filter (4 cylinder is good) to produce water for the tank. Forgot that item. It strips absolutely everything from the water but the H's and the O's.
 
How I handle vacations and such, btw: you cannot live tethered to your tank. I fill a Rubbermaid Brute trashcan (safe re chemical emissions) with ro/di water, connected to an autotopoff unit, set the autofeeder (fishfood) going twice a day, and I can be gone for 3-4 weeks with no worry, thanks to friends who will check just in case. One really, really long trip, I had two big barrels, and a friend simply moved the autotopoff to the next barrel. Not great living room decor: the reservoirs normally live in the basement.
 
Thanks for the help everyone. We have a busy week with some other things so I'll pop back in here in a week or two once I have an idea of what we should do. Leaning towards a smaller starter AIO for now to see if my son likes it. Just seems like a bad idea to take antiquated equipment and spend $2000 to get it up and running as rookies who just want to see if we like doing it. Once I get my spreadsheet I'll have a better idea of costs but I'm guessing close to $2k if we did it the right way. If we get a small AIO it would be half the cost probably. If there is a particular AIO under $1000 you'd recommend let me know.
 
Back
Top