Photo of the day (one image per post)

Macro lenses are great because they are sharp, but it takes a lot of practice to nail focus with them many times because you generally want to use them manually. If you have any questions when you do get it, let us know :)

Thanks, will do. :)

I always manually focus with my 18-55mm lens, and while my photography isn't the sharpest I feel like for the lens I do okay. I also need to stop being lazy and break out the tripod. :p
 
Light Up Night was last night here in Da'Burgh. My daughter and I headed dawntawn N@ to take some pictures of the festivities.

Light%20Up%20Night%202015a.jpg
 
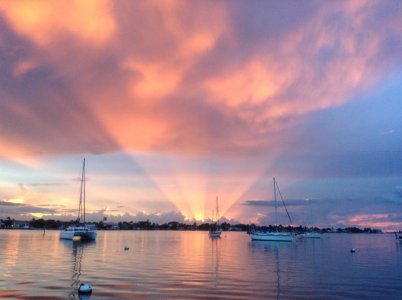
Fiery sunset

Fiery sunset

The evening sky on the water in Stuart FL, taken with an iPad mini.
 

Attachments

  • image.jpg
    image.jpg
    42.6 KB · Views: 0
Took a shot of my puppy this morning...what a pain just getting her to sit and stay :hmm4:

Yuki12.jpg

Beautiful pooch and nice background! TFS

Quick question, is your background layer, the one with a gradient come in from each corner on a separate layer or is it one whole layer? I only ask because I am not sure if the top left corner is a gradient coming in to the actual photo, or if the actual photo had a slight vignette there or if there was a darker element at the point in the frame.
 
Quick question, is your background layer, the one with a gradient come in from each corner on a separate layer or is it one whole layer? I only ask because I am not sure if the top left corner is a gradient coming in to the actual photo, or if the actual photo had a slight vignette there or if there was a darker element at the point in the frame.

So - I run these through CS6...once I get all my edits and watermark, here's what I do...

I first unlock the picture, then I stretch the canvas size - in my case, I use 105 and 108 percent.

I then use the magic wand to highlight the stretched canvas (just the area between the pic and the new edge), isolate the picture (ctrl-i), separate the background (ctrl-j) and paint the background white, which is the background color in my palet, and use ctrl-backspace to paint it all at once.

From there, i drop shadow and bezel the photo.

Now - for your specific question - I drop the curves on the entire picture to make it darker...which hits both the background and the photo itself. Then, I use the very wide paint brush on black to lighten an oval in the picture/background to give it that affect.

To me, it makes it look like a light is hitting the entire photo. Hope you like it :)
 
Joey those night shots rock. What camera is that? HDR? The sharpness, color and overall exposure are top notch.
 
So - I run these through CS6...once I get all my edits and watermark, here's what I do...

I first unlock the picture, then I stretch the canvas size - in my case, I use 105 and 108 percent.

I then use the magic wand to highlight the stretched canvas (just the area between the pic and the new edge), isolate the picture (ctrl-i), separate the background (ctrl-j) and paint the background white, which is the background color in my palet, and use ctrl-backspace to paint it all at once.

From there, i drop shadow and bezel the photo.

Now - for your specific question - I drop the curves on the entire picture to make it darker...which hits both the background and the photo itself. Then, I use the very wide paint brush on black to lighten an oval in the picture/background to give it that affect.

To me, it makes it look like a light is hitting the entire photo. Hope you like it :)

Thanks for the explanation. I used to do something similar with my borders but after a while I got tired of doing it. So, I tried applying it as a rule through CS6 scripts I believe. It works so long as you keep the original aspect ratio, or you can account for it in specific profiles. Either way, after a while, I just stopped creating borders for one reason or another.
Eye in the Sky by Ricardo Vasquez, on Flickr
Notice how large the white border is. I wouldn't do that now, it just distracts so much from this particular picture. If I could do it again I would slim down the border and keep everything else the same.
 
Joey those night shots rock. What camera is that? HDR? The sharpness, color and overall exposure are top notch.

Thanks - I have 2 camera's that I use...one's a Nikon D90, the other is a Nikon D7100. I know...essentially they are the same camera, but it makes it easier for taking multiple lenses with me. Also, my daughter's been going a bit, so she's been using the new one.

While I've done it plenty in the past, neither of these are HDR...just long exposure. I appreciate the comments :)
 
Thanks for the explanation. I used to do something similar with my borders but after a while I got tired of doing it. So, I tried applying it as a rule through CS6 scripts I believe. It works so long as you keep the original aspect ratio, or you can account for it in specific profiles. Either way, after a while, I just stopped creating borders for one reason or another.

No problem.

I tossed mine in a script - but not all aspects of it works through it...some of it I still need to do manually. I'll roll with this for a while, but will probably change to something else once I get bored with it (much like my watermark).
 
Lots of great shots here! I thought I might start contributing as well.

 
Last edited by a moderator:
Made my first attempt at astro last night around 9:00PM Eldorado Canyon Colorado.

 
Last edited by a moderator:
Back
Top