You are using an out of date browser. It may not display this or other websites correctly.
You should upgrade or use an alternative browser.
You should upgrade or use an alternative browser.
Profilux 3EX-My Review and Set Up Guide
- Thread starter this is me
- Start date
this is me
Active member
The alarm will tell you what caused it.
Bu if you want to see the status of the level in your email then just change the code. In your case, change the ILL to LEV in the illimation code line.
Bu if you want to see the status of the level in your email then just change the code. In your case, change the ILL to LEV in the illimation code line.
doggydoc
New member
Here is what I was using:
$$ALMS$$
P
$$REPS[32][00]$$ $$SENN[xx]$$ - $$SENV[xx]$$
$$REPE$$
I
$$REPS[32][01]$$ $$LEV[xx]$$ - $$LEV[xx]$$
$$REPE$$
S
$$REPS[32][02]$$ $$SWIN[xx]$$ - $$SWIS[xx]$$ [$$SWIC[xx]$$]
$$REPE$$
L
$$LEVN[0]$
Like this one????
Thanks guys.
Always at sea;
Doggydoc
this is me
Active member
Someone has asked me if there's a way to add a "safety" for dosing. I pondered about this and came up with this solution and currently running it.
Although the dosing program on the Profilux is very accurate, there's no extra safety feature to prevent the pump from dosing. This can be a disaster to our tank if for some reason, the pump keeps pumping additive to our tank.
My solution is using the conductivity probe to tell the pumps to stop if the max allowed conductivity level has been reached. This caused an alarm, the pump stops, and email sent to your mobile device(if you have it set up).
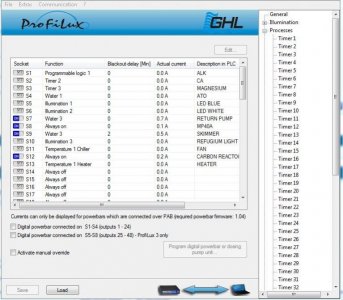
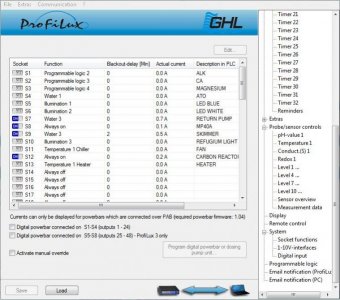
First of all, let's start with my before socket function. As you can see, I have my S1-S4 for dosing and ATO. S1(ALK) use two timers combined in one gate. The rest of the dosers are just one timers.

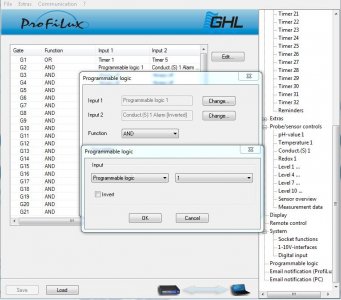
This is my Programmable logic showing the timer1 and timer 5 OR together for ALK

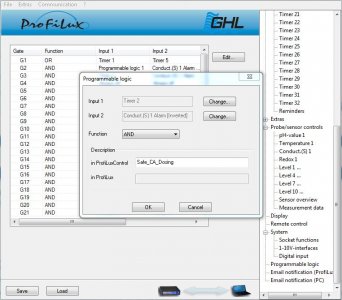
To do the safe dosing method, you will have to AND the timer with the conductivity alarm inverted. I've used a gate for timer1 and timer5, so I have to AND that gate(1) with the alarm.

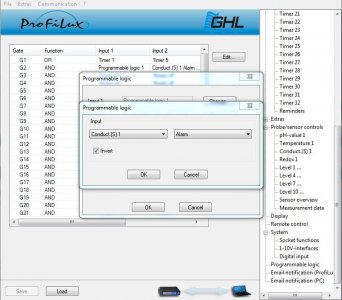
Do not forget to invert your alarm. You want the pump to work when there's no alarm.

Although the dosing program on the Profilux is very accurate, there's no extra safety feature to prevent the pump from dosing. This can be a disaster to our tank if for some reason, the pump keeps pumping additive to our tank.
My solution is using the conductivity probe to tell the pumps to stop if the max allowed conductivity level has been reached. This caused an alarm, the pump stops, and email sent to your mobile device(if you have it set up).
First of all, let's start with my before socket function. As you can see, I have my S1-S4 for dosing and ATO. S1(ALK) use two timers combined in one gate. The rest of the dosers are just one timers.
This is my Programmable logic showing the timer1 and timer 5 OR together for ALK
To do the safe dosing method, you will have to AND the timer with the conductivity alarm inverted. I've used a gate for timer1 and timer5, so I have to AND that gate(1) with the alarm.
Do not forget to invert your alarm. You want the pump to work when there's no alarm.
Attachments
Last edited:
this is me
Active member
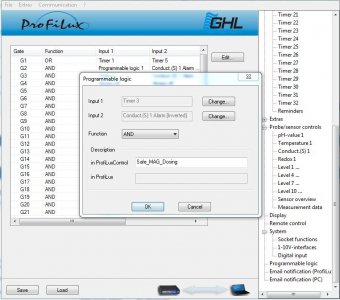
Do the same for calcium

The same for magnesium

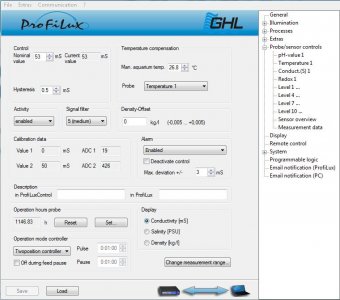
And make sure your Alarm in the Conductivity is enabled. Otherwise, this is useless!

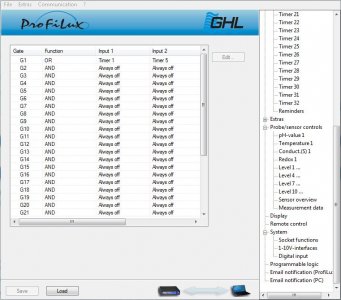
Assign your socket to the appropriate gate. Like I said before, Profilux controllers are really flexible and almost limitless with the use of programmable logic. I think eventually all of my socket will be using gates instead of the function.

The same for magnesium
And make sure your Alarm in the Conductivity is enabled. Otherwise, this is useless!
Assign your socket to the appropriate gate. Like I said before, Profilux controllers are really flexible and almost limitless with the use of programmable logic. I think eventually all of my socket will be using gates instead of the function.
Attachments
GatorPharmD
New member
This thread is just perfect for a newbie like me. This is where I am today - a lot to learn.


GatorPharmD
New member
Nick, I have an optical sensor to set up my ATO and a second optical sensor to place in the display for overflow peace of mind. I have two questions:
1. Should I buy a float sensor for extra security during ATO. I know the pump will shut off in a time dependent fashion, and this may be the only extra security needed.
2. For the display sensor, I have an optical one. Is there a particular reason why you are using float instead of optical?
Thank you.
this is me
Active member
Hey Tony,
I think what you have is fine. There's plenty of security in your set up with the max time shut off of the ATO pump. I don't think you need the second sensor. I bought an extra float sensor for future to do an automatic water change.
I went with the float for my leakage detection because it's cheap. And the mounting of the float is cleaner than the optical. The float can be mount vertically and it's small so it's not an eye sore. The optical is recomended to be mounted horizontally. If you have this, you should know.
After I get my PS black python next week, I will take pictures of my set up.
GatorPharmD
New member
Thank you Nick.
AQD_ottawa
New member
Tony, Big word of cautionary advise, never put a doser ontop of a controller, A doser has water running through it and unions on the front.............. drip drip ")
My ALK line blew off once due to me not bothering to clean the build up off the outlet, this caused back pressure (shows how strong the GHL motors are) and blew the peri tubing union apart. if the controller was below it I would be sending my controller into myself for repair
My ALK line blew off once due to me not bothering to clean the build up off the outlet, this caused back pressure (shows how strong the GHL motors are) and blew the peri tubing union apart. if the controller was below it I would be sending my controller into myself for repair
GatorPharmD
New member
Thank you for the advice. I am planning to put the doser under the P3 or even next to it, I just need to modify the shelf and remove the lip so I can bring the doser close to the edge.
GatorPharmD
New member
Nick, can't wait to see those photos!
this is me
Active member
Tony,
I was waiting for my Pacific Sun Light to come in. It came in last night and I got it hung over the tank and set up. Will have some update tonight.
I was waiting for my Pacific Sun Light to come in. It came in last night and I got it hung over the tank and set up. Will have some update tonight.
this is me
Active member
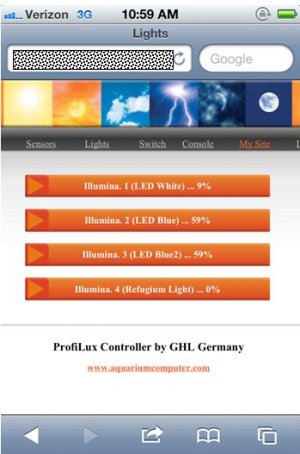
Here's a teaser.
I can only get a snap shot of what's my new light is currently doing at home on my phone. But the fact that I can see the individual channels gradually ramping up and down is awesome!
Tonight, I'll post some update on why the profilux really shines when it comes to dimmable LEDs.
We are still in the dawn period.")

I can only get a snap shot of what's my new light is currently doing at home on my phone. But the fact that I can see the individual channels gradually ramping up and down is awesome!
Tonight, I'll post some update on why the profilux really shines when it comes to dimmable LEDs.
We are still in the dawn period.
Attachments
AQD_ottawa
New member
Great news you got it Nick, you will love the GHL Pacific sun combo. My tank looks awesome with my Black Python.
this is me
Active member
Here's some pictures of my hardware set up. I skipped a bunch of stuff because I don't think you want to see every connection made.
My P3 is sitting on my desk away from any moisture and potential water splash.

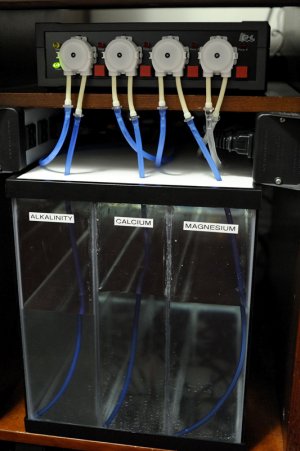
The doser set up with the powerbar hiding under the shelf. I made a 3 chambers 2-part solution storage out of a 10 gallon tank.

2-level ATO in the sump.

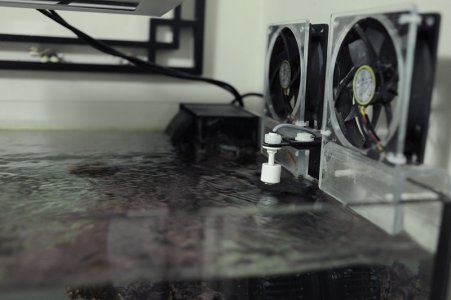
Float in main tank for tank overflow detection.

My P3 is sitting on my desk away from any moisture and potential water splash.
The doser set up with the powerbar hiding under the shelf. I made a 3 chambers 2-part solution storage out of a 10 gallon tank.
2-level ATO in the sump.
Float in main tank for tank overflow detection.
Attachments


this is me
Active member
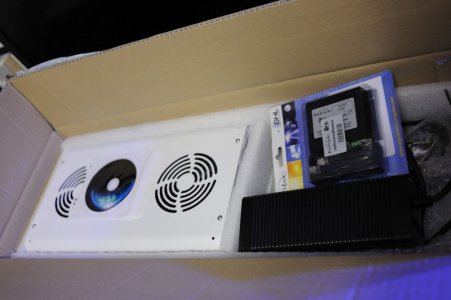
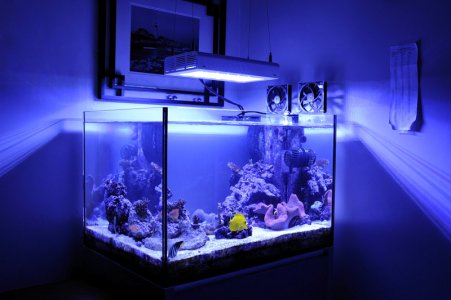
New light arrived yesterday.
White Python XM, GHL LED Control 4 Passive
GHL to Python cable
Python Hanging kit

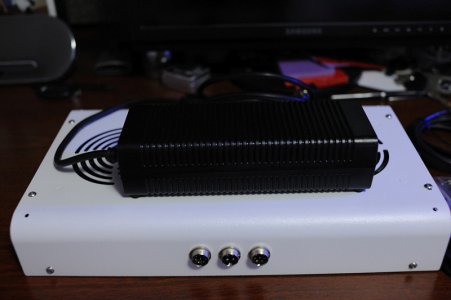
Power supply is quite small. Just a little bigger than my Lenovo laptop charger.

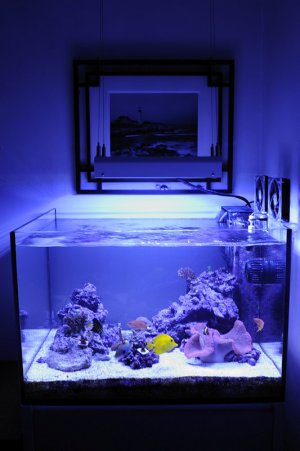
1st day on the tank. Not sure what setting the channels. I have more info later. All I know is the white channel is turned way down to avoid the burn on the corals. It's a very bright fixture.


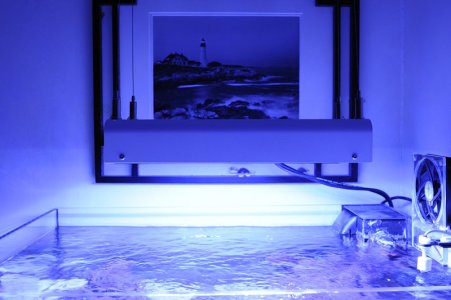
Close up of the fixture. My first impression is that it's very well built. There's a good coating on the fixture. It hangs clean!
Sorry, I don't have much to say. I'm still in the early stage of running this light with the GHL. Give me sometime to set it up and understand it. But so far, I'm very very happy with this combo. Probably the happiest stage in my reefing years. Now I just have to figure out how to keep corals.
Sometime I think I'm in this hobby just for the gadgets.

White Python XM, GHL LED Control 4 Passive
GHL to Python cable
Python Hanging kit
Power supply is quite small. Just a little bigger than my Lenovo laptop charger.
1st day on the tank. Not sure what setting the channels. I have more info later. All I know is the white channel is turned way down to avoid the burn on the corals. It's a very bright fixture.
Close up of the fixture. My first impression is that it's very well built. There's a good coating on the fixture. It hangs clean!
Sorry, I don't have much to say. I'm still in the early stage of running this light with the GHL. Give me sometime to set it up and understand it. But so far, I'm very very happy with this combo. Probably the happiest stage in my reefing years. Now I just have to figure out how to keep corals.
Sometime I think I'm in this hobby just for the gadgets.
Attachments
Last edited:
GatorPharmD
New member
Nick, great set up and great photos. Thanks for sharing. The gadgets play a significant role, hehehe.
Similar threads
- Replies
- 3
- Views
- 285