You are using an out of date browser. It may not display this or other websites correctly.
You should upgrade or use an alternative browser.
You should upgrade or use an alternative browser.
Profilux 3EX-My Review and Set Up Guide
- Thread starter this is me
- Start date
this is me
Active member
It's been a week that I have this set up running. Here's my impression and set up.
First of all, the connection set up between the black python and the profilux is easy and simple via the profilux PMW module(LED Control 4PAssive). Just follow the direction on the pacific sun site.
http://pacific-sun.eu/index.php?option=com_content&view=article&id=78&Itemid=78
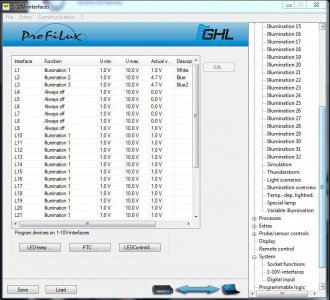
One thing to note here is the LED channels and the port on the Profilux.
L1 "“ white channel
L2 "“ blue channel
L3 "“ moonlight channel
L4 "“ not used in BP/Metis lamps
Profilux offers a great deal of controllability and features on LED lighting. I especially like the ramping up and down of the light with the PMW signal. It can ramp up or down 1% at a time so that the light don't take a hard step of increasing or decreasing. This, I find, is essential to simulate the light found in nature.
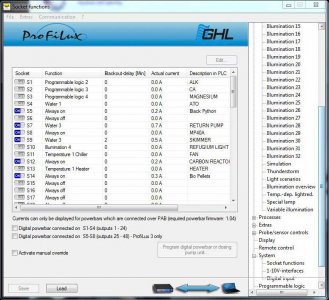
After the light has been correctly hooked up to the profilux, go to socket and edit the function if you have it plug to the powerbar. You can plug the power cord in any outlet if you want to save a socket in the powerbar for something.
Since the LED will be control via the 1-10V port, the function of the light fixtures will have to be always on.

Next edit the 1-10V port to the illumination you'll be using. Notice you can actually see the current voltage at that port. Since my lights are still running its dust period, the two blues have a voltage on them. This can serve as a troubleshoot if you are having trouble turning on your lights.

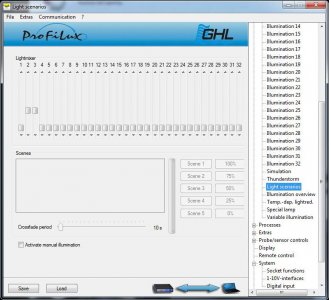
This is a neat feature in the Profilux. The lighting scenerio allows you to find your best color by manual mixing the channels color. Make sure "activate manual" is on and you can dial each channel til you find the color you want. Right down the combination.

First of all, the connection set up between the black python and the profilux is easy and simple via the profilux PMW module(LED Control 4PAssive). Just follow the direction on the pacific sun site.
http://pacific-sun.eu/index.php?option=com_content&view=article&id=78&Itemid=78
One thing to note here is the LED channels and the port on the Profilux.
L1 "“ white channel
L2 "“ blue channel
L3 "“ moonlight channel
L4 "“ not used in BP/Metis lamps
Profilux offers a great deal of controllability and features on LED lighting. I especially like the ramping up and down of the light with the PMW signal. It can ramp up or down 1% at a time so that the light don't take a hard step of increasing or decreasing. This, I find, is essential to simulate the light found in nature.
After the light has been correctly hooked up to the profilux, go to socket and edit the function if you have it plug to the powerbar. You can plug the power cord in any outlet if you want to save a socket in the powerbar for something.
Since the LED will be control via the 1-10V port, the function of the light fixtures will have to be always on.

Next edit the 1-10V port to the illumination you'll be using. Notice you can actually see the current voltage at that port. Since my lights are still running its dust period, the two blues have a voltage on them. This can serve as a troubleshoot if you are having trouble turning on your lights.

This is a neat feature in the Profilux. The lighting scenerio allows you to find your best color by manual mixing the channels color. Make sure "activate manual" is on and you can dial each channel til you find the color you want. Right down the combination.

Attachments
this is me
Active member
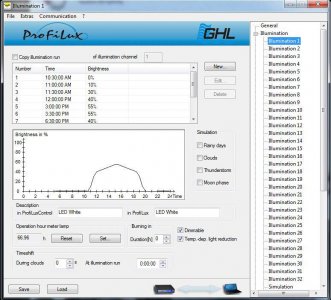
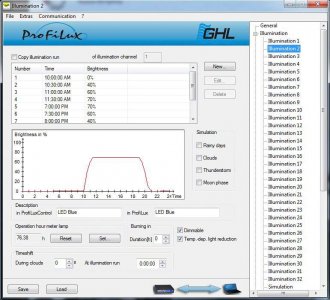
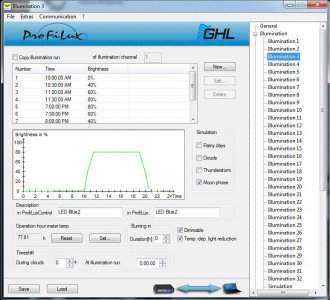
Now go to your illumation and set each channel light to be on or off at what time and the power of the light.
This is my channel 1 which is the XM white. Very very powerful LED. I only dare to go up to 55% and only for half hour.
It ramps up at 10:30AM from 0% to 10%. Then at 11AM, it takes a quick up from 10% to 30%. Another 10% ramp for the next half hour. And then for the max ramp of 55% and stay for 30minutes. This is my high noon light. From then, it ramps down.

Channel 2 is my blue. It ramps up and stays at 70% for quite awhile.

The same for channel 3. Notice the moon phase is checked. This channel also served as moonlight. More on this later in the simulation tab. You can also check for "cloud", "rainy days", and "thunderstorm" simulation.

This is my channel 1 which is the XM white. Very very powerful LED. I only dare to go up to 55% and only for half hour.
It ramps up at 10:30AM from 0% to 10%. Then at 11AM, it takes a quick up from 10% to 30%. Another 10% ramp for the next half hour. And then for the max ramp of 55% and stay for 30minutes. This is my high noon light. From then, it ramps down.

Channel 2 is my blue. It ramps up and stays at 70% for quite awhile.

The same for channel 3. Notice the moon phase is checked. This channel also served as moonlight. More on this later in the simulation tab. You can also check for "cloud", "rainy days", and "thunderstorm" simulation.

Attachments
this is me
Active member
Now go to your illumation and set each channel light to be on or off at what time and the power of the light.
This is my channel 1 which is the XM white. Very very powerful LED. I only dare to go up to 55% and only for half hour.
It ramps up at 10:30AM from 0% to 10%. Then at 11AM, it takes a quick ramp up from 10% to 30%. Another 10% ramp for the next half hour. And then for the max ramp of 55% and stay for 30minutes. This is my high noon light. From then, it ramps down.

Channel 2 is my blue. It ramps up and stays at 70% for quite awhile.

The same for channel 3. Notice the moon phase is checked. This channel also served as moonlight. More on this later in the simulation tab. You can also check for "cloud", "rainy days", and "thunderstorm" simulation.

This is my channel 1 which is the XM white. Very very powerful LED. I only dare to go up to 55% and only for half hour.
It ramps up at 10:30AM from 0% to 10%. Then at 11AM, it takes a quick ramp up from 10% to 30%. Another 10% ramp for the next half hour. And then for the max ramp of 55% and stay for 30minutes. This is my high noon light. From then, it ramps down.

Channel 2 is my blue. It ramps up and stays at 70% for quite awhile.

The same for channel 3. Notice the moon phase is checked. This channel also served as moonlight. More on this later in the simulation tab. You can also check for "cloud", "rainy days", and "thunderstorm" simulation.

this is me
Active member
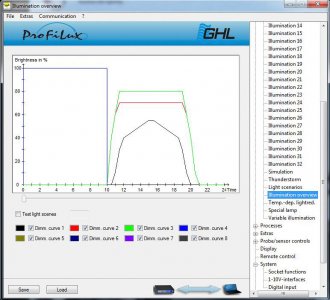
This is another neat feature of the Profilux. You can see what's the light is doing at a certain time. Just click on the test run and slide the bar to the time you want. Great feature!


this is me
Active member
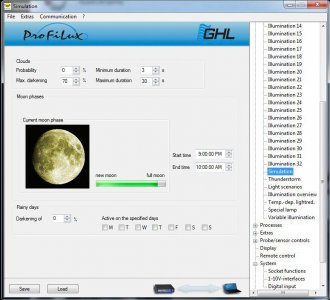
Here, in the simulation tab, you can set your cloudy days probability and the percent of power reduction on the light. What time is your moon rising and falling, and rainy days.

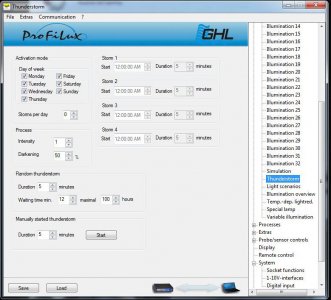
Thunderstorm setting. And manually started thunderstorm. I tested this and it almost blinded my eyes. Very very quick flashes.


Thunderstorm setting. And manually started thunderstorm. I tested this and it almost blinded my eyes. Very very quick flashes.

Attachments
this is me
Active member
That is just some basic setting I'm current running for the 1st week I had it. For the next couple of weeks, I'm gonna look into more powerful simulation using the variable illumation. This is a very powerful feature and will require me to study my tank more carefully before attempting to set variable lighting schedule on my tank.
I'm very happy with this set up and overall it's very to understand and set up. The light on the tank is always changing over the period of the day. It simulate the nature lighting a lot better than an ON or OFF light. My tank is still pretty empty at this point. I just sold the red haddoni and now anemone-free. I now have ~10frags of sps in the tank and 12 more is coming this week. With the stable ALK, CA, and MAG level and the advance lighting set up, I'm hoping to achieve the SPS tank of my dream. Will see how this will go.
Next chapter will be variable illumination.

AQD_ottawa
New member
It is very simple, as with any software you need to familiarise yourself with the flow, but that takes a very short while, its all menu driven and intuitive plus you have Nicks amazing step by step review and our 7 days a week support.
Up until 15th November there is a huge saving on the controller packs also.
Up until 15th November there is a huge saving on the controller packs also.
BigAl2007
Active member
thanks for all the input, I have been considering this or the Apex Neptune. You make it seem so easy, looks pretty difficult to an outsider.
Once you get your mind on the right track is becomes very easy and straight forward. I always tell people to start with something simple like "Lights" and get the basic idea down. That's your foundation then just simply build upon your solid foundation and in no time you'll be having a BLAST!!
reefkeeps
Active member
Nick, thank you that was very helpful, I've resisted the urge to move off the Pacific Sun BlueTooth controller because I was under the impression that it has more variables (steps in the lighting) than the GHL, although I believe GHL is working on a newer version. I do however want the lighting mode, why I don't know, it's just kewl!
I wouldn't be afraid of the power of the XM, I ramp my XMs up starting at noon ramping up over 90 minutes to 100% (450 Watts) and start dropping down at 9PM again for 90 minutes. I'm showing good growth by doing so. I initially started at 60% and raised it 1% a day until I maxed it.
Thanks again Nick for taking the time!
AQD_ottawa
New member
Hi, it can work with any lighting the providing the lighting manufacturer has provided you with for example a 0-10v dimming input.
Yes it can control a calcium reactor in fact there is little it can not control in all seriousness, GHL is probably the most advanced controller on the market worldwide.
The discount right now is approx 20% off MAP on the starter and mega pack.
Yes it can control a calcium reactor in fact there is little it can not control in all seriousness, GHL is probably the most advanced controller on the market worldwide.
The discount right now is approx 20% off MAP on the starter and mega pack.
this is me
Active member
Nick, thank you that was very helpful, I've resisted the urge to move off the Pacific Sun BlueTooth controller because I was under the impression that it has more variables (steps in the lighting) than the GHL, although I believe GHL is working on a newer version. I do however want the lighting mode, why I don't know, it's just kewl!
I wouldn't be afraid of the power of the XM, I ramp my XMs up starting at noon ramping up over 90 minutes to 100% (450 Watts) and start dropping down at 9PM again for 90 minutes. I'm showing good growth by doing so. I initially started at 60% and raised it 1% a day until I maxed it.
Thanks again Nick for taking the time!
No problem. It's fun to set up this controller as I always discover something new.
My tank just transitioned from less than 100W Cree XP-G to 140W XM. I'm already seeing some burnt tips on the SPS. Could be from the high ALK(10dKH) I was running the tank too. With ULNS that I'm running now, a little bit of too much ALK or lighting will caused burnt tips on SPS.
The XM LEDs are the brightest I've seen. Put my old XP-G fixture to shame at just 50% power.
this is me
Active member
Please forgive me if this sounds ignorant: can this work with Acan lighting? Also a calcium reactor? How big is the savings you mentioned? Thanks guys
It can be used with any LED fixture as long as it's have a 1-10V or PMW capable driver. You might have to don some research on your fixture and a little bit of DIY to get it to work.
You mean using the controller to monitor the PH and control the CO2 input of the calcium reactor? If so, this can definitely be done with any controller nowaday.
GatorPharmD
New member
I worked with the level assembly and was able to set up the display optical level in the back of the tank.

Moved it to the front for this photo to show how it looks in reference to the Elos logo. I may move it a bit lower.


Moved it to the front for this photo to show how it looks in reference to the Elos logo. I may move it a bit lower.

GatorPharmD
New member
No, it is just part of the assembly.
Rotknee
Member
Tony thanks for posting the pics. My float level sensor just died and I'm thinking about using an optical sensor this time. The manual doesn't do a good job of helping me to understand how the optical sensor works. So, the sensor is activated when water comes in contact with the black tip of the sensor? Is that correct?
I am hoping to use the optical (vs. the float) for my ATO.
-Rodney
I am hoping to use the optical (vs. the float) for my ATO.
-Rodney
AQD_ottawa
New member
yes this is correct
Similar threads
- Replies
- 3
- Views
- 167

