Sandman's new 100G project w/ new ideas?

sandman450f

Premium Member
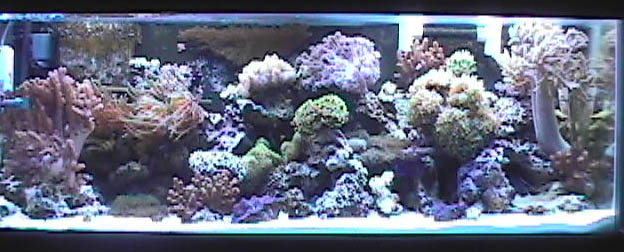
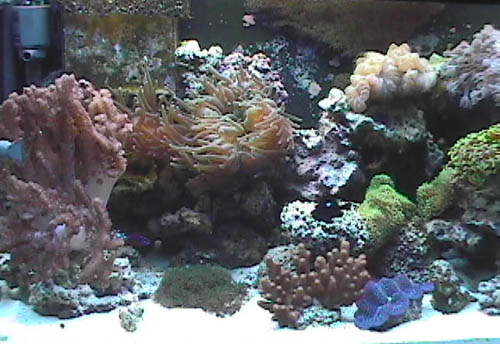
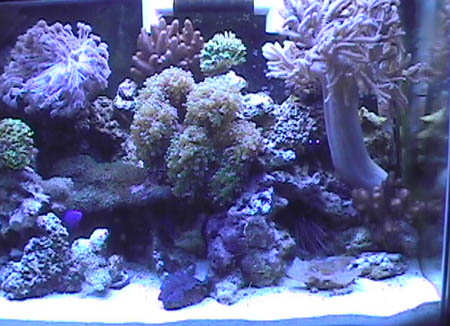
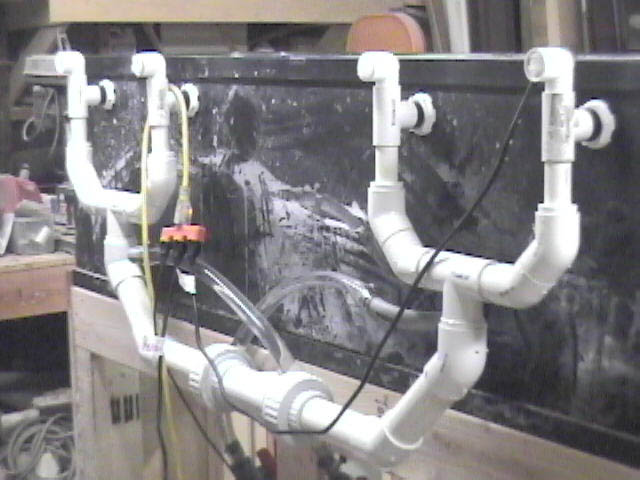
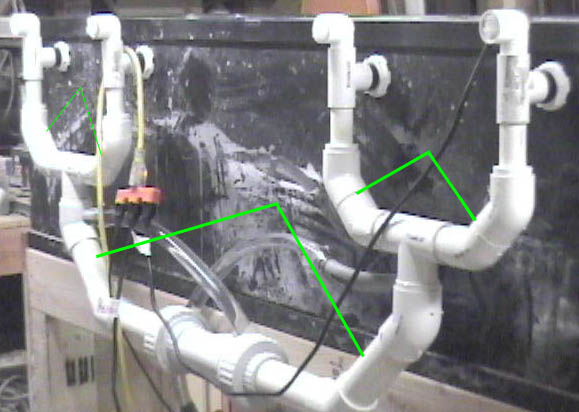
First off, Iv'e been reefin for only abt a year an a half, In that time I have learned more than I ever imagined. Much of it has come here from Reef Central, all of you good members kind enough to take the time to answer questions, and quite a bit has come through trial and error. I'm happy to say ive had great success on my current 60g, albeit pretty easy stock. Ive leaned towards the hardy and less demanding and suffered very few casualties because of it. Here are a couple of pics of my current setup

94549DVC00008.JPG
94549DVC00009.JPG
94549DVC00010.JPG


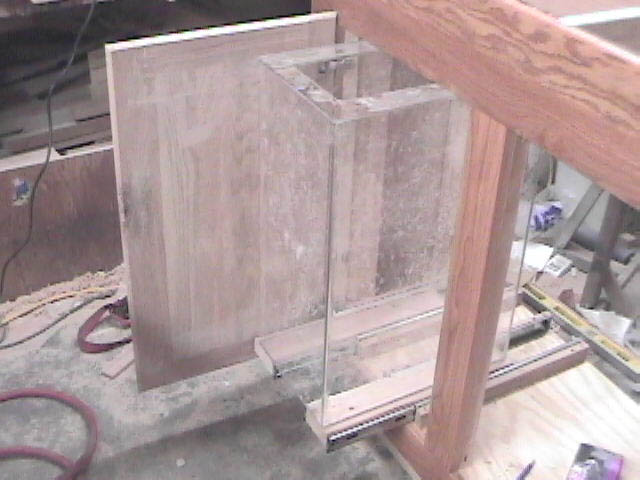
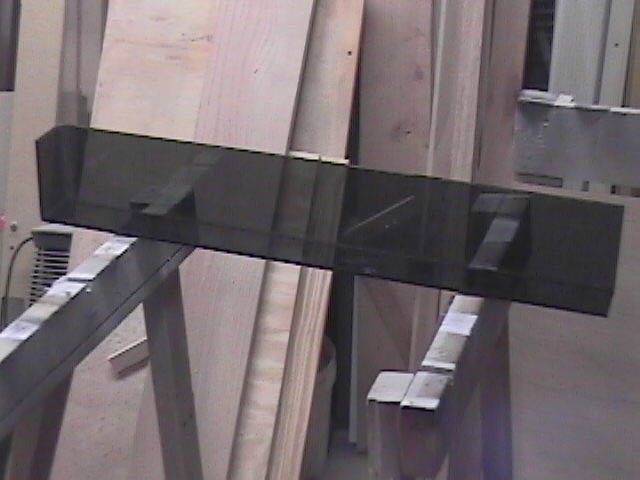
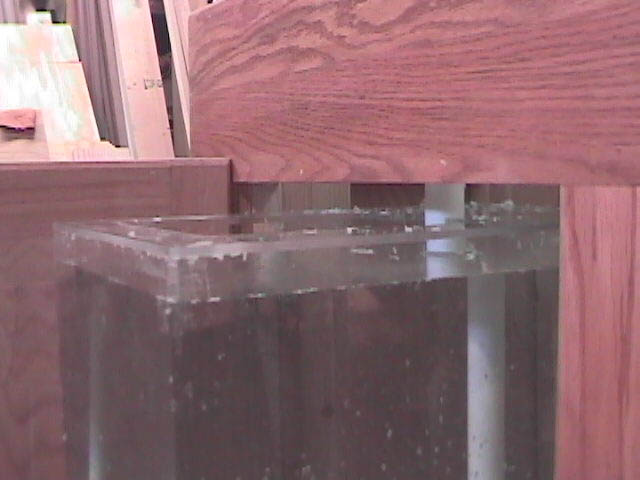
Its a little crowded in there, and, well bigger is better; so, I picked up an AGA 100 with dims I really like 72x18x18.


94549DVC00007.JPG


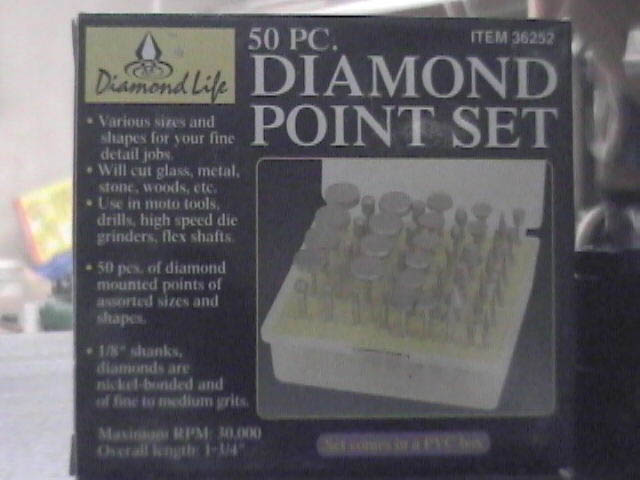
Its used but all the seals appear to be great. Paid either $350 or $400 for it, cant remember now even though it was only abt 3 weeks ago. In any event came with a 30" stand a few rio, maxiflow and seio pumps, (not my favorite but hey it was a package deal all or nothing) a crappy protien skimmer and a bunch of other whatevers.

Well now i got it and what to do? Well, from the past year and a half I know what I dont like:

1. short stands, tank is behind my sofa and I like to stand and watch my tank. Also I want to be able to put a protien skimmer in there that is around 36High. I dont remember which euroreef model it is, but man its tall .

2. immovable tank. I need to be able to move this sucker w/o completely dismantling it. I'll settle for removing most of the water and even some rock. Why do i need to move it, well i'll be replacing my carpet soon to wood, but not before my tank is done.

3. The headach and mess of water changes, pulling out the garbage can, pumps, draining, blah blah blah

4. Most importantly, I hate having the water level drop 6inchs or more in my tank exposing corals anemones and waterever else.

5. Stupid siphon overflows, man that sucks, noisy, unreliable and a damn nightmare when those pesky turbo snails decide to clean the tubes. A little mesh took care of the prob, but not before I had a few overflows and stinkin carpet cause I couldnt clean under the stand.

6. artificial crap in the tank, IE , those little pumps to ensure ou have adequate water movement.

7. That darn protein / oil film on the surface of the water. Surface agitation helps, but back to #6, another artificial piece of crap in the tank.

Well now i know what I dont want, so on to chapter 2, feel free to jump in w/ any comments or questions. As this project actually is nearly completed, I am retro-chronically this adventure.
 
First off, have to build a new stand, that 30" just wouldnt cut it, so gave it to the LFS. I actully saw the basic frame design i wanted to use of GK's new 125 thread, and I believe several people have used it, I cant find who the original designer of it was, but kudos to them. Heres a pic of near completed, sorry i dont have anything earlier showing the framing but this is basically when I started taking pics.

94549DVC00005.JPG


A couple of my beefs get addressed here. #1 the mobility issue. I decide to build my stand on industrial casters. You can see the cuttouts on the bottom of the stand, for two of the four swivel type, and the are 4 more fixed unseen underneath for a ttl of 8. If Im not mistaken combined they give a duty rating of somewhere around 1600lbs. Short memory span, So I dont remember exactly what they were rated at, I figured it out before and decided they were suitable for my purpose.

Also in the pic is a near finished water change tank, and the half completed drawer for pulling it out.

94549DVC00002.JPG


I made this 21 gallon tank out of 1/4 acrylic using weldon 4. Man, great stuff, ordered it from Ridout. My idea is to have a water change tank under the stand, on a pullout drawer. This tank will always be full, part of the circulation system, partial in from tank overflow, then overflow to sump. When it comes time for a water change, simply close the valve, drain the tank, pour in the r/o,. salt and mix. Couple of days later, open the valve and add back to the system. Voila, nice neat water change, and tank water level never fluctuates, I think a good idea, in theory.

94549DVC00001.JPG
 
heres a pic of the w/c tank on the nearly completed drawer.
94549DVC00047.JPG

The drawer is made out of 4 hd drawer slides rated at 100lbs a pair. 2 2x4s make up the base w/ a drawere slide on each side. i sure hope it holds up, I got 200lbs to work with and max 168lbs of water.

Ok drawer finshed, w/ grab handle
94549DVC00058.JPG


And a clearer picture of the rails

94549DVC00058.JPG


These drawer slides extend to somethin like 30" inches, however I didnt want to risk the weight when fully extended, so I limited the travel to abt 8 inches, just enough to dump the water in

Back to the stand, trimmed in Oak, all planking for the front, ply on the sides. Having a short attention, I generally start on another phase of my projects before the prior one is completed. Ive built one of three doors, but decided to jump back and stain the stand. The initial coats were off Ipswich pine, then I went over than with Colonial maple to add a slight orangish hue. I like the results.

Here area couple of pics of the doors and construction, Did it the easy (cheap way) with a biscuit joiner, didnt want to pay $100+ for the decorative t&g router bits.
94549DVC00045.JPG
94549DVC00054.JPG
94549DVC00056.JPG


All woodwork was glued using gorilla glue, my fav.
 
Alright, now all thats 50% done, dont wanna get bored, gotta do somethin new. Hmmmm. tackle another problem, the darn siphon overflow, and while im at it, Im gonna try to get rid of the ugly film on top of the water. Just what I need, a Calfo style overflow. pretty quite, gotta get rid of the toilet flushing like in my current tank, and I can skim the surface of the water.

Crap gotta drill my tank then, Off to the glass shop and then to harbor freight tools. Too short of an attention span to order the hole saw type glass drill, so i'm gonna dremel it. After that im goin to the LFS for some bulkheads. Well, no local glass shop has a piece of 14grey 72 long, and again i dont wanna wait to order (already had to wait for the weldon 4, actually it cam quick, like 2 days) so im gonna go with 2 30" semi boxes instead of the full length 72. Heres a pic of one done

http://reefcentral.com/gallery/data/500/94549DVC00089.JPG
 
Alright, now to tank drilling. A hole saw would be really nice but just cant wait. This is what I got from Harbor Freight

94549DVC00068.JPG


Now Ive decided to drill 6 holes, four 1" for the o/f and two 3/4" returns. Now ive seen other threads where people say using the dremel makes for an extremely messy cut, and seen advice abt using cuttoff cups for a ring to hold water. The ring is good, except it doesnt provide a guide. I made a plywood template below

94549DVC00064.JPG


First prob, tank is stting upright, I need to drill the back, and i'm by myself. Aint gonna flip this puppy myself. Oh well ,Got myself a spray bottle and went to work as is. First hole, nearly an hour. have to hold the dremel w/ two hands, cut for a couple secs, then spray, repeat a couple hundred times. NOT GOOD.
 
Alright, my gardner is here, he can help me flip the tank. He better, charging me $30 a mow and seems like hes commin every week now, dang, blame it on the holidays. Coulda sworn grass grows slower in the winter.

Alright tank flipped. Second hole 30 min, third and fouth 15 each. Plywood guide was great. clamp it to the tank, filled the hole w/ water and cut like gangbusters.

94549DVC00061.JPG


After trying several bits i found that the best combo for me was to use the small ball end cutter for 90% off the cut grinding out abt 3/32 a circular pass. Plenty of lateral pressure, not much down force. Final cut was made best by using pointed bit to punch through then the thin straight bit using an up and down sawing motion to complete the cut. Holes came out ok, i think much better than if it was straight freehand.

Bulkheads in place

94549DVC00069.JPG
 
ok, bulkeads in place, went ahead on cut the two 3/4 returns they went at abt 10 min each, used same method. Now what, finish the stand? Nah. been losing sleep lately thinking abt the plumbing. Gotta get started on that. I wanted to maximize the speed and smoothness of the drainage, of course to increase drain speed (didn't i just say that?) and to keep it as quite a possible. I also didnt want to build "catch" boxes on the outside of the tank. in short what i wanted to do, was to have the 2 outer bulheads run down at a 45 to a central point where it enters the stand, and wanted the two inner bulheads to to run vertically down and intercept the outer lines. Sounds slick and clean, no unnecessarry bends. alright call around. i need a couple of 1 1/2 or 2" sched 40 or 80 wye's. My luck, no-ones got it, gotta order. Forget it. All thats around is ABS dw/dwv. Seen to many arguments on that one. That stuff aint touching my tank, don't know, don't wanna take a chance. Forget the high speed slick and clean, this is what I ended up with.

94549DVC00080.JPG
 
one inch on top, to inch and a half and finally 2" on bottom. El's on top for venting w/ a bit of coarse filter to muffle. The two 3/4 returns on the bottom were plumbed w/ sched 80 sweep 90. I heated them with map gas torch to increase the bend so the wouldnt extend back so far. Clamped it to 1" tubing and then on to a valve, check valve combo. I should have taken pictures of the check valve dissasembled, but didnt do it. This is ball type that takes virtually no pressure to pump past it, no springs or metal of any type to corrode / disolve. the pvc ball falls back on a rubber seat that makes a very good seal (so long as no contaminant gets in there). I tried to get some advice on using this, however didnt get any replies on it. Got from my LFS who said he had them custom made for him. Actually I figure custom made meant glue the ball valve to the check valve body. Big deal. Well they cost $60 each. i'm sure they could be found for much cheaper somewhere else, bit they were there and they were available. No ordering. these valves need to be used upright, so I will be mounting them later to ensure this.

In case you havent noticed, no closed loop, all 16-1800 gals via 2 hf-20's are running through the sump. The sump pictured is only for testing. Actual sump is 40g w/ a 5g refuge

94549DVC00091.JPG
94549DVC00092.JPG
 
Looking really great. Love the water drawer!!

I'm in Yucaipa just down the road. We have the trade some frags after both our new tanks are up. (I'm setting up a custom 77 gallon)

Keith
 
Well the o/f and return system is up and running, filled the whole thing up just yesterday to test. It is quieter than what I have, however not as quiet or as fast as I like. System is running with just an HF20 and a rio2100 right now and all 4 1" bulkheads are almost submerged. I supppose I should have calculated the drain according to the flow.

In any event i suspect that i do not have enough venting in the proper locations. Since I expanded the pipe from 1" to 2" and increased the need for air, most of the required air is being drawn in from the top, prob disrupting water flow. I know I cant be using the full capacity of the pipe. And without doing the calculations I imagine there is roughly abt a 20% increase in volume from using 4x1" merged into a 2" of course I am sure there are other factors not being considered. I am planning to drill a couple of air vents in the 1 1/2 and" or the 2" sections pictured below what do you guys think?
94549Air_vents.JPG
 
Since all the main plumbing is done now for the interesting part, the w/c tank. The main o/f line, 2", enters the stand through the rear support 2/6. This helps to support and remove the weight off the back of the tank. It enters the stand and is teed horizontally, then reduced to 1". The forward velocity of the water pushes itself into the 1" supply pipe for the w/c tank. line is then valved and plumbed to the w/c tank forward and above. The water enters the tank through a downspout. I had to slot the rear portion of the w/c tank opening to allow for the downspout when drawer extended.

94549DVC00077.JPG


The remaining 90 deg outlet on the tee is then plumbed down to the sump, adding an addtional tee and upwards vent section of the pump. No actual need to go w/ 2" for the vent, but I didnt have any reducers left. I'll change that later to something more suitable and less obtrusive, or maybe I'll remove it all together.
94549DVC00094.JPG


Originally I decided to use the fitting and hose from one of the many useless siphon o/f boxes I have, but after installing I found that I got insufficient drainage. I redrilled the w/c cabinet and installed a 2" bulkead w/ a section of pool vac hose and now w/ full flow it handles the drainage well.

94549DVC00096.JPG


Suffice to say, the plumping is now complete w/ the exception of any addtional venting I may need to do. The system is operating for the most part extremely well, and my biggest concern and most useful innovation is working perfectly. The w/c drawer slides out with ease (w/ fully loaded tank) and works exactly as intended. Oh and kudos to myself, the acrylic job was perfect, no leaks

94549DVC00097.JPG
 
Hey after reading through some other threads, I see reference to locklines. Is that what those check valves are called? Whats the going rate for them? Also If anyone has any suggestions for venting or otherwise to increase drain performance please let me know.
 
Now we are up to speed and current with the progress of the tank and hopefully I can stop talkin to myself. At least Im upping the reply and view count!!

The next phase which i'll be working today and .... is to do the water distribution system inside the display. One of the dislikes i had was the articifical crap in the tank and powerheads qualify as just that. I have an scwd, or whatever the acronym actually is, but im not sure i'll use it. I picked up 100ft of "funny pipe" and a bunch of fittings and want to try to distribute the flow around the tank as much as possible, especially sandbed level. If anyone has done this and cares to share i would appreciate it a lot. My goal is to completley hide the fittings and have the least amount of pipe showing, though it is black and I suspect it will blend in well, especially when/ifi coralline grows on it. The landcaping of the tank will be similar to my current, I expect to have only abt 25% of the sand in front clear and rockwork all the way up the back to within 4-5" of the surface. I must avoid any exposed powerheads, though I prob will use some behind the rockwork.

94549DVC00099.JPG


Advice please !!!!
 
Hey Sandman, nice thread so far!!!

I have a different drain system, so this may not help you at all. But is there any way you can have two seperate paths into the sump? I'm not clear on how you have it now. Do you have all four 1" draings coming into one final pipe into the sump?

Here's the concept - If you can have your "main" drain completely submerged, it will be operating at a full siphon, will not suck any air in, so no noise, no bubbles, and max flow. To do this you have to put a gate valve on the line and "tune" it to the flow you need. But that creates a real risk of flood if that line somehow gets clogged. That's where the second drain line comes in. The second drain line has to be higher than the main line (maybe with the use of 90's on your setup? That way if the main drain gets plugged, the water rises to begin draining down the second line until you notice the noise and clear the problem up.

Like I said, I don't know if this is practical with your system and I also don't know if two full siphons at 1" will give you the flow you need or not... Just an idea for you to think about.

Keep up the good work and the pictures - it's an interesting setup. More pictures of the plumbing and how it works with the water change tank etc. would be good. I got a little lost there (of course it may just be my thick skull :rolleyes: )
 
If you can do some type of buried manifold system you could get the flow distribution all through the tank without much of it showing at all. I did something like that and so far it is turning out really well IMO. Here are some pictures of the setup with the tank empty http://www.reefcentral.com/forums/showthread.php?s=&postid=6046080#post6046080 and toward the end of the thread are some pics of the tank as it is now. I still need about 150 more lbs of LR but it's getting there...
 
My drain setup does have all 4 1 inch" merging into 1 2" drain. I think I understand your setup and sounds good. For my purposes I highly doubt I could get 1600gph out of just bulkheads, however i will be meshing the openings to the drains so it is unlikley all 4 could be blocked at the same time. I'll try swapping the 2100 to another HF to increase the tank flow to submerge the b/h. I plan to get forgo the rios altogether (unreliable starting,even w/ new impellers, though the hf's havnt given me any of those problems yet) and get a couple of mags, not sure which ones. I do want the system to balance itself w/o using a restrictor on the returns, so i'll guess i play around, blocking all vents and trying dif pump combinations. The manifold system you have looks good, Mine will be buried as well, but only going with a 2-3" SB, Staying away from the dsb/bb thing and will just stay in between. The piping i got is 1/2 so i should be able to have quite a few outlets, but plan to run from the bulkeads to the front and then work my way back because of resistance and pressure / flow drop issues. I want the exposed sand to benefit from maximum possible flow to suspend det.
 
Back
Top