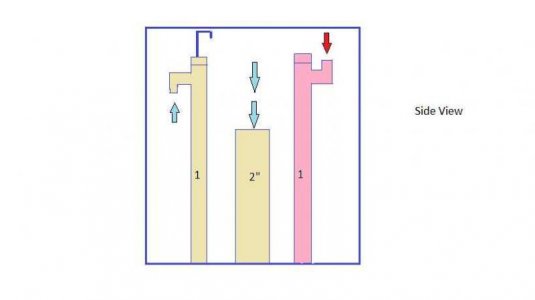
Silent and Failsafe Overflow System

im confused on how that saves room behind the tank...is it the external calfo that saves room since no T's?

maybe i shouldnt worry about a 6-7 inch gap behind the tank???

based on the numbers i am thinking 4 pipes all 1.5 or 2"

1 or 2 of them will be meant for syphon, 2nd one is reserve in case 1 doesnt hande it...

1 for the vented line for the slight extra

1 for emergency syphon/...


thoughts?

1.5" pipe would be easier to work with rather then 2" to the sump i think???

i figure i will turn over around 3000 gph

internal calfo or full coast to coast with a stokman standpipe instead of a durso standpipe so that eliminates the tees. see what I'm saying??? if no do a search on stockman standpipes on ggogle and you'll see.
 
I have been having problems with my system restarting up after the return has been shut off. It runs great when I set it up, but after shutdown and restart the the full siphon will not start again like before, the backup standpipe kicks in at a much higher flowrate. I have to open up the gate valve on the full siphon pipe and close it back to where it was before for the system to work again correctly.

My tank is on a 2nd floor and the pipe drops about 6 feet horizontal before aprox 8 feet drop and another 6 foot horizontal before ending in the sump below. the gate valve is places down near the exit just above the sump.

Any ideas on how to get this thing to restart?

Thanks
 
SLIP fittings are meant to be solvent welded... so solvent weld them :)

Not that we would ever pervert the designed use of any product in order to use it in an aquarium, huh?:spin2:

My earlier comment about the use of silicone was meant for *inside* the overflow - did not want to mistakenly convey the worng message.

On all the slip fittings inside the overflow - I silconed them in to make sure I have an airtight seal. I did it originally to test the system - thinking that I could take them apart, clean off the silicone, and glue.....But it worked perfectly, and continues to do so, so I never have seen the need to glue them.

Any issues that I am overlooking?

T
 
Even with the leveling legs (which really is not a good idea), as Bean said, you are going to be very hard pressed to find equilibrium between the 2 unconnected overflows. If you are able, you should connect the 2.

ok do you have a better suggestion on how to level a tank like mine??? The leveling legs were special ordered and designed for 6000 lb capacity each so they were not cheap. I have a total of 6 leveling legs which should take care of any imperfection in the floor. I don't know how level your floors are :strange: but mine are about 1/4" off across the 4 foot base and 1/8" off front to back. I have the tank in its place now empty and placed a 4 foot level on top and its dead level. he beauty of these leveling legs is that they can be adjusted under weight with a crecent wrench. do you have a better suggestion? as for equilibrium on the two sides... Bean had suggested that they MAY be an issue and I can connect the two side trays and run the pipe behind the tank if I had to. However, with only about 3-500 gph flowing over each wall... somehow I don't think that will be my problem as my 1" pipe can handle more than this under full siphon. I do have a cepex true union valve on each side which can be adjusted independently even if for some reason I get more water over the right than the left wall.

Plumbing is 95% complete and looks great. I should have everything welded in place next week and test run it and will know for sure what tweaking needs to be one here. Till then anyone who wishes to make any suggestions is welcome. thanks
 
maybe i shouldnt worry about a 6-7 inch gap behind the tank???

I used 1" plumbing and with a little bit of modification to the bulkheads, I was able to achieve a 4" gap between the tank and the wall. This was done mainly to keep our cats from being able to get behind the tank where they could mess with wires and/or plumbing.

I use an internal "calfo" style overflow box that I designed to be very slim as to not chew up too much space.
 
can you upload some photos of your overflow and how you modified the plumbing?


Thanks

I dont have any closeup pics of the plumbing mods, but I can easily explain what I did. All you have to do is cut off the piece of the bulkhead that sticks out the back of the tank once you have the plastic nut tightened down, then cut the pvc "T" fitting down a bit so that it can attach to the back of the bulkhead closer to the tank. This keeps all of the plumbing much closer to the tank, reducing the amount of space you need to leave between the tank and your wall.

Regarding the overflow, here are a couple of pics taken during tank setup:

Pre-TintRearofTank.jpg


CloseUpofOverflowtubes.jpg
 
Sorry if this has already been addressed. I just picked up a 180 gallon drilled tank but it has 3 holes in a conventional overflow box at one end of the tank.

Based on my low-tech sketches, would this work and avoid the dreaded "noisy vortex"?

Also how many gph can a 2" drain handle on full siphon?

Thx.
 

Attachments

  • Overflow1.jpg
    Overflow1.jpg
    14 KB · Views: 9
  • Overflow2.jpg
    Overflow2.jpg
    17.9 KB · Views: 10
Make the 1 inch a siphon an dthe 2inch the open drain. It will be quieter. Also if you max out the two inch (like sounds you want to) you won't be able to handle a complete blockage with the remain 2 one inch drains. The max flow will depend on your head pressure. This is a chart that Bean created/found
bulkhead_flow_rates.jpg
 
Oh.....ok.

Then just leave the other 1" as the emergency drain.

I do not have much room to configure the 2". This could be tricky.
 
Hey, Bean! I have been reading and trying to decide how I want to do this, and finally I have just decided to check with you.

I am having a tank built right now, and it has an external coast to coast overflow box on it.

I am planning to install this drain system. So I am just curious about a few things. First of all the box will measure

40" long x 4" deep x 6" tall

#1. Should I place the drains all in one clump like you? I was thinking that spreading them out might have it's advantages, but then again maybe not. I deffer to you!

#2. Would I be better off placing the bulkheads under the box or in the rear of it. Just asking since I will have both options

#3. If I place them in the back, what height would be good, so that my elbows will be close to the bottom of the box. In order to keep fish, etc out of the drains!!


Thanks
NathanS
 
Hey, Bean! I have been reading and trying to decide how I want to do this, and finally I have just decided to check with you.

I am having a tank built right now, and it has an external coast to coast overflow box on it.

First off sweet

I am planning to install this drain system. So I am just curious about a few things. First of all the box will measure

40" long x 4" deep x 6" tall

#1. Should I place the drains all in one clump like you? I was thinking that spreading them out might have it's advantages, but then again maybe not. I deffer to you!

It is a personal preferance thing you main siphon will be the one with the most water coming out of it if you were to put your other pipes elsewhere it wouldn't really have that much of an effect just using more piping, unless you have plans to use the open channel pipe as a fuge feeder but even then I dont think the flow would be enough.

You can put the emergency standpipe elsewhere as well though there is not much of a benifit, I have seen people feed it directly to the return section for what ever reason it is mostly just personal preferance.


#2. Would I be better off placing the bulkheads under the box or in the rear of it. Just asking since I will have both options

Again this is personal preferance thing it look much cleaner in my opinion to have them coming out of the bottom so you dont have the add the 5" or 6" that it would take up coming out of the rear.

#3. If I place them in the back, what height would be good, so that my elbows will be close to the bottom of the box. In order to keep fish, etc out of the drains!!

Don't go through the bottom :)

Thanks
NathanS
 
scott I agree that coming out the bottom is better so that you can place it closer to the wall. But I am thinking an internal wier leading to an outside box that has the pipes in int. This is not what Bean did in the first post (of the original thread. But it does allow for less 'stuff' in the tank. The inside box only has to be tall enough to cover the holes that lead to the outside box. And deep enough to get your finger in to clean out. You could then use egg crate to keep things out of the outside box. I haven't done one of these, but If I did that is the way I would proceed.

If you then come up from the bottom of te outside box, the 'siphon' won't need any additional plumbing on top (and it will be the lowest). The open still needs work, and the emergecny can just be a pipe.

Anyway there is my $0.02.
 
Hi,
I have read this ENTIRE thread, and if I have missed this, I apologize. Are any of you using the overflow box space in some way besides drainage? Can I put a frag rack or some mangroves in there? I have a 40 breeder and it takes up a lot of space. I have a 4 bulb t5 fixture and it is centered over the tank, and there are no bulbs directly above the box. Do I have to worry about light blockage below the box?
 
It is just for drainage. Lack of light should not be a problem. You could put something in there, but it might increase the risk of a blockage of one of the pipes.
 
Back
Top