You are using an out of date browser. It may not display this or other websites correctly.
You should upgrade or use an alternative browser.
You should upgrade or use an alternative browser.
The Ultimate DIY Rocks!
- Thread starter JohnL
- Start date
Insane Reefer
New member
<a href=showthread.php?s=&postid=12357110#post12357110 target=_blank>Originally posted</a> by kentrob11
I think that in the next 10 years or so liverock is gonna be tough to get and this kinda thing is going to be more mainstream.
The sad thing is that our hobby is responsible for very little in the way of removing rock from the ocean. The majority of the rock removed is actually used in construction. And the largest part of it goes to manufacture cement...
Is that irony or what?
cmpenney
New member
<a href=showthread.php?s=&postid=12359110#post12359110 target=_blank>Originally posted</a> by Insane Reefer
And the largest part of it goes to manufacture cement...
Is that irony or what?
I knew that they used a lot of it for construction but I didn't know it was for cement?
The cement we use in the US isn't from aquatic sources is it?
Insane Reefer
New member
Cmpenny - this becomes an issue on islands and in 3rd world coastal countries. Both are limited in resources, so must take their materials were they can get them. Materials for cement manufacture become too expensive if they have to move more than 40 miles from the source, so there is a booming business in pulling it from the ocean. Now most places try to be cool about it, and take rock from non-reef sources, but some are unscrupulous and will just take it where they can.
In the US and most other continental places, there is a really thick layer of limestone that covers the continental plates. It would take generations upon generations to deplete this layer. Most, if not all US manufactured cements come from terrestrial sources...
Kentrob. I've not messed with ceramics myself. We do have a member who has done, and came out with an interesting rock. I think it might have been Yinepu (sp?). With ceramic, if I understand correctly, there is no issue with pH, or very little if there is. The biggest thing I hear about is that people have so-so luck with it in their tanks. You read a lot of "Reef Ceramics" and ceramic media complaints - usually along the lines of "Nitrates!!!"
But my college buddy has an idea about that. He, and now I, think that it might be that the ceramics are too good at housing bacterial colonies. Bacteria use chemical warfare, just like corals do, and use what is readily available to them - like nitrates, for their ammo. Another colony encroaches and war ensues, leading to a dumping of large amounts of nitrates (or whatever) into the system as the colonies vie for dominance.
This is only a theory, but it makes a lot more sense to me than believing rock of any type can absorb and spontaneously release something (like nitrates) back into the system...
cmpenney
New member
A member of my club had set up a new 270 and used only the ceramics in his display. He had all sorts of problems. After banging his head against the wall for a few months he finally pulled some of it out and sent it in to be tested. There were two big problems that he found.
First: except for a millimeter thick or less outer layer on the rock the stuff was bone dry. No water was making it into the ceramic. So there was no denitrification going on in the stuff at all.
Second: The testing results showed disturbingly high levels of heavy metals.
First: except for a millimeter thick or less outer layer on the rock the stuff was bone dry. No water was making it into the ceramic. So there was no denitrification going on in the stuff at all.
Second: The testing results showed disturbingly high levels of heavy metals.
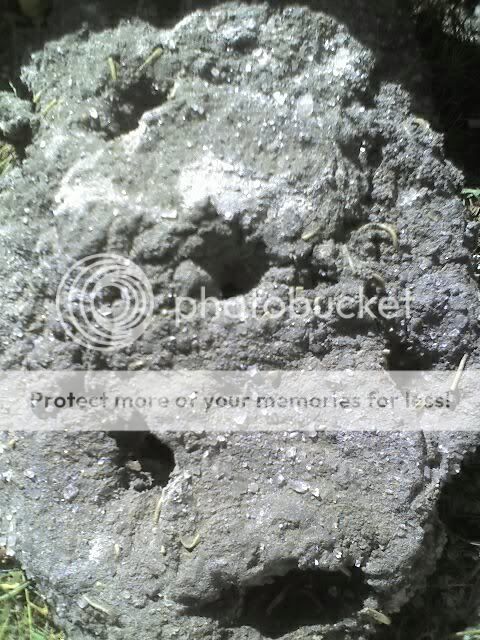
another pic
another pic
hey guys, the nano rock is in the tank, this is a 20g "breeder" as i call it. custom made by myself, 1/4 inch glass.
anyway heres the rock in the tank, has been in there for roughly a week and a half, no algae growth what so ever. despite my seeding efforts with a little cured LS.
notice the slight color change in the rock, became a more light grey after water curing.
more pics when the moonlights come on, to get an idea of the cool shadows this stuff creates, also pics of the dry 3rd batch.

as far as selling this stuff, its a good idea, its ran through my head a few times.
another pic
hey guys, the nano rock is in the tank, this is a 20g "breeder" as i call it. custom made by myself, 1/4 inch glass.
anyway heres the rock in the tank, has been in there for roughly a week and a half, no algae growth what so ever. despite my seeding efforts with a little cured LS.
notice the slight color change in the rock, became a more light grey after water curing.
more pics when the moonlights come on, to get an idea of the cool shadows this stuff creates, also pics of the dry 3rd batch.
as far as selling this stuff, its a good idea, its ran through my head a few times.
Insane Reefer
New member
SUPER LONG POST!
SUPER LONG POST!
v8.0
Hey All,
I'm going to post my favorite tips and links every so often so new people can find it all pretty easy. It is a summation of the most commonly asked questions and things I have picked up through making my batches. Some I’ve gleaned from this thread, others I’ve learned from past mistakes and experiments. I've been making DIY man-made rock or aragocrete off and on for close to 8 years, though I learned about it from the pre-internet BBS's back in the very early 90's. Lately, I have even made some money on my rocks.
This does not contain any information on "Jiffy Rock", the new method I am working on to produce rock in under a week or 10 days. This only pertains to traditional rock methods.
I thought I’d pass this info on â€"œ maybe save someone some frustration or spark a new idea.
I will continue to refine and update this post as more info is added, and repost every so often.
")
First, good info can be found at these two places - I think everyone who wants to make rock should read these in full. One of the articles gets pretty heavy handed with the science/chemistry aspect, the other babbles on tangents once in a while, but both are worth the read, IMO.
ARAGOCRETE RESEARCH BY TRACY GRAY
Reef Propagation Project
List of Appropriate Aggregates
Sand - Sand makes cement stronger, so is something you want to add to your cement. You may also find that sand is a great casting medium and that you can get crazy shapes with damp sand. Any “clean†sand will work â€"œ look for darker grains which could indicate heavy metals and avoid these sands. Whatever you choose, keep in mind that the smaller the grain size, the less obvious it is on the rock, but for sand for use in the cement, you want a larger particle size, if possible.
Crushed Oyster Shell - AKA "OS". Any shell will work, but OS is very cheap at feed stores.
Perlite â€"œ has a pore structure similar to CC, but much, much cheaper â€"œ great for making light weight rock. It is basically inert, puffed glass. Make sure that the perlite you choose does not have any fertilizers added to it â€"œ most do not, but a couple do.
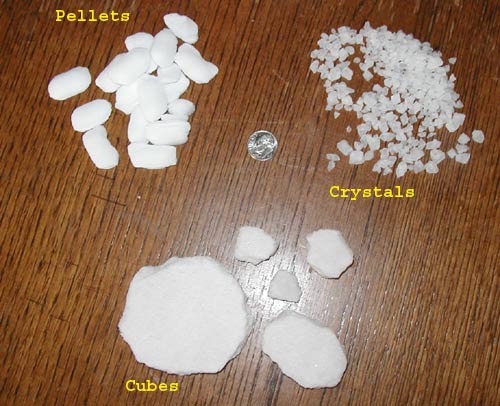
Salt - Many thanks to Travis L. Stevens for figuring this out! The salt of choice is "Solar Salt Crystals", typically found as a Water Softener Salt. 99% pure salt. Get the coarsest crystals you can find. Solar Cube can be used, but is sort of chunky - makes nice holes though. Boiling the "cubes" rounds off the edges and makes nicer holes. Solar Pellets can also be used, same as Cubes. Look at your grocery stores or wally-worlds if your local hardware doesn't have what you want.
Rock Recipes
Ingredients are measured by volume, not weight!
Travis’ Original “Salt Rock†Recipe: 4:1 or 3:1 / Salt:Cement
Improved? “Salt Rock†Recipe: 3:1 or 2:1 / Salt:Cement
Ol' Skool Recipe: 1 to 1.5 : 2 :1 / Cement:CC&OS(mixed â€"œ or use perlite&shell mix):Sand
Ol' Skool + Recipe: 1: 1 to 1.5 : 1.5 :1 / Salt:Cement:CC&OS(mixed â€"œ or use perlite):Sand
I prefer the "Ol Skool" recipe, but I use a variation with perlite. Makes excellent, porous rock. Keep in mind that even though the original “Salt Rock†recipes do not have sand listed, your rock will be much stronger if you replace a portion of the salt with some sand. On the “Original†recipe I’d use 2 sand and 2 salt to 1 cement.
Basic Procedure
Mix dry ingredients together first, excepting salt if used - add tiny amounts of water while vigorously mixing the mud. Mud should be sort of “dry†and a little bit crumbly, not wet and squishy â€"œ there is a fine line between the two. A wet mix will not have as many natural voids in it, be less porous, and will also bind to the salt, making salt release more difficult. Once you have reached a slightly wetter mix then you think you need, lightly toss the salt into the mixture, and then mix it very quickly â€"œ the more salt that leeches off the crystals, the more deleterious the results can be, meaning more chances for your rock to be messed up. Be aware that a dry mix may give the illusion for the first week of being more brittle, but after a week or two, it toughens up and is nice and hard.
After you make your rocks, they need to be kept moist and warm for at least a week or two to achieve the best hydration possible â€"œ though 3-4 weeks is best. Many do take their rock out immediately and start salt release or kuring in 3 days or so, and haven’t reported any bad side effects, so it is up to you. However, new info is starting to show that to put your cement in water before the 2 or 3 weeks of age is needless, as kuring doesn’t really get going until the hydration is starting to come to a halt (there has to be calcium hydroxide for us to leech it, and C-S-H is something that forms latter in the hydration cycle). It is also starting to sound like those who put their rock into the kure bin too quickly end up with prolonged kure time, so that is something to think about too. So you can save yourself some effort and money (water cost money) by letting it sit for a while to let the chemical process in the cement have a chance at finishing doing what they are doing. Plastic bags, wet newspaper, wet casting materials and the like will help seal in moisture. If you think the rock might dry too quickly, mist it with a bottle or hose every so often.
Molding/Casting Material
Really, pretty much anything that is dry and crumbly/powdery will work. I've even used stuffing bread crumbles, but that draws bugs while it dries.
Soil
Salt
Sand
Clay
A certain portion of the molding/casting material will remain on the rocks - most of this can usually be removed with a very quick dip in a dilute acid solution, followed by a good scrubbing with a plastic or fine wire, bristle brush.
If you use a Rubbermaid type tote/bin, you can easily reuse molding material over and over again. Line cardboard boxes with plastic to prevent moisture leak and wall collapse.
DO NOT Wet Salt, if it is used as a mold material - this means when working with salt, do not add water to the casting box as you would or might with say clay or sand.
Salt gives a nice dimpled effect on the surface of the rock, but can wick out the moisture from the rock, making it dry out too quickly. You can recover and reuse any salt left over, but will notice a significant lessening of the amount of leftover salt after each casting.
Sand is my casting material of choice. You can really make some nice, layered rock with sand. Once dampened, it will continue to keep your rock moist during the hydration phase. You loose very little from the casting bin, and if you rinse your rock in a tub, you can reclaim most of what you use.
Coloring Your Cement
There is a lot of interest in creating faux coralline to make the rock more interesting while we wait for real coralline and corals to dominate. First let me say that over all, I have not had a lot of luck with using non-cement colorants. I’ve tried a gamut of stuff from RIT dye and hobby paint to Kool-aid, and none of these work. Oh, for the first couple of days, they might look great, but as the kure progresses, and as calcium carbonate forms, the colors fade out and eventually can barely be distinguished. By the time these rocks are ready for the tank, the color is mostly gone. There has been success using colorants made for cement and grout, but again, these still do fade because of what we are doing to our rock.
Having said that, I have some other things to say for those still wanting to try it. Use real cement colorants â€"œ I have a couple of sources listed below.
Sold in small amounts and in rainbow colors - are very cheap and most should be reef safe as well as mostly color fast:
http://www.earthpigments.com/products/index.cfm?subCat_ID=3
http://stores.ebay.com/BEACHCRAFTERS_W0QQf...QQfsubZ16QQtZkm
http://stores.ebay.com/Olde-World-Concrete...4QQftidZ2QQtZkm
When you are coloring portland cement, make the color several shades darker than what you are hoping to end up with. You can choose to color the mud itself when you make the rock (as Walt Smiths' rock company does), but you will need a lot of colorant to do so, especially in grey cement. Instead, you can make up a slurry of cement and sand to make a "paint" of sorts. Use 1 part cement to 2 or 3 parts really fine sand, made fairly thin and fairly wet and sloppy (like house paint), and use it to decorate rock with “coralline algae†splotches. I’ve used white Portland, but I don’t see why white grout or mortar wouldn’t work as well â€"œ you can use grey, but grey needs a lot more colorant to reach a desired shade. You can use cement colorants to color the cement any shade you desire. Working with a paintbrush, you can easily replicate the swirling patterns of coralline. I’ve also used this mix to paint/dry brush grey Portland rocks to white.
I’ve been thinking about how the colors fade and think I might have a solution. Fast set cement. With it not really needing to kure, you could make your “paint†from the fast set, and the best part is that being impermeable, it should fade very little (fast sets carbonate very little from what I’ve read). This would be something you could add to the rock after it has been kured. Then maybe soak it for a few days after the “coralline†has cured (2-3 days for fast sets).
----------------------------------------------------------------
Now, I will list my tips and tricks, in no particular order. Many will seem stupid or like common sense, but you don’t know about some people’s kids, lol…
Tips and tricks
1. Wear gloves when making rock. If possible, don’t let the cement get on your skin, especially the dry powder. If possible, wear a painter’s mask when measuring and mixing dry cement; this stuff can really burn the inside of your nose.
2. Setup your work area in advance; cover surfaces with plastic or old sheets if needed (like in your kitchen or living room). Fill casting containers with whatever mold material you are using, or have it standing by within easy reach. Give yourself walkways if you are making a lot of rock â€"œ nothing sucks as much as trying to create enough work space after the fact.
3. Think about the weather for not only the day you cast, but the next few days as well, if you plan on doing this outside. Rain can make a mess of things…
4. Use Portland Type I, II (I/II) or III â€"œ these are known to be safe for use and make rock with proper porosity. Fast Set cements can be used, and are in fact great for things like panels or delicate branchwork, but because of their naturally impervious nature, are not the best choice for filtration rock.
5. Mix all aggregates excepting salt into the cement before adding water. Add salt after you have reached the right wet consistency, and mix it in lightly â€"œ the less salt is leeched off the grains of salt, the stronger your final rocks will be. Water softener salt of the type “Solar Salt Crystals†works wonderfully (Thank you Travis Stevens!).
6. 1 part cement to 3-4 parts “other†is an acceptable ratio, whatever you want to mix together is up to you and you should be ok if you follow the 1:3-4 part rule - each person usually finds a recipe on their own that works best for them.
7. Work in layers for added dimension. If you lay a layer of molding stuff in your container, make a few divots in this molding layer first, and add cement to these first to make lumps on the bottom, you can avoid flat bottomed rocks. Now lay the main part of your rock, adding molding material as needed.
8. You can make neat “cliff-face†striations if you take a handful of salt, and lay it just along the top edge of wet cement, forming a narrow line of salt along the edge, laying a thin layer of cement over the salt, and repeating this to form, on the outer edge of your rock, a sort of cliff that looks to be cut by water action.
9. Anything cast thinner than an inch is likely to break, unless you are very careful with it.
10. Find a nice bit of stainless steel or aluminum wire â€"œ 2mm or so in width, and bend a handle for one end (remember you will probably be wearing gloves, so bend accordingly). As you cast your rock, use this wire to poke Lots of little tunnels all through the rock â€"œ all the way through if you can; this will make the rocks extra porous, and give bug life lots of places to hide and propagate in-tank, as well as allowing more water to move through the rock. Alternatively, you can cast the piece, and then poke as much of it as you can â€"œ though this way tends to look a bit contrived. I like the first way better.
11. Once your rock has cured and it has been curing for about a week and if you made it mixed with stuff like crushed coral or shells, mix up a weak acid mix and scrub the outside of your rocks with a stiff bristle brush. Be sure to take proper precautions when working with acid â€"œ not only from burns, but from fumes as well!!! If you only made your rock with salt and cement, ignore the acid wash, as your rocks might dissolve, but still give them a vigorous scrubbing - this will loosen the weakest stuff and get rid of it without shedding it all over your tank. If you have shells or coral, this can make the surface even more porous, and clean cement films from shells and the like that might be on the surface. I use a mixture of 1/2c muriatic acid added to 2c water.
12. You can make “lock together†pieces by wrapping a bit of PVC in something like tissue paper or plastic wrap, sticking it in the wet cement of “part aâ€Â, and then laying plastic wrap over and around the fresh cement/PVC, and then cast “part bâ€Â, making sure to get a good fit around the PVC join. I find this works, but I personally have an easier time if I cast “part a†with PVC set into it, let it cure, then wrap it well with whatever, and cast “part bâ€Â, and I can cast really large pieces this way.
13. Branching rock/Coral skeletons. Pick PVC pipe a bit thinner than what you want your final piece to be. Cut into appropriate lengths, cutting one end flat and the other at an angle. Drill plenty of holes in the PVC to help the cement stick on. Drill extra holes on the very end that will allow you to tie the pieces onto the “main branch†with zip ties. You can bend PVC into believable shapes using heat from either a propane torch or a heat gun, and a couple of pairs of pliers (use appropriate precautions). After you have your PVC framework, mix a thicker blend of Cement Paint (less water, more cement) and paint/dip the skeleton, covering completely. I recommend hanging to dry, and dipping several times, using a paintbrush to smooth it out and prevent weird drips. When done coating, tie a grocery bag around the hanging piece to preserve moisture and allow to cure 48 hours or more.
14. Think about how corals come to you, as frags and whole colonies, and think about how hard it can be to attach these in your typical rock pile. Flatter surfaces and shallow bowls in larger rock shapes can make latter placement easier.
15. You can make rock “shells†if you want to avoid the rock pile look altogether and these are only limited to your imagination and size constraints. You can stuff the cavity in the back of this hollow construction with cheap $1.99/lbs rock, or whatever you want. I DO NOT recommend making these with the cement and salt only recipe! Make a form of some sort (use your imagination), put it in a box that will fit into your tank (making a rock too big for the target tank blows), and secure it to one side, or more (for multi-part casts) with duct tape. Line the rest of the box with plastic. I made my form from plastic grocery bags stuffed into a garbage bag, with a little air added, and taped that into the target box. Slowly build the shell wall (adding details as you wish), filling the box with salt/molding material, until you have the form covered with a fairly uniform covering of cement. LEAVE ALONE FOR A WEEK! Cover with plastic if you can. See my gallery for pictures of the “â€ÂReef Face†or “Nessyâ€Â.
16. Frag Plugs. If you have extra cement at the end of the day, make frag plugs by using a mini muffin pan, and filling with ½in. of cement. Spray the pan with cooking spray for easier release. These can be put in a mesh bag and cured in the toilet tank.
17. Hate scraping the back wall of your tank? You can make thin, wall covering sheets, that can be glued with silicone to the back wall of your tank. Alternatively you could make shelves along those lines. I find casting on a sheet of glass covered in plastic works best for this. Also marking out the actual measurements of the back wall onto the glass helps to avoid sizing issues. I DO NOT recommend using the salt and cement only recipes for this application, nor the use of any salt at all! I also mix this just a little wetter than I normally use. Once you are setup, just drool the cement onto the covered glass. I tried doing large sheets, but these mostly were too weak to hold up and heavy. I find making smaller pieces (12inX12in or so) that abut like a puzzle work best, and sort of give the illusion of looking at a cracked and crevassed reef wall. After you cast these, they need to be kept moist and unmoved for 3 days, 7 days being much better. Believe me. They do. And you will need to mist them once a day. I just covered mine with a garbage bag and used a water bottle to mist it. I recommend an acid wash, as described above, once these have kured for a week.
18. If you make a rock or rocks you don't like, either use fresh cement mix to add some new bits, or break the rock up and use it as aggregate in your next batch - no waste is good.
19. The moister you can keep the cement while it cures, the harder the final rock will be - try wrapping it in a bag, or misting it while it cures. Supposedly, if you can let it sit for two to four weeks before starting to water kure, it will dramatically speed the kure time.
20. Dust your molding sand with oat flour for easy removal of surface sand. Thanks Rhody!
21. Mix molasses with your molding sand to give it more texture. Thanks Rhody!
22. Replace up to 1/3 of your cement with “Hydrated Lime†â€"œ this reduces the over-all alumina content of the cement (and boosts the calcium content) and makes it more resistant to potential “Sulphate Attackâ€Â.
Various things I have used and have worked for me for adding details:
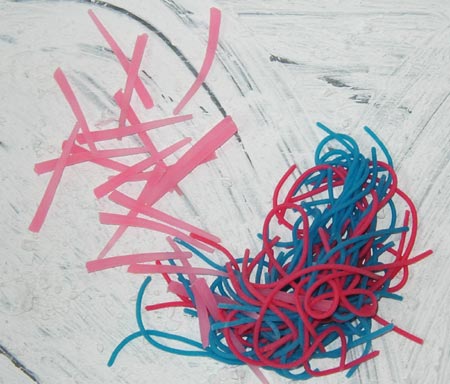
1. Cemented Nylon String. Makes realistic tube worm/duster tubes. Make a thin paste of just cement, and dip small lengths of the sting in. Wipe excess off between fingers and lay onto the rock in desired figure.
2. Veggie Capsules. These can make little tunnels when laid end to end in the wet cement, and then covered with more cement. Or poke into outside edges to mimic polyp holes. Do NOT mix into the cement mix.
3. Nori Sheets. These can be wetted and formed into shapes or rolled into tunnels.
4. Balloons. Both the round and “animal†ones work. I find that filling them with water makes them stronger. Doubling them up works well too. Make sure that you can get the balloon out afterward - i.e. leave the knot sticking out.
5. Cardboard Rolls. Can be cut to form bracing, tunnels or for pillar shapes. Be sure to use it in such a way as will allow you to remove it after a few days of kuring. Hemostats work great for grabbing a-hold and pulling it out.
6. Tissue Paper. The white stuff you find in gift bags. Disintegrates quickly during kure. You can make little (or big) “salt bagsâ€Â, that you can lay into the middle of larger rocks to give more holes for ‘pods and the like. Can be used to make caves and tunnels. Just use a small bit of paper, lay some salt in it and twist or tuck the ends â€"œ a small bit of cotton thread could be used to secure the package too.
7. Pasta. Must be cooked “Al Dente†before use. Do not mix into cement, it only makes a mess and is a pain to get out of the rock as it gets really hard and crunchy when the rock dries (ever scraped 3 day old pasta off a plate?).
Kured Rock that the pasta is stuck in...
Use to add spaces in the rock, or tunnels with spaghetti (at your own risk). Rigatoni adds a nice effect if placed just right. If you use pasta, you MUST keep the rock moist at all times â€"œ if the pasta dries, it will most likely never come out, ever.
8. Jelly. No, not like PB&J, but those toys, etc made of the product known as silicone jelly â€"œ often comes in wiggly balls. Also fishing bait worms made of the jelly/rubber. No need to lube them â€"œ they will release just fine.
Things that DO NOT work:
1. Vinegar/acid kuring. Does have its uses, but don’t expect it to kure your immature rock â€"œ it won’t. Acid, as a general rule is BAD FOR CEMENT, especially porous cement! A weak solution can be used on FULLY CURED rock to hasten the leeching of the Calcium Hydroxide, but using it too soon, or using too high of a concentration is detrimental to the cement. If you must use it, use regular vinegar at ¼ cup per gallon of kure water, and use it only if your rock is at least a month old or the equivalent (steam cured, etc.).
2. Bio-degradable packing peanuts/Cheesy-poofs. I can find no way to really use these that is also safe for the tank.
3. Fish food pellets. That was really, really nasty. I don’t want to go there.
4. Uncooked Pasta. As pasta absorbs water, it expands, causing the cement to fracture and crack â€"œ cook it al dente if you really want to use it.
5. Alka-Seltzer. Doesn’t work. It dissolves too quickly.
6. Yeast. Doesn't work. pH of either the mud or the kure water kills the cells before they can respirate.
7. Co2. Adding into H2O will only make soda pop (carbonic acid), and eat away at your rock, causing fresh, high pH surfaces to be revealed. It can work, but only under high pressure, or in a dry, contained space with a saturation of Co2 for the "atmosphere".
SUPER LONG POST!
v8.0
Hey All,
I'm going to post my favorite tips and links every so often so new people can find it all pretty easy. It is a summation of the most commonly asked questions and things I have picked up through making my batches. Some I’ve gleaned from this thread, others I’ve learned from past mistakes and experiments. I've been making DIY man-made rock or aragocrete off and on for close to 8 years, though I learned about it from the pre-internet BBS's back in the very early 90's. Lately, I have even made some money on my rocks.
This does not contain any information on "Jiffy Rock", the new method I am working on to produce rock in under a week or 10 days. This only pertains to traditional rock methods.
I thought I’d pass this info on â€"œ maybe save someone some frustration or spark a new idea.
I will continue to refine and update this post as more info is added, and repost every so often.
First, good info can be found at these two places - I think everyone who wants to make rock should read these in full. One of the articles gets pretty heavy handed with the science/chemistry aspect, the other babbles on tangents once in a while, but both are worth the read, IMO.
ARAGOCRETE RESEARCH BY TRACY GRAY
Reef Propagation Project
List of Appropriate Aggregates
Sand - Sand makes cement stronger, so is something you want to add to your cement. You may also find that sand is a great casting medium and that you can get crazy shapes with damp sand. Any “clean†sand will work â€"œ look for darker grains which could indicate heavy metals and avoid these sands. Whatever you choose, keep in mind that the smaller the grain size, the less obvious it is on the rock, but for sand for use in the cement, you want a larger particle size, if possible.
- Caribbean/aragonite is “best†for adding to the mud, but very hard to find at a reasonable price.
- Play Sand is generally fine to use - most play sands will be made of quartz and so basically inert.
- Limestone Sand/Pulverized Limestone has gotten good results as a DSB, so should also work and can be found at some Big Box Stores like select Home Despot's.
- Glass Sand is a new product on the market that is made from recycled glass - this would also be an excellent choice and might encourage quicker coralline growth.
- Calcium Carbonate for “Feed Mixing†(AKA Aglime, Chicken Grit, Scratch Sand), comes in a range of textures and grain size â€"œ from sand to gravel like CC. Most real feed or farm supply stores will carry it in some form, and for less than $4/ #50, but make sure it is the calcium based stuff and not granite based â€"œ it should have a percentage of calcium printed on the bag â€"œ if not, it might not be the stuff you are looking for.
- Dolomite Sand
 â€"œ Same as Calcium Carbonate, just another name (and slight chemical variation) and is just fine to use - you might find it as "Aglime" at the farm supply store.
 - Sand Blasting Sand can also be used (and works really well as casting sand) and is sugar fine, look for "Unimin" Brand, or any that says it can be used for filtration â€"œ this will be 99% pure Industrial Quartz.
Crushed Oyster Shell - AKA "OS". Any shell will work, but OS is very cheap at feed stores.
Perlite â€"œ has a pore structure similar to CC, but much, much cheaper â€"œ great for making light weight rock. It is basically inert, puffed glass. Make sure that the perlite you choose does not have any fertilizers added to it â€"œ most do not, but a couple do.
Salt - Many thanks to Travis L. Stevens for figuring this out! The salt of choice is "Solar Salt Crystals", typically found as a Water Softener Salt. 99% pure salt. Get the coarsest crystals you can find. Solar Cube can be used, but is sort of chunky - makes nice holes though. Boiling the "cubes" rounds off the edges and makes nicer holes. Solar Pellets can also be used, same as Cubes. Look at your grocery stores or wally-worlds if your local hardware doesn't have what you want.
Rock Recipes
Ingredients are measured by volume, not weight!
Travis’ Original “Salt Rock†Recipe: 4:1 or 3:1 / Salt:Cement
Improved? “Salt Rock†Recipe: 3:1 or 2:1 / Salt:Cement
Ol' Skool Recipe: 1 to 1.5 : 2 :1 / Cement:CC&OS(mixed â€"œ or use perlite&shell mix):Sand
Ol' Skool + Recipe: 1: 1 to 1.5 : 1.5 :1 / Salt:Cement:CC&OS(mixed â€"œ or use perlite):Sand
I prefer the "Ol Skool" recipe, but I use a variation with perlite. Makes excellent, porous rock. Keep in mind that even though the original “Salt Rock†recipes do not have sand listed, your rock will be much stronger if you replace a portion of the salt with some sand. On the “Original†recipe I’d use 2 sand and 2 salt to 1 cement.
Basic Procedure
Mix dry ingredients together first, excepting salt if used - add tiny amounts of water while vigorously mixing the mud. Mud should be sort of “dry†and a little bit crumbly, not wet and squishy â€"œ there is a fine line between the two. A wet mix will not have as many natural voids in it, be less porous, and will also bind to the salt, making salt release more difficult. Once you have reached a slightly wetter mix then you think you need, lightly toss the salt into the mixture, and then mix it very quickly â€"œ the more salt that leeches off the crystals, the more deleterious the results can be, meaning more chances for your rock to be messed up. Be aware that a dry mix may give the illusion for the first week of being more brittle, but after a week or two, it toughens up and is nice and hard.
After you make your rocks, they need to be kept moist and warm for at least a week or two to achieve the best hydration possible â€"œ though 3-4 weeks is best. Many do take their rock out immediately and start salt release or kuring in 3 days or so, and haven’t reported any bad side effects, so it is up to you. However, new info is starting to show that to put your cement in water before the 2 or 3 weeks of age is needless, as kuring doesn’t really get going until the hydration is starting to come to a halt (there has to be calcium hydroxide for us to leech it, and C-S-H is something that forms latter in the hydration cycle). It is also starting to sound like those who put their rock into the kure bin too quickly end up with prolonged kure time, so that is something to think about too. So you can save yourself some effort and money (water cost money) by letting it sit for a while to let the chemical process in the cement have a chance at finishing doing what they are doing. Plastic bags, wet newspaper, wet casting materials and the like will help seal in moisture. If you think the rock might dry too quickly, mist it with a bottle or hose every so often.
Molding/Casting Material
Really, pretty much anything that is dry and crumbly/powdery will work. I've even used stuffing bread crumbles, but that draws bugs while it dries.
Soil
Salt
Sand
Clay
A certain portion of the molding/casting material will remain on the rocks - most of this can usually be removed with a very quick dip in a dilute acid solution, followed by a good scrubbing with a plastic or fine wire, bristle brush.
If you use a Rubbermaid type tote/bin, you can easily reuse molding material over and over again. Line cardboard boxes with plastic to prevent moisture leak and wall collapse.
DO NOT Wet Salt, if it is used as a mold material - this means when working with salt, do not add water to the casting box as you would or might with say clay or sand.
Salt gives a nice dimpled effect on the surface of the rock, but can wick out the moisture from the rock, making it dry out too quickly. You can recover and reuse any salt left over, but will notice a significant lessening of the amount of leftover salt after each casting.
Sand is my casting material of choice. You can really make some nice, layered rock with sand. Once dampened, it will continue to keep your rock moist during the hydration phase. You loose very little from the casting bin, and if you rinse your rock in a tub, you can reclaim most of what you use.
Coloring Your Cement
There is a lot of interest in creating faux coralline to make the rock more interesting while we wait for real coralline and corals to dominate. First let me say that over all, I have not had a lot of luck with using non-cement colorants. I’ve tried a gamut of stuff from RIT dye and hobby paint to Kool-aid, and none of these work. Oh, for the first couple of days, they might look great, but as the kure progresses, and as calcium carbonate forms, the colors fade out and eventually can barely be distinguished. By the time these rocks are ready for the tank, the color is mostly gone. There has been success using colorants made for cement and grout, but again, these still do fade because of what we are doing to our rock.
Having said that, I have some other things to say for those still wanting to try it. Use real cement colorants â€"œ I have a couple of sources listed below.
Sold in small amounts and in rainbow colors - are very cheap and most should be reef safe as well as mostly color fast:
http://www.earthpigments.com/products/index.cfm?subCat_ID=3
http://stores.ebay.com/BEACHCRAFTERS_W0QQf...QQfsubZ16QQtZkm
http://stores.ebay.com/Olde-World-Concrete...4QQftidZ2QQtZkm
When you are coloring portland cement, make the color several shades darker than what you are hoping to end up with. You can choose to color the mud itself when you make the rock (as Walt Smiths' rock company does), but you will need a lot of colorant to do so, especially in grey cement. Instead, you can make up a slurry of cement and sand to make a "paint" of sorts. Use 1 part cement to 2 or 3 parts really fine sand, made fairly thin and fairly wet and sloppy (like house paint), and use it to decorate rock with “coralline algae†splotches. I’ve used white Portland, but I don’t see why white grout or mortar wouldn’t work as well â€"œ you can use grey, but grey needs a lot more colorant to reach a desired shade. You can use cement colorants to color the cement any shade you desire. Working with a paintbrush, you can easily replicate the swirling patterns of coralline. I’ve also used this mix to paint/dry brush grey Portland rocks to white.
I’ve been thinking about how the colors fade and think I might have a solution. Fast set cement. With it not really needing to kure, you could make your “paint†from the fast set, and the best part is that being impermeable, it should fade very little (fast sets carbonate very little from what I’ve read). This would be something you could add to the rock after it has been kured. Then maybe soak it for a few days after the “coralline†has cured (2-3 days for fast sets).
----------------------------------------------------------------
Now, I will list my tips and tricks, in no particular order. Many will seem stupid or like common sense, but you don’t know about some people’s kids, lol…
Tips and tricks
1. Wear gloves when making rock. If possible, don’t let the cement get on your skin, especially the dry powder. If possible, wear a painter’s mask when measuring and mixing dry cement; this stuff can really burn the inside of your nose.
2. Setup your work area in advance; cover surfaces with plastic or old sheets if needed (like in your kitchen or living room). Fill casting containers with whatever mold material you are using, or have it standing by within easy reach. Give yourself walkways if you are making a lot of rock â€"œ nothing sucks as much as trying to create enough work space after the fact.
3. Think about the weather for not only the day you cast, but the next few days as well, if you plan on doing this outside. Rain can make a mess of things…
4. Use Portland Type I, II (I/II) or III â€"œ these are known to be safe for use and make rock with proper porosity. Fast Set cements can be used, and are in fact great for things like panels or delicate branchwork, but because of their naturally impervious nature, are not the best choice for filtration rock.
5. Mix all aggregates excepting salt into the cement before adding water. Add salt after you have reached the right wet consistency, and mix it in lightly â€"œ the less salt is leeched off the grains of salt, the stronger your final rocks will be. Water softener salt of the type “Solar Salt Crystals†works wonderfully (Thank you Travis Stevens!).
6. 1 part cement to 3-4 parts “other†is an acceptable ratio, whatever you want to mix together is up to you and you should be ok if you follow the 1:3-4 part rule - each person usually finds a recipe on their own that works best for them.
7. Work in layers for added dimension. If you lay a layer of molding stuff in your container, make a few divots in this molding layer first, and add cement to these first to make lumps on the bottom, you can avoid flat bottomed rocks. Now lay the main part of your rock, adding molding material as needed.
8. You can make neat “cliff-face†striations if you take a handful of salt, and lay it just along the top edge of wet cement, forming a narrow line of salt along the edge, laying a thin layer of cement over the salt, and repeating this to form, on the outer edge of your rock, a sort of cliff that looks to be cut by water action.
9. Anything cast thinner than an inch is likely to break, unless you are very careful with it.
10. Find a nice bit of stainless steel or aluminum wire â€"œ 2mm or so in width, and bend a handle for one end (remember you will probably be wearing gloves, so bend accordingly). As you cast your rock, use this wire to poke Lots of little tunnels all through the rock â€"œ all the way through if you can; this will make the rocks extra porous, and give bug life lots of places to hide and propagate in-tank, as well as allowing more water to move through the rock. Alternatively, you can cast the piece, and then poke as much of it as you can â€"œ though this way tends to look a bit contrived. I like the first way better.
11. Once your rock has cured and it has been curing for about a week and if you made it mixed with stuff like crushed coral or shells, mix up a weak acid mix and scrub the outside of your rocks with a stiff bristle brush. Be sure to take proper precautions when working with acid â€"œ not only from burns, but from fumes as well!!! If you only made your rock with salt and cement, ignore the acid wash, as your rocks might dissolve, but still give them a vigorous scrubbing - this will loosen the weakest stuff and get rid of it without shedding it all over your tank. If you have shells or coral, this can make the surface even more porous, and clean cement films from shells and the like that might be on the surface. I use a mixture of 1/2c muriatic acid added to 2c water.
12. You can make “lock together†pieces by wrapping a bit of PVC in something like tissue paper or plastic wrap, sticking it in the wet cement of “part aâ€Â, and then laying plastic wrap over and around the fresh cement/PVC, and then cast “part bâ€Â, making sure to get a good fit around the PVC join. I find this works, but I personally have an easier time if I cast “part a†with PVC set into it, let it cure, then wrap it well with whatever, and cast “part bâ€Â, and I can cast really large pieces this way.
13. Branching rock/Coral skeletons. Pick PVC pipe a bit thinner than what you want your final piece to be. Cut into appropriate lengths, cutting one end flat and the other at an angle. Drill plenty of holes in the PVC to help the cement stick on. Drill extra holes on the very end that will allow you to tie the pieces onto the “main branch†with zip ties. You can bend PVC into believable shapes using heat from either a propane torch or a heat gun, and a couple of pairs of pliers (use appropriate precautions). After you have your PVC framework, mix a thicker blend of Cement Paint (less water, more cement) and paint/dip the skeleton, covering completely. I recommend hanging to dry, and dipping several times, using a paintbrush to smooth it out and prevent weird drips. When done coating, tie a grocery bag around the hanging piece to preserve moisture and allow to cure 48 hours or more.
14. Think about how corals come to you, as frags and whole colonies, and think about how hard it can be to attach these in your typical rock pile. Flatter surfaces and shallow bowls in larger rock shapes can make latter placement easier.
15. You can make rock “shells†if you want to avoid the rock pile look altogether and these are only limited to your imagination and size constraints. You can stuff the cavity in the back of this hollow construction with cheap $1.99/lbs rock, or whatever you want. I DO NOT recommend making these with the cement and salt only recipe! Make a form of some sort (use your imagination), put it in a box that will fit into your tank (making a rock too big for the target tank blows), and secure it to one side, or more (for multi-part casts) with duct tape. Line the rest of the box with plastic. I made my form from plastic grocery bags stuffed into a garbage bag, with a little air added, and taped that into the target box. Slowly build the shell wall (adding details as you wish), filling the box with salt/molding material, until you have the form covered with a fairly uniform covering of cement. LEAVE ALONE FOR A WEEK! Cover with plastic if you can. See my gallery for pictures of the “â€ÂReef Face†or “Nessyâ€Â.
16. Frag Plugs. If you have extra cement at the end of the day, make frag plugs by using a mini muffin pan, and filling with ½in. of cement. Spray the pan with cooking spray for easier release. These can be put in a mesh bag and cured in the toilet tank.
17. Hate scraping the back wall of your tank? You can make thin, wall covering sheets, that can be glued with silicone to the back wall of your tank. Alternatively you could make shelves along those lines. I find casting on a sheet of glass covered in plastic works best for this. Also marking out the actual measurements of the back wall onto the glass helps to avoid sizing issues. I DO NOT recommend using the salt and cement only recipes for this application, nor the use of any salt at all! I also mix this just a little wetter than I normally use. Once you are setup, just drool the cement onto the covered glass. I tried doing large sheets, but these mostly were too weak to hold up and heavy. I find making smaller pieces (12inX12in or so) that abut like a puzzle work best, and sort of give the illusion of looking at a cracked and crevassed reef wall. After you cast these, they need to be kept moist and unmoved for 3 days, 7 days being much better. Believe me. They do. And you will need to mist them once a day. I just covered mine with a garbage bag and used a water bottle to mist it. I recommend an acid wash, as described above, once these have kured for a week.
18. If you make a rock or rocks you don't like, either use fresh cement mix to add some new bits, or break the rock up and use it as aggregate in your next batch - no waste is good.
19. The moister you can keep the cement while it cures, the harder the final rock will be - try wrapping it in a bag, or misting it while it cures. Supposedly, if you can let it sit for two to four weeks before starting to water kure, it will dramatically speed the kure time.
20. Dust your molding sand with oat flour for easy removal of surface sand. Thanks Rhody!
21. Mix molasses with your molding sand to give it more texture. Thanks Rhody!
22. Replace up to 1/3 of your cement with “Hydrated Lime†â€"œ this reduces the over-all alumina content of the cement (and boosts the calcium content) and makes it more resistant to potential “Sulphate Attackâ€Â.
Various things I have used and have worked for me for adding details:
1. Cemented Nylon String. Makes realistic tube worm/duster tubes. Make a thin paste of just cement, and dip small lengths of the sting in. Wipe excess off between fingers and lay onto the rock in desired figure.
2. Veggie Capsules. These can make little tunnels when laid end to end in the wet cement, and then covered with more cement. Or poke into outside edges to mimic polyp holes. Do NOT mix into the cement mix.
3. Nori Sheets. These can be wetted and formed into shapes or rolled into tunnels.
4. Balloons. Both the round and “animal†ones work. I find that filling them with water makes them stronger. Doubling them up works well too. Make sure that you can get the balloon out afterward - i.e. leave the knot sticking out.
5. Cardboard Rolls. Can be cut to form bracing, tunnels or for pillar shapes. Be sure to use it in such a way as will allow you to remove it after a few days of kuring. Hemostats work great for grabbing a-hold and pulling it out.
6. Tissue Paper. The white stuff you find in gift bags. Disintegrates quickly during kure. You can make little (or big) “salt bagsâ€Â, that you can lay into the middle of larger rocks to give more holes for ‘pods and the like. Can be used to make caves and tunnels. Just use a small bit of paper, lay some salt in it and twist or tuck the ends â€"œ a small bit of cotton thread could be used to secure the package too.
7. Pasta. Must be cooked “Al Dente†before use. Do not mix into cement, it only makes a mess and is a pain to get out of the rock as it gets really hard and crunchy when the rock dries (ever scraped 3 day old pasta off a plate?).
Kured Rock that the pasta is stuck in...
Use to add spaces in the rock, or tunnels with spaghetti (at your own risk). Rigatoni adds a nice effect if placed just right. If you use pasta, you MUST keep the rock moist at all times â€"œ if the pasta dries, it will most likely never come out, ever.
8. Jelly. No, not like PB&J, but those toys, etc made of the product known as silicone jelly â€"œ often comes in wiggly balls. Also fishing bait worms made of the jelly/rubber. No need to lube them â€"œ they will release just fine.
Things that DO NOT work:
1. Vinegar/acid kuring. Does have its uses, but don’t expect it to kure your immature rock â€"œ it won’t. Acid, as a general rule is BAD FOR CEMENT, especially porous cement! A weak solution can be used on FULLY CURED rock to hasten the leeching of the Calcium Hydroxide, but using it too soon, or using too high of a concentration is detrimental to the cement. If you must use it, use regular vinegar at ¼ cup per gallon of kure water, and use it only if your rock is at least a month old or the equivalent (steam cured, etc.).
2. Bio-degradable packing peanuts/Cheesy-poofs. I can find no way to really use these that is also safe for the tank.
3. Fish food pellets. That was really, really nasty. I don’t want to go there.
4. Uncooked Pasta. As pasta absorbs water, it expands, causing the cement to fracture and crack â€"œ cook it al dente if you really want to use it.
5. Alka-Seltzer. Doesn’t work. It dissolves too quickly.
6. Yeast. Doesn't work. pH of either the mud or the kure water kills the cells before they can respirate.
7. Co2. Adding into H2O will only make soda pop (carbonic acid), and eat away at your rock, causing fresh, high pH surfaces to be revealed. It can work, but only under high pressure, or in a dry, contained space with a saturation of Co2 for the "atmosphere".
Last edited:
Insane Reefer
New member
Salt Release
If you used salt in your rock, it must be removed before kuring can happen. Salt will release in warm water much easier than it will in cold water, and really hot water (150°F) works best of all. Do not boil cement as temperatures of over 150°F can be damaging to the matrix of the rock; water boils at 212°F â€"œ 150°F is around the hottest that home water heaters go to, so the hottest tap water you have would be perfect. Also be careful about “shocking†the cement â€"œ cement is a crystalline structure and sudden changes in temperature (such as using cold water to refill a bin that was heated) can cause micro-fractures that in turn can lead to rock failure down the road. Allow warm rock to cool before putting it in cold water.
Removing the salt will take multiple water changes. It generally takes two days to two weeks to remove salt, based on factors such as temperature and movement of the water, wetness of the mud, aggregates used and density of the cast piece.
If you aren’t sure that the salt is gone, you can do a “Taste Testâ€Â. After draining and rinsing the rock (pick your largest/thickest piece), allow the water to drain out for a few minutes. Pick the rock up and use your finger to catch a drip of water from the bottom of the rock and taste it. If there is still salt present, the water drop will be salty. If the salt is gone, the drop will taste of mineral water and very slightly sweet.
Rock Kuring
Kuring your rock is the next hurdle. It is really, really best to leave your rock alone for at least a week before starting this step. According to Quikcrete reps, it takes at least 7-14 days for the rock to stop curing/hardening (though this process is actually going on for a lot, lot longer) - even though it looks and feels done. Testing standards say it takes 28 days to reach full strength and before testing for commercial applications can commence. By putting your rock in the kure bin too soon, you are wasting a lot of water, prolonging the hydration process and making weaker rock. Rocks during this 2-4 week period will naturally loose pH - from 12-13 at casting time down to 9-11, with NO WATER USED. I have been finding that by leaving the rock alone for a month or so, my average kure takes less than 2-3 weeks (and a lot less water and effort!).
Kuring is pretty straight forward. Lots of time, and lots of water changes with adequate water volume, unless you have access to a reasonably clean, free flowing waterway. This step is dramatically decreased if you wait until the 4-5 week range of your rocks life. Powerheads help force water through the rock and help the insides kure out. Adding heat to the bucket, upwards of 90°F will really speed things along, and if you can get it to around 150°F, it will happen even quicker. It is much like mixing sugar into tea. If you put sugar into iced tea, it can be almost impossible to get it to dissolve, but you can add the same amount of sugar to a cup of hot tea and it almost instantly dissolves. Same principle here. The cooler your kure water is, the longer it will take the rock to kure.
When your bucket kured rock quits leeching out scum on the surface of the water, and stops leaving a white residue on the bottom of the bucket and on the rocks themselves, you can start checking for pH. Rock has been known to kure in as little as 2 weeks, but most bucket/bin kured rock takes 6-8 weeks to reach safe levels â€"œ some will take up to 3 months. Be prepared to wait.
When your tests indicate that the rock might be done, you will want to do a proper pH test on it. To properly test for pH, use saltwater â€"œ saltwater is preferred since this is what the rock will be sitting in for the rest of its life. Feel free to use old water from a tank change, just test the pH prior to use. Let the rock sit in this for 3-4 days without air or powerheads â€"œ you want still, stagnant water for this. After the 3-4 days, give the water a bit of a stirring and check pH with appropriate test kit. If it is in the acceptable range of 7.0 to 9.0, it is probably safe to use. If not, continue to kure.
You can use any acceptable pH testing method. The test you use should have a testing range of 5-10 at a minimum. I like using Litmus Paper. It can read pH from 1-14, and is fairly easy to read. Litmus paper can be gotten at “Hobby Lobby†for $3.89 per 100 strips. These can also be used to test your reefs’ pH") Litmus can also be found at pharmacies, online, and at other full service hobby stores, usually in the section that has things like “Magic Crystalsâ€Â, and horseshoe/bar magnets â€"œ the “Science Sectionâ€Â.
Litmus can also be found at pharmacies, online, and at other full service hobby stores, usually in the section that has things like “Magic Crystalsâ€Â, and horseshoe/bar magnets â€"œ the “Science Sectionâ€Â.
Once kuring has finished your rock can be used
If added to a newly established tank, you can go ahead and put it all in at once. If the tank is older, with inhabitants, you may wish to add a rock or two at a time, to allow the system to “settle†between each addition. Maintain pH testing for the first two weeks and buffer if needed.
Expect an algae bloom. :eek1:
A few people, those who either have waterways to kure in, or those with really butch systems have reported no algae blooms, but I suspect they are the exception, not the rule. If your tank blooms, don’t panic. Most tanks bloom within the maturation period anyway. Double check your system for things like NO2 and NO3, and other algae causing symptoms and correct anything that isn’t up to snuff. Take all the normal steps to curtail the growth, but then just ride it out. If the bloom is caused by the rocks, the algae will soon deplete the readily available nutrients and starve itself out. If it doesn’t go away within a few months, then you should check into other reasons for the bloom.
If you place your rock in tank with low light for two weeks to a month, you can avoid most of the bright green covering algae â€"œ low lights allow the rock to settle in without being attacked by algae so badly, or so it seems, IME…
Expectations
And in conclusion, I'd like to address expectations. I have a feeling that some people are expecting the rocks they make to be as hard as cement blocks or cement stepping stone, because, after all, they are made with cement, so it should be, right? Well, in this case, no - they won't be.
Let's compare our “mud†to a typical cement poured “slurryâ€Â.
First, poured commercial slurry's are made with a higher ratio of cement than we usually use. Next, they add enough water that they can pour the slurry - much like a milkshake. I've never been able to pour my mud; we try to make ours as dry as we can and still have it stick together. Now take a look at the aggregates - they use dense sands and gravel, we usually use calcium based substances when we can - there is a marked difference in each of these as far as strength goes.
And finally, when cement is poured, they try to get it settled down - they drag tools over it to smooth it and make sure it is even and all that, and sealing the surface. We go for as much openness as possible, and we try not to pack the mud if we can help it.
Looking at it like this might help people come to a better understanding of what a reasonable expectation of their rock might be.
Our rock is going to flake and shed. The more porous the rock is, the more likely it will be to do so. The better the mud is made though, the less you will see of it. Maybe you have seen a box of real live rock just after shipping. If you have, you probably noticed the rubble in the bottom. Most distributors are not in the habit of making up the extra weight in a box with rubble - that would be bad business. Most of that rubble simply came from the rock during shipping. Calcium based rock is not the strongest in the world, and essentially, our rock is calcium based.
But flaking and shedding are not the same as brittle rock. Your rock is brittle if you can snap large pieces off after a month or two. Small bits rubbing off is not necessarily indicative of failed rock, those could just be pieces that didn't get adhered well.
My first piece of advice would be to wait. It takes a month for the curing process to reach near completion and the rock to reach something close to its final strength. If your rock seems brittle or flaky, beyond what you should reasonably expect, just leave it alone for a month, in a moist (not wet), warm environment, like a plastic bag. Some of the early salt rock I made seemed really brittle, too brittle to use, certainly, for the first couple of weeks. It was when I later found it again, in the bottom of a bucket outside, that I realized how nicely it had hardened up. If after leaving it alone, you can easily snap sizable portions off (golf ball sized?), then you have a problem.
My next piece of advice would be to use a stiff bristled brush, like what you use to clean your grill, to give your rock a good once over when it reaches about four weeks old (or after the pH test in Jiffy Rock). This will remove about 90% of the shedding and flaking, if the shedding and flaking isn't due to rock failure that is. If you have done this and a couple of weeks later it is readily shedding again, then I'd say you might have a problem.
Remember that even slight variations can make a huge difference. Humidity and Temperature at casting and during the cure can make drastic differences. A tablespoon of water can make a difference on smaller batches - too wet and too dry can be a fine line. Differences in the cement itself can wildly vary - every plant uses its own recipe to make the clinker. Differences in local materials used for the recipe can often vary with availability and cost. My white cement is going to be different then Neptunes' cement, and his, even from the same plant as Sunkools' may vary as well, from lot to lot.
Salt can mess up the strength of your rock, so if you used salt, think about that. If you added it upfront, with the aggregates, you may have over-mixed it and too much salt mixed into the batch. Try adding the salt after the mud is mixed and ready - and just lightly mix it in.
A ratio of 1:3 to 1:5 is best for us. 1 part cement to 3-5 parts "other", which can include salt.
And finally, realize that even the best made rock can still chip and shed once in a while. Moving it around in your tank, bumping it against each other (esp larger pieces), will inevitably cause bits to shed or chip off, unless you went for rounded ball like shapes, which seem to loose less, but also seem less porous and less attractive too.
I hope this helps a few people out there. I know that having something you worked hard on, that doesn't turn out like you wanted, can be disappointing. Hopefully this will help people understand what they should expect, and what they can do to correct it...
Well, I think that about covers my repertoire. I apologize for the length of this post, but hopefully some of you will find something of use…
I encourage the rest of you to take some time to write up your experiences and tips and share them with us â€"œ by sharing our experiences, we all learn and get better and better at making our own rock.
Good Luck, and Rock On!
:rollface:
If you used salt in your rock, it must be removed before kuring can happen. Salt will release in warm water much easier than it will in cold water, and really hot water (150°F) works best of all. Do not boil cement as temperatures of over 150°F can be damaging to the matrix of the rock; water boils at 212°F â€"œ 150°F is around the hottest that home water heaters go to, so the hottest tap water you have would be perfect. Also be careful about “shocking†the cement â€"œ cement is a crystalline structure and sudden changes in temperature (such as using cold water to refill a bin that was heated) can cause micro-fractures that in turn can lead to rock failure down the road. Allow warm rock to cool before putting it in cold water.
Removing the salt will take multiple water changes. It generally takes two days to two weeks to remove salt, based on factors such as temperature and movement of the water, wetness of the mud, aggregates used and density of the cast piece.
If you aren’t sure that the salt is gone, you can do a “Taste Testâ€Â. After draining and rinsing the rock (pick your largest/thickest piece), allow the water to drain out for a few minutes. Pick the rock up and use your finger to catch a drip of water from the bottom of the rock and taste it. If there is still salt present, the water drop will be salty. If the salt is gone, the drop will taste of mineral water and very slightly sweet.
Rock Kuring
Kuring your rock is the next hurdle. It is really, really best to leave your rock alone for at least a week before starting this step. According to Quikcrete reps, it takes at least 7-14 days for the rock to stop curing/hardening (though this process is actually going on for a lot, lot longer) - even though it looks and feels done. Testing standards say it takes 28 days to reach full strength and before testing for commercial applications can commence. By putting your rock in the kure bin too soon, you are wasting a lot of water, prolonging the hydration process and making weaker rock. Rocks during this 2-4 week period will naturally loose pH - from 12-13 at casting time down to 9-11, with NO WATER USED. I have been finding that by leaving the rock alone for a month or so, my average kure takes less than 2-3 weeks (and a lot less water and effort!).
Kuring is pretty straight forward. Lots of time, and lots of water changes with adequate water volume, unless you have access to a reasonably clean, free flowing waterway. This step is dramatically decreased if you wait until the 4-5 week range of your rocks life. Powerheads help force water through the rock and help the insides kure out. Adding heat to the bucket, upwards of 90°F will really speed things along, and if you can get it to around 150°F, it will happen even quicker. It is much like mixing sugar into tea. If you put sugar into iced tea, it can be almost impossible to get it to dissolve, but you can add the same amount of sugar to a cup of hot tea and it almost instantly dissolves. Same principle here. The cooler your kure water is, the longer it will take the rock to kure.
When your bucket kured rock quits leeching out scum on the surface of the water, and stops leaving a white residue on the bottom of the bucket and on the rocks themselves, you can start checking for pH. Rock has been known to kure in as little as 2 weeks, but most bucket/bin kured rock takes 6-8 weeks to reach safe levels â€"œ some will take up to 3 months. Be prepared to wait.
When your tests indicate that the rock might be done, you will want to do a proper pH test on it. To properly test for pH, use saltwater â€"œ saltwater is preferred since this is what the rock will be sitting in for the rest of its life. Feel free to use old water from a tank change, just test the pH prior to use. Let the rock sit in this for 3-4 days without air or powerheads â€"œ you want still, stagnant water for this. After the 3-4 days, give the water a bit of a stirring and check pH with appropriate test kit. If it is in the acceptable range of 7.0 to 9.0, it is probably safe to use. If not, continue to kure.
You can use any acceptable pH testing method. The test you use should have a testing range of 5-10 at a minimum. I like using Litmus Paper. It can read pH from 1-14, and is fairly easy to read. Litmus paper can be gotten at “Hobby Lobby†for $3.89 per 100 strips. These can also be used to test your reefs’ pH
Litmus can also be found at pharmacies, online, and at other full service hobby stores, usually in the section that has things like “Magic Crystalsâ€Â, and horseshoe/bar magnets â€"œ the “Science Sectionâ€Â. Once kuring has finished your rock can be used
If added to a newly established tank, you can go ahead and put it all in at once. If the tank is older, with inhabitants, you may wish to add a rock or two at a time, to allow the system to “settle†between each addition. Maintain pH testing for the first two weeks and buffer if needed.
Expect an algae bloom. :eek1:
A few people, those who either have waterways to kure in, or those with really butch systems have reported no algae blooms, but I suspect they are the exception, not the rule. If your tank blooms, don’t panic. Most tanks bloom within the maturation period anyway. Double check your system for things like NO2 and NO3, and other algae causing symptoms and correct anything that isn’t up to snuff. Take all the normal steps to curtail the growth, but then just ride it out. If the bloom is caused by the rocks, the algae will soon deplete the readily available nutrients and starve itself out. If it doesn’t go away within a few months, then you should check into other reasons for the bloom.
If you place your rock in tank with low light for two weeks to a month, you can avoid most of the bright green covering algae â€"œ low lights allow the rock to settle in without being attacked by algae so badly, or so it seems, IME…
Expectations
And in conclusion, I'd like to address expectations. I have a feeling that some people are expecting the rocks they make to be as hard as cement blocks or cement stepping stone, because, after all, they are made with cement, so it should be, right? Well, in this case, no - they won't be.
Let's compare our “mud†to a typical cement poured “slurryâ€Â.
First, poured commercial slurry's are made with a higher ratio of cement than we usually use. Next, they add enough water that they can pour the slurry - much like a milkshake. I've never been able to pour my mud; we try to make ours as dry as we can and still have it stick together. Now take a look at the aggregates - they use dense sands and gravel, we usually use calcium based substances when we can - there is a marked difference in each of these as far as strength goes.
And finally, when cement is poured, they try to get it settled down - they drag tools over it to smooth it and make sure it is even and all that, and sealing the surface. We go for as much openness as possible, and we try not to pack the mud if we can help it.
Looking at it like this might help people come to a better understanding of what a reasonable expectation of their rock might be.
Our rock is going to flake and shed. The more porous the rock is, the more likely it will be to do so. The better the mud is made though, the less you will see of it. Maybe you have seen a box of real live rock just after shipping. If you have, you probably noticed the rubble in the bottom. Most distributors are not in the habit of making up the extra weight in a box with rubble - that would be bad business. Most of that rubble simply came from the rock during shipping. Calcium based rock is not the strongest in the world, and essentially, our rock is calcium based.
But flaking and shedding are not the same as brittle rock. Your rock is brittle if you can snap large pieces off after a month or two. Small bits rubbing off is not necessarily indicative of failed rock, those could just be pieces that didn't get adhered well.
My first piece of advice would be to wait. It takes a month for the curing process to reach near completion and the rock to reach something close to its final strength. If your rock seems brittle or flaky, beyond what you should reasonably expect, just leave it alone for a month, in a moist (not wet), warm environment, like a plastic bag. Some of the early salt rock I made seemed really brittle, too brittle to use, certainly, for the first couple of weeks. It was when I later found it again, in the bottom of a bucket outside, that I realized how nicely it had hardened up. If after leaving it alone, you can easily snap sizable portions off (golf ball sized?), then you have a problem.
My next piece of advice would be to use a stiff bristled brush, like what you use to clean your grill, to give your rock a good once over when it reaches about four weeks old (or after the pH test in Jiffy Rock). This will remove about 90% of the shedding and flaking, if the shedding and flaking isn't due to rock failure that is. If you have done this and a couple of weeks later it is readily shedding again, then I'd say you might have a problem.
Remember that even slight variations can make a huge difference. Humidity and Temperature at casting and during the cure can make drastic differences. A tablespoon of water can make a difference on smaller batches - too wet and too dry can be a fine line. Differences in the cement itself can wildly vary - every plant uses its own recipe to make the clinker. Differences in local materials used for the recipe can often vary with availability and cost. My white cement is going to be different then Neptunes' cement, and his, even from the same plant as Sunkools' may vary as well, from lot to lot.
Salt can mess up the strength of your rock, so if you used salt, think about that. If you added it upfront, with the aggregates, you may have over-mixed it and too much salt mixed into the batch. Try adding the salt after the mud is mixed and ready - and just lightly mix it in.
A ratio of 1:3 to 1:5 is best for us. 1 part cement to 3-5 parts "other", which can include salt.
And finally, realize that even the best made rock can still chip and shed once in a while. Moving it around in your tank, bumping it against each other (esp larger pieces), will inevitably cause bits to shed or chip off, unless you went for rounded ball like shapes, which seem to loose less, but also seem less porous and less attractive too.
I hope this helps a few people out there. I know that having something you worked hard on, that doesn't turn out like you wanted, can be disappointing. Hopefully this will help people understand what they should expect, and what they can do to correct it...
Well, I think that about covers my repertoire. I apologize for the length of this post, but hopefully some of you will find something of use…
I encourage the rest of you to take some time to write up your experiences and tips and share them with us â€"œ by sharing our experiences, we all learn and get better and better at making our own rock.
Good Luck, and Rock On!
:rollface:
Insane Reefer
New member
Looking good, Seagul
Surprised about the lack of algae/diatom though. My rock had a decent covering of diatom within 24 hours and my tank, like yours was brand new, with a few pieces to seed. I wouldn't worry about it though, I just find it curious.
Very interesting, thanks for posting this. That would blow my buddies idea out of the water, if there isn't any place for bacteria to grow. Could you possibly get the info on the test place your buddy used, or maybe put me in touch with your buddy directly? I might be interested in sending off some MLR to see what there is to see, but wouldn't know where to go...
Surprised about the lack of algae/diatom though. My rock had a decent covering of diatom within 24 hours and my tank, like yours was brand new, with a few pieces to seed. I wouldn't worry about it though, I just find it curious.
<a href=showthread.php?s=&postid=12359456#post12359456 target=_blank>Originally posted</a> by cmpenney
A member of my club had set up a new 270 and used only the ceramics in his display. He had all sorts of problems. After banging his head against the wall for a few months he finally pulled some of it out and sent it in to be tested.
Very interesting, thanks for posting this. That would blow my buddies idea out of the water, if there isn't any place for bacteria to grow. Could you possibly get the info on the test place your buddy used, or maybe put me in touch with your buddy directly? I might be interested in sending off some MLR to see what there is to see, but wouldn't know where to go...
grannybj
New member
CMPenny I am the one that has ceramic rocks in my tank that I have made myself. I would never put only ceramic rock in my tank but I have had good results with the ones I have mixed into my real live rock. I am very attached to the established ceramic pieces I have . I fired 4 more rocks last weekend to do some creative fragging on. I have them in my sump and after another week or so,I will break apart one of the new rocks and see what I find. It's to soon to know if anything but water has penetrated the piece.
I picked up some A.R.M. media to work into some clay and fire off. I think it may give me the voids that are so hard to create in the clay. And most natural materials are safe in the kiln...as in they don't blow up.
I picked up some A.R.M. media to work into some clay and fire off. I think it may give me the voids that are so hard to create in the clay. And most natural materials are safe in the kiln...as in they don't blow up.
Insane Reefer
New member
Ah, that's right - I knew it was someone who doesn't post often, and for some reason Yin kept coming to mind. Sorry about that.
There are so many different types of clay that one would think there is something out there that would fit the bill. I seem to recall something about powdered clay - I would think that that would be a good place to start, if such exists. That would make it easy to blend in aggregates.
There are so many different types of clay that one would think there is something out there that would fit the bill. I seem to recall something about powdered clay - I would think that that would be a good place to start, if such exists. That would make it easy to blend in aggregates.
reefnewbie54321
In Memoriam
I browse through this thread all the time but never post but I just read about the "Mini Rock Suana" and how everone was going about building them. Heres what I would do....
Get anything that is insulated such as a cooler. Fill up the cooler with boiling water and drop in a fogger head.
http://www.mainlandmart.com/foggers.html
The cooler would keep the water hot for a long period of time and the fogger head would produce a thick hot steamy mist that would fill the entire cooler. You would just need some tpe of rack to hold the rocks out of the water.
I think this would be a simpler and more effective method then using a pressure cooker's exhuast as a source of steam. And almost all humidifers are pointless in trying to use becase they dont produce steam but col mist. Vicks does make a steam vaporizer but It is very small and does not produce a large quanity of steam.
Insane Reefer
New member
I can sort of give this a trial without the expense of purchasing one of these thingy's. Which are cool mist too, so the same as most humidifiers on the market today.
I just picked up a humidifier, which is a cool mister too, and can test the idea - if I fill it with hot water, in theory, if this were to work, hot mist would come out.
I'm going to go out on a limb and say that this won't work - I don't think that the cooler will be able to provide steam (keep the water that hot) for 6-8 hours.
I really do appreciate the idea, and I will test it in a moment - after I've made some coffee.
Insane Reefer
New member
Ok. I've tried a test with the cool mist humidifier I have. If you put really hot water in (150°F), warm mist does comes out. But it is only warm, not hot...
My concern is that I know from my previous runs with the MRS that the cooler itself will cool fairly rapidly to 110°F, at which point it can sit there for several hours - this I think is it's "sweet spot" as far as keeping stuff warm. Boiling water would quickly stop being boiling water, and I don't think this will be able to raise the temp in the steaming box to 150°F without the water boiling, and continuing to boil through-out the stream phase.
But I really like the idea. I also like the idea of using a cooler hooked to my larger rock sauna to act sort of as the "powerhouse".
Wonder how we could get this to work?
Thanks for the idea, Reefnewbie!
Rysam
New member
this is a bit spendy, but im sure the concept could be adapted to heat/boil a 5 gallon bucket of water somehow. maybe concentrate the beam on a small section of tubing with a pump to the main reservoir? just another idea to play with on spring break. not as convenient as a steamer but the sun is free and the utility man isnt .
http://www.sunoven.com/order.asp
.
http://www.sunoven.com/order.asp
.
Insane Reefer
New member
Those are kinda cool - they've been mentioned before way back when I was first trying to come up with a heat based option. I kinda want one just to use for it's intended purpose - I have a friend with one and she loves it.
I think my dad has one of those really big stock tank heaters - they keep the tank from freezing over in the winter, and I know there are solar powered models; I'll ask him and see if I can borrow his if he does. I've wondering how warm they can heat a smaller volume of water? Probably not enough to produce steam, but might be useful in the kure bin...
Folks don't really see the cost utility-wise when they go to make rock. They generally just see that they can make 300lbs of rock for under $25, and don't realize that the kure of rock often costs more than the rock itself does - not that this is an issue for the hobbyist who is just making a couple of batches for personal use, but for those thinking of going commercial, these costs do make an impact.
Once I'm in full production, I estimate that my electric bill will increase about 15% and my water bill will increase about 20% to produce around 500lbs a month. And that is with the rain water I collect, which during the summer and winter will not be enough to process the rock.
Similar threads
- Replies
- 0
- Views
- 41
- Replies
- 0
- Views
- 165