Wooden External Overflow Box?

What if it was made like a glass holes overflow box that sat on the outside? A bulkhead would pass through the glass and through the wood wall with gaskets between the glass/wood and in the inside of the tank. That would hold the box on the tank without needing silicone. I would do it with multiple holes (like 3) and have elbows on the inside of the tank. You would still need to make a wood box with 4 walls and a bottom and epoxy the entire thing well enough that it didn't leak.

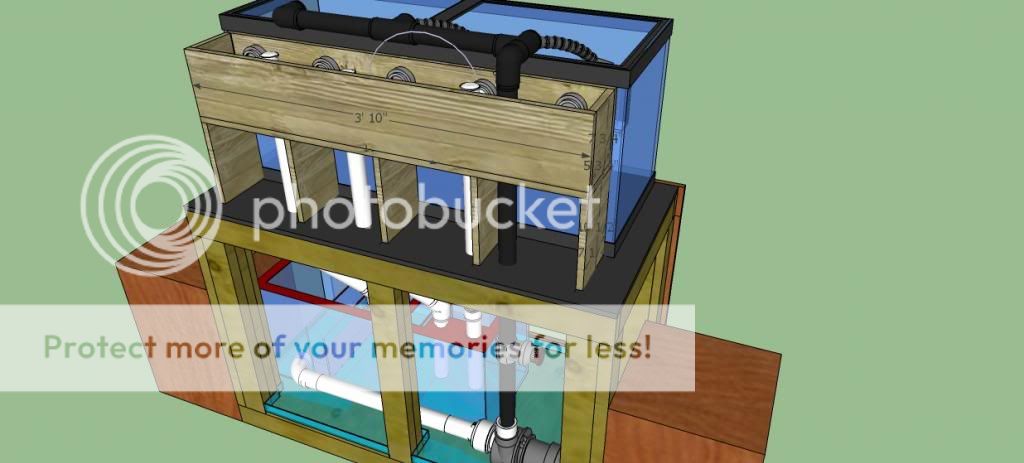
Thanks for your response, UserName. Yes, you are describing my setup, to some degree. My setup is a 75-gallon tank, with an internal, coast-to-coast/Calfo overflow box that is not very deep from front to back. The internal overflow box is made of glass, is already installed. It was much easier to make than an external overflow box made of glass because the internal box has only two pieces of glass, but the external box has four pieces of glass. The system utilizes a BeanAnimal overflow system, plumbed to an external overflow box. Thus, as you describe, 5 bulkheads pass water through 5 holes drilled in the back wall of the aquarium. The water is channeled into an external oveflow box, which has 3 PVC-elbow drain lines, giving effect to the BeanAnimal system. Here, you are saying to use gaskets on both sides of the bulkhead: (1) at the flange side, in the internal box, where the flange of the bulkhead lodges against the inside of the back, aquarium-glass wall; and (2) at the nut side, in the external box, at the inside of the bulkhead lock nut. You are saying to epoxy the whole box, to ensure against leakage. Yes, this is the plan, right now. I'm just hoping that attachment of the overflow box by resort to the 5 bulkheads screwed into place will be sufficient to support the weight of the external overflow box. Thanks.

The gasket is only a measure for just in case your water level inside your box reaches back to the bulkhead. If you use rubber gaskets, they won't affect the nut or the threads on the bulkhead. You can use a gasket on both sides of the box, but depending on the thickness of your glass, gaskets, and wood for the box, you may run out of thread on your bulkheads.

Thanks, Cymonous. So you're saying that installing a second rubber gasket at the nut end of the bulkhead, in the external box (in addition to the one installed at the flange side of the bulkhead in the internal overflow box) would ordinarily not be needed. However, you say, in case the water level of the external box rises to the height of the bulkhead, the rubber gasket there would prevent any backflow out of the wooden box, to the seam separating the tank and the box, causing leakage. That sounds like a good suggestion. You're saying that to use a gasket there, as a second bulkhead gasket, will not cause any harm. Thanks.

I still think you are better off working with acrylic, it may cost you more up front but will last longer, it will be easier to glue, and look cleaner. You can also make it with four walls and glue with silicone one whole side to the tank. The one I showed you worked with a U pipe to transfer the water to the outside. But drilling the tank is better, no problems with air getting in there. Why does it need to be so big? Four feet long seens pretty big.

Thanks, Lazhar. I'm not concerned with how it looks because it will be behind the tank, covered in a hutch, and no one will possibly see the box. I am not convinced that acrylic would be easier to glue than wood, which is super easy to glue. Acrylic is costly, and wood is cheap. However, it would be easier to work with acrylic, from the perspective that the wood will require several coats of epoxy paint, whereas acrylic will not. However, I like working with wood, and I like the idea of using wood because it is ubiquitous and cheap. Acrylic must be in the proper thickness, which is costly and less available. Why do you say that acrylic will last longer than wood? You might be right. Does the epoxy on the wood wear out? I'm not sure. Also, it may be that the wood is stronger than the acrylic, because I can use thicker planks of wood--say 3/4" thick-- than I could readily obtain at reasonable cost in acrylic. Yet, if wood doesn't work out, then maybe your acrylic idea would be the other way to go. Thanks.

You can also use silicone on the treads, it will make it permanent but it will hold the water.

Thanks, Lazhar. Are you saying to screw up the bulkhead nut and then silicone the threads to seal it, or to add strenghth? I'm not clear here. Thanks.

If you are going to put anything on threads, you should use plumber's tape. It is meant to seal threads and does not make it permanent.

Thanks, Cymonous. Actually, if I were to put anything on the threads, it would be plumbers grease, rather than plumber's tape. It seems like a better way to go, for water-sealing purposes. I've used plumber's grease before, and it has caused fewer problems for me than when using plumber's tape. Thanks.

GENERAL QUESTION, EVERYONE: should I use plywood, given its superiority of strength over a plank of pine or oak? Wood experts, what do you think? Thanks, everyone, for their advice and observations.
 
Last edited:
Plywood Overflow Box: Materials and Construction

Plywood Overflow Box: Materials and Construction

Last night I was looking at websites that provide details on building plywood tanks. Scaling these models down to the size of an overflow-box seems quite doable. Once site in particular, http://www.garf.org/140.gallon.html, provided helpful details on the particular materials and methods used to build plywood aquariums.

Applying the same principles here, to build a waterproof, external overflow-box made of plywood, I would use most of the materials listed on the website, excluding the glass. Instead, I would build four walls and a floor made of plywood. Special thanks to Garf's Reef at the website above, for these helpful instructions.

If you all disagree with the materials or methods of this construction, or have helpful suggestions, please chime in. Thank you.

A. Materials to Build a Plywood, External Overflow-Box

Distilling the information from the website linked above, I will need the following materials to build a plywood, external overflow-box:

  • 3/4 inch, AC EXTERIOR plywood;
  • 2-inch drywall screws;
  • Resorcenol waterproof glue;
  • autobody putty w/ hardener;
  • two-part epoxy paint;
  • silicone caulk, non-toxic aquarium suitable;
  • 120 grit sandpaper;
  • 220 grit sandpaper; and
  • paper towels.
B. Instructions for Constructing the Plywood, External Overflow-Box

I have adapted the instructions from the website linked above, to apply to an overflow box. Specifically, in I have substituted references to a "face frame" (that would accommodate a glass panel) with references to a "face panel," given that the box will have four walls, not three walls and a frame for a glass panel. I have also corrected very minor typographical and order-of-instruction errors that were contained in the original.

Note regarding the use of stanchions during construction: the instructions calling for the use of stanchions explain that the stanchions may be a box or anything of the correct height, to support the plywood pieces during construction. The original instructions called for two 16-inch stantions because the tank being constructed was 16 inches tall. Thus, one must scale down the height of the stantions, to match the height of the overflow box, for proper clearance and support of the panels. Here, I will be building an overflow box that is 8 inches tall. Hence, the instructions below call for two 8-inch stantions.

Here are the instructions for building the plywood, external overflow-box:

  • Inspect all plywood pieces for rough or flawed edges, which might later affect tank integrity. Sand as needed;
  • Lay the bottom panel on two 8-inch stanchions;
  • Apply glue along all four edges of the bottom panel, sufficiently heavy to accommodate the edges of the back panel, end panels, and face panel.
  • Turn the bottom panel over, glue-side down, centered on the stanchions so that all edges of bottom panel are accessible.
  • Raise the back panel up, under the bottom panel, mating the long edge of the back panel into the glue along edge of bottom panel. Ensure that the edges are flush, and that they make a 90-degree corner;
  • Using a screwgun, screw the back panel to the bottom panel, inserting 2-inch drywall screws at 3-inch intervals along entire length. ENSURE THAT ALL SCREWS ARE FULLY SEALED, AND TIGHT;
  • Apply glue along one 16-inch edge of each end panel;
  • Raise each end panel up under bottom panel, and screw tightly to both bottom panel and backpanel. Place drywall screws at three inch intervals;
  • Apply glue along inside edges of face panel, where they will mate with the end panels;
  • Raise face panel up under the remaining edge of bottom panel, and screw the face panel into the bottom panel and end panels. Use three (3) screws in each end, and use the normal three-inch intervals along the length. Ensure that all edges are flush, and tight, after final tightening of screws;
  • WIPE EXCESS GLUE FROM ALL JOINTS AFTER FINAL TIGHTENING, AS IT IS VERY DIFFICULT TO CHIP OR SAND AWAY AFTER IT IS HARDENED;
  • Turn partially-completed tank right side up on stanchions for inspection. At this point, all panels screwed together should rest on the bottom panel, for the strongest possible base. If this is not the case, quickly disassemble the pieces before the glue sets, and reassemble properly;
  • Recheck all work, wiping away excess glue, and insuring that corners are square, true, and not pulled open by later construction; and
  • Allow to dry overnight if possible, though this is not critical.

C. Instructions for Painting the Plywood, External Overflow-Box
  • PRECAUTIONS: FOR ALL PROCEDURES INVOLVING EPOXY PAINT, THE FOLLOWING PRECAUTIONS MUST BE ADHERED TO:
    1. NO SMOKING;
    2. DO NOT LET BRUSHES DRY;
    3. DO NOT BREATHE FUMES;
    4. APPLY PAINT IN A WELL-VENTILATED AREA, PREFERABLY OUT-OF-DOORS, AND MOST ESPECIALLY AWAY FROM THE AIR INTAKE. THE FUMES ARE HIGHLY TOXIC AND THEY MAY RESULT IN SERIOUS RESPIRATORY PROBLEMS IN HUMANS IF THEY ARE CONCENTRATED AND EXPOSURE IS PROLONGED.
  • Apply epoxy paint to all exposed wood surfaces of tank;
  • Make coat of paint as thin as possible, while covering the wood surfaces completely, because the paint runs easily;
  • Allow coat to dry overnight;
  • Fill all cracks and holes with autobody putty, making as smooth a surface as possible, depicted as follows:

    putty140_zps190f6dc8.gif
  • Sand entire surface, using 120-grit paper or power sander, and apply second coat. Again, ensure that the coat is as thin as possible, to avoid running paint.
  • SANDING DETAILS:
    1. Use the 120-grit sandpaper for sanding the first two coats of epoxy paint;
    2. Use the 220-grit sandpaper for sanding the third coat, in preparation for the fourth or final finish coat;
    3. If a power-sander is used, then the sanding pressure applied would be less for the last coat;
  • Repeat procedure in these painting steps until four (4) coats of the epoxy paint are applied; and
  • Allow tank to dry in well-ventilated, warm area for 24 hours before proceeding.
 
Is the exterior plywood you are referring to treated plywood? Very interested in how this turns out, I may take the same route for my build.
 
Is the exterior plywood you are referring to treated plywood? Very interested in how this turns out, I may take the same route for my build.

Thanks for your question, ForeverAlone. According to research I've done on the web, and not from my personal experience, the term "AC exterior plywood" has a very specific meaning. The best explanation I've seen has been found on the website, http://woodworking.about.com/od/plywood/p/PlywoodGrades.htm, set forth as follows:
The normal grading system uses the letters A, B, C & D, where A is the best quality, with virtually no blemishes and very well sanded. Grade D typically contains up to the maximum number of blemishes allowed.

The letter grades typically come in pairs, where one letter refers to the "better" side, called the face, and the other letter to the back side, opposite the face. As such, a sheet of A-C plywood will be very well finished on the face with a relatively unfinished back. Conversely, construction grade plywood would be C-D (commonly referred to as CDX plywood), which is great for structural use but not suited to be finish material.

(Source: Chris Baylor, About.com Guide.)

"Exterior" plywood is one of four basic types that one can obtain, explained in great detail at the above-referenced website as follows:

PLYWOOD BONDING TYPES:

In addition to the plywood grades, there are four common plywood bonding types. The difference is in the glues that are used to bind the plies, or layers of the plywood.

Interior Plywood:

Plywoods for interior use only are made from various hardwood and softwood species, and can be used only in interior applications such as wall sheathing, furniture (where exposure to moisture is limited), cabinetry and the like. Interior plywood is available in most grades, as well as a number of hardwood species such as birch, oak and cherry.

Exterior Plywood:

The most common type of plywood, readily available at home centers. The glues used in exterior plywoods are much more resistant to moisture than interior plywoods. Once again, nearly all grades are available, with A-C, B-C and CDX the most common. Numerous hardwood species are also available in exterior varieties.

Marine Plywood:

When moisture resistance is a priority, look into marine plywood. This type uses the best adhesives and is manufactured to the highest standards. It also is most commonly graded as A-A, with two top grade faces, but is limited in the hardwood choices that are practical for use in marine settings.

Structural Plywood:

When the appearance of the face is of lesser concern than the strength and stability of the material, structural plywood will typically be the choice. The resins used to adhere the plies are designed for extra strength to avoid separating of the layers. Structural plywood is seldom found in a grade higher than C-D. It is commonly used in concrete forms on construction sites.
(Source: Chris Baylor, About.com Guide.)

I'll post the progress of construction. Let us know if you decide to build a wood, external overflow-box, ForeverAlone. Thanks.
 
Type of epoxy paint?

Type of epoxy paint?

I have researched expoxy paints for plywood aquariums. I might get one of the three listed below. Anyone ever work with these products before? Your thoughts and advice? Thanks.

  • NSP 120 Blue, by Progressive Epoxy Polymers, Inc. - $67.00 (free shipping)
    1.5 quart kit - high quality light blue epoxy paint.
    This epoxy has DBA nuclear and NSF 61 potable water approvals.
    Profiled at: http://www.king-cart.com.

  • PT10 Black., by Aquatic Eco-Systems - $81.90
    120 oz. kit - epoxy paint. (a kit is 4 parts paint and 1 part activator).
    Can be used for coating fiberglass, wood, steel, concrete or even galvanized surfaces. Excellent for drinking water, ozone contact, fresh and saltwater aquaculture, etc., and it is recognized by the EPA as nontoxic (after curing), is extremely durable and has excellent adhesion to a wide variety of materials.
    Profiled at http://www.aquaticeco.com

  • Liquid Rubber/Black Epoxy, by Pond Shield - $ 79.95
    1.5 Quart Kit of Elastomeric Emulsion. Kit yields 60 square feet at 10 mils thickness on a smooth surface.
    Safe for fish and plants. Easy application. Very low maintenance after installation.
    Profiled at: http://www.pondarmor.com/shop/pond-shield-epoxy-black-1-5-quart-kit
    However a big negative is its incompatibility with silicone. This requires one to use alternative products to seal the corners and seams of the overflow-box, such as: butyl rubber, polyurethane caulk, or 3M 5200.
 
Last edited:
Is the exterior plywood you are referring to treated plywood? Very interested in how this turns out, I may take the same route for my build.

Hey, ForeverAlone: Today, I went shopping for wood at a "big box," home-improvement store. Given the small dimensions of the external, overflow-box (5" deep, front to back, 8" tall, and 48" long, matching the length of the 75-gal. tank) there is no need to get plywood. Instead I got two planks of pine, 96" long x 7.25" wide x 3/4" thick. The pine planks are of very good quality.

In getting the two pine planks, I needn't worry about glues inside the wood because it is a solid piece of wood--unlike plywood. Thus, there are no glues inside the solid planks of pine. Just wood. So, in further response to your question about plywood grade, there is no need to worry about fussing with "AC Exterior" type of wood, as you would when purchasing plywood. Recall, that "exterior" plywood uses moisture-resistant glue in the plywood, unlike interior plywood, which does not. If you go with pine planks, there would be no need to worry about such considerations.

Also, given the superior finish of the pine planks, pre-existing in the store, I also dispensed with the need for patching putty, saving cost. Thus, going with planks of pine, rather than plywood, one need not worry about whether the wood is graded "AC" for its surfaces. The finish on both sides of the pine planks is definitely "A" grade. Just thought you'd like to know for your possible project. Good luck. Keep us posted.
 
I have researched expoxy paints for plywood aquariums. I might get one of the three listed below. Anyone ever work with these products before? Your thoughts and advice? Thanks.

  • NSP 120 Blue, by Progressive Epoxy Polymers, Inc. - $67.00 (free shipping)
    1.5 quart kit - high quality light blue epoxy paint.
    This epoxy has DBA nuclear and NSF 61 potable water approvals.
    Profiled at: http://www.king-cart.com.

  • PT10 Black., by Aquatic Eco-Systems - $81.90
    120 oz. kit - epoxy paint. (a kit is 4 parts paint and 1 part activator).
    Can be used for coating fiberglass, wood, steel, concrete or even galvanized surfaces. Excellent for drinking water, ozone contact, fresh and saltwater aquaculture, etc., and it is recognized by the EPA as nontoxic (after curing), is extremely durable and has excellent adhesion to a wide variety of materials.
    Profiled at http://www.aquaticeco.com

  • Liquid Rubber/Black Epoxy, by Pond Shield - $ 79.95
    1.5 Quart Kit of Elastomeric Emulsion. Kit yields 60 square feet at 10 mils thickness on a smooth surface.
    Safe for fish and plants. Easy application. Very low maintenance after installation.
    Profiled at: http://www.pondarmor.com/shop/pond-shield-epoxy-black-1-5-quart-kit
    However a big negative is its incompatibility with silicone. This requires one to use alternative products to seal the corners and seams of the overflow-box, such as: butyl rubber, polyurethane caulk, or 3M 5200.

A. UPDATE

I just purchased the Aquatic Eco-Systems PT 10 Black - $81.90. There is a hazardous materials charge that added $25.00 to the price, plus shipping for a total of $125.93 out the door. There should be a lot of extra material left, after painting my wood oveflow box with this epoxy paint. I guess I can use the unused product on other aquarium projects.

B. LESSONS LEARNED AND FALSE ECONOMY OF WORKING WITH GLASS AT MY SKILL LEVEL

Buying pricey epoxy may seem to be an expensive way to go for an external overflow box. However, it would have actually been cheaper for me to go with a wooden overflow box from the beginning--even with the expensive epoxy paint.

In fact, if I could go back in time, knowing what I know now, I would not have wasted so much time and money trying to build my external overflow-box out of glass. Here is why:
  • Drilling an unattached, flat panel of glass for an external, overflow-box bottom is not as easy as drilling an assembled wall of an aquarium. I have successfully drilled many holes in an aquarium wall with relative ease. However, when drilling the glass-panel unattached, I wound up cracking the glass on four occasions, ruining the glass. This necessiated repurchases and set me back in time, as the cold weather limited my ability to drill the glass under the running water of a hose outdoors (it was snowing), and I prefer using a running hose to cool the glass-drill bit, as compared to using stationary water inside plumber's putty;
  • I am not exactly sure why the glass panel cracked, but I have a theory:
    [*]I think it has something to do with vibration and suspension;
    [*]When drilling the unattached panel of glass, I took precautions and sandwiched it between two layers of rubber matting--to dampen the vibrations. This had to be clamped down to prevent movement of the glass during drilling;
    [*]However, an aquarium wall has open air on both sides of its flat plane. It is attached and has flexible silicone holding it in place;
    [*]Drilling glass causes the glass to become a vibrating body; and
    [*]When the panel lies flat on a surface, this vibrating body has a greater propensity to crack, as compared to a glass wall of an aquarium, which does not lie against a surface and can vibrate freely in the air.​
  • So eventually, I purchased the bottom panel at an out-of-state glass shop in Sacramento, which had the holes machine-drilled by its vendor. This cost me $100.00. For price-comparison purposes in your neck of the woods, the bottom panel measures 5.25" by 48" with three holes cut in particular locations. The Sacramento shop intended to get the glass to me in one week. However, it took about three weeks to get the glass, due to two mistakes made by the glass shop's vendor:

1. The first time the glass was delivered to me, the glass was 1/8" thick, not 1/4" thick as ordered; and

2. The second time the glass was delivered to me, the holes were drilled in the wrong location of the panel, notwithstanding the correct CAD drawings supplied to the vendor. The vendor eventually got it right, but the delay was quite frustrating.​

  • The other panels of the overflow-box were made by three other glass shops locally because no single shop could seem to get the work done right the first time. For example, the sizing was slightly off on some panels, the corners were not truly square on others, and the edge was not correctly finished on another occasion. These errors and haggling set me back several re-makes. I find that glass shops usually don't have to fabricate glass to the tolerances of an aquarium. For example, if the glass is a little off here or there, or not truly square, it doesn't usually affect the proper installation of a glass in a window frame. But fabricating five pieces of glass to fit together flushly in three, co-planar dimensions, for use in a waterproof setting requires a greater precision in the cuts and corners of many glass panels than the local glass shops in my town have been willing to make.

  • The cost of errors (including my own) has set me back many hundreds of dollars, the exact amount I am too much in denial to recall accurately. The real frustration was the setback in time.
  • If no errors were made, the project would have cost me about $ 110.00 in materials for all five glass panels of the box, plus the cost of the new diamond-encrusted drill bit to cut the holes in the bottom-panel. However, this is false economy considering: The delicacy of work, risks of breakage, risks of delay, and unavoidable heartache of dealing with glass fabrication if you are not a skilled glass worker.

All things considered, the cost of expensive epoxy paint and cheap wood seems to be the better way to go for me, as less skill is required to fabricate, paint, and silicone a wood external overflow box as compared to fabricating a fragile glass box, with multiple stages of siliconing in short "cure time" windows and delicate handling required. In turn, working with wood presents less risk of breakage, over-spending, and loss of time. Thoughts, anyone?
 
Last edited:
STATUS UPDATE: Modified Plans to Accommodate Wood Overflow-Box

Before I did anything careless, like cutting wood without confirming what the new dimensions of my wood overflow-box will be, I recalculated spacing needs and the design, as shown below. The wood overflow-box will be painted black, but it is depicted in beige wood color with grain here, for easy viewing. As you can see from the drawings, the wood overflow-box will be supported structurally in two ways:
  • Horizontally, by means of the bulkhead connection;
  • Note: here, the bulkhead will be reversed, with the flange side in the external overflow-box (because of the skinny depth (front to back) of the internal overflow-box, which will not allow me to insert a bulkhead into the internal overflow-box (see Drawing 3); I can only slide the bulkhead in back-to-front, from the external overflow-box through the hole, to the internal overflow-box).
  • Question: Do you all see a problem with the flange side being on the outside, or backwards here, if I use a rubber seal/gasket on both sides of the bulkhead, the nut side and the flange side?; and
  • Vertically, by means of the 5 wood-support planks below the bottom of the wood overflow-box (see Drawings 1-2). This should help take pressure of the bulkheads, preventing the bulkheads from carrying the entire load of 5 gallons of water, during ordinary use, which weighs 42.75 lbs, plus the weight of the pine box.
I'll be getting started soon on the cutting, gluing, and screwing the wood, probably tomorrow. Then, by this weekend, I'll probably be painting the overflow box with water-proof, epoxy paint. But first, the paint has to be shipped to me from Florida. Then, I will silicone the seams. I'll keep you all updated on the progress here, including with pictures.

Three SketchUp snapshots below depict the design of the wood overflow box, as it fits into my 75-Gallon Build that uses a BeanAnimal Overflow system with both an internal and external overflow box. The dimensions and other considerations had to change in the drawing, from when it used to be designed as a glass, external overflow-box, given the sizing and thickness of the pine wood planks and extra, "fourth" wall that will form the box. For example, each wood plank from the store is 96", which after cutting and edging, will yield 47" lengths, not 48" lengths, as originally intended with glass. Also, rather than rip the planks to make them 5.25" wide, I am simply leaving them as bought from the store, at 7.25". Also, the thickness of the walls is 3/4" as wood, not 1/4" as glass, as originally drawn. The plans are now complete.

Thoughts, anyone? Suggestions? Comments?

Drawing 1:

2013-03-17AquariumStandW-WoodOverflowViewAdj1_zpsc74b42ba.jpg


Drawing 2:

2013-03-17AquariumStandW-WoodOverflowView2Adj_zps559cfa83.jpg


Drawing 3:

2013-03-17AquariumStandW-WoodOverflowView3Adj_zpsf21a2204.jpg
 
Great write-up and sketches! I think the supports you have on the bottom is more than enough to take the weight off of the bulkheads. I don't see any issues with turning around the bulkheads to give you more room but you might want to thinking about placing another gasket on the bulkhead between the overflow box and tank glass. This would give you a good seal and possibly be more forgiving if you wind up with any shrinkage in the wood over time.

I know you are painting the wood with epoxy paint but does it completely seal the wood and stop it from expanding and contracting? I just worry about little cracks forming in the paint if there is any movement. Maybe the paint has some flex to it to allow for a little movement without cracking.
 
Great write-up and sketches! I think the supports you have on the bottom is more than enough to take the weight off of the bulkheads. I don't see any issues with turning around the bulkheads to give you more room but you might want to thinking about placing another gasket on the bulkhead between the overflow box and tank glass. This would give you a good seal and possibly be more forgiving if you wind up with any shrinkage in the wood over time.

Thanks for your response, ForeverAlone. If I follow you correctly, you are recommending using three (3) gasket/seals, at the following locations:

1. From The Sending Side: Where the locknut of the bulkhead rests against the rear, glass wall of aquarium. Here, the gasket/seal will prevent "forward" leakage from the sending side of the bulkhead, where water exits the aquarium;

2. In Transit: Sandwiched in between the rear, aquarium wall and the external overflow-box, where the two components come into contact. Although the moving water inside the bulkhead pipe cannot leak at that juncture, your thinking is that the gasket/seal will prevent "forward" leakage from the aquarium or "backward" leakage from the overflow-box, if the gaskets placed at the sending or receiving side fail; and

3. On the Receiving Side: Where the flange of the bulkhead rests against the inside wall of the external, overflow-box. Here, the gasket/seal will prevent "backward" leakage at the receiving side of the bulkhead, which you suspect might occur due to possible cracking in the epoxy-paint of the overflow box, due to the naturally-ocurring expansion and contraction of wood.​

Is that correct? Do you have any suggestions where I could buy only the gasket/seals, without having to buy the bulkhead? I have plenty of bulkheads, but need extra gasket/seals, as the bulkheads were supplied by the seller with only one (1) gasket/seal. Thanks.

I know you are painting the wood with epoxy paint but does it completely seal the wood and stop it from expanding and contracting? I just worry about little cracks forming in the paint if there is any movement. Maybe the paint has some flex to it to allow for a little movement without cracking.

It's a good question. I'll be using several coats of the epoxy-paint, and that should more than suffice. I spoke to an agent at the paint company yesterday, at Aquatic Eco-Systems in Florida. I asked him about the PT10 Black epoxy-paint I was purchasing from his company, for use in my aquarium. I asked him how many coats were required to seal the wood. He advised me that one coat should be enough. However, I wondered if he were merely expressing optimistim or sales-hype about his company's product. Thus, discounting his opinion, somewhat, on this concern, my hope is that three coats of epoxy-paint should correctly seal the wood. I have to figure that the paint-company agent was aware of the fact that the PT10 Black epoxy-paint is widely-used in the construction of plywood aquariums. So his opinion has to be somewhat informed. As well, three coats should guard against any operator error by me in either mixing or applying the epoxy-paint.

The research I have done on the Internet has raised the issue of possible expansion and cracking of epoxy-paint used in plywood-aquarium construction. Yet, huge, plywood aquariums are built all the time, with great success. The epoxy paint I selected was rated as one of the most-used brands and types for the construction of plywood aquariums.

My thought is that the overflow box will hold much less water than a many-hundred-gallon, plywood aquarium. The theory is that I will not experience the extremes of expansion and contraction that a large aquarium would. As well, I have read that falling debris in a tank, such as rocks, can cause punctures in the paint of a large, plywood aquarium, leading to further cracking of the paint. Yet, here, the external overflow box should ordinarily have no debris in it. This should help guard against cracking in the epoxy-paint.

I will be inspecting my wood overflow box regularly, to watch for signs of leakage. If a problem arises, hopefully, it will take time to develop, from moist wood, to slow dripping, to fast dripping, before which final stage I could remedy the problem. Still, I am given hope by the success of so many aquarists who have built large-scale, plywood aquariums using the epoxy product I am going to use.

Comments, thoughts, advice, anyone? Thanks.
 
I think the biggest concern with using solid wood, as opposed to ply, is the expansion and contraction of the wood overtime. Plywood is stable and when you are essentially bolting it to your glass pane with bulkheads you want something stable.

If your wood is not seasoned thoroughly, then it may twist or cup over time, even if sealed, and this will put stress on the glass pane. If it were me, I would not use pine for this project, I would go back and get a sheet of 1/2" ply and seal it the same way with the epoxy and sleep much easier at night.

Wow, UserName, very good to know! What you suggest is very helpful. I'll return the planks of pine and head for the Plywood Section. So, you'd go with 1/2-inch plywood, not 3/4-inch plywood, which would provide more rigidity than 1/2-inch plywood? Also, should I go for exterior-grade plywood, or does that risk being "pressure-treated" wood, containing contaminants toxic to aquarium inhabitants? Your thoughts would be most appreciated here.
 
1/2" Should be more than enough for what you are doing in terms of strength. As far as interior or exterior, if you seal it properly is shouldn't really matter. But what might matter is getting a good finish grade play as it will have a smoother surface and you will be more likely to get a good seal with your epoxy if you are not working with little pits and grooves in the surface. I would make sure there are gaskets in between the tank and the box to reduce point pressure on any area of the glass that unevenness in the epoxy will create.
 
Another thought it to drill the holes in the wood panel before assembling the box, and then use that panel as a guide for the glass drilling. Then your holes will line up perfectly. If they don't you will create a lot of stress on the glass that way as well.

You could also clamp your board to a backer board of the same size and drill through both at once. One will be for the box and one will be for the drilling of the tank. That way the board for the box doesn't get wet with the tank drilling before epoxying it.
 
1/2" Should be more than enough for what you are doing in terms of strength. As far as interior or exterior, if you seal it properly is shouldn't really matter. But what might matter is getting a good finish grade play as it will have a smoother surface and you will be more likely to get a good seal with your epoxy if you are not working with little pits and grooves in the surface. I would make sure there are gaskets in between the tank and the box to reduce point pressure on any area of the glass that unevenness in the epoxy will create.

Thanks, for your reply, UserName. Very good suggestion. Now that you have me going back to plywood, it got me thinking. Why not use marine-grade plywood? I can get it a store in town, and I don't mind paying more for it. It will have the most water-resistant glues in it, but might be overkill. I might just go for it, in 1/2-inch thickness, trying to find an AC quality, with at least one, very good, finish-grade side. The gasket/seal placement you refer to, is it the way I described it above, in Post No. 30 (three gasket seals, one at the sending side, one at the transit side, and one at the receiving side), where you are specifying the second seal described there, i.e., the "in-transit" seal? I want to get it right. Thanks.

Another thought it to drill the holes in the wood panel before assembling the box, and then use that panel as a guide for the glass drilling. Then your holes will line up perfectly. If they don't you will create a lot of stress on the glass that way as well.

Great suggestion. In doing so, I'd have to be extra sure that I clean up any glue that might deposit in, near, or on the holes, in the fabrication process.

You could also clamp your board to a backer board of the same size and drill through both at once. One will be for the box and one will be for the drilling of the tank. That way the board for the box doesn't get wet with the tank drilling before epoxying it.

Another great suggestion when starting out the hole-drilling of the tank. Yet, here, I've already drilled the five glass holes. Thanks, again.
 
I just meant a gasket between the tank and the overflow box so that the wood is not clamped directly to the glass.

If you have already drilled the glass holes then I recommend making a pattern from those holes to drill the holes in the wood so that they are identically spaced.
 
I just meant a gasket between the tank and the overflow box so that the wood is not clamped directly to the glass.

If you have already drilled the glass holes then I recommend making a pattern from those holes to drill the holes in the wood so that they are identically spaced.

Sounds, good, UserName. Thanks.

What about my going with the Marine-Grade Plywood? I'm liking the idea. Any reason why not to, other than price and overkill?

Thanks, again.
 
er ok i didnt see the sketches load earlier. why are you even bothering with the extra box in the rear? why not just use street 90's inside the black overflow in the tank, and run the drains outside down just like you plan too?
 
Back
Top