180 Gallon Transformation

foxrazr

Member
First of all I have had this tank since December 2010. Like any reefing junky I have changed equipment around and like everyone else I have dreamed of upgrading my tank. This year I would upgrade I said but when I looked into upgrading big surprise, custom tanks cost more, a lot more. I started researching and got me thinking what about if I upgrade what I already have.

I currently have a 180 gallon reef ready Aqueon tank which is 72"x24"x24". It was nice in the beginning but with time the overflows in the back got crusted with algae and are hard to clean. They have become a distraction and realize they take too much space inside the aquarium. Current plan for the tank is to remove the overflows, drill the back or side for a bean animal overflow increasing the space inside and making it silent all at once.

Current tank stand is the regular of the mill pine stand you buy at petco. Again it was nice in the beginning but with time the stand has become my enemy. It makes my cleaning routine difficult because it is short. It is difficult to access the sump and skimmer. Also the stand builder forget or believed that the bottom platform didn't need any cross bracing and the plywood has bowed like a canoe. Putting my sump uneven. Current plan is to make a metal stand 40" tall and skin it to make it look like my kitchen cabinets. The metal stand is currently being made by a close friend of mine.

Last item to be upgraded is the sump. Current sump is an aqueon proflex model 4. This sump has an identity crises because it doesn't know what it wants to be. One day it wants to be a berlin sump. The next day a wet dry bio ball filter and on sundays wants to have a refugium. Through Aquarium Specialty I got My Reef Creations to create my dream sump. Sump is to be 48"Lx20"Wx18"T. I received my sump yesterday. Pictures to be posted soon.

I will post updates on the transformation. Stay Tuned.
 
Pictures of my sump!

<a href="http://s1017.photobucket.com/user/foxrazr/media/180%20gallon%20Transformation/IMG_2303.jpg.html" target="_blank"><img src="http://i1017.photobucket.com/albums/af293/foxrazr/180%20gallon%20Transformation/IMG_2303.jpg" border="0" alt=" photo IMG_2303.jpg"/></a>

<a href="http://s1017.photobucket.com/user/foxrazr/media/180%20gallon%20Transformation/IMG_2302.jpg.html" target="_blank"><img src="http://i1017.photobucket.com/albums/af293/foxrazr/180%20gallon%20Transformation/IMG_2302.jpg" border="0" alt=" photo IMG_2302.jpg"/></a>

<a href="http://s1017.photobucket.com/user/foxrazr/media/180%20gallon%20Transformation/IMG_2298.jpg.html" target="_blank"><img src="http://i1017.photobucket.com/albums/af293/foxrazr/180%20gallon%20Transformation/IMG_2298.jpg" border="0" alt=" photo IMG_2298.jpg"/></a>

<a href="http://s1017.photobucket.com/user/foxrazr/media/180%20gallon%20Transformation/IMG_2296.jpg.html" target="_blank"><img src="http://i1017.photobucket.com/albums/af293/foxrazr/180%20gallon%20Transformation/IMG_2296.jpg" border="0" alt=" photo IMG_2296.jpg"/></a>

<a href="http://s1017.photobucket.com/user/foxrazr/media/180%20gallon%20Transformation/IMG_2291.jpg.html" target="_blank"><img src="http://i1017.photobucket.com/albums/af293/foxrazr/180%20gallon%20Transformation/IMG_2291.jpg" border="0" alt=" photo IMG_2291.jpg"/></a>

<a href="http://s1017.photobucket.com/user/foxrazr/media/180%20gallon%20Transformation/IMG_2290.jpg.html" target="_blank"><img src="http://i1017.photobucket.com/albums/af293/foxrazr/180%20gallon%20Transformation/IMG_2290.jpg" border="0" alt=" photo IMG_2290.jpg"/></a>
 
Sump design: Had to be simple, access for easy cleaning, large skimmer section and had to have white.
 
I purchased 2 media reactors last year from ATB when it was going through its rough spot. I will be using them with GAC and Seachem Phosguard. I currently use HC GFO from BRS but i am changing to Phosguard as I hear it is cleaner to use. Any suggestions guys?

<a href="http://s1017.photobucket.com/user/foxrazr/media/180%20gallon%20Transformation/IMG_2306.jpg.html" target="_blank"><img src="http://i1017.photobucket.com/albums/af293/foxrazr/180%20gallon%20Transformation/IMG_2306.jpg" border="0" alt=" photo IMG_2306.jpg"/></a>
 
I didn't use BRS GFO but i can say that Phosguard is very good product i place it in the sump , just you need to rinse it with water.

Happy Reefing !!!
 
This is what I mean with the dirty overflows in the back and the stuff I will be working with.

<a href="http://s1017.photobucket.com/user/foxrazr/media/180%20gallon%20Transformation/IMG_2320.jpg.html" target="_blank"><img src="http://i1017.photobucket.com/albums/af293/foxrazr/180%20gallon%20Transformation/IMG_2320.jpg" border="0" alt=" photo IMG_2320.jpg"/></a>


Here is a shot of the gang.

<a href="http://s1017.photobucket.com/user/foxrazr/media/180%20gallon%20Transformation/IMG_2326.jpg.html" target="_blank"><img src="http://i1017.photobucket.com/albums/af293/foxrazr/180%20gallon%20Transformation/IMG_2326.jpg" border="0" alt=" photo IMG_2326.jpg"/></a>
 
Well I have been reading up a lot on the bean animal overflow and it looks like I am hitting my first snag. The drain lines have to be somewhat submerged and due to the sump design that is not possible. Any help will be appreciated. Also looking into maybe glass holes 1500.
 
Well I have been reading up a lot on the bean animal overflow and it looks like I am hitting my first snag. The drain lines have to be somewhat submerged and due to the sump design that is not possible. Any help will be appreciated. Also looking into maybe glass holes 1500.

What seems to be the trouble with your BA overflow? I didn't fully submerge my overflow lines. Here's a short video I just shot. I do see that our sumps are a bit different in that the overflow lines in my sump run into an anti-chamber before flowing over the socks. This may cause a difference in the way the overflow functions, but I don't recall seeing that it was required they be submerged other than to help quite them further. I may be wrong on that. Guess someone else could chime in.

<iframe width="853" height="480" src="//www.youtube.com/embed/BcyU-yh2rgw" frameborder="0" allowfullscreen></iframe>
 
Yeah I was under the impression that the drains had to be submerged for the bean animal overflow to work. I ask the same question in the DIY section and got my answer.
 
Thank you my family grew by one. I will be changing the tank to a different location in the house for the added space. Since I am moving everything I decided to upgrade the equipment. I was concerned since I ordered a custom made sump that I couldn't submerge the lines but it looks like its going to work. I can't wait to get past the removing of the overflows and drilling the tank. Since I have never drilled glass before.
 
Be sure to check with the tank's manufacturer. If it's made of tempered glass you may not be able to drill it, or might need special equipment.

Dave.M
 
UPS came today and dropped off the substrate I will be using.

<a href="http://s1017.photobucket.com/user/foxrazr/media/180%20gallon%20Transformation/IMG_2348.jpg.html" target="_blank"><img src="http://i1017.photobucket.com/albums/af293/foxrazr/180%20gallon%20Transformation/IMG_2348.jpg" border="0" alt=" photo IMG_2348.jpg"/></a>

<a href="http://s1017.photobucket.com/user/foxrazr/media/180%20gallon%20Transformation/IMG_2350.jpg.html" target="_blank"><img src="http://i1017.photobucket.com/albums/af293/foxrazr/180%20gallon%20Transformation/IMG_2350.jpg" border="0" alt=" photo IMG_2350.jpg"/></a>

<a href="http://s1017.photobucket.com/user/foxrazr/media/180%20gallon%20Transformation/IMG_2352.jpg.html" target="_blank"><img src="http://i1017.photobucket.com/albums/af293/foxrazr/180%20gallon%20Transformation/IMG_2352.jpg" border="0" alt=" photo IMG_2352.jpg"/></a>


Do you guys think 180 lbs. is enough for a 2-3" deep sand bed?
 
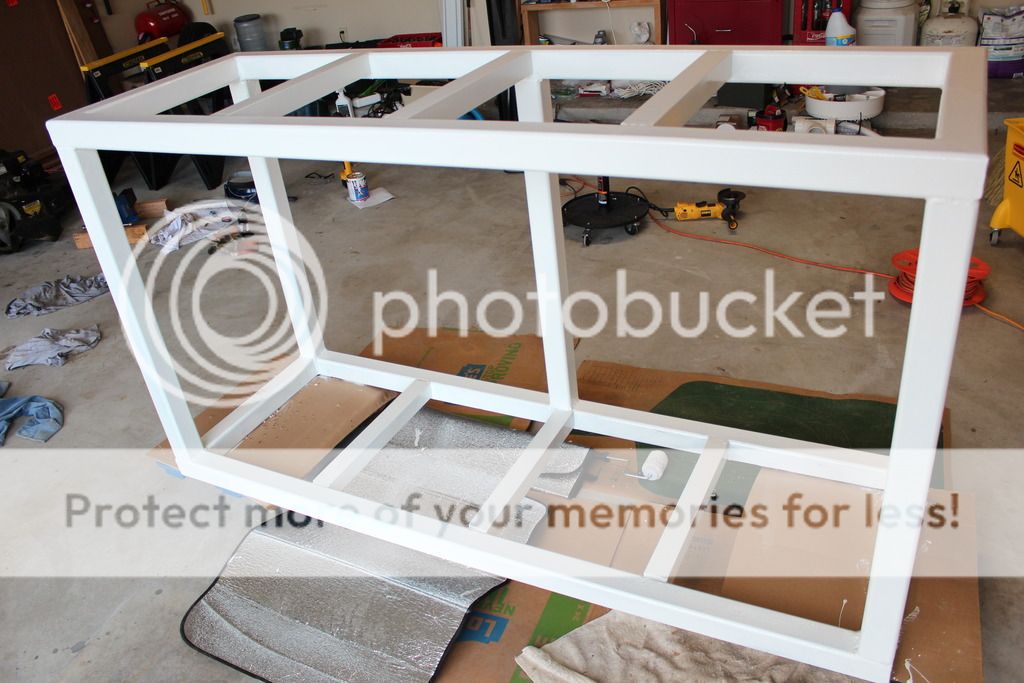
Another piece of the puzzle is complete. My friend came by today to drop off the stand. Stand was made with 2.5" square tubing 3/16" wall. Stand is 40" Tall. This thing weighs a lot. Now to get the por-15 and paint it.

Front Side and level in picture is 24" Tall.
<a href="http://s1017.photobucket.com/user/foxrazr/media/180%20gallon%20Transformation/IMG_2355.jpg.html" target="_blank"><img src="http://i1017.photobucket.com/albums/af293/foxrazr/180%20gallon%20Transformation/IMG_2355.jpg" border="0" alt=" photo IMG_2355.jpg"/></a>
 
After a long hiatus I am restarting the project again. A couple of things happened in this couple of months. Thankfully all good!!! Well enough about me this past weekend I got busy again and finally finished painting the aquarium stand.

 
Nice! I drilled my dual over flow 180 on one end to put in a BA type system. Works great and love that I don't have any big overflows on the back or in the corners of hte tank.
 
Back
Top