Acrylic fabrication questions? I can help!

Yes, IMO. Sure you dont want to go with an internal overflow?

I got an internal overflow box on my 48x48x24 cube and it works great, cant even tell its even there, of course its 48" in depth front to back...

Here is an internal overflow box similar to what Im currently running on my 240g tank.


Would this Internal Overflow box be stronger/safer than the external boxes?


Thats what Im thinking, since you're tank is 42" front to back you have a decent ammount of room for an internal one.

The tank would be stronger because your not modifying a pressurized bulkhead (wall). How would the internal overflow react? They work pretty good, really depends on the thickness of it and flow rate. I've never had a problem with an internal overflow breaking due to pressure issues depending on the water height. May bow a little but thats fine, it's not the same as a one of the tank walls. Im pretty fond of the Bean Animal and Herbie designs. Have to stop there though when it comes to plumbing as there are many others more knowledgeable than me on this.
 
Last edited:
Thats what Im thinking, since you're tank is 42" front to back you have a decent ammount of room for an internal one.

The tank would be stronger because your not modifying a pressurized bulkhead (wall). How would the internal overflow react? They work pretty good, really depends on the thickness of it and flow rate. I've never had a problem with an internal overflow breaking due to pressure issues depending on the water height. May bow a little but thats fine, it's not the same as a one of the tank walls. Im pretty fond of the Bean Animal and Herbie designs. Have to stop there though when it comes to plumbing as there are many others more knowledgeable than me on this.

Phixer,

Could a 6" perimeter brace and between access holes on the top work instead of the current 8"?

I have a 48"x48"x24" cube made out of 3/4" acrylic and there is zero bowing. It has a 3/4" top with a 6" euro style brace only and I really like how its still open enough to do work on the bottom corners of the tank.
 
Has anyone done cold forming? I just love the way slight bow front tanks look.. ok to put things to perspective I m making a 10 feet long 24" height tank. The center of the bow front will be only 4" protruded ahead (would be zero if it was a straight box tank) ... so 4" ahead in a 120" long tank according to me is easy for cold forming. . Tank to be done in 3/4" plexiglass. Manual says the degree of bend should be minimum 180 times the thickness of sheet. So I guess it ideally easily surpasses that ratio... moreover I have seen if acrylic sheet are kept standing they juzt bend over fime. Any advise ?
 
So are you meaning by cold forming that one would just bend the sheet into a slight bow, and then weld it in place so that the welds would keep the shape? Or as you also put it, just let it lay over a form for a length of time and let it naturally warp to shape?

I suppose one could do that, I think the difficulty would be in forcing it to retain such shape during the assembly process. If you forced a natural warp, this would tend to want to go back into shape once you took it off the mold, but you would probably have time to work with it. Once the top and bottom panels were bonded in place, it would stay just fine I would think, and then water pressure from the inside would relieve the stress of the sheet wanting to pull back straight.

Otherwise we're talking a big oven for a 10' section.

Interesting question! Not sure I have a great answer on exactly what will work.
 
Hey is there any table saw blade that can be used to prep edges? I have previously paid my local plastics shop to cnc cut, but that gets expensive. I have a router but not a big router table.
 
Diablo triple-chip is what I use but it doesn't leave an edge I would consider good for bonding. Home Depot carries them. You still have to scrape the edges with a razor blade if nothing else. Squaring is another issue.
 
Floyd, thanks mate! My plan is to keep it in form for couple of days with weight on it. I expect it will retain the shape. The plexiglas manual states that exactly so wanting to take that chance. If there are any ideas on it please let me know or if you can please contact James to seek his opinion or rather advise for me? I ll be truly obliged!
 
On another note, can I make a 24" long, 18" wide and 36" high tank with spartech 15mm sheet ? I know 36" needs thicker but overall water volume is pretty less to exert pressure?
 
Removing Scratches From Acrylic

Removing Scratches From Acrylic

Finally, got my acrylic tank tore down last week and polished out the micro scratches and a few long scratches from sand that made it way into the cleaner. I would like to thank 'Floyd' for the product suggestions (Meguiars) as the project turned out flawless.

a>


a>


a>


<a href="http://www.flickr.com/photos/97234438@N08/9807015743/" title="2013-09-12 17.04.09 by themauilife, on Flickr"><img src="http://farm3.staticflickr.com/2871/9807015743_91e87a1085_z.jpg" width="640" height="480" alt="2013-09-12 17.04.09"></a>

a>
 
Phixer,

Could a 6" perimeter brace and between access holes on the top work instead of the current 8"?

I have a 48"x48"x24" cube made out of 3/4" acrylic and there is zero bowing. It has a 3/4" top with a 6" euro style brace only and I really like how its still open enough to do work on the bottom corners of the tank.

Hi KMU, many combinantions will work. Is that cube 24" tall? If so 3/4 is fine for a 24" height.

How long do you want it to last?

Will answer this way, because it's best to know why.

Will try not to be long winded. The physical properties of acrylic for our applications (aquarium building) are pretty much a function of temperature and sustained pressure over time in addition to UV exposure. Different than diving where these factors are constantly changing. The science used to determine what works best per given application is called Finite Element Analysis (FEA). There is another term known in the industry as modulus of elasticity but I wont go into it here, would take a long time. Even if you cant see percievable bowing the stress is there, much greater when you observe significant deflection. When determining your dimensions (including thickness) all things should be considered. Most MFGs dont do the math and will have no idea what your talking about when using these terms, they just build and several years later the tanks begin to craze. Not the right way to build IMO. However, aquariums differ from diving applications because they are subjected to continuous sustained static pressure over longer periods of time (slight psi changes during water changes). Although less total pressure it becomes a function of time/pressure and temp. That makes acrylic subjected to saltwater a pretty hostile environment. That being said...


For your application it's important to understand what the tensile strength of the bond seams are capable of supporting as these are normally the weakest link in a polymerizable joint (solvent is a totally different animal and not what I would use for 1.25" which is what I would use for 36" height. Remembering this is 1" at a height of 36" (not what I would recommend) and that the top of the tank being closer to the lights is subjected to more heat and UV light, these factors must be considered if you want the tank to last a long time.

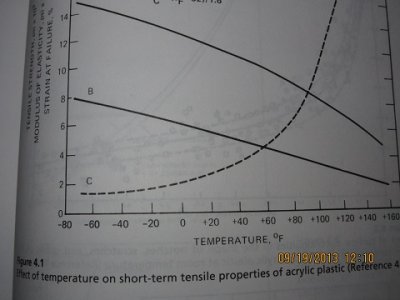
Considering a temp of 85F a designer can specify the thickness of the panel to insure that its long term creep deflection (bowing) does not exceed specified design limits. The creep modulus for acrylic for a 30 year loading duration with a temp range from 30-100F varies from 270,000 to 160,000psi respectively. Whether a panel will fail while filling the aquarium with water can be caluculated either analytically or with the aid of FEA. If the max flexure stress exceeds the short-term flexure strength of acrylic, the panel will rupture. The min short term flexure strength for acrylic is 14,000psi at 75F and 12,000psi at 100F. Handbook of Acrylics pg182.

Much more math, PM me and I'll explain.

There is a real economic incentive to using thinner material, but there is a trade off. Keeping the maximum pressure well below these limits per wall thickness and the tensile strength of the cement will ensure longer life. If done right these joints will never see pressure close enough to what they are capable of handling.

So what does this all mean? How long do you want the tank to last?


I wouldnt go any thinner than 8" considering 1" thick material at 36".
 
Last edited:
Diablo triple-chip is what I use but it doesn't leave an edge I would consider good for bonding. Home Depot carries them. You still have to scrape the edges with a razor blade if nothing else. Squaring is another issue.

So, routing is really the only correct way to do it? What bit do you prefer?
 
No, I wouldn't say that, but it depends on the build type. If you're talking a sump or frag tank, you can take the 2 end pieces (which are the only ones that really need to be square) and double-stick tape them together, then rough cut and square as best you can, then scrape the edges with a razor blade. Then when you separate them, you mark them so that they are both in line with each other so that when you bond them to the front panel, if they are a little bit off-square, they are off-square in the same direction. Then you bond to the back, then put the euro on, then the bottom. If you get them close enough to square (usually within 1/16" on cross-measurement is good enough) you will be OK, you may end up with some bubbles on the bottom seam, but adding heavy weights when bonding the bottom panel on can help (and making sure to bond on MDF w/camper shell foam).

If you're talking about a display tank build, then router table prep of the ends and the top and bottom edge of the front and back panels is more important, but again, not hyper critical. Worst case you may have to add a few gussets.

As for edge prep bits, I like the Bosch 1/2" shank 3/4" diameter 2-flute straight cutter at Lowe's. For flush trim, and bearing tipped bit will do, spiral upcut is nice if you can get it, 1/2" is expensive for a one time use, 1/4" is ok.
 
Used as a cushion underneath the joint you are bonding. Take 3/4" MDF and cut it into a strip about 4" wide and a few inches longer than the joint you are bonding. Then find Camper Shell Foam (it's like extra-wide weatherstripping, it's about 1-1/4" wide and 3/16" thick, with sticky back, on 30' roll) and attach this to the MDF, 2 strips on each side. Make several of these. Put them under your work and it levels out your joint and allows you to insert shims to tighten up pins.

Like this

DSC00204.jpg


DSC00254.jpg


DSC00243.jpg


DSC00751.jpg
 
Ah ha. Gotcha. Do you think pink foamular from home depot would do the same thing?

Also, is adding weight a secret to getting rid of bubbles?
 
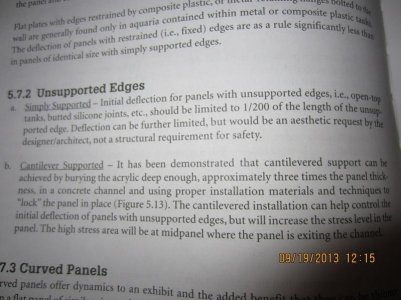
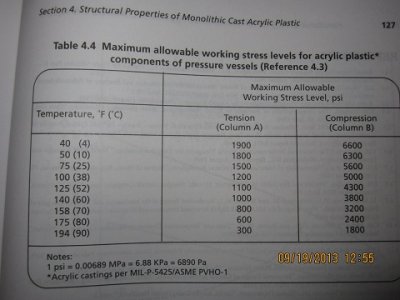
These are a couple of the tables I spoke of Floyd / KMU. Great stuff here but this is only a tiny portion of data available, one needs to put it all together design properly. This is the science behind it and why much of it is written in engineering terms. Like I said though, this is only a small fraction of data.

Sorry for the poor quality photos, my scanner dosent work and trying to find corresponding keys on this keyboard for some of the Greek symbols in the formulas is difficult. The second paragraph is geared more towards a concrete public tank viewing window.

1/200 / 72" = .036" yours will have supported edges KMU. Deflection is further limited by the use of top with access holes in your design. If I get a chance I'll see if I can find the tension data for 1" cell cast.

There is also some good data publised in tech reports we used to use when I did this stuff for the Navy. TR # 1303 Crazing and Degradation of Flexural Strength in Acrylic Plates ,US Navy Ocean Systems Center, its dated info now as I remember reading it many years ago but still worth reading if you can obtain it thru a Universities engineering program or research library. Most schools with marine engineering programs should be able to get it. Applicable data related to what we need to know when designing and building acrylic aquariums.

So what does all of this mean? It means that if you use thinner material it will undergo more stress and must be designed so the stress is imparted in the least destructive manner to retain the structural integrity of the tank. Go with 8" IMHO.
 

Attachments

  • IMG_0678.jpg
    IMG_0678.jpg
    65.2 KB · Views: 5
  • IMG_0676.JPG
    IMG_0676.JPG
    58.2 KB · Views: 5
  • IMG_0677.jpg
    IMG_0677.jpg
    36.1 KB · Views: 5
  • IMG_0680.JPG
    IMG_0680.JPG
    66.1 KB · Views: 5
  • IMG_0681.jpg
    IMG_0681.jpg
    51.8 KB · Views: 5
Last edited:
Hi all-

I want to try my hand at some basic acrylic fabrication by making a algae racetrack for my aquarium. However, I am daunted by the size of this Thread, with 3,539 posts, to figure out which techniques are appropriate for small scale projects. I would like some advise or a set of posts buried within this thread that tell me how to build this racetrack. I am skilled with woodworking tools, I just have never worked with acrylic before.

Is the process the same for a 4"x24" inch trough as it is for a 48"x96" aquarium?
Can I use the sheets of OPTIX acrylic at lowes?
How thick does the sheet need to be?
What type of solvent or cement do I need?
How do I cut it to size?

Thanks.
 
You don't have to be as anal with a simple build. It's not going to experience the pressures. So rough cut acrylic can do just fine, as long as the cuts are straight (and you can sand and scrape edges to make them line up)

1/4" should be fine. Might be able to do 3/16" but I wouldn't go much thinner.

Optix is extruded and will be just fine

Solvent should still be Weld-on, #3 or #4, but you could also use #16 for this, but it's goopy and messy. Once you bond joints and it cures, you can follow up with another bead of 16 to seal it.

Cut to size using a table saw preferably, because nothing else will really give you nice straight edges. If this is a one time build, a standard blade is OK, but you will have to do some further edge prep.

It'll probably look messy, but as long as it holds water, right?
 
Back
Top