smartwater101
New member
I've glued the tank and the majority of it looks great. But there are 2 edges that are a complete mess. I was considering using smaller pieces to reinforce those edges.... do you have any suggestions? thanks

I would use 1.250" minimum thickness for that height. 1" is too thin for a tank 3ft tall...IMO. Using the same dimensions of 72" long and 42" wide and those cutout dimensions I would use two cutouts (lower illustration). Better structural rigidity and less stress. You would still have enough area for good gas exchange considering a 3ft depth. The top panel behaves differently than the others, it is subjected to compression stress as well being pulled apart. 3 cutouts for a tank 6ft long is greater propensity for cracks and buckling due to less material, not much gained for surface area either vs 2 cutouts with good water movement. I would also radius the inside edges (see photos attached). Im refinishing this tank now (scratch removal). It's 28" tall (inside) using 7/8" thick material ...(strange?) , 30" wide and 120" long. Id like to show you the deflection but it's empty. System is acting up when attempting to open them, hopefully you can open them full size or export them and open with MS Paint.
I would use 1.250" minimum thickness for that height. 1" is too thin for a tank 3ft tall...IMO. Using the same dimensions of 72" long and 42" wide and those cutout dimensions I would use two cutouts (lower illustration). Better structural rigidity and less stress. You would still have enough area for good gas exchange considering a 3ft depth. The top panel behaves differently than the others, it is subjected to compression stress as well being pulled apart. 3 cutouts for a tank 6ft long is greater propensity for cracks and buckling due to less material, not much gained for surface area either vs 2 cutouts with good water movement. I would also radius the inside edges (see photos attached). Im refinishing this tank now (scratch removal). It's 28" tall (inside) using 7/8" thick material ...(strange?) , 30" wide and 120" long. Id like to show you the deflection but it's empty. System is acting up when attempting to open them, hopefully you can open them full size or export them and open with MS Paint.
start with 3" eurobrace on any tank..
24" high, use 1/2" minimum
30" high, use 3/4" minimum
36" high, use 1" minimum
with these in mind, I recommend a 6" wide crossbrace every 24" of tank length. So a 48 x 24" will have 3" eurobrace and a 6" crossbrace. If the same tank were 72" long - just one more crossbrace. At 8' length, I recommend jumping up one material thickness to keep deflection down.
There are times when someone's lighting scheme doesn't match the above formula. Ie., if someone wants an 8' tank but only 3 cutouts in the top. In such cases, I recommend increasing the eurobrace width to 4.5" and increasing the width of the crossbraces to 8".
Iv'e been using this formula, 1.5" radius corners, and material thickness minimums above, for many years and I have *never* had a tank fail.
If someone doesn't want the crossbrace - they simply have to make the material thicker, and/or increase the width of eurobrace to maintain rigidity.
Just to give another perspective, here is Jame's (Acrylics) formula
For your 42 x 72 tank, I guess I can't see how going with the 2-opening scheme would be better. Phixer perhaps you can explain that reasoning. I would think that taking the 3-opening version and then thinning the perimeter but adding a crossbrace along the center axis the long way (making 6 openings) might actually be the best way. So you would have a 3" perimeter brace, then 6" wide cross braces at 24" and 48" and then one across the center of the long dimension, also 6". You would lose some access hole space, and your rear strip would have to be 6" wide still to accommodate the holes in the top.
But the other thing you can do in order to thin out the bracing a bit is increase the thickness of the brace, at cost of course.
Just some food for thought, and not based on experience, just repeating what I have picked up along the way...
Here's why IMO. Considering 1" thick material at 36" high must design with structural rigidity in mind. Deflection (bowing) is greatest at the center of the front (viewing) and back panels. As the force of the water pushes outwards using 3 cutouts we are looking at an area 6" wide of 1" thick acrylic resisting this force at it's greatest point ,the center. This section will see stress trying to pull it in a perpendicular direction as well as the torsional stress trying to twist it. I believe this stress it will localize in the 4 corners of the center cutout (1" thick material = less resistance to cracking) also why radiused inside corners are so important. With 2 cutouts your looking at an 8" wide perimeter with a 42 inch long crossmember of 1" thick acrylic being pulled lengthwise rather than perpendicular. Although there are no grain boundaries such as in wood we are still looking at only 6" of 1" material in an area where deflection will be greatest vs 42" pulled in both directions.
If using 1.250 I believe the 3 cutout design would work ok but I like that center brace in consideration of the direction of force and liken it to rebar in concrete.
I can understand your logic regarding the point of highest deflection, but I would defer back to James' formula which he has been using for decades without fail, and he doesn't make a mention of this. Remember that the euro is connected fully across the top edge of the front panel, and this connection distributes the pressures. Increasing the width of the perimeter euro would distribute this stress more evenly. Increasing the width of the crossbraces would allow this stress to "channel" across a greater area. Adding the radiused corners to the cutouts allows this stress to transfer to the crossbraces more evenly instead of concentrating it at the corner.
The problem with crackouts is a result of not putting a radius on the cutouts. Also, from my discussions with a few guys at Cyro, they also mentioned that any sharp angles will cause the stress to focus in that location. Meaning that not only is it important to radius the corners, but it is also important to round off sharp edges - namely, the euro cutouts. I was already doing this (putting a 1/8" round on both the inside and outside of the euro cutouts) but this was mainly done so that one does not cut their hands/arms on the edges of the opening. Even knocking them down with a razor blade by scraping it across the sharp edge at a 45 degree angle 5 or 6 times is enough to remove potential point stresses than can 'gather' on sharp edges.
I've glued the tank and the majority of it looks great. But there are 2 edges that are a complete mess. I was considering using smaller pieces to reinforce those edges.... do you have any suggestions? thanks
The price of the acrylic sheets of 1-1/4" Vs 1" is around 55% more, so we need to make it work.
Which TOP design gives the best strength? will make radiused corners on the top brace.
would the overflow being external reduce its strength because of the overflow teeths are on the main back panel?
I really appreciate all the help and suggestions
THX in advance
Heyy everyone,
Long time lurker, first time poster!
Sorry to make my first post a cry for help, but here it is :bigeyes:
I recently purchased an acrylic tank from an individual who makes them at home.
I paid after I accepted the quote, and then picked it up when it was finished last night (it was dark)
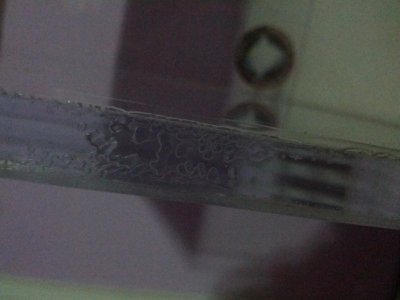
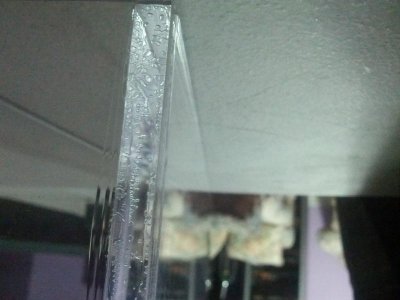
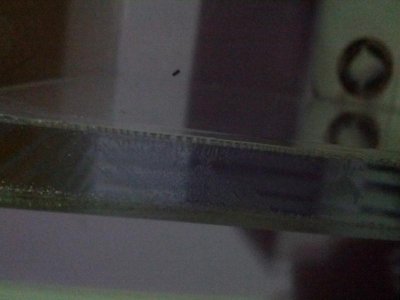
This morning I checked out the seams, there seeeeemmmmmsssss to be obvious excess bubbles. Lots of bubbles from micro to larger stretch across the seam.
There are many 1 to 2" patches of these bubbles.
The individual assures me that they have had experience with those joints and would not give out anything that they'd think would fail...
I was told that the company that cut the acrylic used a router and that he used weld on 4 with a bead of 16?
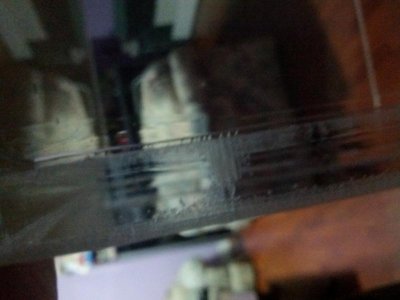
Attached are some quick cellphone pics
I'm not crazy if I pursue this guy to get the tanks refunded/redone? Right?? :sad2:
$$ sure is. Hope you can use Polycast GP or Reynolds R cast. IMO/IME, the design must be based on the properties of the material you are using.
For 1" thick material the 2 cut out design is my recommendation.
Yes, remember for this application (1" thick material) you will have an overflow located in the center of the panel, the area of greatest deflection (weakened more so if using a 3 cutout top and 1" thick material which will inherently deflect more at that height). Anytime you remove material you lose structural integrity.
We all have different backrounds and perspectives on how to fabricate, why this thread is so valuable. If you get a chance, study the Handbook of Acrylics for Submersibles, Hyperbaric Chambers, and Aquaria by Jerry Stachiw, most public libraries can special order it for you as it's costly to purchase. It gets deep (no pun intended) but it will explain the physics behind the design and address characteristics of the materials.
If your interested in marine engineering, oceanography or aircraft pressurization (believe it or not) much of it is applicable to what we do although the pressure is normally pushing is the other direction LOL...
Heyy everyone,
Long time lurker, first time poster!
Sorry to make my first post a cry for help, but here it is :bigeyes:
I recently purchased an acrylic tank from an individual who makes them at home.
I paid after I accepted the quote, and then picked it up when it was finished last night (it was dark)
This morning I checked out the seams, there seeeeemmmmmsssss to be obvious excess bubbles. Lots of bubbles from micro to larger stretch across the seam.
There are many 1 to 2" patches of these bubbles.
The individual assures me that they have had experience with those joints and would not give out anything that they'd think would fail...
I was told that the company that cut the acrylic used a router and that he used weld on 4 with a bead of 16?
Attached are some quick cellphone pics
I'm not crazy if I pursue this guy to get the tanks refunded/redone? Right?? :sad2:
Phixer THX for your information
I will talk to my tank builder and get the brand of acrylic used
We use Evonic Industries Cyro Acrylite GP and weld on 40 to glue it.
http://www.acrylite.net/product/acrylite/en/products/sheet/gp/pages/default.aspx


Can you post a few more pics from different angles? can't quite see this joint very well in this pic due to reflections, etc. Need close-ups