Acrylic fabrication questions? I can help!

Hi KMU, many combinantions will work. Is that cube 24" tall? If so 3/4 is fine for a 24" height.

How long do you want it to last?

Will answer this way, because it's best to know why.

Will try not to be long winded. The physical properties of acrylic for our applications (aquarium building) are pretty much a function of temperature and sustained pressure over time in addition to UV exposure. Different than diving where these factors are constantly changing. The science used to determine what works best per given application is called Finite Element Analysis (FEA). There is another term known in the industry as modulus of elasticity but I wont go into it here, would take a long time. Even if you cant see percievable bowing the stress is there, much greater when you observe significant deflection. When determining your dimensions (including thickness) all things should be considered. Most MFGs dont do the math and will have no idea what your talking about when using these terms, they just build and several years later the tanks begin to craze. Not the right way to build IMO. However, aquariums differ from diving applications because they are subjected to continuous sustained static pressure over longer periods of time (slight psi changes during water changes). Although less total pressure it becomes a function of time/pressure and temp. That makes acrylic subjected to saltwater a pretty hostile environment. That being said...


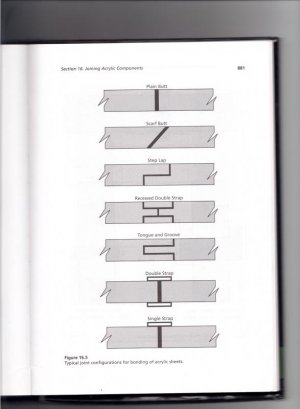
For your application it's important to understand what the tensile strength of the bond seams are capable of supporting as these are normally the weakest link in a polymerizable joint (solvent is a totally different animal and not what I would use for 1.25" which is what I would use for 36" height. Remembering this is 1" at a height of 36" (not what I would recommend) and that the top of the tank being closer to the lights is subjected to more heat and UV light, these factors must be considered if you want the tank to last a long time.

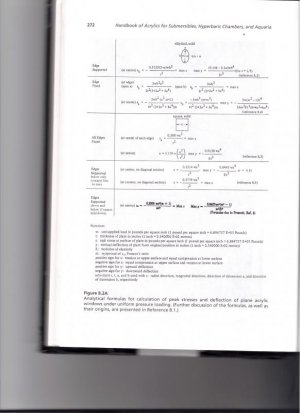
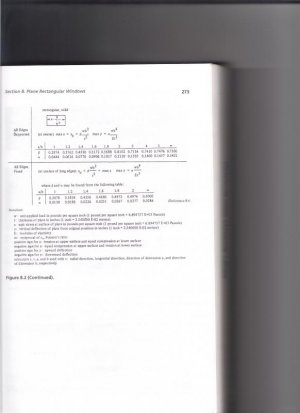
Considering a temp of 85F a designer can specify the thickness of the panel to insure that its long term creep deflection (bowing) does not exceed specified design limits. The creep modulus for acrylic for a 30 year loading duration with a temp range from 30-100F varies from 270,000 to 160,000psi respectively. Whether a panel will fail while filling the aquarium with water can be caluculated either analytically or with the aid of FEA. If the max flexure stress exceeds the short-term flexure strength of acrylic, the panel will rupture. The min short term flexure strength for acrylic is 14,000psi at 75F and 12,000psi at 100F. Handbook of Acrylics pg182.

Much more math, PM me and I'll explain.

There is a real economic incentive to using thinner material, but there is a trade off. Keeping the maximum pressure well below these limits per wall thickness and the tensile strength of the cement will ensure longer life. If done right these joints will never see pressure close enough to what they are capable of handling.

So what does this all mean? How long do you want the tank to last?


I wouldnt go any thinner than 8" considering 1" thick material at 36".


Phixer

THX for all the help on the build, will follow your advice on going with an 8" brace

I really appreciate all the information provided
 
Looking for consensuses on the best magnetic cleaner for acrylic? One that can leave the acrylic sides micro/scratch free or at lest one that performs well.
 
Hello all! I may be asking a question that has already been answered but with so many posts, I started going cross eyed looking through...sorry.:uhoh3:

I am planning to build my first sump. I am curious if its possible to use a pre-made glass tank but use acrylic pieces for baffles/dividers.....If so, what would I use for adhering?

Thanks in advance!
 
Looking for consensuses on the best magnetic cleaner for acrylic? One that can leave the acrylic sides micro/scratch free or at lest one that performs well.

Any of them are going to do a decent job, many companies carry "acrylic safe" mag cleaners but most that I've seen put an acrylic safe white pad between the magnet and the tank wall additionally.

Hello all! I may be asking a question that has already been answered but with so many posts, I started going cross eyed looking through...sorry.:uhoh3:

I am planning to build my first sump. I am curious if its possible to use a pre-made glass tank but use acrylic pieces for baffles/dividers.....If so, what would I use for adhering?

Thanks in advance!

You can use acrylic baffles for dividers and silicone them in place as long as there is no water level difference on either side of them. And way level difference and the pressure will eventually cause them to break free, unless you use a LOT of silicone, and it will not look pretty, but it will work.
 
You don't have to be as anal with a simple build. It's not going to experience the pressures. So rough cut acrylic can do just fine, as long as the cuts are straight (and you can sand and scrape edges to make them line up)

1/4" should be fine. Might be able to do 3/16" but I wouldn't go much thinner.

Optix is extruded and will be just fine

Solvent should still be Weld-on, #3 or #4, but you could also use #16 for this, but it's goopy and messy. Once you bond joints and it cures, you can follow up with another bead of 16 to seal it.

Cut to size using a table saw preferably, because nothing else will really give you nice straight edges. If this is a one time build, a standard blade is OK, but you will have to do some further edge prep.

It'll probably look messy, but as long as it holds water, right?


Floyd-

Thanks for your response. I am not really concerned with the look of the project, just the functionality. If this holds water it will be great.
 
The math

The math

Hope this is helpful. Probably need to enlarge these if interested. The tensile strength of bonds achieved by the cements without post cure heat treatment are in the 2300 - 2700 psi range. Bonds post cured for 48 hrs anywhere between 150 and 175F normally end up in the 6-8000 psi range. Well above what most will ever see.

Using ρ = m/V = fluid , at sea level with a water density of 1025 kg/m³ and a depth of 3 ft were looking around 16psi static pressure if my math is correct.

Theres one part of it. Need to figure out the shear strength of the joint, this is also based on the thickness of the material or overlap.
 

Attachments

  • scan0001.jpg
    scan0001.jpg
    45.7 KB · Views: 5
  • scan0001 (2).jpg
    scan0001 (2).jpg
    33.2 KB · Views: 5
Phixer/Floyd,

Still working on trying to bond acrylic pieces end to end. I bought some scrap acrylic 1/2"- 1.5" to practice bonding the ends. I will be practicing with Weldon 40, will be getting the 42 gun once I get the technique down.

Question I have is, what do you recommend I use to dam up the 40/42? I have seen others us blue painters tape. I can tape up the end with painters tape, but I do not know if the glue on the painters tape will have an effect on the 40 when they contact each other.

Advice greatly appreciated.
 
Aluminum foil tape with the sticky side away. Keep the cement indoors for about 72 hrs prior to use, this will allow the temp to stabilize. Also keep the gap between panels between 4-6mm if possible. Heres why, if the gap is to large the additional volume of cement will cause it to boil as it heats up. This is known as an exothermic reaction and will create more bubbles (exactly what your trying to prevent). So try to keep the gap around 5mm. Also as it dries, it shrinks (about 20%) so be sure to over fill it and allow the panels to move if they arent to heavy. I would recommend overfilling it by about 1/4 - 10 mm rather than adding more to it as it dries. Your bond will be much stronger if overfilled and finished flat with a router and sanding/polishing than if you were to under fill and add more later.

Will you be annealing prior to bonding? Not always necessary but does make a difference if the acrylic has had some heavy duty machining done to it. You dont want it to craze, an easy way to tell is to give the machined edge a quick wipe with some denatured alcohol. If the machined edge begins to craze it will need to be re-cut and annealed. If no crazing the joint should be fine when the cement comes into contact with it.

Another note...As the cement dries it will want to pull the panels together as it shrinks, keeping it overfilled will help with this but sometimes this shrinkage creates tension within the joint that results in small creases in the cement if the panels are not allowed to move or if they are held stationary during the entire drying process. Remember this process is different than solvent cementing. Keep an eye on the sides as you bond them to the front/back panels. I normally suspend these to prevent a dry joint with corner clamps or slab lifters. As it dries I will lower it a bit if I think the cement will crease due to shrinkage.
 
Last edited:
Aluminum foil tape with the sticky side away. Keep the cement indoors for about 72 hrs prior to use, this will allow the temp to stabilize. Also keep the gap between panels between 4-6mm if possible. Heres why, if the gap is to large the additional volume of cement will cause it to boil as it heats up. This is known as an exothermic reaction and will create more bubbles (exactly what your trying to prevent). So try to keep the gap around 5mm. Also as it dries, it shrinks (about 20%) so be sure to over fill it and allow the panels to move if they arent to heavy. I would recommend overfilling it by about 1/4 - 10 mm rather than adding more to it as it dries. Your bond will be much stronger if overfilled and finished flat with a router and sanding/polishing than if you were to under fill and add more later.

Will you be annealing prior to bonding? Not always necessary but does make a difference if the acrylic has had some heavy duty machining done to it. You dont want it to craze, an easy way to tell is to give the machined edge a quick wipe with some denatured alcohol. If the machined edge begins to craze it will need to be re-cut and annealed. If no crazing the joint should be fine when the cement comes into contact with it.

Another note...As the cement dries it will want to pull the panels together as it shrinks, keeping it overfilled will help with this but sometimes this shrinkage creates tension within the joint that results in small creases in the cement if the panels are not allowed to move or if they are held stationary during the entire drying process. Remember this process is different than solvent cementing. Keep an eye on the sides as you bond them to the front/back panels. I normally suspend these to prevent a dry joint with corner clamps or slab lifters. As it dries I will lower it a bit if I think the cement will crease due to shrinkage.

For the aluminum foil tape, should i create a divot on the bottom and the sides to allow for overfilling of the bottom and sides. I know to overfill the top, but was wondering about the bottom/sides.

Will try the alcohol trick, but I just purchased some left over stock and cut them in half with a miter saw using a blade for plastic. Will tension from shrinkage effect the bonding of end to end joints? This is the joint that I will be practicing. I am not sure how much heat was produced during the cut.

If there is tension in the joints, then should I release the two pieces from the clamps after I let the joints dry 2-4 hrs. Or should i release the clamps from one of the pieces.

As for the bottom and top pieces, I plan on using solvent weld. Based on the thickness of the material I will be using, I think using WO4 would be the easiest.

As of now, the estimated size of the tank will be 20'x3'x2' or 20'x2'x2'. I was planning on using 3/4" for the sides and 1/2" for the bottom. Or do you think i should go thicker? I know that it is not recommended, but would there be a problem with putting together a multipiece eurobracing, like the way glass tanks are usually done. I would overlap the eurobracing, i.e. long piece will sit on top of the sides and the short pieces will be inbetween the side panels and adhered to the the long piece from the bottom.

I will be adding fillets (either 3/4" or 1") based on the thickness of material i use for the sides.
 
Last edited:
For the aluminum foil tape, should i create a divot on the bottom and the sides to allow for overfilling of the bottom and sides. I know to overfill the top, but was wondering about the bottom/sides.

Will try the alcohol trick, but I just purchased some left over stock and cut them in half with a miter saw using a blade for plastic. Will tension from shrinkage effect the bonding of end to end joints? This is the joint that I will be practicing. I am not sure how much heat was produced during the cut.

If there is tension in the joints, then should I release the two pieces from the clamps after I let the joints dry 2-4 hrs. Or should i release the clamps from one of the pieces.

As for the bottom and top pieces, I plan on using solvent weld. Based on the thickness of the material I will be using, I think using WO4 would be the easiest.

As of now, the estimated size of the tank will be 20'x3'x2' or 20'x2'x2'. I was planning on using 3/4" for the sides and 1/2" for the bottom. Or do you think i should go thicker? I know that it is not recommended, but would there be a problem with putting together a multipiece eurobracing, like the way glass tanks are usually done. I would overlap the eurobracing, i.e. long piece will sit on top of the sides and the short pieces will be inbetween the side panels and adhered to the the long piece from the bottom.

I will be adding fillets (either 3/4" or 1") based on the thickness of material i use for the sides.


Yes although I've used a piece of plate glass on the bottom and just overfilled the top. Better results with the dip on the bottom.

Tension from the shrinkage will affect the bond if not over filled, as the cement dries it will shrink. You will need to time this as it really depends on the temp and humidity of the environment you are working in. Normally takes about 30 minutes, practice on some scrap first and time it. Also mix some up in a cup and time how long it takes for it to begin to set , try to replicate the same volume of cement for your scrap as what you intend to use for your final job. This is your working time. Take notes of the temp and humidity when you do this and try to replicate this condition when you perform the real thing.

Additionally when it starts to set up if your panels are too heavy (due to thickness) to move on their own when the cement polymerizes then gently (remembering your working times) nudge them a little closer with a dead blow rubber mallet when the cement just starts to set. Never use spaces and be sure not to push them too close together or the cement will not polymerize. Keep that gap around 5mm.

I must be honest with you, I avoid solvent jobs because most of what I work with now is over 1" thick and I prefer 2 part polymerizable cements. Floyd and James are very knowledgeable in regards to the processes used for solvent bonding and I would have to defer to them. Solvent just isnt my thing.

Keep all thickneses the same, the big MFGs will use varying thicknesses to save money. Although the forces are different on the top and bottom panels they are subjected to torsional, bending and cross sectional stress that requires the same thickness material as the sides. Sure it can be done with thinner material, fish can also be kept in plastic bags too LOL.


What was the height? 2ft? If 2ft tall, 3/4" is good and may as well solvent bond also. Solvent would work better for 3/4" thick material IMO because it's less finicky. The 2 part method is best for material 1" and over IMO. Most can get decent results using solvent providing the material is absoloutely flat and smooth for anything under 1".

Think of it in terms of structural integrity, one piece is always stronger than multiple pieces joined together. Glass and acrylic are very different. For acrylic; I prefer a solid top with radiused access cutouts because of the strength this design affords. Especially in close proximity to the UV light and hot lights associated with most reef tanks. The UV light will wear on your joints cast with polymerizable cement if no UV additive is mixed in. Will turn them yellow over time, I havent found much loss in strength though, dont quote me though will have to look at some of my old Navy reports and TDs. Reynolds mixes their own, dont think WO has UV stabilizers will have to check. Just something to consider when building a top composed of multiple pieces glued together.
If you want to use an open top design with a Eurobrace definitely will need to use thicker material for longevity. For acrylic I would always use solid pieces when ever you can unless you have to join panels due to size availability.

The important thing to remember about the bottom in an acrylic tank is to keep 100% of it supported across the entire bottom surface. No perimeter stands, must be a flat bottomed stand. The bottom bears a lot of compressive stress just looking for the slightest imperfection to yield too. If your interested I have a bunch of test data and photographs showing what the results are of hydrostatic loading on areas that were unevenly supported. By using the same thickness for the bottom you will have more forgiviness but must remember to put it on a flat, smooth and level surface that will not flex. Flexing puts additional strain on the joints. That being said, all panels except the top bond to the face of the bottom panel so the width of the joint is determined by the thickness of the side panels...however the ammount the bottom flexes also determines the longevity of the joint. With thicker material you will have less flexing and thicker joints. Consider the flexing that occures when the tank is empty and being moved also. Ive made some good stands with concrete block and steel H beams (W6x25) If I remember right?...top covered with plywood and granite. Really flat and looks good.
 
Last edited:
Phixer,

Will definitely practice on the scraps first. Is the nudging of the two piece during the polymerizing process a must. Due to the fact that the sheets will both be 8ft long, it would be difficult to ensure that when I nudge the pieces together (with rubber mallet) that i might shift the pieces off alignment, probably very very little if any.

The height of the long panels will be roughly 2ft tall, less the cut and the router to provide a smooth surface. I estimate the final height of the long panels to be about 23.5" tall. Would 3/4" bow in the middle of a 20ft long tank? Or would 1" be better? If there is minimal bowing, would like to use 3/4" due to cost issues.

As for the top bracing, I would also like to do one piece with radius cut-out. I was just inquiring about the strength of a multiple piece eurobracing because it would save me from having to bond the top piece together. Guess I would have to do two more end to end bonds.

As for the stand, I was going to either do metal or wood stand. 2 sheets of 3/4" plywood and then a layer of self leveling cement on top to ensure 100% level. What do you think? I am leaning more towards wood since it would be easier for me to put together and do not require special tools, ie mig welder.


Got ya. It's not a must, just be sure to over fill the void and finish flush. You will actually gain strength by finishing it flush. And never put shims in between the panels, this will create tons of stress. Also when you finish your panels do not sand in circles. After routing the bead close to flush but not all the way... finish by sanding with a block in an alternating perpedicular (90 degree) pattern using different grades. To repeat :)Make sure you dont sand in circles, this is why we see so many swirl marks in acrylic. Your on the right track especially if you can get two scraps to practice with that are identical to the width your bonding. Im just hoping you wont have to anneal the panels, you will know this before you bond if it crazes this can be costly and hard to find a shop that has the equipment. I had to go all the way to Reynolds in GJ. Costly but they do good work.

1" is always better as pressure is a function of height but even so with longer panels you will get a little bit of bowing irregardless of the height. A good top is essential in minimizing this. A 20ft long tank at 3/4...yes you will see some deflection with panel that long even though 2ft in ht. 1" always better but I certainly can related to the costs. Spartech (Polycast) makes a 72x120" sheet size.

Your idea of self leveling cement is a good one. Much better than shims. Ive seen people use a thin layer of 5000psi before and it worked great without crumbling. Will you be using any additives such as fiberglass in the cement?

Thanks for tip on not buffing in circles. Will definitely keep that in mind during that process. The test piece are not as wide as 2ft and is cut with a 90degree angle versus the 45degree angle i wanted to use for the tank build bonding. Main practice for me now is to learn to work with 40 so that when i use 42, it would be easier since i wont have to mix it. Im also thinking of getting more scraps after i practice on the 90degree bonding and do some 45degree bonding as well. I know the angle of the 45degress will probably make the application process more difficult. But, I will be using your suggestion of squeezing out the 42 into a bucket and then applying it with a syringe.

As for annealing, if I router the ends a few millimeters each time, do you think there would be enough heat buildup to warrant annealing. I guess testing with alcohol would be best practice regardless.

I'm trying to stick with 3/4" but also willing to move up to 1". I am aware of the different size that Spartech offers. Definitely 72x120 would make my life a lot easier, however, if i did get a piece that was 120" long, then i would make the tank 25ft long. I do not want the side bonds to meet each other when i glue the top or the bottom to the sides. Essentially, I dont want the end to end bonding of the side panels to meet with the end to end bonding of the top/bottom panels. I want the sheets to sort of overlap each other, like they do with brick paving. Dont know if that makes any sense.

As for the cement, the thought of fiberglass didnt come to mind. If i were to do cement/fiberglass then I would probably want to go poured epoxy resin method instead. I have researched that method when building a large wood tank came to mind as well.

This is off topic, but what are you thoughts of using epoxy resin versus cement/fiberglass. Both will self level, but wondering which will be stronger.

The attachment is for butt joints.

If it dosent craze after you give it a quick wipe with alcohol then you wont need to anneal it.

Where will you be using 45 degree angles? Are you talking about miter joints for the sides?

You will need to compare the compressive strength of each. Epoxy becomes brittle over time which is why plywood tanks often use a layered fiberglass composite in alternate directions. Without the fiberglass a lot of spider web cracking occurs and then they leak. Especially after years of flexing due to water changes or a move. Even so epoxy is great stuff but dosent handle UV light well either, it turns yellow. Then again so does the 2 part stuff if subjected to too much UV light.

I would use the self leveling cement with powdered fiberglass mixed into it providing the requirement is less than an inch thick.
How thick are you looking at?
 

Attachments

  • scan0001.jpg
    scan0001.jpg
    34.9 KB · Views: 5
Last edited:
I personally would not bother with self leveling anything. Just a solid frame that is perfectly flat on top and 2 layers of 3/4" ply. I must say this is a very informatics discussion you guys are having and thank you for keeping it public, it's a great help and expansion on thus thread, as I don't think this topic has been covered nearly this well in this thread!
 
The attachment is for butt joints.

If it dosent craze after you give it a quick wipe with alcohol then you wont need to anneal it.

Where will you be using 45 degree angles? Are you talking about miter joints for the sides?

You will need to compare the compressive strength of each. Epoxy becomes brittle over time which is why plywood tanks often use a layered fiberglass composite in alternate directions. Without the fiberglass a lot of spider web cracking occurs and then they leak. Especially after years of flexing due to water changes or a move. Even so epoxy is great stuff but dosent handle UV light well either, it turns yellow. Then again so does the 2 part stuff if subjected to too much UV light.

I would use the self leveling cement with powdered fiberglass mixed into it providing the requirement is less than an inch thick.
How thick are you looking at?

Yes, the 45degree joints i was referring to is for the sides, scarf butt joint.

I would have to also agree with the self leveling cement with fiberglass. As for the thickness, I was hoping to go as thin as possible. The main purpose of the self leveling cement is to ensure that the stand is 100% level all across the length of the surface.

I would like to get your opinion on the bonding of the side panels to the top/bottom. I am not referring to the technique of the bond more so the placement of the panels. I would like it so that the scarf butt joints wont touch/meet each other on the side and bottom/top. I know that there are sheets of acrylic that are 10ft long, but then the bottom/top scarf butt and the side scarf butt joints would be exactly in the middle. (i.e. Bottom 10ft,10ft side 10ft,10ft or do you think it would be better to do Bottom 5ft,10ft,5ft side 10ft,10ft) Hope that made sense!
 
I personally would not bother with self leveling anything. Just a solid frame that is perfectly flat on top and 2 layers of 3/4" ply. I must say this is a very informatics discussion you guys are having and thank you for keeping it public, it's a great help and expansion on thus thread, as I don't think this topic has been covered nearly this well in this thread!

I can make a stand pretty well, but at a length of 20ft, there will definitely be something that will be off level. I do plan on using 2 layers of 3/4" ply, self leveling cement (thin as possible) and then 3/4" high density foam.

I totally agree, for anyone trying to put together their own tank/stand, RC is definitely a great help. Wish there were more manufacturers out there that would share their knowledge!
 
Good point Floyd. This information is important IMO it's how we advance our hobby. Hope we can keep it going and more people will start building their own.

Nemo, I think Im picking up what your putting down, at least partially. Do you have any illustrations?

For the top I would consider the location of the proposed seams in relation to potential clevage and torsional prone areas. For the top panel it's the other types of stress that should be considered. The top is perhaps the most important panel of them all when you consider that it has the least ammount of material and is subjected to the most varying types of stress, bending, twisting, cleavage and shear. Take a look at this tank, the seam is actually about a third of the way in from the left.

The 16ft tank Im doing now is seamed in the middle but invisible. Many of the casino tanks behind the bar (Nugget in Reno) and a couple I've seen in LV have seams spaced like you describe.

Just remember when bonding not to let the panels touch otherwise you will create a stress area and a dry joint.
 

Attachments

  • IMG_0487.jpg
    IMG_0487.jpg
    47.2 KB · Views: 5
Last edited:
Sump build 45" x 20" x 20". How wide of a top brace would I need if I wanted to use 1/4" acrylic? Alternatively, how thick of acrylic would I need if I didn't do a top brace? Thanks.
 
Back
Top