Acrylic fabrication questions? I can help!

Router cut. Sometimes I use a hole saw to rough-cut but usually I just drill a hole with a 1/2" acrylic drill bit, then route it out.

I have a set of 1/2" acrylic templates that I had CNC cut for various bulkhead sizes and types from 3/4" through 4" ABS & S-80 (standard BRS dims) so those are router cut, I double-stick-tape the template down and use a 1/4" spiral upcut bit on a router table.
 
ABS is fine for most applications. Schedule 80 are a little more robust, but if you are really that worried the better route to go is a commercial grade bulkhead like one by Greenlee or Banjo. Get your hands on one of those and you'll see what I mean - the threads are 3x as deep, most are double-gasketed, and left-hand threaded (so they tighten as you screw a fitting into it, instead of loosening).

These are heavily used on farm implements such as sprayer tanks, etc. But $$
Thanks Floyd, I'm not overly worried since the box will be less than 16" wide and 6" tall.
 
Floyd,

What size and how many bulkheads do you use? How do you figure out the internal/external box dimensions? I'm sure there is some calculation that can be done based on flow rate and/or overflow box size, but I haven't run across it...my particular setup will target about 1500-ish GPH and is a 48" with an internal full C2C (or close).

Thanks!
 
I'm not sure, an octagon shape has some different structural properties. Normally, you would want 1" minimum for a 36" tall tank. That has quite a bit to do with pressure at the bottom seam and probably something to do with bowing across a total length. The latter would probably not be the concern, but the former is still quite applicable.

I would imagine that an octagon tank would have a bit more strength because of the angle of the seams meaning more bonding surface at the joint for the same thickness material when compared to a perpendicular seam, but I don't know for sure.

I'm going to defer this question to someone who might actually know.
 
Tank started leaking and the stand seems to be absorbing it.
Can't really see it leaking from anywhere but its in the corner somewhere. That's the only part of the stand that is getting wet. It happens to be where the overflow is.

I plan on draining the tank some and then draining the overflow area completely dry and using weldon 16 along the seams in the overflow in the corner area.

Should i have any issues doing this?

Also should i just apply a bead of weldon 16 by itself or use some acrylic strips along the seams as well?
 

Attachments

  • IMG_1067.JPG
    IMG_1067.JPG
    38.6 KB · Views: 5
I could be wrong, but I would put a layer of foam under the tank too... And when i say foam, I mean some pink Foamula Insulated Sheathing.
 
Last edited:
There are varying opinions on foam.

James/Acrylics says a good stand and 2 layers of 3/4" plywood (good quality plywood) and perfectly flat, no bumps or anything, is just fine.

Some say put any non-rimmed tank on foam. While that is 100% true for glass tanks (with no trim) at best this is optional for acrylic tanks. A very thin sheet of foam might take out some inconsistencies but it comes down to the quality of the stand and tank. The foam compresses permanently and this is not necessarily good.

James has stated that the thing to actually use is 1/4" neoprene but you're looking at some bucks for that.

I think what it comes down to is that you have to ID the leak for sure, #16 is not a gap filler although some use it for that, applying multiple layers to seal up a leaking joint. WO40 is more applicable. Gussets would be OK as long as it's a tight fit, sanding off the corner a bit so that any dried solvent in the existing joint doesn't interfere with a tight seal, then goop on the #16 (which works well for a repair with a gusset)
 
So a buddy of mine runs a machine shop and he said they just got a new laser cutter machine. if I have him cut me acrylic goodies, will these edges be prepped for welding? or do you think I would still have to route them?
 
No, you absolutely cannot weld laser cut edges. They will instantly craze. You need to route them, and you need to route enough off to clear off all the material affected by the laser cutting. It's almost easier to rough cut on a table saw
 
That's what I thought, but I didn't want it to be true. lol. I'm sure the laser gets super hot, which does the same thing as flame polishing - hence crazing when welded. boo.
 
So I'm thinking about switching to professional plastics for my materials. they are less expensive in general than my current supplier, and they have a facility near me. can somebody please browse their acrylic selection and let me know which is best/most cost effective for sumps, containers and small frag tanks? Thanks.

http://www.professionalplastics.com/
there cost appears to be around near 100 % higher for cast acrylic than what I can get locally from 2 to 3 manufacturers around my area. Let's say for instance a 1/4" cast acrylic cost around $130 to 160. They price it at $215 to $299 from professional plastics.
seems like a ripoff to me.
 
Floyd thanks for all your help answering so many of our questions on acrylic. Been super helpful.

I'm looking to make a few brackets from acrylic. My question, is there anywhere that I can buy acrylic that's in a long ruler shape, so not very wide almost like a stick, something around 1/4" x 1" x 20"

Or should I just buy some scrap odds & ends from somewhere
 
there cost appears to be around near 100 % higher for cast acrylic than what I can get locally from 2 to 3 manufacturers around my area. Let's say for instance a 1/4" cast acrylic cost around $130 to 160. They price it at $215 to $299 from professional plastics.
seems like a ripoff to me.

The only other outfit near me sells astari niagra, which I've read is not good.
 
Floyd,

What size and how many bulkheads do you use? How do you figure out the internal/external box dimensions? I'm sure there is some calculation that can be done based on flow rate and/or overflow box size, but I haven't run across it...my particular setup will target about 1500-ish GPH and is a 48" with an internal full C2C (or close).

Thanks!

Actually I was having an interesting conversation with Bean about that recently.

Basically what I have been doing is allowing for the footprint dims to allow for 1/2" of clear space from the edge of the drain bulkheads to the inside edge of the box.

Then, the height of the box is driven by how deep the pass-through bulkheads need to be in order to keep them fully submerged during operation. Usually this is not an issue as you generally want the top of the outer box to be roughly lining up with the top of the tank. The factor here to consider is which is worse: the tank overflowing, or the box overflowing, in the event of a total failure (2 pipes clogged and third cannot handle flow, or all 3 pipe clogged).

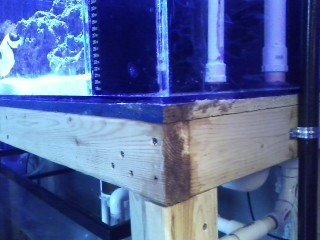
The one in the pic, I made so that the outer box is actually even with the bottom edge of the trim on the tank. So the outer box is lower than the rim of the tank. What I have realized since is that in a bad scenario where the drains can't keep up, and then let's say you have a sensor that shuts off the return pump when the water level in the external box rises to a certain point, or it overflows. What happens in this situation is that (let's say it's a total block of all 3 drains) the external box will continue to overflow until the water level in the tank drops such that it is below the level of the external box, or reaches the bottom of the weir or notches (in a notched overflow). Because of this, I now make these so that the external box stands off the tank so that it can be installed even with the rim of the tank by adding a laminated sheet of 1/4" material to that side of the external box.

Then, you have plenty of "overhead" for your emergency to kick in full and siphon & flush as the box level oscillates.

Increasing the footprint dim of the external box will give you extra volume to allow for the time factor in which the box fills up to a critical point. This turns out to be a bit of a complex calculation, because you have to figure out

1) how fast the water level rises based on the footprint of the box and in influx of water,

2) how long it takes for the emergency to turn into a full siphon (which depends heavily on your pipe routing, which is why it's important to have no 90s and a straight shot to the sump)

3) what water level you need in order to cause the emergency pipe to turn into a full siphon with no air intrusion from the surface (vortexing)

4) what the full-siphon capacity of the emergency pipe is

Usually, the only time this becomes an issue is when you are pushing 3000 GPH or better. 1.5" emergency pipe with a straight shot to the sump (or maybe just a few 45s) will siphon pretty quick once the water over it reaches about 1" or so, so you just have to allow for the rate of rise of water that gets it to this point and allow for a comfortable overage.

At 1500 GPH, if you have 2" of headroom from the top of the emergency pipe to the top of the box and it's a 1.5" pipe - in reality, no worries, not at all.
 
Hey all a few weeks back I purchased I used aio that was covered in coralline. Long story short after cleaning the tank I noticed the vertical seam on the front pane had come apart. I did notice some dirt in the seem I guess from my cleaning. First question is can I fix this seam and if I can how would you guys recommend cleaning the seam?
 
Back
Top