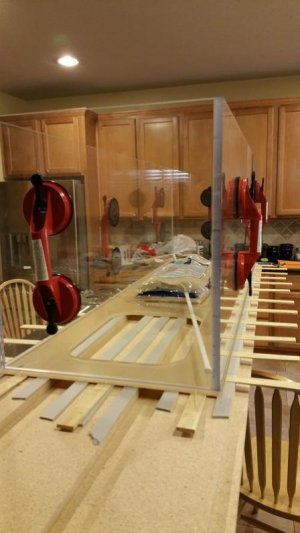
Acrylic fabrication questions? I can help!

Thanks for posting the breakdown of the process. Things went much smoother on my latest attempt. The only adjustment needed after pulling the pins was a little side to side, but hardly anything. I'll be surprised if I have to scrape any corners, everything feels nice a flat and ready for the bottom piece.

It's funny, after getting more comfortable with this acrylic process I'm looking around my system thinking, ok what else can I build with acrylic?
 
Floyd, I know you answered this question before but I can seem to find it now. What is the rule on height if you want a tank with no bow in it. I've always done.
1/4 acrylic no higher then 12''
3/8 x 18''
1/2 x 24''
3/4 x 26''
1 x 30''

Does this sound right?
 
From James:

start with 3" eurobrace on any tank..

24" high, use 1/2" minimum
30" high, use 3/4" minimum
36" high, use 1" minimum

with these in mind, I recommend a 6" wide crossbrace every 24" of tank length. So a 48 x 24" will have 3" eurobrace and a 6" crossbrace. If the same tank were 72" long - just one more crossbrace. At 8' length, I recommend jumping up one material thickness to keep deflection down.

There are times when someone's lighting scheme doesn't match the above formula. Ie., if someone wants an 8' tank but only 3 cutouts in the top. In such cases, I recommend increasing the eurobrace width to 4.5" and increasing the width of the crossbraces to 8".

Iv'e been using this formula, 1.5" radius corners, and material thickness minimums above, for many years and I have *never* had a tank fail.

If someone doesn't want the crossbrace - they simply have to make the material thicker, and/or increase the width of eurobrace to maintain rigidity.
 
Also keep in mind those inperial thicknesses, i.e. Polycast. Plexiglas and Acrylic are the "metric equivalent" which is actually thinner.

1/4" -> 0.236
3/8" -> 0.357
1/2" -> 0.472

etc
 
Hi Floyd -

I have a quick question about the Foam / MDF. I just got the foam in and have cut my MDF into 6" strips per your instructions. How many strips of foam are you placing per MDF? Looks like maybe 3?

I am going to play with the new 16g applicator needles a bit and then charge onto the main DT.

Thanks...

Shawn
 
I put 2 or 3 strips on each side depending on the width of the MDF. I think I use 2 on a 4" wide piece so on a 6" wide 3 is fine. All that really matters is that one of the foam sections is positioned directly under the entire joint so you have the cushioning to shim & pin. You also want to support the horizontal piece so that it doesn't sag so positioning strips every foot or so throughout the horizontal piece will take care of that.
 
Thanks Floyd - Looks like I am short about 2 rolls to do the undersides. Oh well.

I had a question / idea about stabilizing the sizes when gluing up the top and bottom. After playing around I can see now how much potential the assembly is going to have to slide when pulling the pins. On the DT, this could be compounded with the extra weight.

My idea is to get two expandable curtains rods. I would first place a bag of sand in the middle of the tank. Then, place the rods in an "X" formation with the ends snug into the corners. Follow this with more bags of sand to keep them in place. I think that this would generally stop or at least greatly reduce and movement.

Thoughts? Have you experimented with this at all?
 
I have a question about fixing an acrylic tank. I have another thread going and haven't had much luck with an answer. I have a tank with about a 4in crack in the center on the bottom panel. I was able to cut the bottom off with a table saw. It went fine until the last cut I caught something and the tank moved which resulted in about a 1/16th to a 1/32in difference in height. I was able to get an 18in straight edge, and sand it out. I can only go so far, but it is not totally flat. i have two questions. My first is how do the edges need to be finished before glueing? I cannot run a router around it because it has rounded corners, so if sanding what grit do I go to? I was also wondering where the small imperfection is. would I want to leave it and then use a thicker (#16) or maybe put a euro brace around the bottom on the inside? Or could I shim it when glueing to close the gap, but then the acrylic wouldn't be flat at that spot so I am thinking that wouldn't be good. I could supply some pics if that would help.

It has an internal filtration system, so to cut anymore off the bottom might affect that so I cannot cut anymore off the bottom. People have said to scrap the tank but I am having a tank built, and I am selling this one, so I need something to put my fish in for a couple months. Any suggestions would be appreciated.

TIA Derek
 
Adova, when bonding the top and bottom to the f/b/l/r assembly, you are correct. As soon as you get down to the last few pins, until the joint starts to set the whole thing will slowly slide. One tank I was building slid right to the edge of the piece before we realized it and we had to push it back into place, slowly - which left for a not-so-perfect looking joint

Your idea has potential so I would go with it. Another thing you can do is something that James described in this thread which sounds pretty funny - taped bricks. Take a regular red brick and wrap it with about 1 rolls' worth of duct tape, sticky side out. Fun to make! Then once you get the panel in position, before you put in the pins, set the tape bricks in place you will probably want 3 of them) and the whole assembly won't move once you pull the pins.

dc, if the crack was in the center of the panel, I would have just drilled holes at either end of the crack to stop the crack, then placed another piece of acrylic over the top of it on the inside. That panel is not under a bowing type pressure so that would have repaired it. hindsight I guess.

But as far as what you have described, you need to have the edge completely flush all the way around - #16 is not a gap filler, #40 is. But this is a job for both.

You still need to get that edge as flush as possible. One thing you can do for most of the edge is this:

Start out by placing the tank bottom up. Then measure and mark all the way around the tank so that you have a line that is equal height all the way around (i.e., find the 'worst point' and that will be your line)

Now use this as a reference line to place another piece of acrylic with a perfectly straight routed edge right in line with that line and use double-stick-tape to hold it in place. Use a router with a flush trim bit and trim the material to the line. You should be able to do this for most of the tank. The rest, you are going to have to scrape down by hand. Don't sand, sanding rounds the edges. You need to scrape with a razor blade, at least for the final bonding edge, and it's going to take time.

Bond the bottom piece on, and then fill the inside corner with weld-on 40 and gussets made out or scrap strips of material. 1/2" or so should be fine. In the rounded inside corners, you can try to make pieces that fit in place but you're going to have to puzzle-piece it all together, then do all the bonding in one shot, unless you enjoy sanding off cured WO40 in order to have a good bonding surface

I would probably add to that but storytime for the kids
 
Thank you so much for the reply I was going to do that and asked in a thread


http://www.reefcentral.com/forums/showthread.php?t=2478711

I didn't get a good reply so not knowing enough I took drastic action. I am disappointed in myself for not following my gut. I was going to fix the crack, and then bond another sheet to it, and be done. I spent along time buffing the scratches out, and I am hoping I can fix this so all isn't lost. I have a router table,but not sure how to set it up to shave a little off. I am going to try what you suggested, but with curved corners I am not sure about it

TIA Derek
 
I was also wondering about cell cast acrylic. I bought some and it has blue plastic. The place I bought it from said that's all they carry, extruded would be special order. I had seen online that cell cast comes in paper only. Is that true?
 
Just in case someone does not answer with a more definitive answer in time - I would not use acrylic with blue protective wrapping. I am not sure if it is cast or not (probably not) but I think it is definitely the crap stuff. What did it cost you? What thickness and size. Just to give you some comparison, my suppliers charge between $150 and $200 for a 4 x 8' sheet of 1/4"...

Shawn
 
Floyd -

FWIW - the curtain rod and sand bags worked like a charm. I was going to use two, but I put too much pressure on one of these crap little guys and it bent over. One did the job, though...

Shawn
 

Attachments

  • 20150212_164312.jpg
    20150212_164312.jpg
    43.4 KB · Views: 5
Just in case someone does not answer with a more definitive answer in time - I would not use acrylic with blue protective wrapping. I am not sure if it is cast or not (probably not) but I think it is definitely the crap stuff. What did it cost you? What thickness and size. Just to give you some comparison, my suppliers charge between $150 and $200 for a 4 x 8' sheet of 1/4"...

Shawn

I paid $58 for a 2x4 sheet. When I went there I asked for extruded, and he said he didn't have it and would order some. We got talking and he asked what I was using it for. I told him an aquarium, his reply was you want to use cell cast, and thats what I have. This is going on a bottom panel of a 75gal SeaClear tank. The DT part of the tank is actually 55gal. I did notice it is thinner than the 1/4in that came off. I didn't know if it was because it was a different brand or why? I read somewhere, maybe here that it is actually measured in mm, and now I am wondering if this is to thin. The pc that came of was 1/16th greater than 1/4in, and this one is a 1/16 under a 1/4. if that makes any sense.

thanks for the info

Derek
 
He is right - cast is what you want. I think I remember seeing your other threads about this issue and I think I have to agree with the rest that you are probably throwing good money after bad. The trick to successful acrylic is perfect (e.g. straight and smooth and true) seams. That will be tough to accomplish in your scenario.

An interesting experiment, but I would be surprised if it had a positive (long term) result. As far as the thickness - eh - not sure - probably ok...
 
Acrylic comes in many mm thicknesses so you prob got 0.236 which is "metric" 1/4". The stuff that came off could have been .354 or "metric" 3/8"

Generally anything with blue plastic masking is extruded. If it has a paper mask then it is like cell cast but not always.

If it has blue mask and is cell cast, it is likely generic junk. You want only plexiglas-g, polycast, or acrylite GP. All of those have paper mask
 
He is right - cast is what you want. I think I remember seeing your other threads about this issue and I think I have to agree with the rest that you are probably throwing good money after bad. The trick to successful acrylic is perfect (e.g. straight and smooth and true) seams. That will be tough to accomplish in your scenario.

An interesting experiment, but I would be surprised if it had a positive (long term) result. As far as the thickness - eh - not sure - probably ok...

So I return it and get the right stuff. Why wouldn't it come out right? I am a better than average wood worker and redid the seam with a router and got a perfect edge. I am just looking to glue the right panel on the bottom of a tank. I am using it for 1-2 month until my new tank comes in. How else do you learn to work with this stuff, if not on a small project. I have "thrown away" more than $60 bucks in this hobby. Thanks for the input. Also the advice from them was wrong, so if you are agreeing with them you are giving bad advice. Floyd said the same as me. fix the crack then glue another sheet to it. Instead I listened to them and cut the bottom off what would have been 2 hour project. Thats what I should have done, just use some common sense, and have been done with it.

Derek
 
Actually - the advice I was referring to was to trash it and just rebuild or buy another. Definitely not to cut the bottom off. Just trying to help - I will shut up now...
 
Cheap material, when used in a pressure vessel (aquarium) has a higher likelihood to fail. The bottom seam is the highest pressure but it's the wall material and thickness that have the most to do with it. You can get away with a thinner bottom material (it is typical to see one size down in thickness for the bottom panel compared to the walls)

So if you are only going to use the tank for a few months, you could probably use the sheet you have. But if it's not much more then I would get a better sheet.

Maybe ask your supplier what brand it is you got. They should know.
 
Back
Top