Acrylic fabrication questions? I can help!

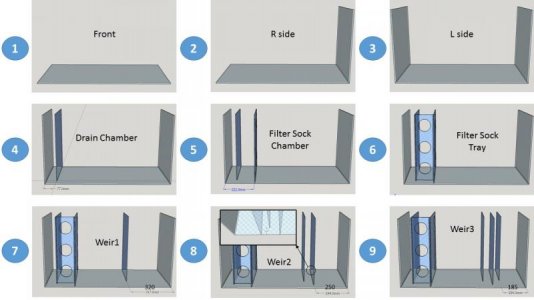
Because you can't bond seams while they are vertical. All the solvent would run out. So if you bond the back to the bottom, now you have to simultaneously bond 2 perpendicular joints (back-end and back-bottom). Can't.

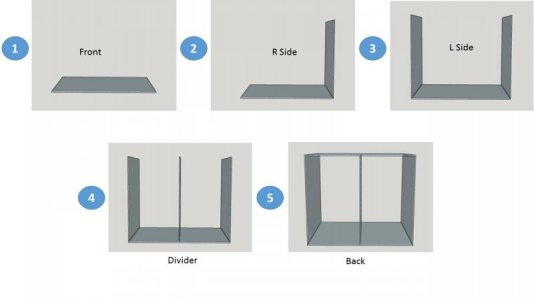
Bond both ends to back (or front)
Bond that assembly to front (or back)
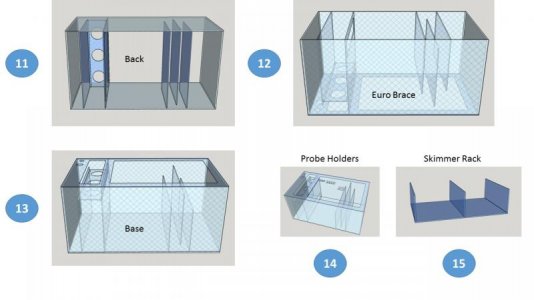
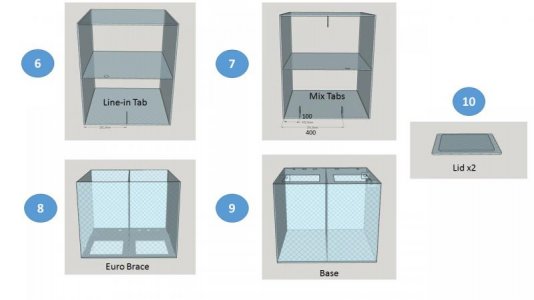
Bond euro
Bond bottom

Go back and search my post in this thread for a detailed description of the process, I posted it earlier this year
 
Sorry to keep posting here. I soooo want to stop thinking and start building! I'm trusting the initial advice everyone seems to give. Going with 8mm.

I'm going to use the pin method. Read alot on here. Makes a ton of sense.

The question now is, what's up with the build order? Had I not read otherwise on this thread, I would have started with the base and then built around that. Why should I start with the front face and build the 4 walls first? Under this scenario, top before bottom makes sense, but why not start from the base?
Quite simply because the base of the tank has to remain flat in order for the tank to sit flat. Acrylic usually comes with a bit of warping in it and it's just easier to route a straight line than it is to try and flatten out a warped sheet. If you glue bottom first, you really have no good way to straighten out the bottom piece so that the tank sits perfectly flat.

If you can route a straight line; gluing the vertical walls together will inherently straighten out the bottom since the weight will be pushing down on the bottom - thus flattening it out.

Hope this makes sense :)

James
 
There's got to be more than one way to build a strong, attractive tank that will last years and years. With all the panels be machined on a CNC router will ensure complete accuracy, and with the use of jigs/clamps (same as the pins method) to ensure everything goes together as it should I see no reason to not have a great looking tank that'll last years and years.
There's lotsa ways to do it. FWIW, most shops that use a 2-part cement for the vertical panes still glue the top and bottom using solvent.

...if correct methods are followed it'll be successful. Maybe I need to go back and refine my methods with the pins. To be honest, I was surprised that the solvent weld/pins method achieved the results that it did in my tests.

Out of interest sake, would you mind posting some photos of your work? The joins/over all tank would be fantastic to see. I haven't been able to find many detailed photos of aquariums but this way.
Thought I'd throw a coupla pics up of a tank that I built back in '98 and still going strong. These pics were taken about a year ago but shows that solvent welded joints can not only remain viable after all these years, but still looking good too :)
Not a drop of any 2-part cements in this tank, all made with solvent and no CNC machining whatsoever. I don't particularly care for NCs but do see their place :) Every piece fitted and machined by hand. This particular tank is 10' long and 6' high. 2.5" front and back, and the internal components are 1.5" acrylic.

With that said, I have no argument to using the 2-part cements, they can work very well, no question about that provided you are using good material. Whatever you're most comfortable with :)

So we're all on the same page, your Plex GS is Acrylite GP. Exactly the same material, just different branding.

Hope all is well,
James


So we're all on the same page, your Plex GS is Acrylite GP. Exactly the same material, just different branding.

Hope all is well,
James

Hope all is well with YOU James!!

About this above, is that something that is now true across the board, everywhere? When did this change?

Maybe this is a material nomenclature I haven't encountered before: Plex "GS". I thought it was just another term for Plex "G".

Just to double check: Plexiglas G is not equal to Acrylite GP, or is it?
As far as I know, it's always been the case. IIRC it was an agreement between Rohm & Haas and American Cyanamid back in the day. Rohm & Haas (the Plexiglas folks) built the first factory for American Cyanamid (the Cyro/Acrylite folks) and since then - Acrylite has held the international rights. US rights to the name Plexiglas remained with Rohm & Haas. Both companies have changed owners and names, but the branding itself is still the same.

Check out Plexiglas-shop.com and you'll see the Plex GS name but on an Evonik site using Evonik color codes.

Plex G is the same as Plex GM, but Plex GS actually Acrylite GP branded as Plex.

Hope this makes sense?

And yeah, doing a good bit better, thank you :-)

James
 
Floyd (and all), I know it isn't a show piece but I am almost done with my BA inside/outside overflow box:

Bean Animal (1).jpg

Bean Animal (2).jpg

Bean Animal (3).jpg

Bean Animal (4).jpg

Bean Animal (5).jpg
 
Floyd R Turbo, Acrylics, and dattack. Thanks so much for the advice.

Floyd R Turbo, I read your old posts (#10 "“ in response to Chopper320's post, #4022, #4024) . The build order makes so much sense now. Would have been a nightmare to weld a horizontal and a vertical seam at the same time using weld-on #4.

My worry now is about getting everything square so that when I flip the sides/Euro brace assembly onto the base, that I don't have gaps. I plan to be as careful as possible, but do you have any tips?

All the panels will be machined using a CNC router so I expect to have good starting material, but how do you manage to get the edges aligned perfectly while racing the clock to pull the pins and remove air bubbles?

Are there any specialized tools that you recommend?

I've searched the internet and have found some videos, but they all seem to be from non-experts using the capillary action method. Have any of you ever made a tutorial video or do you have a good one to recommend?

Seems like you must get asked these questions all the time. Is there a sticky I'm missing?

Thanks again everyone!
 

Attachments

  • Slide1.jpg
    Slide1.jpg
    40 KB · Views: 5
  • Slide2.jpg
    Slide2.jpg
    37.6 KB · Views: 6
  • Slide3.jpg
    Slide3.jpg
    20.9 KB · Views: 9
  • Slide4.jpg
    Slide4.jpg
    29.2 KB · Views: 4
Last edited:
Floyd R Turbo, Acrylics, and dattack. Thanks so much for the advice.

Floyd R Turbo, I read your old posts (#10 "“ in response to Chopper320's post, #4022, #4024) . The build order makes so much sense now. Would have been a nightmare to weld a horizontal and a vertical seam at the same time using weld-on #4.

My worry now is about getting everything square so that when I flip the sides/Euro brace assembly onto the base, that I don't have gaps. I plan to be as careful as possible, but do you have any tips?

All the panels will be machined using a CNC router so I expect to have good starting material, but how do you manage to get the edges aligned perfectly while racing the clock to pull the pins and remove air bubbles?

Are there any specialized tools that you recommend?

I've searched the internet and have found some videos, but they all seem to be from non-experts using the capillary action method. Have any of you ever made a tutorial video or do you have a good one to recommend?

Seems like you must get asked these questions all the time. Is there a sticky I'm missing?

Thanks again everyone!
Excellent diagrams
 
Floyd R Turbo, Acrylics, and dattack. Thanks so much for the advice.

Floyd R Turbo, I read your old posts (#10 "“ in response to Chopper320's post, #4022, #4024) . The build order makes so much sense now. Would have been a nightmare to weld a horizontal and a vertical seam at the same time using weld-on #4.

My worry now is about getting everything square so that when I flip the sides/Euro brace assembly onto the base, that I don't have gaps. I plan to be as careful as possible, but do you have any tips?

All the panels will be machined using a CNC router so I expect to have good starting material, but how do you manage to get the edges aligned perfectly while racing the clock to pull the pins and remove air bubbles?

Are there any specialized tools that you recommend?

I've searched the internet and have found some videos, but they all seem to be from non-experts using the capillary action method. Have any of you ever made a tutorial video or do you have a good one to recommend?

Seems like you must get asked these questions all the time. Is there a sticky I'm missing?

Thanks again everyone!
If your front and back are machined to the same dimensions as the ends (height,) and the ends are either exactly square or at least aligned congruently, it's nigh impossible to get out of square.

Align the pieces while dry, set your wires, check side to side and glue away :) If you apply your solvent correctly, there shouldn't be many/any bubbles to get rid of. The amount of solvent used wires or pins should allow you to easily remove the wires before anything starts to set. Some folks have issues doing the top and bottom joints but having an extra pair of hands to pull wires helps :)

I'll see about making a quick vid today if I can..

HTH,
James
I would love to see a good video.I'm sure after doing it so much it's second nature, but for us newb diyers, that would be a huge confidence builder. I'm planning to build a sump this summer and don't want to ruin a few hundred dollars worth of acrylic.
 
Acrylics, a video would be fantastic! It seems to be a close guarded secret how to do this properly so videos are very scarce relating directly to aquariums.
 
Finally done with the welding :). Thanks again guys for the walk through:


I even made a cover for it from scraps :)

I also got the baffles done for my sump:

 
Ok, my acrylic experts! I have decided to build my own overflow box and I have a question.

What acrylic thickness should I use for my external box which is part of an internal/external overflow held together with 6x 1.5" bulkheads (bean drain)? I'm using 1/4 inch on the internal and was thinking I should use 1/2 inch on the external, but if I can "safely" get away with a thinner dimension that would be nice to know. The dimensions for the box are 71 x 4.5 x 7.

Here's a sneak peek at what I'm doing for the 310 upgrade. I'm going to great lengths to conceal all equipment and the box. Plus I'll be incorporating a shadowbox background behind the tank. This was a decision made after the glass tank was drilled, otherwise I would have done my hole placement differently. Nevertheless, I can't change it now and I'm not worried about it as I believe I have a solid plan. In the first picture you see an exploded illustration of all of my cuts for the acrylic. Bracing, Front, Back/Sides, Bottom. In the second picture is the pukani overhang that will be attached to the front of the box. I'm not to concerned about weight because A) It's light weight pukani and B) The pond foam I used actually adds a decent amount of positive buoyancy.

Anyway, any and all suggestions are welcome. Thanks in advance!

Oh, don't mind the zip ties and plastic yellow markers... All that rock is going in the Gulf of Mexico for a few months. :)

Edit: Also, I plan on welding the bottoms for the inside dimension rather than the outside. I'm assuming this makes no difference being that the box is floating in air rather than on a stand like an aquarium. Right?

attachment.php


attachment.php
 

Attachments

  • OVERFLOW BOX.jpg
    OVERFLOW BOX.jpg
    56.2 KB · Views: 4
Last edited:
Acrylic fabrication questions? I can help!

Looking into a tank from a local shop. They built it out of 1/2" cell cast acrylic. Approximately 280 gallons, 90"L x 24"W x 30"H. Is the acrylic thickness fine or will I have issues? They are asking around $2700.

View attachment 324246
 
Last edited:
At 30'' High I wouldn't suggest using 1/2'' acrylic, you will see major bow.

Agreed and with those tight radius on the Eurobrace theres an excellent chance it'll fail

90" L and 30" H with .50" material is insane.

Contact James AKA Acrylics and just have him build you a real tank that'll last a lifetime without ever having to worry about 300 gallons of water on your floor.
 
Back
Top