Acrylic fabrication questions? I can help!

Cutting the top of my 140G tall TruVu acrylic system

Cutting the top of my 140G tall TruVu acrylic system

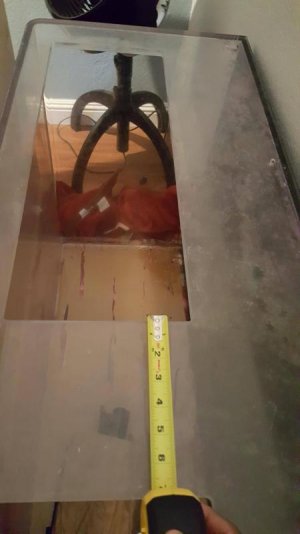
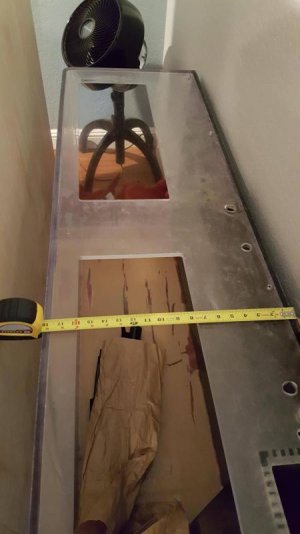
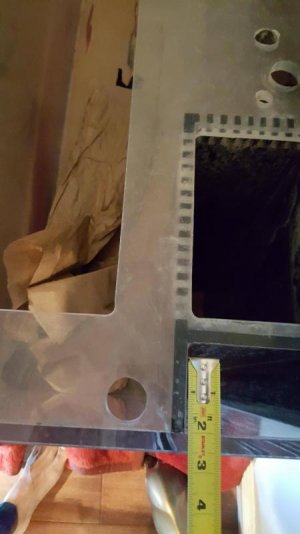
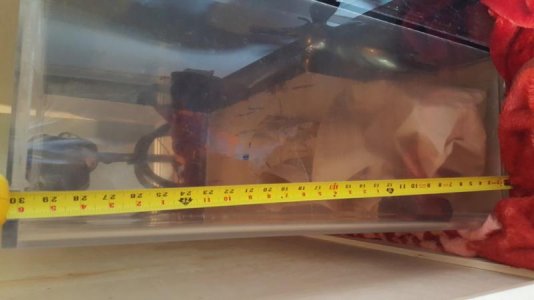
I got this 140 Gallon (60"x18"x30") TruVu acrylic fish-tank from CL few months back and I am setting this up.
The acrylic thickness is 1/2"
This has a standard configuration with a top bracing and has just 2 small openings to interface within the inside of tank. I want to cut the top of it and make the openings larger or if possible remove entirely or reduce the thickness of the center bracing as well if that won't compromise the structural stability of the tank. Currently the center bracing is 6 inches wide. Also what tool can be used to cut the top ?

Kindly advise on this.
 
Last edited:
Is that 30" tall? 1/2" is pretty thin to begin with for 30 tall...pics would help. Pretty sure TruVu is the one that threatened James with a lawsuit after he told everyone what he thought of their tank construction once...if that tells you anything
 
Is that 30" tall? 1/2" is pretty thin to begin with for 30 tall...pics would help. Pretty sure TruVu is the one that threatened James with a lawsuit after he told everyone what he thought of their tank construction once...if that tells you anything

Please find the images attached. Yes it is 30" tall. I wish I can cut at least the openings wider for hanging couple of AI Hydra over them.
 

Attachments

  • O2PmHDp - Imgur.jpg
    O2PmHDp - Imgur.jpg
    28.7 KB · Views: 2
  • kZSHGVx - Imgur.jpg
    kZSHGVx - Imgur.jpg
    33.8 KB · Views: 2
  • iqVElwd - Imgur.jpg
    iqVElwd - Imgur.jpg
    32.9 KB · Views: 2
  • 20160811_103130.jpg.jpg
    20160811_103130.jpg.jpg
    31.4 KB · Views: 2
Ah, it sucks. Thanks anyways for a quick reply.

I have asked a question on the lighting section on how to negotiate with this poor top configuration of the tank, if anyone can advise on that same.
http://www.reefcentral.com/forums/showthread.php?t=2594162

Meanwhile, should I be concerned coz you say it is under built. Do you think I should be better off getting rid of this and getting a new one ?
 
I found this Acrylic aquarium fish tank restore service in our area. Do you think it is a good idea, I can ask them if they can re-brace and seal the top of the tank in a better suitable manner, like may be with 3 openings and 2x3" cross braces ?
 
That is an option I suppose, but I wouldn't cut the top off or anything. That tank in the pics has very small diameter corners, probably 1" or 1.5", and that's where your crack-out is going to occur (surprised it hasn't already).

Openings on the new top and preferrably the cutouts you make should be 4" diameter. The trick is going to be cutting the existing top so that your cutout is nice and clean instead of jagged and disjointed (meaning the transition from a straight line to the corner is smooth). This might not seem like it makes much of a difference but it does, any sharp edge or transition or rough cut is going to be a place where stress focuses.

one way to do that would be to use a pattern jig on top of the tank (bearing at the base of the cutting bit) and then laminate a new top on and use the pattern to but both the new cutout and make the existing one larger.

Another way would be to make the existing opening bigger first (making sure to have 4" diameter corners and smooth lines, no bumps/juts/sharp points) and then laminate the addtional piece on (rough cutting holes so that you could add things like clamps when bonding) and use a flush cutter to cut the holes in the new top, with the bearing riding on the existing top that you just modded.

The latter would be easier as you don't have to make a pattern jig and find a bit that would work. The trick is going to be modding the existing top correctly, you don't want to take out material in a manner that would generally weaken the tank to the point that no thickness of new top would really be good enough.

What do you mean by small diameter corners ? Do you mean the top openings are aligned towards the front spaced at only just 2.25" from the front where as there is like ~8" space from the back to the opening ? If so, yeah the openings are mis aligned and placed towards the front of the tank.

I have been asking around for this in the SF bay area for someone who can cut out the existing top and laminate an ideal new one with larger openings and aligned right. No luck so far. :(

Openings on the new top and preferrably the cutouts you make should be 4" diameter.
What do you mean by that ? do you mean there should be 4" worth acrylic from the edges before the opening start ?
Do you like the center bracing to left as is ?
 
Last edited:
The offset of the opening is not really relevant. I'm just referring to the corner - they are a tight diameter and this focuses the stress there, so when you see a tank crack out, it usually starts there.

Better tanks are made with a large radius corner on the cutout which spreads the stress out and leads to less propensity to crack. hard to describe without drawing a picture.

with only 2.25" from the front of the tank to the opening, you don't have much room to work with. It's already too narrow, should ideally be 3" wide minimum around the perimeter and a 6" wide crossbrace.

The offset is because they have a cutout in the rear corner, bumping out around that would weaken it even more...
 
The offset of the opening is not really relevant. I'm just referring to the corner - they are a tight diameter and this focuses the stress there, so when you see a tank crack out, it usually starts there.

Better tanks are made with a large radius corner on the cutout which spreads the stress out and leads to less propensity to crack. hard to describe without drawing a picture.

.
I'm sorry, i would like to clarify if you mean by corners, the corners of the tank itself (all 4 corners from top to bottom) should be of diameter ~ 4" or do you mean just the corners of the top opening cutouts ?

I went to TAP plastics and showed our conversation here. They were ok to make a new top sheet, and can do even with 1", with the desired openings in place. They said I can to glue that on top of my current top but no guarantee. Is that what you meant by laminating a new top over the current ?
 
4" or do you mean just the corners of the top opening cutouts ?
yes
I went to TAP plastics and showed our conversation here. They were ok to make a new top sheet, and can do even with 1", with the desired openings in place. They said I can to glue that on top of my current top but no guarantee. Is that what you meant by laminating a new top over the current ?
yes

sorry too busy to go into any further detail atm. Someone else might be able to
 
Hi Floyd, thank you so much for all the information. I learned a lot in couple of days. Appreciate you help. I may end up building a new tank mostly than risk all this. Do you know of any good manufacturers whom I can deal with ?
 
One of my acrylic tanks is leaking on the end, mid seam it seams (wink wink).

What is the best way to fix it?

It appears like it is just leaking on that one side and when I push on that pane of acrylic, the leak definitely stops so I'm thinking all I need is some weld on along that seam?

Maybe a new piece of small acrylic to brace it?

The tank is 5 foot by 3 foot. 12 inches tall.

https://youtu.be/H1z8qx43W3c

http://m.imgur.com/eXJgHPN
http://m.imgur.com/uOP6Mnc
http://m.imgur.com/COVjjbl


Thank you!
 
hey James,
What should be the mix for a very humid environment?
Say 80 +- 5 humidity, 86 deg temp.
EDC 75%, DCM 20%, Acid 5%?
EDC 70%, DCM 15%, Acid 5%, Di acetone alcohol 10%?
EDC 65%, DCM 20%, Acid 5%, Di acetone alcohol 10%?

Targeting at least 30 to 40 sec soak time...

Thanks in advance
 
Last edited:
I'm not sure where you got Di acetone alcohol, I've never seen that as a recommended ingredient in the mix, unless I just completely missed it.

But I think this mixture:

80% MC
15% EDC
5% AA

Is plenty enough to eliminate any blushing due to bonding in high humidity. EDC is really expensive when compared to MC, so while EDC can be used alone or as the primary ingredient, it doesn't need to be and makes little financial sense
 
You'll have to kinda experiment as I keep my shop's temp and humidity as stable as possible.

The absolute strongest joints will be straight methylene chloride, but this doesn't flow well and reacts very quickly - esp on longer joints.

You can certainly use straight ethylene dichloride if you wish as well, with or without a little 99+% acetic acid. Or a combination of the 3 as I usually do. Basically, you want to use as little acid as possible - just enough to maintain smooth,even flow pattern. If you use too much, the joints tend to get kinduva grainy look to them.

The EDC will give the smallest amount of blushing while straight MC will have the most. Since I don't work in your climate, I cannot tell you exactly how much of which to use, you'll just kinda have to experiment and see what works best for you :)

HTH,
James
 
You'll have to kinda experiment as I keep my shop's temp and humidity as stable as possible.
What's the temp and humidity you keep?

You can certainly use straight ethylene dichloride if you wish as well, with or without a little 99+% acetic acid. Or a combination of the 3 as I usually do. Basically, you want to use as little acid as possible - just enough to maintain smooth,even flow pattern. If you use too much, the joints tend to get kinduva grainy look to them.
I'll try to adjust accordingly, trying different mixes, or go to last resort, fixing a AC unit in my garage. :dance:
What do you mean by grainy look?
And what do you think about Di acetone alcohol?
 
Back
Top