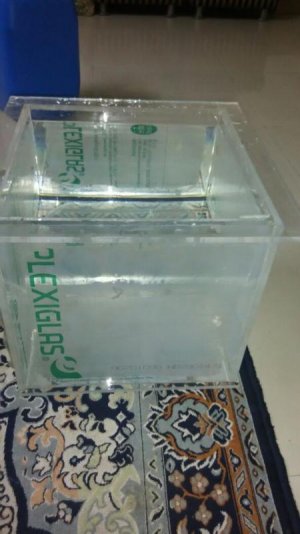
Acrylic fabrication questions? I can help!

1) make sure your right-angle bracket is actually 90 degrees

2) clean bonding surfaces with denatured alcohol on a clean cotton cloth (like an old white t-shirt, they make bags of rags out of this material) EDIT: and blow off with compressed or canned air, and don't touch these surfaces again (with fingers or anything that would make them not clean)

3) attach your vertical panel to the right-angle bracket with both pieces fit together in their "final" position (i.e. where they will be once the pins are pulled).

Uptill 3) everything is great

4) at this point, do any shimming needed to tighten up the joint (into it's "final" position)

Shimming is only required beneath the pins? or can be random

5) now, insert the pins, shim additionally if needed (should be very minor at this point) and blow out the joint with canned air

The pins or rather say the wire i use is 0.45 mm or 0.01771654", it bends when i insert so i have to lift the panel up and place them. James had mentioned to loosen up the clamps when you insert those wires manually rather then pushing them in. Actually im quiet confused, loosing the clamps would loose the 90 deg angle on the pane.

6) run solvent
Finally im being able to do it better.
Cant thank ya'll much enough!

7) pull pins after the soak time

By the time i finish my run its almost 15 sec, and the solvent dries up. I think might be the humidity that is playing its part. I have to get ethleye chemical that james had mentioned to slow down the cure rate. I'll get it for my next build

8) make sure the joint is aligned at the ends
Yep

9) once the joint is starting to firm up (after about a minute or so) then momentarily loosen the clamps while very gently applying pressure to the top edge (pushing down on the joint, essentially). Gently, as in don't smash it together, you just don't want the vertical panel to move/fall sideways, let the weight of the panel do the work (that's all you need)

After gluing up both the ends,pulling up the last pin on the second end panel and waiting for a few seconds. I put mdf planks on top of both the panes and added weight.

10) maybe add a small weight to the horizontal part of the 90 degree bracket

Before running the solvent or after that?

What the last couple steps do is allow the top piece to settle in a bit, as a very tiny fraction of (micrometers) of material is dissolved, and you want to close this tiny gap to prevent air intrusion along the joint (it's like the extra 1% towards perfection). It also prevent the 90 degree bracket from "suspending" the vertical panel up and allowing the gap to form, in the case where you made a goof on one of the setup steps, etc...you won't get much more squish-out when loosening the clamps, or rather, you shouldn't

Regarding the last pin pulling thing, yes that is totally expected. Pulling the last pin will result in final settling of the joint and this is where you see the squish-out. The syrupy stuff is dissolved acrylic from both sides (which creates the micrometer-gap that you account for my loosening the clamps)

HTH
Bud

What i felt was i didnt get any squish out.

Read the quote.
 
Last edited:
I'll try to figure out where all your comments are...you can quote individual blocks using the QUOTE bb code, in vB you have to copy/paste the text you want to quote then in the editor click the quote button and paste it in so that your replies are not embedded within the quote. Either that or change the color of your text

Shimming is only required beneath the pins? or can be random

shimming is not required under each pin. I shim prior to adding pins - you have to visually look at the joint by looking along the joint and spotting the gaps, if you're using foam on boards like you are you should be able to see these with some practice.

Then when you start adding pins, some will inevitably not be tight. Sometimes when you add a pin, another loosens. It's a good idea to get all pins in place and then go back and shim the loose ones. Which sometimes loosens another pins. So you have to go around and around until all pins are tight with the minimum amount of shimming

The pins or rather say the wire i use is 0.45 mm or 0.01771654", it bends when i insert so i have to lift the panel up and place them. James had mentioned to loosen up the clamps when you insert those wires manually rather then pushing them in. Actually im quiet confused, loosing the clamps would loose the 90 deg angle on the pane.

I use solid picture hanging wire which I think is 26 or 28 gauge, can't recall. It's roughly the same diameter as garbage bag twist ties, which you can also use (just strip them)

When you set up the joint without the pins, you will leave a lip of material to allow for the fillet to form (which will be flush trimmed off after you are done). When you have the assembly sitting on a board with foam, just press down on the horizontal panel to open up the gap, slide the pin into the joint about 1 or 2 mm, then release. You should not need to lift up on the vertical panel to get the pin into a joint that is only 1/2" material or less, or even 3/4" for that matter, but it depends on the total weight I guess. And no you would not loosed clamps until after you have ran the solvent and pulled the pins.

By the time i finish my run its almost 15 sec, and the solvent dries up. I think might be the humidity that is playing its part. I have to get ethleye chemical that james had mentioned to slow down the cure rate. I'll get it for my next build

There's no way the solvent would dry up inside the joint in 15 seconds. I have run 10' joints (bottom/top joints) that take the better part of a minute to run and when I pull the pins, the solvent/squish-out is thick, but not dry by any means. If you're using straight MC, it can evap a little faster, adding 5% AA can help but it's not that huge of a difference.

EDC is way expensive, >$150 a gallon in the US, and it's dangerous also. I don't use it. It would be nice to use it, for several reasons, but it's not necessary.

After gluing up both the ends,pulling up the last pin on the second end panel and waiting for a few seconds. I put mdf planks on top of both the panes and added weight.

I typically don't add weight to the end panels or interior baffles on the first joint, just because adding any kind of weight to the top of a panel like that just adds in a tipping factor. If your routed edge is truly square and straight and your 90 degree bracket is good, and your joint is properly prepared (dry fit before pins added then shimmed minimally) the weight of the panel itself should be all you need.

Do one panel at a time, the whole process. Then after a day of curing, you flip the assembly on to the other panel and that's when you have a surface that you can add weight to, if needed. I find that the same applies: the weight of the material is usually enough to keep the joint true (except that after flipping, the front panel will bow and flare out the ends, so you have to support that in the middle to prevent that, which may cause lifting of the assembly, so weight might be needed)

I usually only need weight added when bonding the top and bottom on.

Before running the solvent or after that?

The steps are listed in order of when you do everything so this is last, after momentarily loosening the clamps to allow the panel to settle. Then once the clamps are back, adding weight pushes the joint together even more

What i felt was i didnt get any squish out.

It's possible that you didn't use enough solvent or your pins/wires are too small.

For reference, I can fill a 24" joint with solvent in about 5 seconds, maybe 10. Using a 22 gauge needle.

For a top/bottom joint that is 10' long/etc, I switch to the 2 oz squeeze bottle and a #16 needle which is huge and scary but with practice I can fill that 10' joint in about 15 seconds flat and have pins pulled in another 10
 
Sounds like your solvent is too fast.
.45mm is fat, way fat. What might be happening is you're applying the solvent and perhaps waiting too long? If this is true, then some of the solvent you're applying is evaporating in that waiting time and because it's such a fast solvent - your joint is already set by the time you pull the wires.

The joint should be slight syrupy when you pull the wires. I don't know what gauge application needle you're using but the thinner needles take longer to apply the solvent, so when you add a minute or so of waiting time on top of that - your joint is essentially set and dry.

Try different waiting times, from basically a "zero wait" to perhaps 30 seconds or so. When I glue material, I apply the solvent and wait *maybe* 15 seconds or so, sometimes no wait at all, depending on the length of the joint, material thickness, diameter of wire, etc., but I think a minute might be too much in this case - seein' as how it's coming out dry.

For me, it stays syrupy for a moment or so, this way I can shim after the solvent has been applied.

HTH,
James
 
Pretty sure I use this

http://www.homedepot.com/p/OOK-100-ft-Galvanized-Steel-Wire-50138/100204195

Which is 28 gauge, or 0.3211 mm. so 0.45mm is too thick, I agree. I would think that with a joint that is too far apart, what would happen is that you would need to fill the solvent with so much in order to get contact that this would allow the solvent to evaporate more quickly and perhaps even run out of the joint, and the edges of the joint would not get much contact time with the solvent due to this also.

With the joint "tighter", capillary action will keep the solvent fully in the joint and all areas will get adequate contact time.

I think this is your issue at this point. Too wide of a joint gap + fast solvent = quick evaporation = no squish out.

Tighten the joint and you should be better off
 
Seems this baby is holding up well!
Did a 24 hour water test. After peeling protective sheet. Seams dont seem that bad.
But im an anal person when it comes to perfection. Thanks ya'll for your support. Without ya'll there would be none of this. Especially James and Bud.
 

Attachments

  • IMG-20160715-WA0004.jpg
    IMG-20160715-WA0004.jpg
    42.9 KB · Views: 4
How to work with 2 part?
For instance bonding other than transparent surfaces? how to apply on seams?
how to jig it or clamp it? working time etc..
 
Dumb question about using acrylic in general. What do I need to know if I want to use acrylic baffles in a DIY glass sump / refugium? I know that silicone doesn't bond great to acrylic, but these aren't weight-bearing walls.

Is it true that acrylic expands in water? Is it true that acrylic expands more than glass at the same increase in temp?
Yes, acrylic expands in water, and some with heat but not as much as one might think. It expands mostly because it absorbs water. If you leave 1/16" of slop on each side (1/8" total) - you'll be good. It won't expand that much and gives you some room to fit it without having to wedge it in place.

Best way to do it is to silicone a strip of acrylic on each side of the baffle on the sump wall, thin 1/2" wide strip or a little stronger is better, and 1/4" acrylic for these strips is just fine. GE 1200 series silicone is very good for what you're doing and not expensive not particularly difficult to find.

HTH,
James
 
Cool - thank you! I was also considering using acrylic as "walls" at the ends of glass tanks for an upcoming build. Attached is a rough schematic. Do you think I could get away with this?

Imagine that the gray walls on the interior of the top 3 tanks were black acrylic. The widths are approx 8" - I would use black silicone I guess. What do you think? I'm just trying to avoid overflow boxes for a more uncluttered look.
 
You might get away with it.. I wouldn't trust silicone itself, but would opt to put the strips in. One of my concerns is making the overflow areas too "messy" - if it won't get seen, perhaps it wouldn't matter either way?
I'd keep the drain holes up high if ya can though, just in case it won't hold as you'd like.

James
 
The more I think about it the less I want to use the acrylic. I was just using it to give me the black color and to be able to have the slots at the top. I think glass would give me good concealment and would be sturdier. The glass would still give me total control over the water height in each tank. The only thing I would be missing out on would be the slits.

That's a pretty big problem though. Fish are going to go right over the top of that thing if I can't figure out another way to "strain" the overflow water. Maybe I could have black acrylic cross pieces over the top of the tank covering my overflow areas (one on each end), with acrylic "combs" glued so that they come down from the top and meet the glass walls... I need someone that is good at cutting and fabricating acrylic. These guys online want to charge a huge setup for setting up a CNC for these custom pieces with the slits.

Does anyone know where I can get acrylic pieces cut for a reasonable price?
 
you can use Gutter-Guard if ya like. Just silicone it onto an acrylic frame or whatever looks nice? it'd give you better flow and smaller openings that a slotted acrylic piece :)

James
 
sure you could paint it, but IMO it'd be simpler/easier to just make the frame from black acrylic. Black acrylic, black Gutter-Guard, and black silicone if'n ya wish.. If you did it right - would look slick :)

James
 
Ah, when I went looking for the gutter guard I didn;t see any black - I guess I assumed it wouldn't be very popular in black - I'll look harder.
 
Sir James,
Crosslinked acrylic can be solvent welded? Any difference in strength if any compared to the conventional one? any pointers?
 
Sir James,
Crosslinked acrylic can be solvent welded? Any difference in strength if any compared to the conventional one? any pointers?
not at all. It's molecular chains are effectively infinite, so not really soluble. You could try casting the joint, but the 40 won't have much to bite into since it's cross-linked so I wouldn't count on it in any way. For all practical purposes, it's not viable for any sort of chemical bonding.

James
 
Back
Top