You are using an out of date browser. It may not display this or other websites correctly.
You should upgrade or use an alternative browser.
You should upgrade or use an alternative browser.
Acrylic fabrication questions? I can help!
- Thread starter JohnL
- Start date
pandimus
Active member
I was just assuming..perhaps James has a better idea.I'm wondering if I could construct something to support the bottom of the drop off. I just don't see creating an angle like that and having it look good on the desk.
Sent from my XT1254 using Tapatalk
I wouldn't take much to help. The way these are "usually" made is the top, bottom, and "ends" (as pictured) are glued together as a 38 x 24" assembly. The ~28 x 8" "L" drop is then made as a separate assembly and glue into the tank. The remainder is then flush cut off. The it's glued onto the front and back (as pictured) then flush cut again. If you leave a corner radius or 45 in that corner - it will help relieve potential strains on the corner.
If you leave that corner sharp and bump into the tank, the mass of the tank will be moving and the drop will hit your desk. All of the energy of the tank moving will now be concentrated on that corner which will likely crack. And yes, I've cracked one here in the shop just moving it around, so I've learned")
If you have any millwork on the edges of your desk, use it to your advantage and create a radius to go around it if you can")
HTH,
James
If you leave that corner sharp and bump into the tank, the mass of the tank will be moving and the drop will hit your desk. All of the energy of the tank moving will now be concentrated on that corner which will likely crack. And yes, I've cracked one here in the shop just moving it around, so I've learned
If you have any millwork on the edges of your desk, use it to your advantage and create a radius to go around it if you can
HTH,
James
Gluing PVC and Acrylic
Gluing PVC and Acrylic
Hi folks - I really did do a search on this but, I would like a clarification. I need to glue a 3/4" PVC union to the top of a calcium reactor. Top is 3/8" thick. Back in 2011, James wrote:
However, tetrahydrafuran (THF) can also be use about as effectively as methylene chloride. THF is the primary ingredient in PVC pipe cement.
Does this mean that if I use pipe cement where the main ingredient is tetrahydrafuran that it would work for this job? Or is there something better? I can't afford WO-40.
Thanks
Floyd R Turbo
Either busy or sleeping
There are several online retailers, but the same foilks that carry acrylic should be able to get a hold of PVC as well - Laird, Regal, Port, Sabic Polymershapes, etc
Floyd R Turbo
Either busy or sleeping
42 is 40 packaged in a handy tube for 4x as much and a gun that costs like $500.
I think 2007 is for PVC, that's basically THF (active ingredient in PVC cement)
I think 2007 is for PVC, that's basically THF (active ingredient in PVC cement)
I use the exact same jigs and techniques for 1" as I do 1/4" material. The only things that change are to make the solvent a little slower - use a touch more acid. The wires or "pins" are different as well, for 1/4" I use .008" wire but for 1" I use .014" wires. Everything else is exactly the same.
.008" is very thin approx 0.2 mm is that correct?
Such thin pins would bend while forcing between the panels unlike thicker pins. So do you lift the end panels manually and fit those in?
I understand that if you use bigger pins on smaller thickness, you get a bigger ooze out of the joint while you pull up those pins, and too excessive is not what is required right?
Floyd R Turbo
Either busy or sleeping
DCM 95%, Acid 5%, humidity 80%, temp 27 deg Celsius.
I guess ran too much solvent on a scrap test piece?
Have a look at the pics what's missing?
Temp and humidity that high will result in the solvent drying white anywhere it is in contact with air (i.e. the fillet). You need humidity below 50% and temp below 74F, that's probably a minimum (or maximum, depending on your viewpoint)
Floyd R Turbo
Either busy or sleeping
Polished out, maybe. Flame, no. Better to just do your bonding in the proper temp/humidity. It is not a structural problem - it's purely cosmetic.
Floyd R Turbo
Either busy or sleeping
well maybe not purely but at least for purposes of practicing getting rid of bubbles etc, it's fine.
I don't use "pins" - never have. I use tungsten wire which for the most part - simply doesn't "bend." But yes, .008" for thinner material, .014" for thicker..008" is very thin approx 0.2 mm is that correct?
Such thin pins would bend while forcing between the panels unlike thicker pins. So do you lift the end panels manually and fit those in?
For thinner material (<3/4") I just have to push down on the material. The foam will compress and allow for insertion of the wire. On thicker material, yes, I lift the piece to allow the wire in. When the solvent is applied, I then release the spring clamps and set the joint, tapping a little side to side if needed to make sure the sides are flush.
Excessive ooze is not only unattractive but such joints tend to be more stressed and craze easier. Remember that solvent is a chemical stressor, more solvent = more stress.I understand that if you use bigger pins on smaller thickness, you get a bigger ooze out of the joint while you pull up those pins, and too excessive is not what is required right?
James
Generally referred to as "blushing" - it's far too humid at 80%. This is where the addition of ethylene dichloride works well. It achieves a good joint but so much blushing.DCM 95%, Acid 5%, humidity 80%, temp 27 deg Celsius.
I guess ran too much solvent on a scrap test piece?
Have a look at the pics what's missing?
HTH,
James
Hey james,
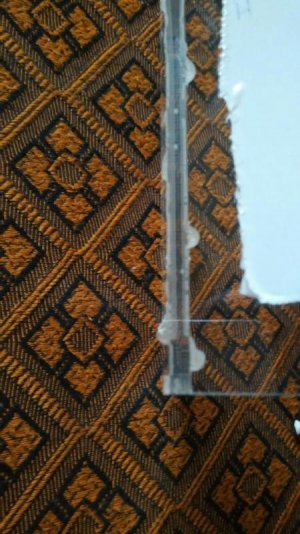
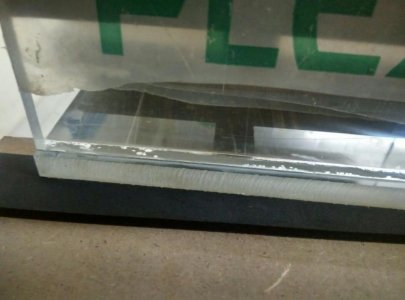
I'm getting a taste of it now. here are the pics
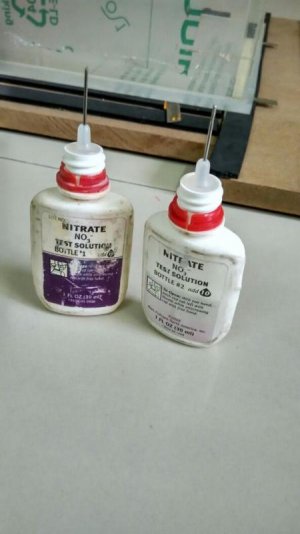
I used .45 mm wire. I was facing major issue with solvent dispenser, used a syringe initially which was totally not in control. Find the pics for DIY solvent bottle. Yep its not available locally.
When you run the solvent and pull out the pins. it feels like the tank is not settling down untill you pull the last pin where you feel a little nudge downwards. Its like syrupy thing between the surfaces when you start pulling pins? or is it a dry joint?
I'm getting a taste of it now. here are the pics
I used .45 mm wire. I was facing major issue with solvent dispenser, used a syringe initially which was totally not in control. Find the pics for DIY solvent bottle. Yep its not available locally.
When you run the solvent and pull out the pins. it feels like the tank is not settling down untill you pull the last pin where you feel a little nudge downwards. Its like syrupy thing between the surfaces when you start pulling pins? or is it a dry joint?
Attachments
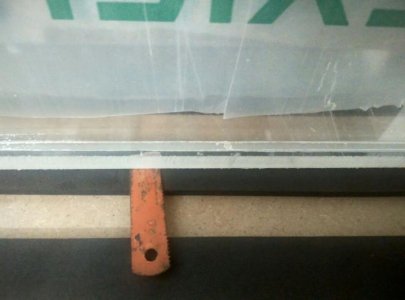
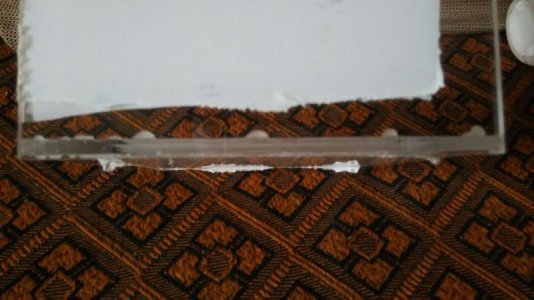
Images at previous post were the first run by syringe. Second run was by another diy bottle, when by the DIY applicator it made flowing so much easier.
here are the later pics..lastly i used those empty testkit bottles for the bottom joint. i'll post bottom pics later when cured.
Thanks.
here are the later pics..lastly i used those empty testkit bottles for the bottom joint. i'll post bottom pics later when cured.
Thanks.
Attachments


Floyd R Turbo
Either busy or sleeping
1) make sure your right-angle bracket is actually 90 degrees
2) clean bonding surfaces with denatured alcohol on a clean cotton cloth (like an old white t-shirt, they make bags of rags out of this material) EDIT: and blow off with compressed or canned air, and don't touch these surfaces again (with fingers or anything that would make them not clean)
3) attach your vertical panel to the right-angle bracket with both pieces fit together in their "final" position (i.e. where they will be once the pins are pulled).
4) at this point, do any shimming needed to tighten up the joint (into it's "final" position)
5) now, insert the pins, shim additionally if needed (should be very minor at this point) and blow out the joint with canned air
6) run solvent
7) pull pins after the soak time
8) make sure the joint is aligned at the ends
9) once the joint is starting to firm up (after about a minute or so) then momentarily loosen the clamps while very gently applying pressure to the top edge (pushing down on the joint, essentially). Gently, as in don't smash it together, you just don't want the vertical panel to move/fall sideways, let the weight of the panel do the work (that's all you need)
10) maybe add a small weight to the horizontal part of the 90 degree bracket
What the last couple steps do is allow the top piece to settle in a bit, as a very tiny fraction of (micrometers) of material is dissolved, and you want to close this tiny gap to prevent air intrusion along the joint (it's like the extra 1% towards perfection). It also prevent the 90 degree bracket from "suspending" the vertical panel up and allowing the gap to form, in the case where you made a goof on one of the setup steps, etc...you won't get much more squish-out when loosening the clamps, or rather, you shouldn't
Regarding the last pin pulling thing, yes that is totally expected. Pulling the last pin will result in final settling of the joint and this is where you see the squish-out. The syrupy stuff is dissolved acrylic from both sides (which creates the micrometer-gap that you account for my loosening the clamps)
HTH
Bud
Similar threads
- Replies
- 0
- Views
- 119
- Replies
- 2
- Views
- 2K
- Replies
- 4
- Views
- 1K
- Replies
- 29
- Views
- 240