Floyd R Turbo
Either busy or sleeping
Alage Scrubber Basics Summary Part 1: Page 1 of 10
Alage Scrubber Basics Summary Part 1: Page 1 of 10
Algae Scrubber Build Basics Summary
It's that time again: you got it "“ Summary Time! I decided to revamp the previous summary post with some additional information and updates. In the interest of providing as many pictures as possible (since I cannot make references to other websites on RC) I have decided to split this up into several more posts. I have also re-organized it a bit, and fixed numerous glaring grammatical errors and typos.
The thread raced to post #2000, so I had to leave this summary as mainly a recompilation of the previous summary, with only a few things added. As I promised before, I will write up "œPart 2" which will cover various troubleshooting pointers, enclosed boxes, growth types, customizing to your specific system, overflow protection, increasing flow, operation, maintenance, cleaning, etc.
With that said, here are the revamped Basics:
There are many options when it comes to building your own scrubber. Hopefully this series of posts will wrap up all the basic concepts as clearly and concisely as possible. It seems that many people look at this concept and think they can make some kind of major improvement, and post their idea. Then, a newbie can look at that and think that it makes great sense and mimic it, without understanding the pitfalls. I feel that it is important to understand the concept and purpose behind the basics, and why you should rarely deviate from them without fully understanding the basic concepts first.
Most of the issues people encounter with their DIY builds can be directly attributed to missing one or two of the basic principles. So consider this a "best practice" summary. That is, there are several ways to build a scrubber, but there is always a cheap and easy way, as well as the most effective and efficient way.
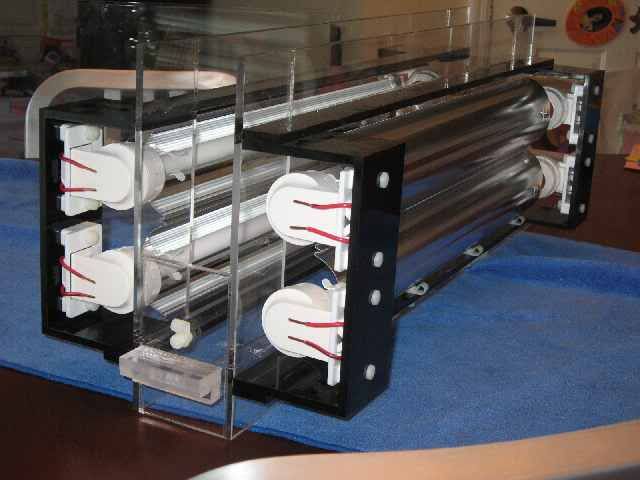
The Vertical Waterfall Algae Scrubber
99% of this summary is dedicated to the basic of designing and constructing a modern, vertical screen, waterfall-style Algae Scrubber, illuminated from both sides. This is simply because this design is currently by far the most efficient and effective type of Algae Scrubber design, and the only one that I recommend building. Mention is made of what considerations to make for building a single-sided or horizontal scrubber.
The vertical waterfall style algae scrubber is very efficient for a couple of reasons. The design allows you to illuminate the algae from both sides and place the lights very close, which reduces the distance that light has to travel through water in order to reach the algae. The water flow over the screen is relatively thin and moves fast; this is important, because algae requires turbulent flow in order for nutrients to reach the cells on a microscopic level (this is referred to as the "œboundary layer"). Because of both of these factors, vertical scrubbers require less light and material than the older style horizontal scrubbers for equivalent filtration capacity.
The Slot Pipe, Screen, and Fasteners
The principal component of the modern vertical waterfall Algae Scrubber is the slot pipe and plastic canvas screen. The screen is inserted into a section of horizontal PVC pipe which has a slot cut into it. The screen is typically held in place with a fastener through a cut-out section of the screen, like this:

Slot Pipe
The slot pipe itself should be Schedule 40 PVC at a minimum. Don't use vent pipe, flexible hose, or thin-walled PVC. The reason is that cutting a slot in the tube weakens it enough that it can bow over time and cause the slot to change width. This is especially true for a wide, tall scrubber. Anything over 24" should probably have 2 slots, with a small section in the center left uncut (maybe 1/4") with some kind of means of support at the center. It may look fine at first, but with heavy growth, you start to see this:

I'm not saying that it won't work, and I'm not critiquing the design pictured above. It just got me thinking that it can't be good to have that pipe flexing that much. So this is a recommendation I am making for scrubbers with screens over 24" wide. But check out that growth!!! That's 6.5 pounds of algae (drained).
Pipe Diameter
When running a scrubber fed directly from the overflow, there is usually no need to deviate from the size of the drain pipe that you currently use. But, that all depends on your total resultant flow to the pipe, length of screen, etc. In the majority of cases, this doesn't change anything. However, if you had a large tank, and were combining 4 1" drain lines together to feed one large scrubber, you have different considerations.
If you're doing a pump fed scrubber, either top of tank or sump, try to match the size of the slot pipe and other PVC components to the recommendations from the pump manufacturer, and if in doubt, err on the side of larger pipe. Larger pipe puts less head pressure on the pump, which will increase the flow rate.
Cutting the Slot
The width of the slot should be approximately 1/8" wide, the same length as the screen which you are using (as exact as possible), and as straight as possible. Cutting a straight, even width slot is arguably the most difficult part of building a scrubber. It is also one of the most important steps. If the slot is crooked, the screen may not hang properly, and there may be areas where the flow is lighter and heavier. This can result in sections of weak growth.
However you go about this, you might need a few tries to get good at it. PVC is cheap, so practice on a small section so you get used to how this is done. It's going to take a little time and patience "“ don't rush it. Mark the slot, and cut carefully. If you mess up, do it again. Once you solvent weld an end cap and a union to it, it is not as cheap to replace (but still relatively cheap).
Doing it right means using a power tool. Probably the most common tool for this use is a rotary tool, or a Dremel, using a cutoff wheel:

Very recently, someone reported great success by using an oscillating tool. So if you're looking for a reason to add another tool to the arsenal, here's your chance.

Another idea is to use a router. Since plastics are "˜grabby', and plunge routing plastic takes extra grip and control, extra precautions apply - so this is not for the inexperienced, but it makes very straight slots. This method requires building a guide jig for the router, and a clamping system to keep the PVC firmly in place.
Reportedly, the best way to cut a perfectly slot straight is by using a table saw. However, there really is no way to cut a slot in the middle of a section of pipe (or across the whole length of the pipe) without removing the anti-kickback device and lowering the pipe on to the spinning blade. You could also do it with a handheld circular saw, but like the router method, you would need a jig and clamp system, and you still are lowering a spinning blade onto the PVC (if you're cutting the slot in the middle and leaving the ends uncut). I have never tried this and I do not recommend this method because it sounds too dangerous.
However you decide to cut the slot in the pipe, remember to observe all necessary safety precautions. Either that, or have someone else do it for you.
Alage Scrubber Basics Summary Part 1: Page 1 of 10
Algae Scrubber Build Basics Summary
It's that time again: you got it "“ Summary Time! I decided to revamp the previous summary post with some additional information and updates. In the interest of providing as many pictures as possible (since I cannot make references to other websites on RC) I have decided to split this up into several more posts. I have also re-organized it a bit, and fixed numerous glaring grammatical errors and typos.
The thread raced to post #2000, so I had to leave this summary as mainly a recompilation of the previous summary, with only a few things added. As I promised before, I will write up "œPart 2" which will cover various troubleshooting pointers, enclosed boxes, growth types, customizing to your specific system, overflow protection, increasing flow, operation, maintenance, cleaning, etc.
With that said, here are the revamped Basics:
There are many options when it comes to building your own scrubber. Hopefully this series of posts will wrap up all the basic concepts as clearly and concisely as possible. It seems that many people look at this concept and think they can make some kind of major improvement, and post their idea. Then, a newbie can look at that and think that it makes great sense and mimic it, without understanding the pitfalls. I feel that it is important to understand the concept and purpose behind the basics, and why you should rarely deviate from them without fully understanding the basic concepts first.
Most of the issues people encounter with their DIY builds can be directly attributed to missing one or two of the basic principles. So consider this a "best practice" summary. That is, there are several ways to build a scrubber, but there is always a cheap and easy way, as well as the most effective and efficient way.
The Vertical Waterfall Algae Scrubber
99% of this summary is dedicated to the basic of designing and constructing a modern, vertical screen, waterfall-style Algae Scrubber, illuminated from both sides. This is simply because this design is currently by far the most efficient and effective type of Algae Scrubber design, and the only one that I recommend building. Mention is made of what considerations to make for building a single-sided or horizontal scrubber.
The vertical waterfall style algae scrubber is very efficient for a couple of reasons. The design allows you to illuminate the algae from both sides and place the lights very close, which reduces the distance that light has to travel through water in order to reach the algae. The water flow over the screen is relatively thin and moves fast; this is important, because algae requires turbulent flow in order for nutrients to reach the cells on a microscopic level (this is referred to as the "œboundary layer"). Because of both of these factors, vertical scrubbers require less light and material than the older style horizontal scrubbers for equivalent filtration capacity.
The Slot Pipe, Screen, and Fasteners
The principal component of the modern vertical waterfall Algae Scrubber is the slot pipe and plastic canvas screen. The screen is inserted into a section of horizontal PVC pipe which has a slot cut into it. The screen is typically held in place with a fastener through a cut-out section of the screen, like this:
Slot Pipe
The slot pipe itself should be Schedule 40 PVC at a minimum. Don't use vent pipe, flexible hose, or thin-walled PVC. The reason is that cutting a slot in the tube weakens it enough that it can bow over time and cause the slot to change width. This is especially true for a wide, tall scrubber. Anything over 24" should probably have 2 slots, with a small section in the center left uncut (maybe 1/4") with some kind of means of support at the center. It may look fine at first, but with heavy growth, you start to see this:
I'm not saying that it won't work, and I'm not critiquing the design pictured above. It just got me thinking that it can't be good to have that pipe flexing that much. So this is a recommendation I am making for scrubbers with screens over 24" wide. But check out that growth!!! That's 6.5 pounds of algae (drained).
Pipe Diameter
When running a scrubber fed directly from the overflow, there is usually no need to deviate from the size of the drain pipe that you currently use. But, that all depends on your total resultant flow to the pipe, length of screen, etc. In the majority of cases, this doesn't change anything. However, if you had a large tank, and were combining 4 1" drain lines together to feed one large scrubber, you have different considerations.
If you're doing a pump fed scrubber, either top of tank or sump, try to match the size of the slot pipe and other PVC components to the recommendations from the pump manufacturer, and if in doubt, err on the side of larger pipe. Larger pipe puts less head pressure on the pump, which will increase the flow rate.
Cutting the Slot
The width of the slot should be approximately 1/8" wide, the same length as the screen which you are using (as exact as possible), and as straight as possible. Cutting a straight, even width slot is arguably the most difficult part of building a scrubber. It is also one of the most important steps. If the slot is crooked, the screen may not hang properly, and there may be areas where the flow is lighter and heavier. This can result in sections of weak growth.
However you go about this, you might need a few tries to get good at it. PVC is cheap, so practice on a small section so you get used to how this is done. It's going to take a little time and patience "“ don't rush it. Mark the slot, and cut carefully. If you mess up, do it again. Once you solvent weld an end cap and a union to it, it is not as cheap to replace (but still relatively cheap).
Doing it right means using a power tool. Probably the most common tool for this use is a rotary tool, or a Dremel, using a cutoff wheel:
Very recently, someone reported great success by using an oscillating tool. So if you're looking for a reason to add another tool to the arsenal, here's your chance.
Another idea is to use a router. Since plastics are "˜grabby', and plunge routing plastic takes extra grip and control, extra precautions apply - so this is not for the inexperienced, but it makes very straight slots. This method requires building a guide jig for the router, and a clamping system to keep the PVC firmly in place.
Reportedly, the best way to cut a perfectly slot straight is by using a table saw. However, there really is no way to cut a slot in the middle of a section of pipe (or across the whole length of the pipe) without removing the anti-kickback device and lowering the pipe on to the spinning blade. You could also do it with a handheld circular saw, but like the router method, you would need a jig and clamp system, and you still are lowering a spinning blade onto the PVC (if you're cutting the slot in the middle and leaving the ends uncut). I have never tried this and I do not recommend this method because it sounds too dangerous.
However you decide to cut the slot in the pipe, remember to observe all necessary safety precautions. Either that, or have someone else do it for you.


") LOL! Great re-write-up! So, when are you going to come out with the book? Seriously, you have enough into this already for a small booklet. I am peddling backwards with my own ats at the moment due to plumbing problems on the new display tank. I just took my ats down for now until I get my tanks plumbing fixed, but, reading this gives me some incentive to back up and re-evaluate my design and make a better one. For instince, I was originally planning to feed my ats with the main siphon drain from my BeanAnimal overflow, but, because my main display was not even set up yet, I could not test my actual water flow and thus build my ats to correspond to my tanks flow rate. I appreciate the re-hash - with the new info!I really is helpful even to someone like myself that has read all the prior material in this thread and others, to see it more concise and organized. Thank you!
LOL! Great re-write-up! So, when are you going to come out with the book? Seriously, you have enough into this already for a small booklet. I am peddling backwards with my own ats at the moment due to plumbing problems on the new display tank. I just took my ats down for now until I get my tanks plumbing fixed, but, reading this gives me some incentive to back up and re-evaluate my design and make a better one. For instince, I was originally planning to feed my ats with the main siphon drain from my BeanAnimal overflow, but, because my main display was not even set up yet, I could not test my actual water flow and thus build my ats to correspond to my tanks flow rate. I appreciate the re-hash - with the new info!I really is helpful even to someone like myself that has read all the prior material in this thread and others, to see it more concise and organized. Thank you!")