You are using an out of date browser. It may not display this or other websites correctly.
You should upgrade or use an alternative browser.
You should upgrade or use an alternative browser.
Algae Scrubber Basics
- Thread starter srusso
- Start date

karimwassef
Active member
ok. today was a lot of work.. and pain...
First, I disassembled the screen again so I can make four modifications:
1. Replace the clips holding the screens with an inner tube to force a more uniform distribution.
2. Plug up the ends of the top tube to avoid the water running down the vertical pipes.
3. Add a lower pipe so I can stretch the mesh to create a more uniform flow.
4. Rough up the mesh.
5. Create a light shield for the top slit to avoid algae growing into it.
Ok.. so here is the mesh removed:
<a href="http://s1062.photobucket.com/user/karimwassef/media/76F9CAE1-5D6D-44F5-93FE-EDCD34F9DD36_zpsgyc23onn.jpg.html" target="_blank"><img src="http://i1062.photobucket.com/albums/t496/karimwassef/76F9CAE1-5D6D-44F5-93FE-EDCD34F9DD36_zpsgyc23onn.jpg" border="0" alt=" photo 76F9CAE1-5D6D-44F5-93FE-EDCD34F9DD36_zpsgyc23onn.jpg"/></a>
and here's the screw that holds the frame in place
<a href="http://s1062.photobucket.com/user/karimwassef/media/5DC02F76-2352-4DB8-AE30-F3EE60963F08_zpsifo0jlvz.jpg.html" target="_blank"><img src="http://i1062.photobucket.com/albums/t496/karimwassef/5DC02F76-2352-4DB8-AE30-F3EE60963F08_zpsifo0jlvz.jpg" border="0" alt=" photo 5DC02F76-2352-4DB8-AE30-F3EE60963F08_zpsifo0jlvz.jpg"/></a>
<a href="http://s1062.photobucket.com/user/karimwassef/media/B3878CB0-D03A-4F29-9633-3D43FC81F7AB_zpsub23k7ow.jpg.html" target="_blank"><img src="http://i1062.photobucket.com/albums/t496/karimwassef/B3878CB0-D03A-4F29-9633-3D43FC81F7AB_zpsub23k7ow.jpg" border="0" alt=" photo B3878CB0-D03A-4F29-9633-3D43FC81F7AB_zpsub23k7ow.jpg"/></a>
Here is the clip holding up the mesh
<a href="http://s1062.photobucket.com/user/karimwassef/media/45F34DF4-5F1A-4DCA-A304-842CE4C842D9_zpszrpbmxl5.jpg.html" target="_blank"><img src="http://i1062.photobucket.com/albums/t496/karimwassef/45F34DF4-5F1A-4DCA-A304-842CE4C842D9_zpszrpbmxl5.jpg" border="0" alt=" photo 45F34DF4-5F1A-4DCA-A304-842CE4C842D9_zpszrpbmxl5.jpg"/></a>
This allows the mesh to be pulled out
<a href="http://s1062.photobucket.com/user/karimwassef/media/D862E4F9-7FE4-4E3A-A34B-BADDA3560C37_zpsmh7h1w9n.jpg.html" target="_blank"><img src="http://i1062.photobucket.com/albums/t496/karimwassef/D862E4F9-7FE4-4E3A-A34B-BADDA3560C37_zpsmh7h1w9n.jpg" border="0" alt=" photo D862E4F9-7FE4-4E3A-A34B-BADDA3560C37_zpsmh7h1w9n.jpg"/></a>
<a href="http://s1062.photobucket.com/user/karimwassef/media/CB36FF7F-3A41-45EE-8DEF-0DFC3EA6558E_zps3pjnkbdh.jpg.html" target="_blank"><img src="http://i1062.photobucket.com/albums/t496/karimwassef/CB36FF7F-3A41-45EE-8DEF-0DFC3EA6558E_zps3pjnkbdh.jpg" border="0" alt=" photo CB36FF7F-3A41-45EE-8DEF-0DFC3EA6558E_zps3pjnkbdh.jpg"/></a>
I replaced the clips with 1/2" PEX pipe. The idea is that this will force the water to flow further down the 1" PVC before flowing down to the mesh.
<a href="http://s1062.photobucket.com/user/karimwassef/media/C78605CD-E21E-4C59-A7CB-6EFF4F4B2D0D_zpsv0kev2ti.jpg.html" target="_blank"><img src="http://i1062.photobucket.com/albums/t496/karimwassef/C78605CD-E21E-4C59-A7CB-6EFF4F4B2D0D_zpsv0kev2ti.jpg" border="0" alt=" photo C78605CD-E21E-4C59-A7CB-6EFF4F4B2D0D_zpsv0kev2ti.jpg"/></a>
I used epoxy putty to plug up the ends inside the elbows behind the PEX. It's hard to see, but you can see it in the far end of the pipe.
<a href="http://s1062.photobucket.com/user/karimwassef/media/73638705-FBE7-4D4A-97A4-866360C5E4DE_zpsordodinm.jpg.html" target="_blank"><img src="http://i1062.photobucket.com/albums/t496/karimwassef/73638705-FBE7-4D4A-97A4-866360C5E4DE_zpsordodinm.jpg" border="0" alt=" photo 73638705-FBE7-4D4A-97A4-866360C5E4DE_zpsordodinm.jpg"/></a>
and here's the view from the 1" union inlet showing the PEX inside the PVC
<a href="http://s1062.photobucket.com/user/karimwassef/media/3A455244-6CBB-42F2-BB74-877EFE450B27_zpsiwhu5mri.jpg.html" target="_blank"><img src="http://i1062.photobucket.com/albums/t496/karimwassef/3A455244-6CBB-42F2-BB74-877EFE450B27_zpsiwhu5mri.jpg" border="0" alt=" photo 3A455244-6CBB-42F2-BB74-877EFE450B27_zpsiwhu5mri.jpg"/></a>
<a href="http://s1062.photobucket.com/user/karimwassef/media/D23A8353-0B8E-4060-A2AC-DE024985B65F_zpssakrrtuu.jpg.html" target="_blank"><img src="http://i1062.photobucket.com/albums/t496/karimwassef/D23A8353-0B8E-4060-A2AC-DE024985B65F_zpssakrrtuu.jpg" border="0" alt=" photo D23A8353-0B8E-4060-A2AC-DE024985B65F_zpssakrrtuu.jpg"/></a>
karimwassef
Active member
and here's the completed PVC frame with the stretched mesh
<a href="http://s1062.photobucket.com/user/karimwassef/media/IMG_6031_zpslellt6a5.jpg.html" target="_blank"><img src="http://i1062.photobucket.com/albums/t496/karimwassef/IMG_6031_zpslellt6a5.jpg" border="0" alt=" photo IMG_6031_zpslellt6a5.jpg"/></a>
I think it's much flatter now
<a href="http://s1062.photobucket.com/user/karimwassef/media/IMG_6032_zpsfvawqeu5.jpg.html" target="_blank"><img src="http://i1062.photobucket.com/albums/t496/karimwassef/IMG_6032_zpsfvawqeu5.jpg" border="0" alt=" photo IMG_6032_zpsfvawqeu5.jpg"/></a>
Great.. now to rough it up
<a href="http://s1062.photobucket.com/user/karimwassef/media/IMG_6033_zps3zqyc3hm.jpg.html" target="_blank"><img src="http://i1062.photobucket.com/albums/t496/karimwassef/IMG_6033_zps3zqyc3hm.jpg" border="0" alt=" photo IMG_6033_zps3zqyc3hm.jpg"/></a>
DISASTER!!!! Oh the drama!
<a href="http://s1062.photobucket.com/user/karimwassef/media/IMG_6034_zpsmk77xxrs.jpg.html" target="_blank"><img src="http://i1062.photobucket.com/albums/t496/karimwassef/IMG_6034_zpsmk77xxrs.jpg" border="0" alt=" photo IMG_6034_zpsmk77xxrs.jpg"/></a>
Ok... every failure is an opportunity to learn, and experiment...
<a href="http://s1062.photobucket.com/user/karimwassef/media/IMG_6035_zpsvuhorbp9.jpg.html" target="_blank"><img src="http://i1062.photobucket.com/albums/t496/karimwassef/IMG_6035_zpsvuhorbp9.jpg" border="0" alt=" photo IMG_6035_zpsvuhorbp9.jpg"/></a>
This gives me a chance to try a different kind of mesh/mesh interface bond. Here's the patch
<a href="http://s1062.photobucket.com/user/karimwassef/media/IMG_6036_zpst8pyiomw.jpg.html" target="_blank"><img src="http://i1062.photobucket.com/albums/t496/karimwassef/IMG_6036_zpst8pyiomw.jpg" border="0" alt=" photo IMG_6036_zpst8pyiomw.jpg"/></a>
Some of you recommended I try fishing line, and since the holes are now offset by half a step, this is a perfect opportunity to try it...
I didn't have mono filament nylon fishing line, so I borrowed my daughter's silicone line. It's like fishing line but it's rubbery and stretchy. She uses it to make jewelry like bracelets and necklaces.
<a href="http://s1062.photobucket.com/user/karimwassef/media/IMG_6038_zpsaumdc3um.jpg.html" target="_blank"><img src="http://i1062.photobucket.com/albums/t496/karimwassef/IMG_6038_zpsaumdc3um.jpg" border="0" alt=" photo IMG_6038_zpsaumdc3um.jpg"/></a>
<a href="http://s1062.photobucket.com/user/karimwassef/media/IMG_6039_zpsscy61gpt.jpg.html" target="_blank"><img src="http://i1062.photobucket.com/albums/t496/karimwassef/IMG_6039_zpsscy61gpt.jpg" border="0" alt=" photo IMG_6039_zpsscy61gpt.jpg"/></a>
I was hesitant, but the stretchiness actually makes it easier to tie a knot
<a href="http://s1062.photobucket.com/user/karimwassef/media/IMG_6040_zpsroh0pef2.jpg.html" target="_blank"><img src="http://i1062.photobucket.com/albums/t496/karimwassef/IMG_6040_zpsroh0pef2.jpg" border="0" alt=" photo IMG_6040_zpsroh0pef2.jpg"/></a>
and a little silicone glue
<a href="http://s1062.photobucket.com/user/karimwassef/media/IMG_6041_zpsbwaiyhoi.jpg.html" target="_blank"><img src="http://i1062.photobucket.com/albums/t496/karimwassef/IMG_6041_zpsbwaiyhoi.jpg" border="0" alt=" photo IMG_6041_zpsbwaiyhoi.jpg"/></a>
karimwassef
Active member
I liked the silicone line so much I decided to change one of the four corner bonds in the middle of the mesh to see how it compares... experimenting...
<a href="http://s1062.photobucket.com/user/karimwassef/media/IMG_6042_zpstpd7gccd.jpg.html" target="_blank"><img src="http://i1062.photobucket.com/albums/t496/karimwassef/IMG_6042_zpstpd7gccd.jpg" border="0" alt=" photo IMG_6042_zpstpd7gccd.jpg"/></a>
Here's what the other connection looks like for reference
<a href="http://s1062.photobucket.com/user/karimwassef/media/IMG_6043_zpszxo1up3m.jpg.html" target="_blank"><img src="http://i1062.photobucket.com/albums/t496/karimwassef/IMG_6043_zpszxo1up3m.jpg" border="0" alt=" photo IMG_6043_zpszxo1up3m.jpg"/></a>
Now it's time for the light shield. I decided to use 2" PVC with holes and slots cut to cover up the opening.
<a href="http://s1062.photobucket.com/user/karimwassef/media/IMG_6044_zpsqvzdi5f8.jpg.html" target="_blank"><img src="http://i1062.photobucket.com/albums/t496/karimwassef/IMG_6044_zpsqvzdi5f8.jpg" border="0" alt=" photo IMG_6044_zpsqvzdi5f8.jpg"/></a>
<a href="http://s1062.photobucket.com/user/karimwassef/media/IMG_6045_zpsmym6fot7.jpg.html" target="_blank"><img src="http://i1062.photobucket.com/albums/t496/karimwassef/IMG_6045_zpsmym6fot7.jpg" border="0" alt=" photo IMG_6045_zpsmym6fot7.jpg"/></a>
<a href="http://s1062.photobucket.com/user/karimwassef/media/IMG_6046_zpsi2s7eqy7.jpg.html" target="_blank"><img src="http://i1062.photobucket.com/albums/t496/karimwassef/IMG_6046_zpsi2s7eqy7.jpg" border="0" alt=" photo IMG_6046_zpsi2s7eqy7.jpg"/></a>
<a href="http://s1062.photobucket.com/user/karimwassef/media/IMG_6047_zps0vv1hiyw.jpg.html" target="_blank"><img src="http://i1062.photobucket.com/albums/t496/karimwassef/IMG_6047_zps0vv1hiyw.jpg" border="0" alt=" photo IMG_6047_zps0vv1hiyw.jpg"/></a>
karimwassef
Active member
and here it is
<a href="http://s1062.photobucket.com/user/karimwassef/media/IMG_6049_zpsbwhjvdjv.jpg.html" target="_blank"><img src="http://i1062.photobucket.com/albums/t496/karimwassef/IMG_6049_zpsbwhjvdjv.jpg" border="0" alt=" photo IMG_6049_zpsbwhjvdjv.jpg"/></a>
and here it is running with water
<a href="http://s1062.photobucket.com/user/karimwassef/media/IMG_6051_zpsu9pgytn1.jpg.html" target="_blank"><img src="http://i1062.photobucket.com/albums/t496/karimwassef/IMG_6051_zpsu9pgytn1.jpg" border="0" alt=" photo IMG_6051_zpsu9pgytn1.jpg"/></a>
The light shield looks ok
<a href="http://s1062.photobucket.com/user/karimwassef/media/IMG_6052_zps23im0ibh.jpg.html" target="_blank"><img src="http://i1062.photobucket.com/albums/t496/karimwassef/IMG_6052_zps23im0ibh.jpg" border="0" alt=" photo IMG_6052_zps23im0ibh.jpg"/></a>
So does the little patch
<a href="http://s1062.photobucket.com/user/karimwassef/media/IMG_6053_zpsjob2gldv.jpg.html" target="_blank"><img src="http://i1062.photobucket.com/albums/t496/karimwassef/IMG_6053_zpsjob2gldv.jpg" border="0" alt=" photo IMG_6053_zpsjob2gldv.jpg"/></a>
but the back impedance from using the PEX pipe instead of the clips is slowing down the flow and increasing the water level in the raised tank.
<a href="http://s1062.photobucket.com/user/karimwassef/media/IMG_6062_zpsgxv1ekqb.jpg.html" target="_blank"><img src="http://i1062.photobucket.com/albums/t496/karimwassef/IMG_6062_zpsgxv1ekqb.jpg" border="0" alt=" photo IMG_6062_zpsgxv1ekqb.jpg"/></a>
jerseypete
New member
Maybe feed the screen from both sides instead of the middle. Was having trouble with flow going evenly over the screen. Now water flows in from both sides.and here it is
<a href="http://s1062.photobucket.com/user/karimwassef/media/IMG_6049_zpsbwhjvdjv.jpg.html" target="_blank"><img src="http://i1062.photobucket.com/albums/t496/karimwassef/IMG_6049_zpsbwhjvdjv.jpg" border="0" alt=" photo IMG_6049_zpsbwhjvdjv.jpg"/></a>
and here it is running with water
<a href="http://s1062.photobucket.com/user/karimwassef/media/IMG_6051_zpsu9pgytn1.jpg.html" target="_blank"><img src="http://i1062.photobucket.com/albums/t496/karimwassef/IMG_6051_zpsu9pgytn1.jpg" border="0" alt=" photo IMG_6051_zpsu9pgytn1.jpg"/></a>
The light shield looks ok
<a href="http://s1062.photobucket.com/user/karimwassef/media/IMG_6052_zps23im0ibh.jpg.html" target="_blank"><img src="http://i1062.photobucket.com/albums/t496/karimwassef/IMG_6052_zps23im0ibh.jpg" border="0" alt=" photo IMG_6052_zps23im0ibh.jpg"/></a>
So does the little patch
<a href="http://s1062.photobucket.com/user/karimwassef/media/IMG_6053_zpsjob2gldv.jpg.html" target="_blank"><img src="http://i1062.photobucket.com/albums/t496/karimwassef/IMG_6053_zpsjob2gldv.jpg" border="0" alt=" photo IMG_6053_zpsjob2gldv.jpg"/></a>
but the back impedance from using the PEX pipe instead of the clips is slowing down the flow and increasing the water level in the raised tank.
<a href="http://s1062.photobucket.com/user/karimwassef/media/IMG_6062_zpsgxv1ekqb.jpg.html" target="_blank"><img src="http://i1062.photobucket.com/albums/t496/karimwassef/IMG_6062_zpsgxv1ekqb.jpg" border="0" alt=" photo IMG_6062_zpsgxv1ekqb.jpg"/></a>

 View attachment 352183was able to get a more even flow.
 Sent from my SAMSUNG-SM-G900A using Tapatalk
karimwassef
Active member
I agree. Feeding from both sides would be more controlled. I got it working, so I'm satisfied with it for now.
<iframe width="560" height="315" src="https://www.youtube.com/embed/z7n_O657AEo" frameborder="0" allowfullscreen></iframe>
I'll start on the lights now. I think I'll move the CFL closer ? Still need to migrate to the 200W bulb and get the 100W LED assembled.
I have this temptation to add massive DC fans to blow air against the screen. It just looks like a perfect swamp air conditioner ... The LEDs will need some cooling so I might combine the two. I'll try to resist, but three powerful DC fans in a row would be awesome...
Here's the docu-video version
<iframe width="560" height="315" src="https://www.youtube.com/embed/0PrSO2TQTgA" frameborder="0" allowfullscreen></iframe>
Last edited:
karimwassef
Active member
I like to experiment. The plumbing is creating excessive shadowing so I'll move it closer.
I'm looking forward to comparing the front CFL growth and the back LED growth... should be interesting.
I'm also going to turn my tank dark for a few days to see if I can't accelerate the growth on the screen.
Since I'm sharing, here's my floating sump ATS
<iframe width="560" height="315" src="https://www.youtube.com/embed/_l1Xv6XYTLI" frameborder="0" allowfullscreen></iframe>
azjohnny
Active member
I like to experiment. The plumbing is creating excessive shadowing so I'll move it closer.
I'm looking forward to comparing the front CFL growth and the back LED growth... should be interesting.
I'm also going to turn my tank dark for a few days to see if I can't accelerate the growth on the screen.
Since I'm sharing, here's my floating sump ATS
<iframe width="560" height="315" src="https://www.youtube.com/embed/_l1Xv6XYTLI" frameborder="0" allowfullscreen></iframe>
Try increasing he spread of light, I was using 2 par 38 bulbs on each side of a 13"x10" screen all the bulbs were 36 watt 9 red/ 3 blue led. I am now using a landscape 30 watt LED flood light which has much better spread. ( red to blue ratio is 4/1
The original bulbs had a spot light effect, it was strong at a certain point but nothing between the lights
karimwassef
Active member
Thanks. I'll play around with the lights.
Any other ideas on making it better?
Any other ideas on making it better?
karimwassef
Active member
I don't have a spotlight. My current light is a large horticulture reflector... I can change the shape of the wings to change the distribution.
Don't know if you can tell from the video. Here's a few pics of it
<a href="http://s1062.photobucket.com/user/karimwassef/media/207305ED-E232-4F27-A9D3-6EA4924FE118_zpsitgezmkt.jpg.html" target="_blank"><img src="http://i1062.photobucket.com/albums/t496/karimwassef/207305ED-E232-4F27-A9D3-6EA4924FE118_zpsitgezmkt.jpg" border="0" alt=" photo 207305ED-E232-4F27-A9D3-6EA4924FE118_zpsitgezmkt.jpg"/></a>
<a href="http://s1062.photobucket.com/user/karimwassef/media/FBE0A75C-9CBB-42D4-8829-FF23EAD3E353_zpsvpglp4o7.jpg.html" target="_blank"><img src="http://i1062.photobucket.com/albums/t496/karimwassef/FBE0A75C-9CBB-42D4-8829-FF23EAD3E353_zpsvpglp4o7.jpg" border="0" alt=" photo FBE0A75C-9CBB-42D4-8829-FF23EAD3E353_zpsvpglp4o7.jpg"/></a>
<a href="http://s1062.photobucket.com/user/karimwassef/media/C2D22A5B-2B39-43EB-AD07-103FFE98F2A2_zpsld7ypmau.jpg.html" target="_blank"><img src="http://i1062.photobucket.com/albums/t496/karimwassef/C2D22A5B-2B39-43EB-AD07-103FFE98F2A2_zpsld7ypmau.jpg" border="0" alt=" photo C2D22A5B-2B39-43EB-AD07-103FFE98F2A2_zpsld7ypmau.jpg"/></a>
karimwassef
Active member
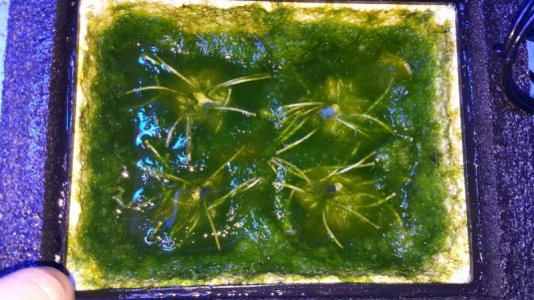
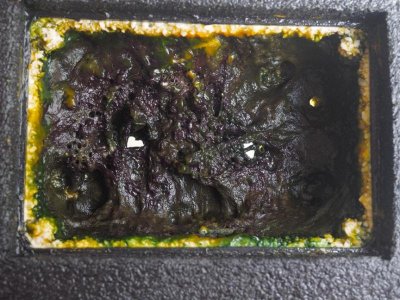
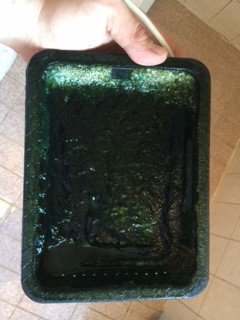
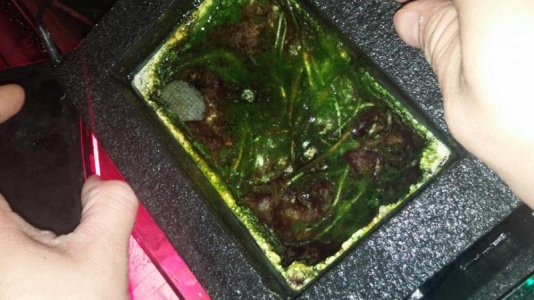
In case anyone is curious why I'm pushing my ATS builds... I live on a lake and have an insect invasion due to a semi-open tank. And I have this strange "black algae"
<iframe width="560" height="315" src="https://www.youtube.com/embed/sn3mUXQKZtQ" frameborder="0" allowfullscreen></iframe>
<iframe width="560" height="315" src="https://www.youtube.com/embed/sn3mUXQKZtQ" frameborder="0" allowfullscreen></iframe>
karimwassef
Active member
Ok. Lights. Here's my LED build:
starting with Aluminum flashing 20" x 20" ~ $1.50 and wrap some white duct tape on the edges to avoid getting cut ~ $0.50
<a href="http://s1062.photobucket.com/user/karimwassef/media/49529016-FE8D-46A3-AEA5-CE632BD53834_zpsinkudpwb.jpg.html" target="_blank"><img src="http://i1062.photobucket.com/albums/t496/karimwassef/49529016-FE8D-46A3-AEA5-CE632BD53834_zpsinkudpwb.jpg" border="0" alt=" photo 49529016-FE8D-46A3-AEA5-CE632BD53834_zpsinkudpwb.jpg"/></a>
<a href="http://s1062.photobucket.com/user/karimwassef/media/CDA1231E-8D8F-4A25-AD98-7238AFCB2086_zpslnqvihhk.jpg.html" target="_blank"><img src="http://i1062.photobucket.com/albums/t496/karimwassef/CDA1231E-8D8F-4A25-AD98-7238AFCB2086_zpslnqvihhk.jpg" border="0" alt=" photo CDA1231E-8D8F-4A25-AD98-7238AFCB2086_zpslnqvihhk.jpg"/></a>
and line up the 7020 rigid LED strips ~ $15 (these have sticker backs)
<a href="http://s1062.photobucket.com/user/karimwassef/media/41DF0A17-2158-405D-8B91-61A3E46D376D_zpsxzbexouc.jpg.html" target="_blank"><img src="http://i1062.photobucket.com/albums/t496/karimwassef/41DF0A17-2158-405D-8B91-61A3E46D376D_zpsxzbexouc.jpg" border="0" alt=" photo 41DF0A17-2158-405D-8B91-61A3E46D376D_zpsxzbexouc.jpg"/></a>
cut out the duct tape to get a solid interface to the flashing.
<a href="http://s1062.photobucket.com/user/karimwassef/media/886405A9-E134-412B-B7B1-A6043A815A70_zpsvg9i8ojr.jpg.html" target="_blank"><img src="http://i1062.photobucket.com/albums/t496/karimwassef/886405A9-E134-412B-B7B1-A6043A815A70_zpsvg9i8ojr.jpg" border="0" alt=" photo 886405A9-E134-412B-B7B1-A6043A815A70_zpsvg9i8ojr.jpg"/></a>
check that they work (should have done that first, huh? - oh well, all good)
<a href="http://s1062.photobucket.com/user/karimwassef/media/5B71193A-1B77-4EA4-B1DD-5C110209BCE0_zpsdfubzfgk.jpg.html" target="_blank"><img src="http://i1062.photobucket.com/albums/t496/karimwassef/5B71193A-1B77-4EA4-B1DD-5C110209BCE0_zpsdfubzfgk.jpg" border="0" alt=" photo 5B71193A-1B77-4EA4-B1DD-5C110209BCE0_zpsdfubzfgk.jpg"/></a>
line it up with 12V power supply ~ $25 and a fan $10 and use my PAR sensor a foot ahead of it...
<a href="http://s1062.photobucket.com/user/karimwassef/media/de79f547-e379-4993-8ebb-e5a79a81ffb7_zpse3fcbjhw.jpg.html" target="_blank"><img src="http://i1062.photobucket.com/albums/t496/karimwassef/de79f547-e379-4993-8ebb-e5a79a81ffb7_zpse3fcbjhw.jpg" border="0" alt=" photo de79f547-e379-4993-8ebb-e5a79a81ffb7_zpse3fcbjhw.jpg"/></a>
I wired up a couple of temperature sensors at the center and the edges...
<a href="http://s1062.photobucket.com/user/karimwassef/media/03799cd2-9b1f-4c5c-96aa-334cb4e7833d_zpsksyox3st.jpg.html" target="_blank"><img src="http://i1062.photobucket.com/albums/t496/karimwassef/03799cd2-9b1f-4c5c-96aa-334cb4e7833d_zpsksyox3st.jpg" border="0" alt=" photo 03799cd2-9b1f-4c5c-96aa-334cb4e7833d_zpsksyox3st.jpg"/></a>
After about an hour, here's the result - the temperature rise in the middle is 14 degrees F. At the edge, it'd 8 degrees. Max temp is 100F in a room with an ambient of 86F. So, the design is sustainable.
Here's the fun part -
At ~ 110W, this setup has a PAR one foot away on center = 318!!!
In contrast, my 125W grow CFL (it's a year old) = 92!
That's 3.5 x more PAR from the LED.
karimwassef
Active member
So the light cost $17 and the power supply and fan were $35. So $52 for 110W LED at a PAR of 318.
The CFL reflector was $33 and the bulb was $23. So $56 for 125W CFL at a PAR of 92 (old bulb - for full disclosure).
I'll put the new 200W CFL ($20 bulb + $7 adapter) tomorrow and compare. So $60 for 200W CFL at a PAR of ... TBD
The CFL reflector was $33 and the bulb was $23. So $56 for 125W CFL at a PAR of 92 (old bulb - for full disclosure).
I'll put the new 200W CFL ($20 bulb + $7 adapter) tomorrow and compare. So $60 for 200W CFL at a PAR of ... TBD
Last edited:
karimwassef
Active member
Is it just me or is the mesh already getting discolored after 24hrs with the CFL?
<a href="http://s1062.photobucket.com/user/karimwassef/media/AC326EA1-8A5C-4D8F-A019-DBEBBB9C1CF6_zps8e0e1sxt.jpg.html" target="_blank"><img src="http://i1062.photobucket.com/albums/t496/karimwassef/AC326EA1-8A5C-4D8F-A019-DBEBBB9C1CF6_zps8e0e1sxt.jpg" border="0" alt=" photo AC326EA1-8A5C-4D8F-A019-DBEBBB9C1CF6_zps8e0e1sxt.jpg"/></a>
It's more brownish in the middle areas of the sheets (where I roughed it up more) and bluish at the interfaces (where I went lighter).
karimwassef
Active member
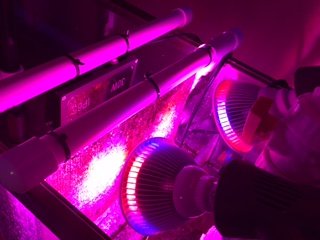
Decided to hang the LED square
<a href="http://s1062.photobucket.com/user/karimwassef/media/B2B6208A-14AE-4C8C-B034-348C8690725F_zpswvkd2w6z.jpg.html" target="_blank"><img src="http://i1062.photobucket.com/albums/t496/karimwassef/B2B6208A-14AE-4C8C-B034-348C8690725F_zpswvkd2w6z.jpg" border="0" alt=" photo B2B6208A-14AE-4C8C-B034-348C8690725F_zpswvkd2w6z.jpg"/></a>
Left the CFL up for reference (for now)
<a href="http://s1062.photobucket.com/user/karimwassef/media/BB36EA79-283E-4617-8204-1B4D7E4E3F11_zpsxf5oc4xm.jpg.html" target="_blank"><img src="http://i1062.photobucket.com/albums/t496/karimwassef/BB36EA79-283E-4617-8204-1B4D7E4E3F11_zpsxf5oc4xm.jpg" border="0" alt=" photo BB36EA79-283E-4617-8204-1B4D7E4E3F11_zpsxf5oc4xm.jpg"/></a>
<a href="http://s1062.photobucket.com/user/karimwassef/media/EB770054-5579-4305-B76E-1726A730232A_zpskpllyqwd.jpg.html" target="_blank"><img src="http://i1062.photobucket.com/albums/t496/karimwassef/EB770054-5579-4305-B76E-1726A730232A_zpskpllyqwd.jpg" border="0" alt=" photo EB770054-5579-4305-B76E-1726A730232A_zpskpllyqwd.jpg"/></a>
It's ~ 10in away and screen PAR is 400
karimwassef
Active member
It does look better and more uniform. Of course the 4x increase in PAR doesn't hurt.
Barrier accumulate salt creep and reduce light, but then again, that would be on the LEDs otherwise. I'll try and contain the spray another way.
Barrier accumulate salt creep and reduce light, but then again, that would be on the LEDs otherwise. I'll try and contain the spray another way.
Similar threads
- Replies
- 9
- Views
- 352
- Replies
- 0
- Views
- 362