SantaMonica
Well-known member
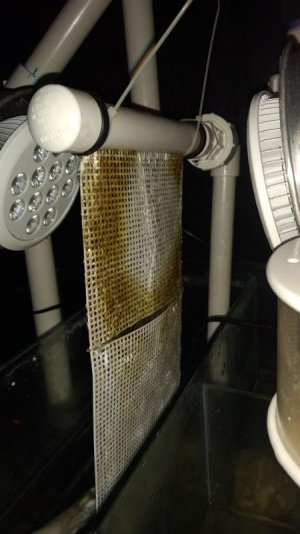
Brown is normal for second week.
From my readings you can make the screen longer so it reaches your sump, just don't rough up that section so algae doesn't grow on that section.
What homer said. Take a plain piece of canvas (can even be the #4 which has larger holes) and use the small zip-ties to connect the 2 screens together. Don't tighten them down to the point where they overlap, leave it loose like a hinge so that the screens almost touch each other but line up vertically. If you play with the rotation of the zip ties after you thread them through and partially tighten them down, you can get it so that the water sheets nearly perfectly from one screen to the next
Tightening them down so that they overlap will cause the water on one side to splash a bit as it hits the "ridge". For some, that's an issue.
Thanks. I will just make the screen 4 x 12 and not "rough up" the bottom portion.
A new screen takes time to mature, you are just getting a start, and that usually takes the form of diatoms or thin brown growth. So, that's rather normal.
What is not normal is the bare spot in the middle. Since it's perfectly round, it can be only one thing: photosaturation. That is, too much light intensity. With LEDs, you have to be particularly careful of this because they are a more focused/directed light source by nature. When you have no algae growth, there is nothing to adsorb the incident light energy, so whatever algae that gets a foothold there is immediately overwhelmed.
Also, the 18 hours rule is mainly for CFL/fluorescent, which is less directed/intense. With LED, I would start with 9 hrs/day and wait for a screen to start to mature before going longer (depending on dimmability)
Once your screen starts to get more mature, you can start hitting it with more intensity and longer photoperiod, but not right away.
To solve this in your situation, the first thing is to back down the photoperiod until you start getting growth. However this will not solve the photoinhibition part, because the intensity causes photoinhibition almost instantly. If you are stuck with the position of the fixtures, then you can sometimes "get past" that roadblock by breaking up the photoperiod into smaller chunks (30-60 minutes with 15m dark) and/or alternating which light is on, but this usually takes time. The better thing to do is decrease intensity.
1) dim the lamp. Usually this is not an option for a stock lamp
2) back it off (distance). Move the lights back an inch, maybe two, and see what happens. Adjust position if you don't see new growth covering the center within about 5-6 days (you should at least see some brown coloration)
3) place a diffuser in front of the lamp. Sometimes this works perfect, other times it blocks too much of the light. So you may have to experiment. Make sure you don't put any diffusing material directly on the face of the lamp (heat, melting, etc)
4) remove the lenses from the lamp (it goes without saying that this option will generally void any warranty). Most of these PAR type lamps have a bezel that is screwed on, when you remove the screws the lenses can be removed. This allows the LED light to spread out, and the intensity is less focused. The flipside of that is that now you have essentially widened the "cone" of intensity of the light right in front of the lamp, and this can cause the light to spread out a lot more. So your position you have them in now might actually end up being a bit too far away after removing the lenses, but moving the lamp closer means exposing the circuit board to salt spray (actually, removing the lenses does that too). You can cut a thin sheet of plastic (1/16" or 1/32" lexan from home depot works) into a circle and glue that to the outside of the bezel after you remove the lenses and out it back on, the bezel will block some of the now non-focused light, but you can move the lamp closer. Or you could fashion a clear cover to replace the bezel.
Odd because I have the exact lighting that I am suppose to have. Oh well.
Dimming and moving the lights are not options. Going to try changing from 16 hours on to 9 hours on to see what happens. Hopefully, that'll do the trick
The first two don't specify which type of red is being used. The last one looks decent, 5 red 660 and 1 blue 430, that's a good lamp. But, it's 6W meaning they are using 6x 1W LED and probably not driving them to the full current, so consider that a 3W lamp. That's kind of the rule of thumb for all stock fixtures
Here is my recommendation for LED lighting of a waterfall algae scrubber screen:
This is for a double-sided screen using Philips Luxeon ES 3W Deep Red 660nm LEDs without lenses (120-140 degree) running at 700mA at 2-3" from the screen to LED
Minimum coverage: One LED on each side of every 8 sq in of screen
Maximum coverage: One LED on each side of every 4 sq in of screen
Simple as that. For new screens (bare) if using the "Maximum" level, run at 350mA until mature, or use a diffuser. Might have to do this with the Minimum level also actually, but not typically. The minimum could probably be stretched to a larger area but screen will cure slower and generally have less capacity.
So for a 6x6 screen, which is 36 sq in, /8 = 4.5 per side. Make it 5.
So for a 6x6 screen, which is 36 sq in, /4 = 9 per side.
Supplementing with blue/violet: Always run blues at 350mA, violets can be run higher but should follow the same rule for the maturing stage (350 at first, then increase after maturing). Use one to two at this current level for every 5-6 reds, roughly. Lots of flexibility here, a little blue/violet goes a long way. I've used 440-445nm Royal Blue Luxeon ESs for this, but I know of at least one other that used to use RBs and switched to Deep Violets and almost doubled growth. Steve's LEDs now carries a good Hyper Violet made by SemiLED.
Regarding non DIY-LEDs in general, this is what I have roughed out to help with this.
The issue is that my DIY LED guideline is based on coverage. You can't say "I need 5 3W LEDs which is 15W, so a 15 W fixture is what I need". It doesn't work that way.
That's because a 3W LED does not necessarily consume 3W, and a purchased LED may rate it's intensity based on actual wattage used, or it may add up the LEDs and give a wattage but the actual watt draw is less. You have to watch for this.
A 3W Philips Luxeon ES 660nm LED will typically drop 2.2v across the LED at 700mA. Power = Amps * Volts so 2.2 V * 0.700 A = 1.54W. What? I thought it was a 3W. It is. That is something called MARKETING. LEDs have become more efficient over time as they have been redesigned, so a lower Vdrop and Idrive results in the same output, but instead of calling it a 1.5W and confusing everyone, they call it a 3W still.
So now on to your fixture you are looking at.
Converting the "LED per unit area guideline" to a "wattage" guideline is as simple as doing the math.
Figure out what you need per the "unit area" guideline. In the above example, 6x6 screen, minimum level (low intensity), 5x 3W per side. Each is actually drawing 1.5W, so 5x1.5 = 7.5W. Your light fixture should actually consume, at the wall, a minimum of 7.5W. The electronics built into the fixture will draw power also, meaning that you might want to add a little cushion to the number. So a 10W fixture on a 6x6 screen would be about right for a comparable replacement to an array of 5x 3W LEDs.
Now let's add that factor in and parallel it to screen size. A 6x6 screen = 36 sq in. Make it 40. you need a 10W actual-draw LED fixture on each side of this. So you could say that the rule of thumb for a pre-built LED fixture is that you need 0.25W per square inch of screen. That would get you into the Minimum light arena - or "Minimum Intensity", and you need one of these on each side of the screen.
Doubling that would put you on the higher end. 0.5W per square inch - actual wattage draw of fixture.
What you have to watch for is when they use a multi-chip that has 9 1W LEDs on it and they call that 10W. Not necessarily true. But 1W LEDs are actually more efficient than 3W LEDs when you are talking radiant flux output per unit of energy input into the LED, so it's not horrible, just shoot for the higher light level and you'll be OK usually. At best, you will actually be at the minimum level. At worst, you'll be on the low side but still OK.
The first two don't specify which type of red is being used. The last one looks decent, 5 red 660 and 1 blue 430, that's a good lamp. But, it's 6W meaning they are using 6x 1W LED and probably not driving them to the full current, so consider that a 3W lamp. That's kind of the rule of thumb for all stock fixtures
http://algaescrubber.zohosites.com/lighting-led.html.