DIY "Drews Doser" Peristaltic Dosing pump

I prefer models with adjustable speed.

As and FYI, I bought the two I'm currently using on ebay for about $50 and $70. They don't come up all the time, but if you keep an eye out for them you can get one pretty cheap.
 
We cleaned out the storage room last week. I know we had three of these at one time but I only could find one in the trash bin. These things are beast, I bet it tops out at 10 pounds.


19302811a12257517606l.jpg
 
Thanks for the info, here is my build

The Parts
doser-1.jpg


Removing the pump head
doser-2.jpg


Testing the fit - that radio shack box listed by the OP is a perfect fit. Note those little clips on the sides of the pump, I believe you can easily swap motors available from apt .. which means if instead of dosing I want to do top off with a higher flow rate, no problem! The little ac motors are cheaper than a whole unit. If it ever burns out for whatever reason, swapping in a new one should be easy.
doser-3.jpg


This is the mounting plate the peri pump comes with. I clamped it to the front panel and used it as a template to drill all the holes with a 5/64 bit initially to go through the mounting plate hole, than I used a 9/64 from the front to make it big enough for the screw to fit through.
doser-4.jpg


Ok this I thought was pretty cool, the holes on the mounting plate are tapped m3x.5 which happens to be the size of those little computer case screws I have laying around everywhere from building computers. Its the one with the tighter thread in my hand.. the ones used to secure a cdrom to a mounting rails, or motherboard to case. NOT the screws used to secure pci cards to the case which is the thicker thread screw in my hand. You need 2 of the tighter thread screws per pump.
doser-5.jpg


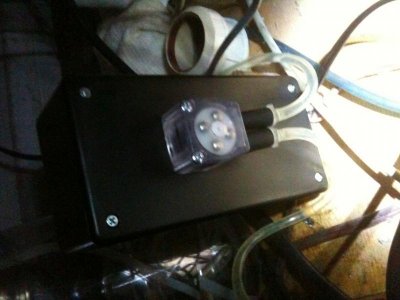
Motors mounted to the plate
doser-6.jpg


Wire it up
doser-8.jpg


Before putting the heads back on
doser-9.jpg
 
Putting the heads back on , there are really only a couple parts
doser-10.jpg


doser-11.jpg


Note the little holes near the base of the clear plastic housing on the project box face plate, there are knobs on the base of the clear housing that sink into the holes and make the housing completely flush against the face plate. Thankfully there are holes in the mounting plate for all this stuff, just punch a 5/64 bit thru like I said before.
doser-12.jpg


rock on
doser-13.jpg
 
Last edited:
Re: DIY "Drews Doser" Peristaltic Dosing pump

Me too. Thanks that is. Got my pump from APT Monday, net to put it in a project box, but it's working so far!


Sent from my iPhone using Tapatalk
 
Re: DIY "Drews Doser" Peristaltic Dosing pump

Boxed and running!


Sent from my iPhone using Tapatalk
 

Attachments

  • ImageUploadedByTapatalk.jpg
    ImageUploadedByTapatalk.jpg
    50.1 KB · Views: 5
nice lookin good. For those of you that do not have an aquarium controller I found that walmart has excellent prices on digital lamp timers. Actually better prices the Loews or HD
 
little update... if you do hook it up to a controller (RKE in my case) DO NOT USE the solid state outlets. It doesn't draw enough power to kick off... dosed an entire bottle of alk before I figured it out.

When hooked up to the mechanical relay ... no problems at all.
 
I had to use mine on the relay outlets on my reefkeeper 2 to get them to work. Any other outlet and it didnt draw enough power either.
 
What rate pump would you guys use for automatic water changes? I have a 60g cube and was hoping to change a little over 1 gallon per day. I was thinking of a pump around 30-60ml per minute. I know the APT pumps are not designed to operate full time, otherwise a slow continuous water change is ideal. Two pumps are necessary to achieve this, unless it is possible to stack two heads on a single motor. Ryan
 
I think you will have to change the tubes once in a while, why not using a higher flow pump 100-200 ml ?
 
Made mine also but has any one used these on the reefkeeper 2? I have them on the Channel 2, 3, 6 and 7 but they do not always come on when they are supposed to and the relay outlets are already taken up........
 
Back
Top