I am building a stand for a 265. stand is gonna be 84x24x33. I am going to use 2x8's for the top runs and maybe even add some center braces just to be overkill. My only worry is the trueness of the wood, mainly the 2x8's. They never seem to have very straight edges. Am I doing to have to plane them? Also does anyone have step by step on how they assembled their stand. It seems pretty straight forward but I still don't want to mess this up lol
You are using an out of date browser. It may not display this or other websites correctly.
You should upgrade or use an alternative browser.
You should upgrade or use an alternative browser.
DIY Stands Template and Calculator
- Thread starter JohnL
- Start date
Floyd R Turbo
Either busy or sleeping
When I was working on my design (2x4 stand) it was suggested that I get a piece of something that I knew was straight and fasten it to the 2x6 (2x8 in your case) and use that to guide the wood along the fence of a table saw, then you have one perfectly straight edge. Then you can take the guide off and rip the other side and both sides would be straight and flat, except you lose a little off each side, but probably not enough to worry about.
Thanks Floyd. I have a cabinet builder who also builds stands for an aquarium dealer next door to his shop quoting me on a stand and canopy. It is pretty expensive and I am pretty sure I will end up making this a DIY. However I think I will use him for the lumber and have him cut all the pieces I need and true them as well
Floyd R Turbo
Either busy or sleeping
According to the OP 2x8s are fine. Overkill is better than underkill though!
TheFishMan65
New member
jp you are overkill on the supports. Turbo said double the 3/4 and I don't know if that is required or not. It won't hurt.
Floyd R Turbo
Either busy or sleeping
Yes, doubled up 3/4" plywood on top for support of the bottom of the tank, and make sure the frame under that is flat and level. Some people put acrylic tanks on a layer of the pink foam insulation board from Home Depot, the theory being that it eliminates pressure points and such, but when I asked James/Acrylics about it he said he has never done it or recommended it (and he's been building tanks for 15 or 20 years or something), just the 2 x 3/4" ply. And I for that use the ACS grade plywood, which should have orange stripes spray painted on one edge.
2 aquarium cabinet
2 aquarium cabinet
Hi to all pros and experts,
I need advice for building a 2 tier aquarium wooden stand to support 2 tanks dimension of 180cm X 60cm X 75 (Glass Aqaurium) top and below
I got some picture from other in this forum thread (Excuse me for borrowing you picture)


Which one should I copy ? There will be vertical support beam behind the stand only...as for the front can I leave the centre bracing suppport blank so there will be another big tank below not sump (running external canister only) and that both the tank can be seen full view. PLEASE ADVICE.
.
2 aquarium cabinet
Hi to all pros and experts,
I need advice for building a 2 tier aquarium wooden stand to support 2 tanks dimension of 180cm X 60cm X 75 (Glass Aqaurium) top and below
I got some picture from other in this forum thread (Excuse me for borrowing you picture)
Which one should I copy ? There will be vertical support beam behind the stand only...as for the front can I leave the centre bracing suppport blank so there will be another big tank below not sump (running external canister only) and that both the tank can be seen full view. PLEASE ADVICE.
.
TheFishMan65
New member
IMHO none of the above. In all cases one tank (or both) is not well supported. That is assuming the same size tanks, so what size tanks?
I would try this.
I wan roughly the same thing... the only thing is I would use 2x6 vertical and 2x8 horizontal wood and the below tank i would just land the aquarium on the floor wood
My planning tank size is 180cm X 60cm X 75cm any advice and recommend ?
TheFishMan65
New member
The only advice I can offer is make sure that the long horizontal supports have legs under them. I think that is the key for a dual stand.
Floyd R Turbo
Either busy or sleeping
One thing I noticed about that link to the 3-tier stand is that there is no member from front to back to support the side edge of the tank. I think you would want to add a piece so that the tank was supported all the way around the bottom frame.
TheFishMan65
New member
I think this would be fine for framed glass tank less than 4 feet in length. Anything larger and I think I would start thinking some more.
Haha thx guy very good thread here. See alot of picture and want to start one of mine but still lack of some experience LOL. Will try to DIY one when I save some money.
The outside aquarium builder for wooden stand lifespan is 5 - 8 years due to normal quality and expensive. DIY your own stand could be last longer if overbuild and cheaper
The outside aquarium builder for wooden stand lifespan is 5 - 8 years due to normal quality and expensive. DIY your own stand could be last longer if overbuild and cheaper
JohnnyAirtime
New member
BTW can anyone please post the picture of what type of screw to driven the joint and the pocket hole screw ? What size should I use for longer lifespan and duriable.
I was thinking Cross Dowel Screw for the joint. Any advice also ?
I used the KREG system for my stand.... http://www.kregtool.com/prodlist.html
Pics of the build here, with how the Kreg system works;
http://www.sdreefs.com/forums/showpost.php?p=644653&postcount=1
... it made the stand build easier, and super solid.
lucky_snapper
New member
My stand is 36in tall from the floor to the table of the stand.. is it too tall ? Now that i have the empty tank on it it seem slightly top heavy. It is going into the living room which is carpeted.
JohnnyAirtime
New member
My stand is 36in tall from the floor to the table of the stand.. is it too tall ? Now that i have the empty tank on it it seem slightly top heavy. It is going into the living room which is carpeted.
Mines 35" tall .... but, 25" wide (front to back). No top heavy here.
... I guess it all depends on your width from front to back.
bereanracer
New member
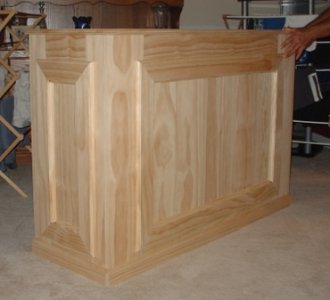
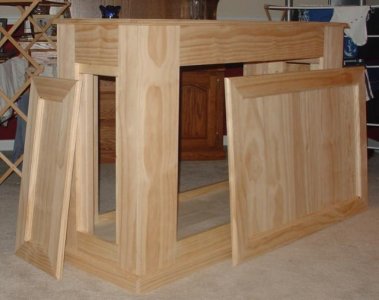
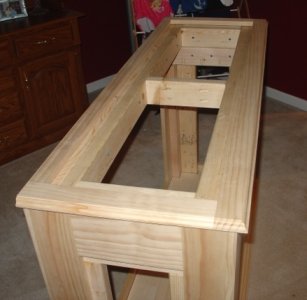
Many thanks to RocketEngineer and all the other great contributors on this thread. My stepdad and I recently finished a stand for my soon to arrive 55gal tank. I wanted a little more space underneath, so I basically widened it by a 2x4 all around. I too used a Kreg jig to put together everything. However, I didn't want to use any finishing nails, nor rely on just glue to attach the skin, so I built the skin seperately. What we did was assemble the frame, then assemble the whole skin using 1 inch pine. We then slid the skin over the frame, and attached it from the inside. A little weird but worked pretty well. We did have to plane the ends of the frame to get the skin to fit but otherwise went smoothly. Unfortunately I don't have pics of the two peices separately, but the finished product is attached. I plan to add a 1x2 trim once the tank is in place that would end up hiding the frame of the tank. Once that is in place I'll stain it and add some magnets to hold the door panels.
Attachments
Similar threads
- Replies
- 1
- Views
- 379
- Replies
- 0
- Views
- 138