This thread was automatically split due to performance issues. You can find the rest of the thread here: http://reefcentral.com/forums/showthread.php?postid=14306359#post14306359
You are using an out of date browser. It may not display this or other websites correctly.
You should upgrade or use an alternative browser.
You should upgrade or use an alternative browser.
DIY Stands Template and Calculator
- Thread starter JohnL
- Start date
Dancing4raiin
New member
<a href=showthread.php?s=&postid=14266627#post14266627 target=_blank>Originally posted</a> by james3370
at least here, lowes wood also was much straighter & the edges were much more square instead of rounded-over
Agreed, The HD wood had rounded edges, and was more warped then the Lowes wood.
RocketEngineer
Space is big.
DIY Stands Template and Calculator The reason for starting this thread is to provide a template for a relatively simple DIY stand design. This design is a compilation of several designs into one place and includes the calculations needed to generate a cut list for any custom design.

The basic principle of the design is two box frames connected by four legs. The upper one supports the tank and transfers the load to the legs. The legs are made of several pieces of 2X4 to assist in construction and sheathing the stand in plywood for strength and cosmetics. The bottom frame transmits the load of the tank into the floor.
Design notes:
*The plan for this stand consists of 21 pieces. Like color pieces are the same length and of the same board size.
*The box frames are screwed together first, then the legs are built off the bottom frame, the top frame is then placed on top and secured to the legs.
*The green pieces are screw strips. These provide limited load strength but serve to make assembly easier and help keep the stand square.
*The blue piece between the upper rails (red) works to keep the upper rails from twisting.
Ok, now to the cut list:
First off: The calculations below are based off of a stand that is "W" inches wide X "D" inches front-to-back X "H" inches high.
(2) Red - Upper Rails: Length = W
These will be sized according to length: 2X4 for 48" or less for smaller tanks (Rule of thumb is 75g-90g); 2X6 up to 72" with 125g-150g being acceptable; For longer spans and larger tanks 2X8s are recommended.
(2) Yellow - Upper Ends: Length = D-3"
Theses will be made of the same material as the upper rails.
(4) Green - Screw Strips: Length = H-2" These 2X4s are shorter then the tank is tall.
(8) Purple - Uprights: Length varies:
- 2X4 Upper Rails: Length = H -7"
- 2X6 Upper Rails: Length = H-9"
- 2X8 Upper Rails: Length = H-10.75"
These 2X4s support the weight of the tank. The ones on the short sides of the stand provide a flat surface for attaching a plywood facing and while they do provide some strength, they are optional.
(2) Orange - Bottom Rails: Length = W
These 2X4s act to spread the weight of the tank over a larger area.
(3) Blue - Bottom Ends: Length = D-3"
Covering the sides of the stand with plywood will help to stiffen the stand against twisting and shifting. Doors can be mounted to the legs as desired.
So there it is. 21 pieces in 6 lengths equals a tank stand that should fit the bill for most people. There are other plans out there but this is a simple design using simple tools and common wood sizes. It may not suit everyone's application but it should fit the bill for most common size tanks. Should someone wish to have me calculate beam strengths for a specific application, PM me with the tank dimensions and I will be happy to run the numbers.
Happy building.
Last edited by a moderator:
RocketEngineer
Space is big.
Things to note:
A 2X4 is actually 1.5" X 3.5"; a 2X6 is actually 1.5" X 5.5"; and a 2X8 is actually 1.5" X 7.25".
Making a beam made up of two boards side by side is twice as strong as each of the individual boards. For a 48" span, a 2X4 supporting 1000#s deflects 0.269" while a 2X6 only deflects 0.069" and a 2X8 deflects 0.030". That said, it is much better to go up in size then it is to double up.
When assembling the stand, be sure all of the pieces have square cut ends and that they are as straight as possible. If one of the long boards for the top frame (red above) has a crown (bows up when stood on edge), be sure to place the crown up. Glue will help bond the pieces together and coated decking screws will resist rusting. Clamping the pieces together and pre-drilling the holes will help make assembly easier.
Pocket drilling the legs (purple) can eliminate the need for the screw strip (green) but I would make sure to skin the stand on three sides to keep it from racking/twisting. Also, be sure to screw both leg pieces together on the corner for added strength.
RocketEngineer
Space is big.
Standard Size tanks:
Less then 55g:
Should you wish to use smaller materials such as 1X4s the main thing to remember is that a 1X4 is half as strong as a 2X4. For a 55g, I would recommend a 2X4 frame but for the smaller sizes 1X4 is plenty strong enough.
Up to 90g:
For a tank with a 48" X 18" footprint and less then 90g, a standard 2X4 is capable of handling the span without issue.
120g/150g: For a tank with a 48" X 24" footprint, I would recommend a 2X6 top frame.
125g-240g: For tanks 72" long, I recommend a 2X8 top frame to span the full width of the tank without a center leg.
If you are dealing with a larger tank, review this thread for similar setups and if you can't find any let me know and I will run the numbers for you.
Rhodes19
New member
RocketEngineer,
Thank you for all the information and time you have put into this thread. It has been useful and easy to understand. I was initially going to make some stands for my 45 and 55 based on your design but as of last week I now have a 180 to take their place. Based on recommendations I have read, I have decided not to use a center leg to make it easier to get a sump and other equipment in and out. From your guidelines I would need to use 2x8s for the top frame. Would I also need to use 2x8s for the bottom frame and support legs or would a smaller 2x work just as well? Also, I have a pocket hole jig and was thinking of using it to assemble the top and bottom frames. Would that be strong enough or should I put the screws into the ends? Thanks.
Chris.
jpc763
Nothing to see Move along
Here is my frame.
http://reefcentral.com/forums/showthread.php?s=&postid=14201153#post14201153
Now here is my finished stand.

With the doors open.

Thanks Rocket!
John
http://reefcentral.com/forums/showthread.php?s=&postid=14201153#post14201153
Now here is my finished stand.
With the doors open.
Thanks Rocket!
John
Last edited by a moderator:
jpc763
Nothing to see Move along
Thanks. Moving is easy. My wife and I moved it pretty easily.<a href=showthread.php?s=&postid=14319161#post14319161 target=_blank>Originally posted</a> by 4jlong
jpc763 Nice stand! out of curiousity, is it difficult for two people to move?
What helps are the little dolly's that you can just see in the left side of the 2nd pic. We put the stand on that and rolled it to where we needed it.
Once the tank was on the stand, it is staying put.
audiophile42
New member
<a href=showthread.php?s=&postid=14306863#post14306863 target=_blank>Originally posted</a> by RocketEngineer
Pocket drilling the legs (purple) can eliminate the need for the screw strip (green) but I would make sure to skin the stand on three sides to keep it from racking/twisting. Also, be sure to screw both leg pieces together on the corner for added strength.
Is pocket drilling just screwing two pieces of wood together at an angle, like this?
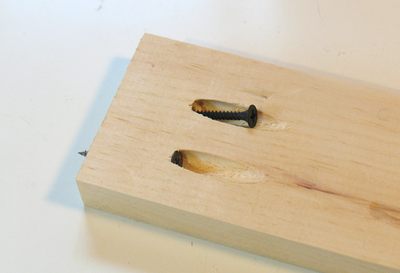
I'm planning a 90g, 48"x18", and having the screw strip in the plan limits my choice of sumps to fit underneath the stand. So if I could get away with not having those, I'm all for it.
Also, would I need to place 2x4's underneath the frame of the sump? Or will having a 1/2" sheet of plywood above the bottom frame of the stand be enough?
Great thread btw RocketEngineer, you've probably helped hundreds of people with their stands.
<a href=showthread.php?s=&postid=14321067#post14321067 target=_blank>Originally posted</a> by audiophile42
Is pocket drilling just screwing two pieces of wood together at an angle, like this?
I'm planning a 90g, 48"x18", and having the screw strip in the plan limits my choice of sumps to fit underneath the stand. So if I could get away with not having those, I'm all for it.
Also, would I need to place 2x4's underneath the frame of the sump? Or will having a 1/2" sheet of plywood above the bottom frame of the stand be enough?
Great thread btw RocketEngineer, you've probably helped hundreds of people with their stands.
Those would be pocket screws. I have used pocket screws on my router table stand made of 1"x2" and the stand can hold almost 180 pounds (me standing on it)

Alex
LoneRegister
New member
almost?
there's gotta be a story there...
there's gotta be a story there...
james3370
Premium Member
<a href=showthread.php?s=&postid=14321786#post14321786 target=_blank>Originally posted</a> by LoneRegister
almost?
there's gotta be a story there...
well he said "and the stand can hold almost 180 pounds (me standing on it)" so i think he meant he weighs almost 180lbs.....
now if he had said "and the stand can almost hold 180 pounds (me standing on it)" then that would mean it the way you are thinking
LOL
james3370
Premium Member
<a href=showthread.php?s=&postid=14306863#post14306863 target=_blank>Originally posted</a> by RocketEngineer
Pocket drilling the legs (purple) can eliminate the need for the screw strip (green) but I would make sure to skin the stand on three sides to keep it from racking/twisting. Also, be sure to screw both leg pieces together on the corner for added strength.
will pocket drilling & not doing the screw strips still be sufficient if i'm planning on skinning all 4 sides w/ 1/4" plywood??? or will i need to step up to 1/2" skin??
i'm also planning a 1/2" bottom & top pieces
Last edited:
 ) Alex
okay, since it didn't register yesterday,
I'm building one of these stands but it'll be going on an uneven floor.
Is it okay to utilize leveling feet at the 4 corners? Or am I going to have a weight distribution problem? And by feet, I mean carriage bolts.
75g tank, stand built slightly oversized.
I'm building one of these stands but it'll be going on an uneven floor.
Is it okay to utilize leveling feet at the 4 corners? Or am I going to have a weight distribution problem? And by feet, I mean carriage bolts.
75g tank, stand built slightly oversized.
I used Pine on my tank..Works just fine..Alot of those factory built ones are made from Pine anyway<a href=showthread.php?s=&postid=14322135#post14322135 target=_blank>Originally posted</a> by dallasg
hi, what would be the best would to use? is pine ok? or too soft
james3370
Premium Member
<a href=showthread.php?s=&postid=14398975#post14398975 target=_blank>Originally posted</a> by chimmike
okay, since it didn't register yesterday,
I'm building one of these stands but it'll be going on an uneven floor.
Is it okay to utilize leveling feet at the 4 corners? Or am I going to have a weight distribution problem? And by feet, I mean carriage bolts.
75g tank, stand built slightly oversized.
i believe i have read in the split thread that leveling feet are bad since they concentrate all the weight on those 4 points.....best to try & shim it if the gap is small, or if it is a larger gap, your best bet is to plane it till you get it level
<a href=showthread.php?s=&postid=14399983#post14399983 target=_blank>Originally posted</a> by james3370
i believe i have read in the split thread that leveling feet are bad since they concentrate all the weight on those 4 points.....best to try & shim it if the gap is small, or if it is a larger gap, your best bet is to plane it till you get it level
that's the thing, I'd rather not shim it because I know once I put the full weight of the tank on it, it might still get thrown off. And as for planing, well, I'd rather not do that, because should I move the stand later, I'd have to plane it to be flat to whatever surface that is.
I think if I do 6 leveling feet, that should help spread the weight.
I'm talking about using carriage bolts, too.....not just little rubber things.
Similar threads
- Replies
- 1
- Views
- 406
- Replies
- 0
- Views
- 165