DIY Stands Template and Calculator

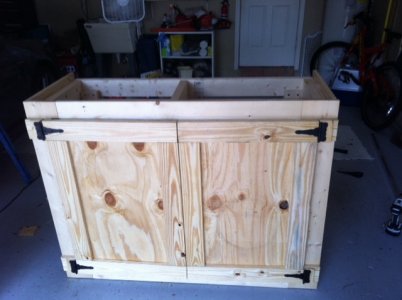
I am going to be skinning soon and would like to use MDF to match some other furniture I built, however, I think this is not practical around water. Is there something similar I can use for this application. Basically I don't want to see any grain or markings in the wood. A Clean white look is what I am going for

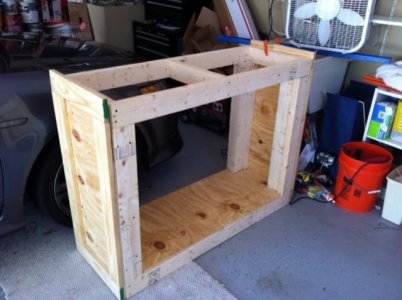
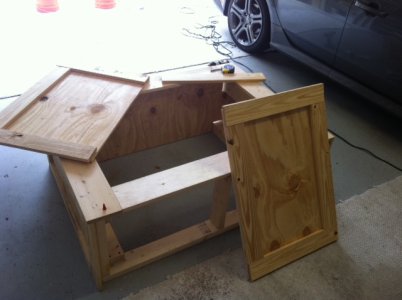
With this design the skin is not a major structural component, but instead is mostly cosmetic. The skin does help hold the 90 degree angles rigidly at 90 degrees, but the fact that pairs of screws are used at the corners instead of single screws takes care of that, making the skin redundant, so you can use anything you want. If MDF is surfaced on both sides, those sides are water proof, aren't they? The cut edge will soak up water like a sponge, and swell, but they make edging for MDF to cover the cut edge. Isn't there a glue/edging pair that will seal the edge and make it safe around water? The ability to block noise and limit vibration is also a factor, so the weight of 1/2" MDF would be a good thing for blocking low frequency sound, compared to say 1/4" plywood.
I think that if you use a proper sealant on plywood, you can then paint it without worrying about the grain showing through, but you'll have a similar problem with the cut edge of plywood, although it's not nearly as absorbent as MDF. I'd do some more homework about sealing the edge of MDF before abandoning the idea.
 
Sorry C for misunderstanding your post, but I just wanted people to realize I am a hobbyist just like them and only offering opinions.

You were right. I'm sorry I was ambiguous about who the professional was (although I'll bet you're a professional something :) )
 
Nah, I just play one on web sites :)

We are all here to help (at least that is what I figure). I always worry that people will think I know more than I do or read a post wrong. I almost always look for a second opinion although I am learning the folks to trust and those to wonder about.
 
Went to the big box stores to find my doors. Doors that I bought 6 months ago for another project that I wanted to match for my stand.they don't sell just doors anymore. I'm pretty bummed. Now what?
 
Any ideas on doors? I was thinking of just having a cabinet maker make some. It would be nice to find some prefab ones local though
 
The style will determine how easy they are to make. For my stand, the boards have a dato for the panel and each vertical has a tongue that goes into the dato. That plus a pair of pocket screws keeps them together. If you are going with more of a molding style, consider having the panel being the same size as the door and just mounting the molding to the front. If you have something like a rail and stile door, you could use door making router bits but those get expensive.

RocketEngineer
 
Thanks Rocket. The doors I was trying to match are raised panel doors. Pretty common but I couldn't build them with my limited tools and wood working ability. I may try building maybe a shaker style. It looks easy. Thanks for your help. Can't wait to get this stand finished and set up
 
hello everyone, i will be starting my diy stand for a 150(60x24x24). i went through a lot of this thread but will admit it is just too much to process so i apologize if these have been asked.
1. if i have a leg in the middle i could use 2x4's instead of 2x6's since the weight will be supported in the middle?
2. if i use my handy pocket hole jig i can skip the screw strips?
3. what does everyone mean by a screw should not be load bearing?i may need a drawing to understand sorry.
4. if i can just pockethole it, would you suggest i just attach 4 screws total from each leg into the top and base 2 top 2 bottom or should i attach them to each other as well in the corners 3 covering top,middle,bottom.
i probably have a million more questions but if we could start with this it would be greatly appreciated.
thank you,
christine
 
looney:

1) Based on the original post, you should be OK with a 2x4 in the middle. However, I think the big clear opening is nice to have when you're working down there.

2) That's what I did, and seems to be pretty common.

3) Any horizontal beam needs to sit on top of the legs/support beams. An easy way to think of it is if there were no screws, would it fall apart. If it wouldn't you're likely doing it right.

4) I joined two 2x4s to make each leg (a total of 8 2x4s for 4 legs). I then attached each leg using 3 pockets on top, and 3 on bottom. It is very solid.
 
You want the top horizontal pieces to rest on top of the cut ends of the vertical pieces (legs). In that configuration the horizontal piece pushes down on the top of the leg, so the leg bears the weight. If instead you were to screw the horizontal piece to the side of the leg, then the horizontal piece would push down on the screws, trying to shear them off, or pull them out of the leg. in that configuration, the screws would bear the weight (not good).
 
thanks for the info and now i understand what that means. i assumed the top would be on top so it wasn't making sense to me when i would read that now i get it. i am planning on having the side with a door to remove things if necessary and i am only 5'1 even with the center support i'll be able to get in there(tiny hands). one of the advantages of being small.
thank you both.
 
Thanks to Rocket an everyone else that contributed to this thread, I have built my first aquarium stand! I just finished staining it tonight, and I still have to hang the doors, but I am almost done.

full.jpg


full2.jpg


Now I need to fid some good plans for a canopy:headwally:
 
thought i would share my stand for my 225,thanks to this thread, i saved lots of cash, i had a 40 breeder stand built a while back and that costed me $300
my new stand has not even hit a hundred yet. built with 2x6 all around.
DSC01419-M.jpg


DSC01421-M.jpg


DSC01423-M.jpg


and the cabinet for electrical/fuge/and storage. In this pic, to the right is the 40 breeder stand, to the left is my diy 20 long stand basedon this thread and my first build. and of course the middle, the new setup that will replace the other two.
DSC01420-M.jpg
 
Nemosworld,
The email I got had links to pictures of your stand, but the post doesn't have those links (odd). Forgive me if I've missed something, but based on the pictures, it looks to me like you missed one of the most important features of the design given in this thread. It looks like your top horizontal pieces are not resting on top of the cut end of a vertical piece (leg), and are instead simply screwed to the side of the leg, so that the screws are supporting all the weight of the tank. You can fix the stand by cutting lengths of 2x4 to fit tightly, vertically, between the upper and lower horizontal pieces. Put one such vertical 2x4 at the end of each horizontal 2x6, so 8 total. When the weight of the tank pushes down on the top horizontal 2x6's, you want the bottom of the 2x6's to push down, at each end, directly onto the to cut end of a 2x4, and for the bottom cut end of each vertical 2x4 to push down onto the lower horizontal 2x6, and for the bottom edge of the lower 2x6 to push down onto the floor. The weight of the tank should be transferred through a solid vertical stack of wood all the way from the tank to the floor. The way you have it the weight of the tank is pushing down on the top horizontal 2x6's, but they are pushing against the side of the screws holding them to the legs, trying to sheer off the screws or tear them out. If the screws hold, then the weight is transferred to the vertical legs, and down into the floor, but the screws are a weak link, and the main point of the design given in this thread is to avoid that weak link. The sheer strength, and pull-out strength of screws is usually high enough so that this bad design still works (unless the wood around the screws ever gets really wet, or the screws rust where the pieces connect) but why take the chance.
 
I see the pictures. The first picture sure looked wrong, but then all the rest have a center support in back and can't tell if they are wrong. I thought maybe it was an accident, but good catch it is probably worth double checking.
 
Still need a vertical member on the sides of each leg too. This adds a lot of stability to the stand and shouldn't be skipped either IMO. With mine (built per OP) with a 2x2x4 120 on it, when I'm cleaning with a mag float on the end and going front to back with it, the tank rocks on the stand. If it weren't for those side members, I'd be a lot more nervous.
 
They are connected, just bad pictures i guess. But they are deff connected. Sorry about that, should have used my camera and not the wifes.
 
It still looks to me like you're missing the outer uprights. Go to the first post in this thread, you should have 2 "purple" pieces on each corner. You only have one. That is my concern.
 
My 75 Gallon stand

My 75 Gallon stand

I want to thank the originator of this thread as I am very pleased with the stand I have built. Also want to thank other for ideas for finish it
The cost of my stand for the 75 gallon tank came to about 130.00 after all the wood and hardware. Pet stores want nearly 500.00 for a junk stand
I wanted a much taller and more open stand for easy access and easy viewing
I used:
-dry wall screws and small nails and some wood glue to attach wood
-latches and knobs from home depot
-all wood from home depot and had the man there actually cut most of my -frame for me. I only used a circular hand saw and jig saw for rest
-Red mahogony oak stain and clear coat
 

Attachments

  • photo(2).JPG
    photo(2).JPG
    94.4 KB · Views: 3
  • photo(3).JPG
    photo(3).JPG
    98.3 KB · Views: 2
  • photo(4).jpg
    photo(4).jpg
    42.1 KB · Views: 3
  • photo(5).JPG
    photo(5).JPG
    98.1 KB · Views: 3
  • photo(6).JPG
    photo(6).JPG
    93.4 KB · Views: 4
My 75 Gallon stand cont.

My 75 Gallon stand cont.

I have not put a semi gloss on it yet. I will add that and knobs this weekend.

You can see how much higher it sits than my other one. This is the main reason I built it.

FIY- This stand is solid and HEAVY
 

Attachments

  • photo(7).JPG
    photo(7).JPG
    101.4 KB · Views: 3
  • photo(9).JPG
    photo(9).JPG
    99.1 KB · Views: 4
Back
Top