Lightsluvr's 340G Upgrade

THe T5 System June 13, 2009

THe T5 System June 13, 2009

After consulting with GrimReefer, the Reef Central T5 guru, I decided to install 12 rows of (2) 54 watt T5 bulbs. I bought 2x54w retro kits from ReefGeek.com for installation on the light rack.

Let there be light!
lights1.jpg


Setting the end caps:
lightrack6.jpg


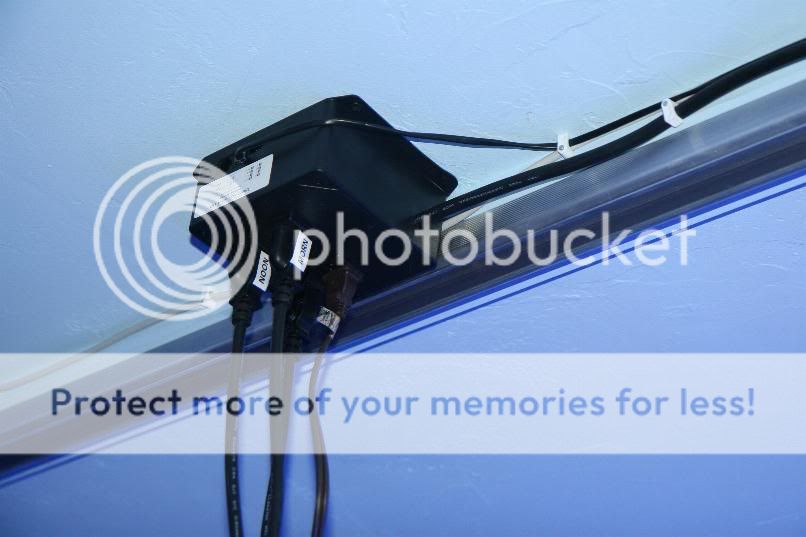
The famous "ballast bank" - 12 rows of T5s = 12 ballasts. Easy to troubleshoot if a row goes out (which has happened from time to time):
lightrack10.jpg


Gettin' er done:
lightrack16.jpg


lightest6.jpg


LL
 
THE BIG MOVE June 20, 2009

THE BIG MOVE June 20, 2009

On this memorable Saturday, nineteen COMAS members and spouses gathered at the LFS for the big moving day:

The evening before, I hired a glass company to remove the pane glass window from the fish room:
window3.jpg


The same guys contracted to remove the larger front window at the LFS to allow egress for the tank and stand: (Note the footwear for a guy moving large glass panes :eek1:)
aq2.jpg


Behind that mass of humanity is the 350G AGE tank, weighing in at 750 pounds. One inch total clearance to get out of the LFS window opening!
aq4.jpg


Followed by the stand:
aq5.jpg


Loaded up for the two block trip to the LL hacienda...
aq7.jpg


LL
 
INTO the fish room June 20, 2009

INTO the fish room June 20, 2009

Unloaded the stand first, across a fence guarded by several tall and thorny rose bushes:
h1.jpg


Through the window opening with a few inches to spare:
h4.jpg


onto the now cured concrete pad where it is carefully leveled:
h8.jpg


Then came the big kahuna - a caption for this photo could be, "is this what a hernia feels like?" :p
h11.jpg


...and through the window into the fish room...
h14.jpg


...careful...
is2.jpg


and onto the stand!
is4.jpg


A final step for the day - lots of hands to lift the light rack into position onto the rail/roller system and level it up:
is6.jpg


LL
 
PLUMBING the BEAST June 27-28, 2009

PLUMBING the BEAST June 27-28, 2009

I took off a week from work to finalize the plans and install the tank plumbing. Once again I received lots of great advice from COMAS members and RC friends including Edand Sandy and Melev...

Started with the returns and closed loop feeds (the easy part):
RetPlum1.jpg


Closed loop feed and return plumbing:
CLplum1.jpg


Five closed loop ports connected by flexible pvc tubing:
CLplum4.jpg


Plumbing the overflows and sump returns... (all drains lead to the ocean):
062801.jpg


062802.jpg


Closed loop flow accelerators:
070201.jpg


LL
 
The BIG FILL July 10-11, 2009

The BIG FILL July 10-11, 2009

With all plumbing glued into place and a defective union valve seal replaced, it was time to fill the tank with its salty life blood...

I drained down water from the 120G and 180G tanks and pumped it into the new tank. I began the process of moving large base rock into the tank as I incrementally began to fill the tank:

071002.jpg


071001.jpg


071006.jpg


300# of CaribSea Seaflor Select sand makes for a cloud, even though throughly rinsed...
071101.jpg


The 6" DSB in the 100G Rubbermaid sump:
071102.jpg


LL
 
LET THERE BE LIFE July 11-13, 2009

LET THERE BE LIFE July 11-13, 2009

After the water had been circulating and the skimmer running for several hours, I began to move fish and coral from their temporary holding tubs into the display tank.

Our prize toadstool was the first coral, followed that day by several others:
071104.jpg


071107.jpg


Jay Jay the fish cat just before he took his first (and last) dip in the tank... :cool:
071108.jpg


071205.jpg


071202.jpg


Night on the reef:
IMG_9452.jpg


LL
 
WATER MANAGEMENT July 18, 2009

WATER MANAGEMENT July 18, 2009

Copied from the GlassReef and EdandSandy water systems, we modified for our fish room. Consisting of a pair of 65G Water tanks inter-connected by a single Blueline 40-HD-X pump which allows us to store RO-DI, pump it into a saltwater mixing tank where the new mix can be circulated constantly until pumped directly into the 100G Rubbermaid Sump for a dry hands water change:

The storage tanks:
071807.jpg


071809.jpg


Top end plumbing:
H20Final02.jpg


H20final03.jpg


First fill up:
H2072501.jpg


LL
 
APEX Controller August 25, 2009

APEX Controller August 25, 2009

apex12.jpg


DC4HD ceiling mounted to accomodate the rolling light rack:
apex14.jpg


Graphing capability:
ApexGraph0803.jpg


ApexGraph20807.jpg


Status notification:
ApexStatus803.jpg


We now have 20 outlets controlled by the Apex. We monitor tank pH, CA reactor pH, ORP and temperature. We are able to access the tank online as well as from our iPhone. Pretty slick.

LL
 
FRAG TANK August 15, 2009

FRAG TANK August 15, 2009

We obtained a small rimless frag tank from a local reefer, built a stand and plumbed it into the main system. The tank has the ability to be converted to a QT or hospital tank by moving the Mag7 return pump to a temporary sump with a freestanding skimmer:
ffroom2.jpg


The frag tank's own T5 mini-rack, shown here with the main tank's T5 light rack rolled back for maintenance:
ftl10.jpg


FTactinics3.jpg


It also features a UV sterilizer on the frag tank overflow:
UVS08.jpg


UVS07.jpg


LL
 
CHARLEY (aka Don) SEPTEMBER 2009

CHARLEY (aka Don) SEPTEMBER 2009

Charley is a big old Vlamingi Tang who came to us as a gift to be paid forward... When he outgrows our tank, he will be a gift to the Oklahoma Aquarium in Jenks, OK. He has been quite the model citizen in the tank, even though he is three times larger than the next largest fish in the community...

don04.jpg


don05.jpg


I'm watching you.. :hmm6:
Charley2.jpg


LL
 
Last edited:
LIFE REEF LRC-2 Calcium Reactor

LIFE REEF LRC-2 Calcium Reactor

We were CA reactor virgins, so it was an experience setting up and tuning in the LRC-2. We were honored to have Jeff, owner of Life Reef, to come on our build thread with some hints and tips...

We recommend this reactor; their customer service is wonderful:
carf01.jpg


carf02.jpg


car15.jpg


LL
 
PHOTO RECAP - Faces in the glass AUG - OCT 2009

PHOTO RECAP - Faces in the glass AUG - OCT 2009

FTS0807B.jpg


Copperband1.jpg


fish080402.jpg


fish080403.jpg


BWClown1.jpg


fish080406.jpg


tangy3.jpg


LL
 
PHOTO RECAP - Eye Candy Aug - Oct 2009

PHOTO RECAP - Eye Candy Aug - Oct 2009

Just a few views of our favorite coral that survived the move and appear to be thriving in their new home:

acan1.jpg


peopleeater.jpg


Blasto2.jpg


candycane1.jpg


coral1.jpg


favia1.jpg


acro1.jpg


foxglove1.jpg


Duncans1.jpg


Thanks for viewing...This is the end of our photo recap, but just the beginning of the adventure. Please return often.

LL
 
thanks for doing this recap i will for sure do the storage tank setup in a few months:D
question though what size pan world pump is that for the storage containers? 100 px-x?
 
Last edited:
RECAP - The original thread

RECAP - The original thread

Thanks if you have scanned the thread recap.

If you really have no life and would like to see the detailed build thread updated day-by-day, here is a link to Part I of the thread:

http://reefcentral.com/forums/showthread.php?t=1638966

WARNING - Part I is 40 pages long. However, there is lots of information from many smart reefers, lots of photos and more than a little humor to keep you awake. If you stay the coruse, please leave a note here in Part II of the thread!

Thanks!

LL
 
does your tank really have a high Ca demand? not really being packed full of Ca demanding corals
do you have any problems with your Ca reactor throwing off your balance?
 
Back
Top