You are using an out of date browser. It may not display this or other websites correctly.
You should upgrade or use an alternative browser.
You should upgrade or use an alternative browser.
Lightsluvr's 340G Upgrade
- Thread starter Lightsluvr
- Start date
- Status
- Not open for further replies.
ReefGuyFergie
New member
This is an awesome build. I am new to this website but I'm in the process of piecing together my 120g brick reef. I'm starting to plan a huge build like this one for when I am more settled, lol. (Permanent housing)
I figure I will get started with some plans now. I'm sure I will keep looking here for more info. The plumbing is the difficult stuff for me, lol.
Keep up the good work. Cant wait to see it finished.
I figure I will get started with some plans now. I'm sure I will keep looking here for more info. The plumbing is the difficult stuff for me, lol.
Keep up the good work. Cant wait to see it finished.
<a href=showthread.php?s=&postid=15345101#post15345101 target=_blank>Originally posted</a> by Lytehouse
Wow George,
do these little guys feel like they've been thrown out to sea?
Great progress...
From your previous posts, I assume pumps on tonight?
The fish from the 120G truly look lost... except for the clowns and the Bangaii cardinal fish. I dumped them in the tank right above their mushroom, so they are quite at home hovering around their personal coral. Just fed the tanks and the royal gramma and anthias were not interested. I think it will take a day or two for them to get their courage up...
Return pump will definitely be on this afternoon. I may hook up the Vortechs this afternoon and just run them for 24-48 hours for my flow. I don't want to freak out the fish with the closed loop too early.
I will turn on the CL at feeding time - want to make sure some wrasse or other fish hasn't taken up residence in one of the flow accelerators... :eek2:
LL
<a href=showthread.php?s=&postid=15345482#post15345482 target=_blank>Originally posted</a> by ReefGuyFergie
This is an awesome build. I am new to this website but I'm in the process of piecing together my 120g brick reef. I'm starting to plan a huge build like this one for when I am more settled, lol. (Permanent housing)
I figure I will get started with some plans now. I'm sure I will keep looking here for more info. The plumbing is the difficult stuff for me, lol.
Keep up the good work. Cant wait to see it finished.
HI Reef Guy - I am honored to be your first post on Reef Central. This is the premier aquarists' resource on the internet. I hope you subscribed tp the thread and will come back often! Leave a note when you stop by.
Thanks.
LL
Last edited:
WHAT I LEARNED TODAY
WHAT I LEARNED TODAY
I learn something new almost every day working on this project.
What I learned today:
I learned that if you remove the feed line to the ATO pump on your old tank, it can create a siphon which starts to send nice fresh RO/DI wherever that little tubing happens to be dangling...
I also learned that this type of leak is silent and can make quite a mess if you are concentrating on the tank, and not the floor...
I am such a doofus... amazing how far a few quarts of RO/DI can spread under carpet...
"Ms. LL, where's the #@& % box fan?"
"What box fan? I didn't even know we had a box fan!!"
(Whoops, that was from my last spill)
LL
LOL
LOL
Which one? If you scroll though the thread, he frequnetly pops up... I call him the "supervisor"
LL
LOL
<a href=showthread.php?s=&postid=15345994#post15345994 target=_blank>Originally posted</a> by FUA
love that pic with the cat just chilling intently watching what you are doing
Which one? If you scroll though the thread, he frequnetly pops up... I call him the "supervisor"
LL
Challenge
Challenge
I am having a challenge dialing in the three overflows. I have never had a tank with this many overflows, and I think my water level isn't quite high enough yet.
I am raising the sump water level and will try again. In addition, I went from 5/64" to 1/8" vent hole in the top of the Dursos. Still getting the "flushing" as the overflow level drops suddenly.
Any suggestions? I have to brush up on my hydraulics!
LL
Challenge
I am having a challenge dialing in the three overflows. I have never had a tank with this many overflows, and I think my water level isn't quite high enough yet.
I am raising the sump water level and will try again. In addition, I went from 5/64" to 1/8" vent hole in the top of the Dursos. Still getting the "flushing" as the overflow level drops suddenly.
Any suggestions? I have to brush up on my hydraulics!
LL
<a href=showthread.php?s=&postid=15347094#post15347094 target=_blank>Originally posted</a> by melev
Brand new plumbing takes up to 14 days to slime over and quiet down.
All drains into the sump should only be submerged 1/2" to 1" into the water.
The Durso should be drilled with a 3/16" bit, IIRC.
I think you have hit on it... I will shorten two of the drains that are obviously too long. Then I'll give it another try.
Thanks, Marc. Sometimes the forest and the trees story prevails...
")
LL
<a href=showthread.php?s=&postid=15347094#post15347094 target=_blank>Originally posted</a> by melev
Brand new plumbing takes up to 14 days to slime over and quiet down.
All drains into the sump should only be submerged 1/2" to 1" into the water.
The Durso should be drilled with a 3/16" bit, IIRC.
Shortening the drain pipes stabilized the overflows. The Orca skimmer isn't settled down, so unless I'm around to watch and listen, I will not run it for the first few days.
Thanks, Marc
LL
skiformance
skiformance racing
DID YOU BREAK IT IN, IN A VINEGAR BATH
<a href=showthread.php?s=&postid=15347460#post15347460 target=_blank>Originally posted</a> by skiformance
DID YOU BREAK IT IN, IN A VINEGAR BATH
It came "broke in" (for 4 months)
LL
<a href=showthread.php?s=&postid=15347621#post15347621 target=_blank>Originally posted</a> by melev
The skimmer is being run externally, but is the water source going into the body controlled with a gate valve?
Yes. (Ball valve actually)
Third one from the left...
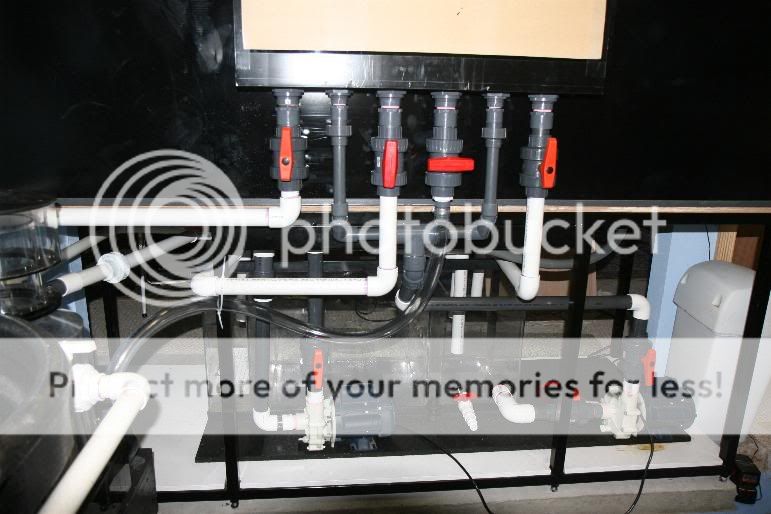
LL
skiformance
skiformance racing
mmmm kay
melev
Well-known member
Ball valves are almost impossible to dial in. My skimmer has a gate valve on the output, and if I twist it about 1/4" (rotation, which is barely a nudge) the cup overflows. You really have to have precision when it comes to water going in (external skimmers) or water going out (internal skimmers).
Also, you don't want any air going into the skimmer. It should be a pipe filled with water that enters the skimmer and the correct rate. I'll dig up a vicious picture that did just that. Gimme a minute.
Also, you don't want any air going into the skimmer. It should be a pipe filled with water that enters the skimmer and the correct rate. I'll dig up a vicious picture that did just that. Gimme a minute.
melev
Well-known member
This is a big picture, so you can see the area I've circled.
The drain comes down to the skimmer, and the gate valve dictates the water going into the Deltec. However, above that spot, you can see a Tee fitting. Whatever excess water (and air bubbles) is redirected to the bubble tower in the corner of the sump's skimmer section. The water beneath that gate valve is only water, zero bubbles, which allows the skimmer to run without fluctuation or agitation within the main reaction chamber.

The drain comes down to the skimmer, and the gate valve dictates the water going into the Deltec. However, above that spot, you can see a Tee fitting. Whatever excess water (and air bubbles) is redirected to the bubble tower in the corner of the sump's skimmer section. The water beneath that gate valve is only water, zero bubbles, which allows the skimmer to run without fluctuation or agitation within the main reaction chamber.
peaceinusa
New member
George,
The rock work is looking very good! I really like the 3 island idea with all the walls being exposed.
Looking forward to seeting this tank again.
The rock work is looking very good! I really like the 3 island idea with all the walls being exposed.
Looking forward to seeting this tank again.
- Status
- Not open for further replies.
Similar threads
- Replies
- 0
- Views
- 96
- Replies
- 4
- Views
- 221
- Replies
- 11
- Views
- 149