Minimalistic multichip DIY LED build

On the fans, get yourself a PWM controller from a popular online auction site, I just recently ordered 2 capable of up to 3A, pretty small and they run on 5-40V. With these you should be able to dial the fans down pretty far and still get reliable starts.

Thanks for the heads up on the PWM controller solution. Might look into that!
 
anyone know where i can get a good deal on the 100w hybrid chips that have both blue and white leds? i can only find one listing on ebay and the seller wants like $125 just for one which i think is crazy because i could get a 100w blue and a 100w white making a total of 200w for less than 80$
 
anyone know where i can get a good deal on the 100w hybrid chips that have both blue and white leds? i can only find one listing on ebay and the seller wants like $125 just for one which i think is crazy because i could get a 100w blue and a 100w white making a total of 200w for less than 80$

That seller has two hybrids at 100 W. One 98 $ and one at 125 $. The difference between them is that the 125 $ can be teoretical "overdriven" up to 250 W. The other max 126 W.

I have not seen any more sellers of these chip - I saw one
EPISTAR 100W Super Actinic Blue Hybrid LED Panel for Aquarium Install for 59.99 but if you look at the specifications it show up being a solid blue chip at 460-470 nm. Not even RB

I will stress that everything I have wrote about my experiences with this type of LED chip´s is based on experiences with chip from the seller that have the 98 $ and 125 $ chip. And I can´t say that my experiences is valid to any other seller - it could be - but I do not know because I have not try.

Sincerely Lasse
 
Indeed. Upon looking more closely at the photo I can make out the +- markings in the plastic next to the tabs. I'd still use the 'wings' though. Much easier to solder particularly for the novice. I think you could also chop up the outer tabs & actually separately feed each line of chips that way. Would be quite the wiring rat's nest though.

Don't do it eh! The tabs on the side are nt the only link between the parallel rows. The current will still go through the "front door" even if you sever the individual "back door" tabs from each other.

I break them off to keep it clean. Sometimes they come in broken in shipping and after a few bends while soldering and installing they tend to break off on their own. If you do end up using them, solder it in place (mounted on the CPU) and make sure the wires are secured firmly.
 
I break them off to keep it clean. Sometimes they come in broken in shipping and after a few bends while soldering and installing they tend to break off on their own. If you do end up using them, solder it in place (mounted on the CPU) and make sure the wires are secured firmly.
OK that's what i wanted to hear
 
no they are still on
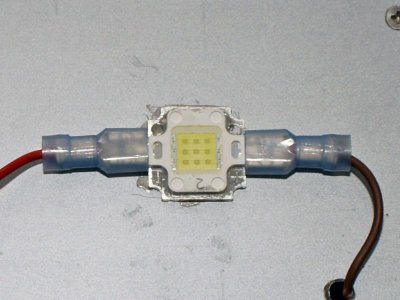
after looking at the chips i realized they were in parallel connected to two common bus bars + - and have inner solder pads witch would make the tabs unnecessary i just wanted to hear a second opinion i have made mistakes before
 
This is a way of connecting if you use 10 or 20 watts chip.


conect.jpg


Sincerely Lasse
 
Staring to get parts in for my DIY build. With the meanwell drivers, how do I wire them up so I can dim? And how do I dim once they are wired up?


Thanks,
Tony
 
I have 3 x 60W multichip.
I test it a few minutes ago, but the light is to much to purple.
Is there a solution for? Place more 20w bleu and cool white leds?
 
@ tronyony. You have (if I rember right) this
LED's:

16000k x 1
14000k x 2
10000k x 2
455nm x 6
445nm x 4
420nm x 2

Drivers:

HLG-80H-48B x 4

Fans:

50MM x 6

The drivers can manage 4 chip in a serie each. I would suggest you to take the four whites (10 an 14 000 K) to the first driver. The 4 of 445 nm -> second driver, 4 od the 455 -> third driver and 2 pcs 420 and 2 pc 455 nm to the fourth driver. Leave the 16 000 K behind. This is only suggestions - you can configure your set up in an orther way if you want. Go to this page and download the PDF. At page five you have the dimming option. As an example. The Red and black wires from the driver are + and - out to the LED. Conect + from driver to plus on the first LED, conect - from that LED to plus on the second and so on till you come to minus at the fourth LED. Conect - from that to - on the driver. Now you have a working circuit and if you put a plug at the AC conection you can plug into the wall and run it. Now without any dim it will give 100 %. With this driver you can dim in 3 different ways. Manually through conecting a 0-100 KOhm potentiometer (a pot) between dim + (blue) and dim - (white) Never connect blue or white wires with red or black in any way. automaticaly through conecting some automatic control devices (aquarium computers or other dimers) to dim + and dim -

I hope you understand what I try to explain - some others can surly give you more tips.

@ Jeroen89 This is one of the drawbacks with the combochips (both blue and white) I think. I suggest that you put up 4 pcs of 20 watts white chips 10 - 16 000 K with a driver you can dim (see my answer to tronyony). I think it enough to fine tune your light with this.

Sincerely Lasse
 
@ tronyony. You have (if I rember right) this


The drivers can manage 4 chip in a serie each. I would suggest you to take the four whites (10 an 14 000 K) to the first driver. The 4 of 445 nm -> second driver, 4 od the 455 -> third driver and 2 pcs 420 and 2 pc 455 nm to the fourth driver. Leave the 16 000 K behind. This is only suggestions - you can configure your set up in an orther way if you want. Go to this page and download the PDF. At page five you have the dimming option. As an example. The Red and black wires from the driver are + and - out to the LED. Conect + from driver to plus on the first LED, conect - from that LED to plus on the second and so on till you come to minus at the fourth LED. Conect - from that to - on the driver. Now you have a working circuit and if you put a plug at the AC conection you can plug into the wall and run it. Now without any dim it will give 100 %. With this driver you can dim in 3 different ways. Manually through conecting a 0-100 KOhm potentiometer (a pot) between dim + (blue) and dim - (white) Never connect blue or white wires with red or black in any way. automaticaly through conecting some automatic control devices (aquarium computers or other dimers) to dim + and dim -

I hope you understand what I try to explain
Lasse, I understood perfectly. That is the explanation I was looking for. I will keep u posted on the build. The LEDs wshould be here this week too.

Thanks,
Tony
 
Also, just so I'm clear, when I add LEDs in series this will reduce the forward voltage from the driver. I ask because the driver puts out 48v but the LEDs are rated at 1-10v. Having 4 of them in series will lower the vf to 10v?

Thanks,
Tony
 
With this driver you can dim in 3 different ways. Manually through conecting a 0-100 KOhm potentiometer (a pot) between dim + (blue) and dim - (white) Never connect blue or white wires with red or black in any way. automaticaly through conecting some automatic control devices (aquarium computers or other dimers) to dim + and dim -

Sincerely Lasse

I have my HLG-80H-36B diming with a 10V wall wart and a 10K Pot. It works great except the light comes on rather suddenly. It does dim completely (off) and (as far as I can tell) as high as when the dimmer circuit is open (all the way on).

I am interested in dimming it using the POT as a rheostat and varying the resistence between the two dimmer wires. I'm a noob so I initially tried to do it with the 10K pot but it would not brighten all the way. Well duh, the PDF says you need to vary the resistance to 100K. And if (like in my case) you are trying to dim three drivers with a single POT you will need a 33K POT. Just pointing that out so nobody makes the same rooky mistake I did ;)

So later tonite I'll wire up a 100K POT and give that a try on a single light.
 
Last edited:
anyone know where i can get a good deal on the 100w hybrid chips that have both blue and white leds? i can only find one listing on ebay and the seller wants like $125 just for one which i think is crazy because i could get a 100w blue and a 100w white making a total of 200w for less than 80$
It's probably because there is multiple colors/phosphors on the chip in the hybrid version. i.e. it's essentially a custom version. If you're worried about price go with multiple chips of different colors.
 
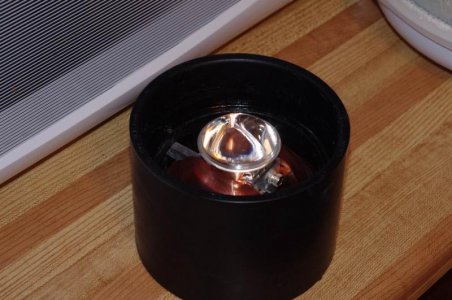
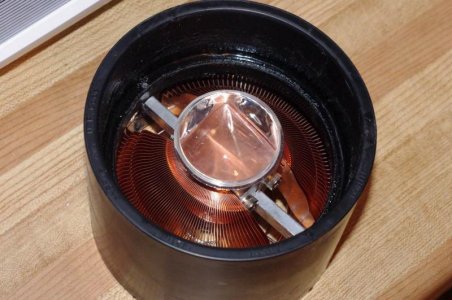
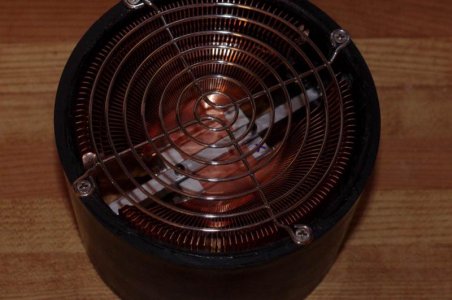
I have been saying that I'd post pictures of my multichip build, and while it's not done I do have some in progress pics to share..

The light body is a 4" DWV ABS coupler, they are slightly larger than SCH40 fittings, and as a coupler it's solid ABS, no foam core stuff. The heatsink, shown without fan (but the fan fits I just didn't take it all back apart to put that on again) is a Zalman CNPS7000Cu, tested at 27C over ambient @ 100W heat input.

This will be housing a 60w hybrid (10k/445), and I'm hoping it won't be too blue after the comments above. The plan is to drive it all the way to 150w if so desired.

If it's not too blue already, I have plans to add a ring of 6 420nm emitters at the bottom around the main reflector.

Mounting options could be hanging or I will be tapping a 1/2 NPT hole in the back, so a gooseneck could be made using metal or plastic conduit and the appropriate fitting. It's a bit too heavy for a kessil gooseneck.
 

Attachments

  • IMGP8905.jpg
    IMGP8905.jpg
    63 KB · Views: 5
  • IMGP8906.jpg
    IMGP8906.jpg
    67.9 KB · Views: 6
  • IMGP8907.jpg
    IMGP8907.jpg
    53.7 KB · Views: 8
ok i want do simple build with one 10w led chip for now see if i like it before i spend a lot money and then slowly add to it later.tank 90gal.i'd like try doing this cheap as i can.
 
Back
Top