My 125gal rebuild - opinions welcome(esp about plumbing)

Blondebell

New member
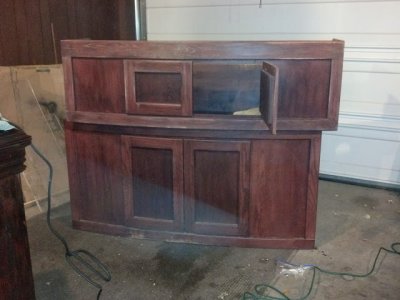
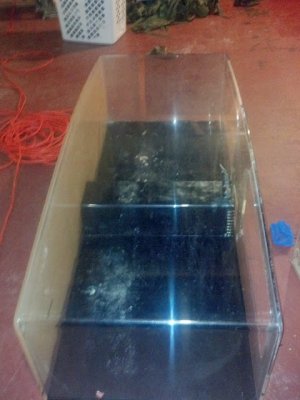
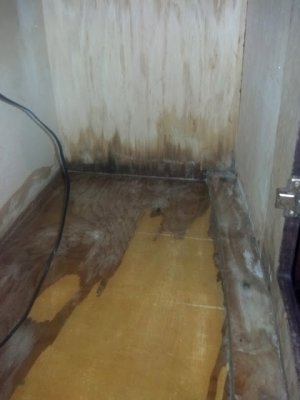
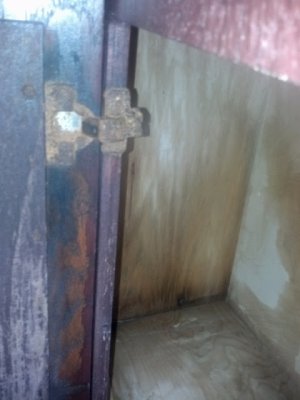
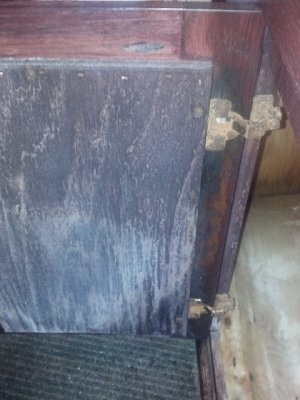
So two years ago my Hubby bought me a project 125gal for my wedding present. Its a 125gal bowfront acrylic tank that was in sad shape but it was a good deal. So we took it home and I sanded and re stained the oak stand and canopy. I cleaned the salt creep from inside and removed warped veneer from the inside and recoated the stand interior with black marine paint and the inside of the canopy with white marine paint to better reflect the light.

Next i decided to try my hand at polishing the acrylic.... hence why its been two years since I started this... Let me tell you it is not nearly as easy as they show in time lapsed videos... and doing the whole tank at once was a mistake. i got super frustrated when scratches weren't coming out and it looked like i had just made it worse. Luckily last week husband got sick of it sitting there all hazy and decided to take over ;) apparently it just need more muscle and determination.

here are my before shots:
 

Attachments

  • 12072618_10156192441235232_8904547773616951473_n.jpg
    12072618_10156192441235232_8904547773616951473_n.jpg
    63.1 KB · Views: 5
  • 12088090_10156192440655232_7234953990809753276_n.jpg
    12088090_10156192440655232_7234953990809753276_n.jpg
    66 KB · Views: 5
  • 11140027_10156192393100232_6725473190645720493_n.jpg
    11140027_10156192393100232_6725473190645720493_n.jpg
    38 KB · Views: 5
  • 12144864_10156192440880232_139722347711838947_n.jpg
    12144864_10156192440880232_139722347711838947_n.jpg
    38.6 KB · Views: 5
  • 12119126_10156192440830232_3362170693410364846_n.jpg
    12119126_10156192440830232_3362170693410364846_n.jpg
    63 KB · Views: 5
sanding the tank

sanding the tank

12088530_10156192440595232_8816136611438858568_n.jpg

12112248_10156192440355232_292747876799421837_n (1).jpg

12115504_10156192440450232_8983278363686278126_n.jpg

12122474_10156192440500232_6131985699935314018_n.jpg

I started out sanding the tank to remove a large amount of imperfections in the acrylic. I used 800>100>1500>2000 grit wet/dry sand paper with lots of water and a little bit of dawn to try and remove the scratches. And i rinsed off the silt between each grit so as to not contaminate the next step.

in hindsight: I would not recommend doing a whole tank at once. This is why i was so easily overwhelmed and I wasnt able to keep track of what parts needed more sanding and which didn't. the scratches got lost in all the haze since i did sand both inside and out. If I were to do this again I would do one panel at a time and then polish to make sure I was on track.
 
Polishing the tank

Polishing the tank

12115858_10156192480315232_2072532827561292328_n.jpg

12122819_10156192480390232_8907815363463417451_n.jpg

View attachment 330311

We used the Novus system 1,2,3 and a car buffer with 8in microfiber bonnets.
We used a different bonnet for step three and step 2. then just a rag for the final step. I attempted to do this by hand and I also used a 6in orbital buffer from Harbor Frieght but the husband ended up having to take over because this was a time consuming and labor intensive process I did not have the patience for. After 3 evenings straight of polishing we finally got the process down pap and ended up with a fairly clear tank :) I would not say it is like brand new because I did not sand enough and some of the scratches were still slightly visable and the buffer did not get close enough to the bottom of the tank to get out the scratches from sand bed. I was fine with this though because it looked great compared to when I got it and I was not about to take a sander to this again.

We found that if we kept buffing until the novus was drying up and becoming clear was when we were actually getting a glass like seen on the acrylic. If you just buff it and then remove excess it left behind a slight haze. Like I said it was a process of elimination to try and get a system for sucess but it is possible.

Also, another in Hindsight: For deep scratches I would go down in grit to 600 use a rubber block or the like with wet/dry sandpaper and sand by hand than use a sander as i found that was harder to control. but this is just a personal preference I believe as I saw many people have had success with sander.
 
repairing inside

repairing inside

Well the inside of the stand was severely damaged by salt creep and water. I scrubbed down the wood and removed warped veneer from the inside and let it dry out for a day. Next I coated inside of stand base with a black Marine paint to protect the wood and I replaced the rusted out screws with rust resistant ones and replaced the nasty hinges.
Next I coated the interior of the Canopy with a white marine paint. I had assumed that white would reflect light back into the tank better than any other color.12112107_10156192393030232_110167587251068458_n.jpg

View attachment 330318

12118593_10156192392950232_2407124123415542685_n.jpg

12088251_10156192392790232_363694003176983371_n.jpg

12079418_10156043510845702_8338586823930213366_n.jpg

And Tada! its like new (almost) again. was totally worth all the effort and waiting. now on to the exciting part.... plumbing!
 
sump and rock

sump and rock

so this is the sump I have and I would like to ideally have a sump for a protein skimmer and a refugium. So I am thinking of daisy chaining a second tank/sump to this one. Ive havent decided between just having a pipe/or two running between these two so that it acts like a normal sump

{tank one] water into sock filter>skimmer >[Tank two] liverock rubble> fug> return pump
ill through a bubble trap in there somewhere between return and skimmer.

~or~

having the water run into liverock rubble in sump one> protein skimmer> bubble trap> return. Then have the refugium elevated and on the right side of sump one. And have return pump back up and have it T'ed off with a ball valve so that only some of the water enters Fug and then overflows back into sump one.
this way I can control water flow thru Fug

Thoughts? Ill try and dry something up for a visual... I have 60ins to play with in stand but doors are narrow so i cant place a long sump in there.

would I be better off getting external skimmer and only have the one sump with fug bubble trap and return?


12107715_10156192579465232_2728735683854507998_n.jpg


So here is all my Live rock... if its alive anymore. its been over a year since it was in a tank. I had it in trash cans with heaters and power heads but then we moved so i drained most the water and stored them in the garage while we lived at my dads during construction at new house. so they dont have much life on them now but im at a cross roads on how to proceed. cure it? or just strip it by washing with diluted bleach water then rinse in RO/DI water and let remaining bleach evaporate and them put them in the tank for a month to cure and cycle? or just rinse real good let dry in sun and then place in tank to cure/cycle? hmm least labor intensive path is desired. Im okay with loosing any remaining bacteria and starting over with dead dry rock and reseeding it and waiting for it to come back.

11224415_10156192579535232_7082443407152443339_n.jpg

12065795_10156192579585232_1933504887032261901_n.jpgand because its so pretty :) another shot
 
Recently redid a 350 acrylic in and out. Wish you had posted before I started.
Your description is far better than I would have done.
That said, I have 2 things to add that made my life easier.
1. Use up/down and then sided to side as you switch grits and Novus polish, You can tell where you still need to cover.
2. Use a grease pencil on the opposite side to mark where you want to give extra attention. Much easier to tell if you got the entire scratch.
 
Thanks guys - the grease pencil sounds it could be very helpful to determine when the scratch has been eliminated.

So things have made some more progress this week. Ive let my rock dry out but ive decided this week im going to bleach it just to be sure its clean. Also, the sump project has evolved into an even project! Gotta love that ;)
I decided to daisy chain my small 26 in sump to a 36 in one that i picked up on facebook (great deal) but the two together wouldnt fit in the stand with such a small door. So Hubby agreed to drill a hole in the wall to the basement and put all of our plumbing and sumps down there. This turned out great because my protein skimmer came in and it looked so much bigger than I thought it would be even tho i measured and knew it would barely fit in stand. I just had noooooo idea how big collection cip would be and that wouldnt fit between stand top and top of skimmer. So all worked out for the best because now i have tons of room in the basement to expand ;) dont tell that to hubby tho.
So this inevitably led to us spending more money because of the excess cost of plumbing and our little rio 3100 pump was not going to cut it with that much head loss... i belevieve after calculating the 2 90 degree elbows and a 45 to get through the wall we would have been left with 3gph after an 8ft vertical height and 2 ft horizontal. Not very effective. So i picked up a mag 24 to do the duty. I have had a mag 9 before and it was a great little pump for the price. We decided to stick with an internal pump to eliminate the opportunity for a leak on the floor... we've had enough of those in the past ;)
(Had a sump split a seam and 50 gals all over my hardwoods and leaked down into duckwork into the furnace... it was bad)...
So now im waiting on the mail for my bulkheads and pump.
pics of our progress to come
 
Yeah im going to do a build thread. Opinions welcome.

So ill do a pic of my sumps ill edit it to show how the flow will work tomorrow.
 
wow that turned out great

Thank you!


So here is what I am planning. sorry if its difficult to read this pic i am not the best artist in the Paint program ;)
The water will drain from the main display through the over flow and down a 1in flex line into the first chamber of the sump. my smaller sump was perfect in size to house a filter sock (if i decide to use them), my media reactor, and my new REEF OCTOPUS CLASSIC 200INT 8” INTERNAL PROTEIN SKIMMER. The baffles of the bubble trap are 10 in which is a little over the recommended depth of the skimmer but that leaves me room to raise it if necessary.
Next the water will pass through 2x 1inch bulkheads that connect the two sumps together and into the largest chamber of the sump. For now I will be placing my live rock rubble in this chamber with some macro algae until i determine exactly how i want to do my refugium. Im still reading too many conflicting positions about how to best utilize this space in a sump - DSB/ Mud and planted refugium/ ATScrubber/ live rock and tumbling chaeto... ultimately I want this to be the best environment to grow my pod population because I really enjoy the fish that prefer them ( aka a Mandarin etc) Ive always used rubble and macro so I know that works but I want to explore other options so anyone with actual experience with larger refugiums are welcome.

12096419_10156212311635232_3527307754473013512_n.jpg

Next is the bubble trap with 10 in baffles, followed by my return chamber that will house my Mag24. Because we decided to move this set up in the basement I had to upgrade my return pump from the cheap rio 3100 an i went with a Mag. Ive had a mag 9 and loved it so. I had debated between a mag18 and the 24 but decided to go with the larger one so that in future if I wish to add on a frag tank to the left of the sump I can feed it with the return line. for now to deal with the increased flow i will be hard plumbing the initial 2 feet of the return line in pvc with an arm T-ing off from the line to extend over the refugium. This extension will have a ball valve so that way i can control the flow returning to the main display without putting pressure on the engine of the return pump. I did not want the sump looking like a raging river ;)

12096412_10156212311715232_3883614149923063020_n.jpg
The mag 24 has 2400 gph and with an 8ft vertical length and a 3 ft horizontal length of travel. I also have a 90 degree elbow where the plumbing inside the overflow bends to enter the tank. There are also 2 45s where the return line exits into the tank through a flexible loc-line Y fitting with flared tips. I also decided to consider where the plumbing bends through the wall as 2 45 degree turns just to over estimate the head loss. so after calculating all of those factors in I was left with just over 1000 gph.
You can estimate you head loss using this calculator that I use.

http://www.reefcentral.com/index.php/head-loss-calculator

Now I wanted my display tank volume to turn over about 5 times per hour so the 1000 gph allows for 8 times. I did not want my sump to move that fast because I want the skimmer to have adequate time to do its job and also I did not want the refugium to move that fast if I later decided to plant it. The extension arm and ball valve allow me to reduce the return's flow by diverting water bank into the sump. Technically this is additional flow in the sump but not turnover. If I decide to plant my refugium I can divert this flow to the skimmer chamber.
So at about 5 times per hour Id have about 625 gph in my main display.

I plan to suppliment the flow in the MD with 2 Jaebo rw-8's which can ramp from 200 -2000 gph. that should give me enough flow if I should decide to add some sps later but for now I have a passion for lps and soft corals so I can turn the rw-8's down to reduce flow. For sps id need about 30-50x the MDvolume and for lps and softies i can be below 30 a bit but Im hoping with this setup and the variable speed pumps i can adjust the flow to adequately meet my needs now and adjust if I add sps later.

12063611_10156212311505232_3959132456881149655_n.jpg

Don't worry I plan to change that outlet out to a GFI ;)

Im still waiting on parts to come in the mail so as we progress Ill keep you updated.
 
Back
Top