My First Tank and Build Process

getting closer...

getting closer...

Got some work done this weekend on the tank. We started the framing for the cabinetry. After painstaking measuring and cutting we have the framing all done and cut. The tank and sump tanks were removed from the stand and soundboard was cut. This will be the access points for the sump tanks.


The face piece that will be along the edge of the floating corner is measured and cut.


The photo below shows the 45-degree cut for the floating edging of the tank.


After finishing the 45-degree cut along the edge we place the framing up against the tank frame. We then used shims to level up the facing flush with the wall edge and ceiling edging.


Next was cutting out the top cabinetry access points. These will be how I get into the top of the tank and access the lighting,


The next two pictures show the soundboard being cut and the final product that was cut to the size of the door opening. It was glued three pieces deep to kill any and all sound. The pieces were glued together, will be framed with trimming, attached to the back of the cabinet door, and will be painted with Redgard before installing. The inside of all the cabinetry will be RedGarded and the outside will be stained to match the bar cabinets. My wife is helping the soundboard stick together.


We put the tank and sump back in place and started plumbing. Decided to call it a day and plan on finishing plumbing later this week. This weekend will be making the last access hole cuts for the refugium area and installing the soundboard to the doors. The live rock is currently in holding tanks cycling and getting ready for install. We are getting close so stay turned"¦
 
I'm tired of the red paint...

I'm tired of the red paint...

Had the day off of work so back at it again. Started off by cutting out more access points in the cabinetry for the sump area. These pictures show the plywood sheet I am using for the cabinet framing and the aligned cut lines.


After the cuts were made it was time to start aligning the trim around the corner edge of the tank. I used wood glue and brackets on the inside of the trim to make the edge come together as close as possible. I am going to have to sand the edge down to hide a few cut imperfections. The first pictures shows me outlining the brackets on the soundboard. I cut out enough of the soundboard for the brackets to fit flush so it would not change the cabinet trim dimensions. The next picture is after the brackets were screwed into the back of the cabinet trim wood.


My plumbing station is set up. Lots of PVC and Home Depot runs to get the right sizes and replacement pieces after I screwed up a few times. The second picture is of the equipment being put into the sump. The Reef Octopus Regal 250 INT protein skimmer was put together and placed into the sump. I quickly realized I need more space so I am going to have to get creative. The two pumps will sit along the bottom of the sump and I will have to build a platform for the protein skimmer to sit on above the pumps. This will allow me just enough clearance from the piping above and still have enough of a slant to run the protein drain line to the drain line installed into the wall sewer plumbing. The third picture shows some of the plumbing. There are unions all over the plumbing so if something breaks or needs replacing it is only a section I will have to redo and not the entire thing.


The last two pictures show the cabinet trim being slid into place. The side and bottom pieces have been connected and the top piece was sanded and dry fit nicely. Decided to call it a night. More to come this weekend. Cheers"¦


Wow! Just caught up, you've been busy! Really appreciate the attention to detail. That thing could stand up to anything. Well maybe not kool-aid...
46e31ccf4f7a1e54f0f901b43ee747bf.jpg


Sent from my SAMSUNG-SM-G891A using Tapatalk
 
so so close...

so so close...

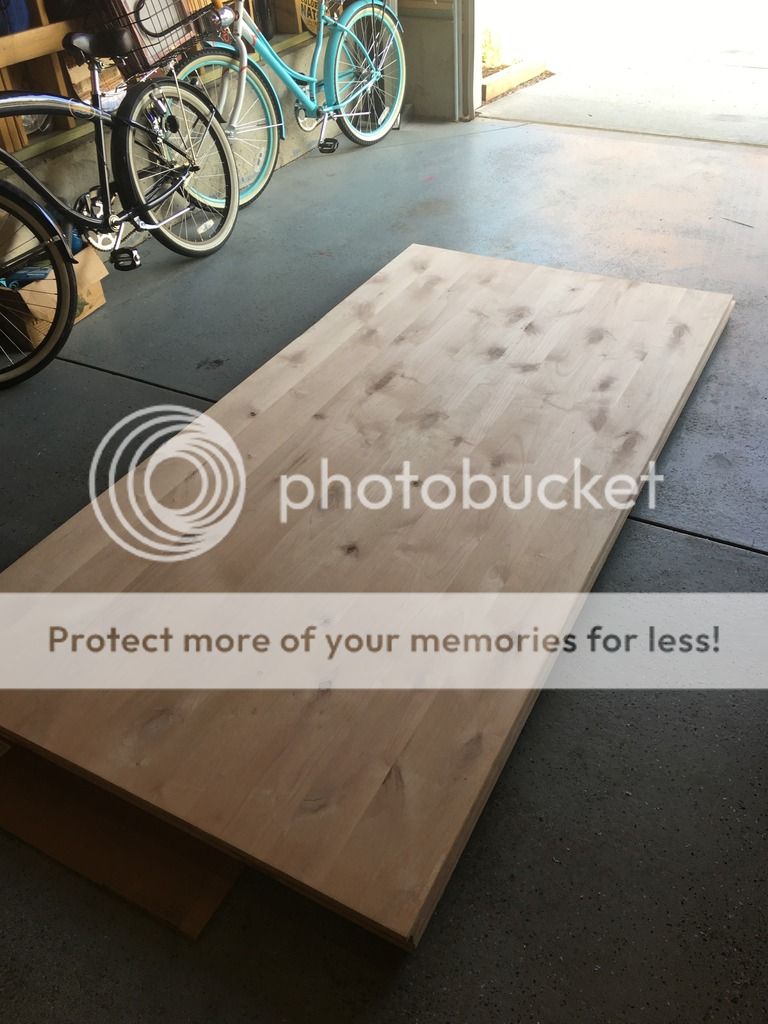
Today started with making the last few cuts on the cabinetry trim boards. The side panel trim was cut and moved down into the basement along with the other trim pieces.


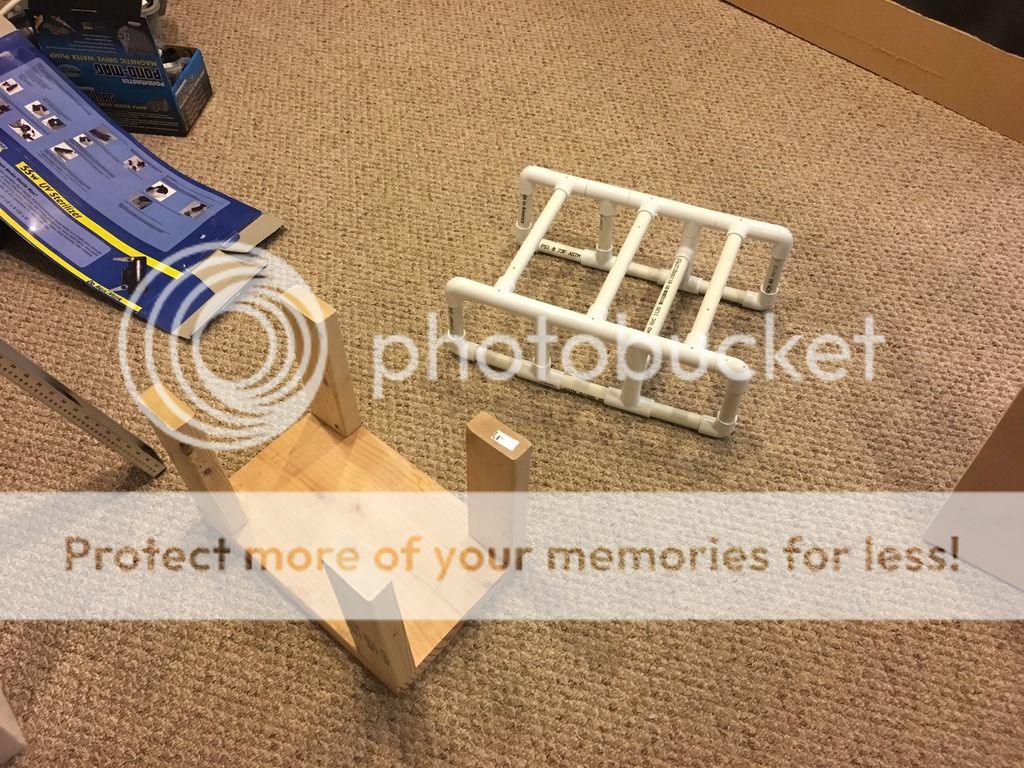
This picture sequence shows the wood being cut and screwed together to form the drop down holder for the UV sterilizer. The only way to fit it under the tank is to have the wood be mounted to the underside of the tank frame and suspend it above the sump tank. Plumbing will be going in front and behind this piece. It was created and then my wonder wife is painting it with RedGard to waterproof. It will get multiple coats since this will be directly above the sump tank. A PVC stand was also created for my protein skimmer to sit on top of in the sump. This has to be done because the return pumps will sit underneath the protein skimmer to make room for all equipment. Another photo later on will show the skimmer and pumps underneath the stand. Small holes were cut all over the PVC to ensure no air is caught in the PVC when it is submerged.


The cabinet trim was pulled away from the tank frame. The stainless steel plates used for securing the trim pieces together were removed and wood glue was applied to all edges. The Plates were then re-secured to the trim wood with stainless steel screws. The second picture shows the steel plates holding the trim together.


This next picture shows the final cabinets trim wood put in place. The seams were secured with wood glue and more steel plates screwed in place. Clamps were applied to ensure the glue dries in the correct shape without any warping.


Below is showing the PVC stand for the protein skimmer. The bottom right has the two sump pumps housed underneath the stand with the skimmer sitting on top. I have about ¼ to 1/2 "œ clearance to get the protein skimmer head off and out of the sump tank.


This last picture is where we currently stand. All cabinetry trim wood is screwed, glued, and clamped in place. I will let it sit for a few days to fully dry then I plan on pulling it all away from the tank frame and RedGarding the whole inside of the wood. Once the RedGard is dry, I can push the trim back in place and secure it to the tank framing. Plumbing is complete and will post pictures after all the trim wood is secured in it's final resting place. I am thinking we are 2-3 weeks out from the tank being stained, doors stained and installed, and water in the tank. All the live rock is currently in a water trough cycling under lights. Hopefully any nasty critters we can remove prior to placing it in the display tank. I need to find a place to make a custom acrylic cube tank for my refugium and top off system. Thanks for following along, cheers...

 
the RedGard returns...

the RedGard returns...

Had the day off from work and was able to squeeze some work in on the tank. The RedGard returns. I finished cutting out the soundboard to fit behind each of the cabinet doors on the tank. They are 3 layers thick of soundboard to kill/dampen any sound coming from the exhaust fan above the tank and all the pumps and water noise within the tank system. Each piece was glued together and then painted with RedGard to waterproof. The picture below shows the final pieces of the soundboards.


This photo shows the wood platform being painted with RedGard. This platform will hold the UV sterilizer above the main sump. It will hand from the bottom on the tank stand and above the sump. This will allow for bulb changes and is able to have plumbing in front and behind the platform. The reason for this is because I ran out of room for the UV sterilizer and this is the only spot available for it.

 
Today was once again all about painting RedGard. The cabinet framing was glued a few days ago and has since dried. We removed the trim from around the tank and painted the backside of the cabinetry trim with RedGard since this will be facing the sump and tank. We painted over everything, including the stainless steel hardware. The final pieces of the soundboard were also painted with RedGard to ensure proper waterproofing. Tomorrow will be installing and securing the cabinetry trim in it's final resting place and finishing all plumbing.
 
These first four pictures are described in the comment above. Basically everything on the inside of the cabinetry trim was painted with RedGard to waterproof including the stainless steel brackets.

<a href="https://ibb.co/f6iP2v"><img src="https://preview.ibb.co/ck6Npa/IMG_1867.jpg" alt="IMG_1867" border="0"></a>

<a href="https://ibb.co/hWn6FF"><img src="https://preview.ibb.co/e2S6FF/IMG_1866.jpg" alt="IMG_1866" border="0"></a>

<a href="https://ibb.co/m4ktvF"><img src="https://preview.ibb.co/iE0hpa/IMG_1865.jpg" alt="IMG_1865" border="0"></a>

<a href="https://ibb.co/neAtvF"><img src="https://preview.ibb.co/kEHHNv/IMG_1864.jpg" alt="IMG_1864" border="0"></a>

After all the cabinetry trim dried from painting, it was slid back into place. The tank was then covered with cardboard to protect the glass. I used a nail gun to secure all the framing so I didn't want any nails hitting the tank glass.

<a href="https://ibb.co/dnbivF"><img src="https://preview.ibb.co/kE7Z2v/IMG_1873.jpg" alt="IMG_1873" border="0"></a>

<a href="https://ibb.co/jVzQ9a"><img src="https://preview.ibb.co/cvkbFF/IMG_1868.jpg" alt="IMG_1868" border="0"></a>
 
Lets talk plumbing. The first picture shows the platform that was created to hold the UV-sterilizer above the sump and between the plumbing for the tank. It is a tight access to change out the light but everything fits well. The second picture shows the sump below the main display tank. The plumbing was attached to the bottom of the tank for drainage into the sump and return back into the tank. I will be running two pumps for this setup in the sump. One pump will send water back into the main display tank and to the UV sterilizer. The second pump will run water back to the main display tank and to the separate refugium tank. The plumbing on the left side of the photo shows a hard U-turn back into the sump. This is temporary until I get the refugium tank up and running. It is a custom size so I will have to have the acrylic tank made special for that. The third photo shows the platform for the UV sterilizer in place and holding the sterilizer (black tube). You can see how half the plumbing is in the platform and the other half is behind this platform.

<a href="https://ibb.co/hQvnNv"><img src="https://preview.ibb.co/nAPQ9a/IMG_1869.jpg" alt="IMG_1869" border="0"></a>

<a href="https://ibb.co/nv8k9a"><img src="https://preview.ibb.co/kFpE2v/IMG_1871.jpg" alt="IMG_1871" border="0"></a>

<a href="https://ibb.co/hGt7Nv"><img src="https://preview.ibb.co/kUnCpa/IMG_1872.jpg" alt="IMG_1872" border="0"></a>

Below are the door openings that were framed with 1x4 wood pieces. The inside and underside have been painted with RedGard. These pieces were secured to the cabinetry trim boards with wood glue and a nail gun. There were only a few rogue nails that punctured the outside of the trim. I will have to fill and sand those down before staining. The plan is to paint the inside trim of these pieces with the epoxy paint I used previously on the surface below the tank. The thought is the finished is a little smoother than the RedGard's finish.

<a href="https://ibb.co/gHd2pa"><img src="https://preview.ibb.co/fj2TUa/IMG_1875.jpg" alt="IMG_1875" border="0"></a>

<a href="https://ibb.co/ew71hv"><img src="https://preview.ibb.co/hPS1hv/IMG_1874.jpg" alt="IMG_1874" border="0"></a>

Here is where we currently stand. Going to fill in all the nail holes, gaps, miss cuts, etc in the cabinetry trim wood with wood putty and will sand it all down in the next few days. After that the plan is to stain everything. Once it is stained, I will add the water and start cycling the tank while the cabinet doors are finished. I will wait to add the water until the stain is completely dry and the smell is gone to ensure the VOCs won't be absorbed into the tank's water. The cabinet doors will be stained prior to installing on the tank. Cheers"¦

<a href="https://ibb.co/iNd2pa"><img src="https://preview.ibb.co/hTcHNv/IMG_1876_1.jpg" alt="IMG_1876_1" border="0"></a>
 
Good job with photo documenting this build. I really wish I had taken as many pics with my sps dom 180. The finished product never truly captures or illustrates how much work and planning went into a build. Good job, it's gonna look legit!
 
Apparently I've hit my limit of 3rd party photo sharing with Photobucket. I've switched sites for my photos and will upload them all when I get a chance. Kind of frustrating... tank update though, the cabinetry is dried and I will be removing all the clamps. I just finished filling alder wood putty into all the seams and imperfections in the wood and will sand and stain it soon.
 
Back from vacation and ready to finish this thing"¦

Worked on the tank a little bit today. Today was all about trim work. I started with tearing out the old flooring trim next to the tank. I am replacing it with knotty alder wood from a lumberyard that has been stripped down on 3 sides. I have to run the 4th cut through a table saw to get the correct size to match the rest of the trim boards. I will stain the trim at the bottom of the tank and paint the trim to match the rest of the trim around the room.

<a href="https://ibb.co/kqXosv"><img src="https://preview.ibb.co/cs86ea/IMG_1941.jpg" alt="IMG_1941" border="0"></a>

<a href="https://ibb.co/d4yHkF"><img src="https://preview.ibb.co/mnw3QF/IMG_1942.jpg" alt="IMG_1942" border="0"></a>

The next few photos show the trim boards along the bottom of the tank. I also stripped down some left over 3/4" plywood and cut small pieces to act as a spacer for the firm pieces to sit on around the show tank.

<a href="https://ibb.co/iiHXKa"><img src="https://preview.ibb.co/h5iiQF/IMG_1944.jpg" alt="IMG_1944" border="0"></a>

<a href="https://ibb.co/fk36ea"><img src="https://preview.ibb.co/dx2ckF/IMG_1943.jpg" alt="IMG_1943" border="0"></a>

The last two pictures show the trim wood going around the display tank. I am trying to attached these pieces without using nails so everything will be biscuit joined and glue in place. If this works great and if not the nail gun is ready. The trim was cut with 45 degree angles and a notch cut out at the ends to butt up against the edges. The top and bottom trim work is secured with wood glue and I have clamped all along the trim to hold it in place. I plan on letting this sit for 48 hours to fully dry and then I will attach the remain side trim pieces and edging around the trim to hide all the seams. After this trim is all in place it will be time to sand everything a few times and then stain.

<a href="https://ibb.co/enBsKa"><img src="https://preview.ibb.co/fC3Tsv/IMG_1945.jpg" alt="IMG_1945" border="0"></a>

<a href="https://ibb.co/ckG3QF"><img src="https://preview.ibb.co/hdUeza/IMG_1946.jpg" alt="IMG_1946" border="0"></a>
 
Apparently I can't go back and change the links to my old pictures to the new file sharing site I am using. Sorry they aren't showing up for everyone. If anyone has questions or wants to see certain ones, let me know and I will try and post them. When I finish the build I will just put all the pictures up of the total progression because I really don't want to start the entire thread over again.
 
Taking a break for dinner and updating you guys that are following along. More trim work today. The display tank trim wood is being installed. I used wood glue, biscuit joints, and clamps to hold it all together to try and not have to use the nail gun. The first three pictures show the trim pieces around the side of the tank. I will allow these to dry and fill the gaps with wood filler and sand it down to blend it together before staining it.

<a href="https://ibb.co/bLdYX5"><img src="https://preview.ibb.co/hji0C5/IMG_1948.jpg" alt="IMG_1948" border="0"></a>

<a href="https://ibb.co/dxYYX5"><img src="https://preview.ibb.co/eV97s5/IMG_1949.jpg" alt="IMG_1949" border="0"></a>

<a href="https://ibb.co/kwEwkQ"><img src="https://preview.ibb.co/mUpU5Q/IMG_1950.jpg" alt="IMG_1950" border="0"></a>
The next picture shows the front edge of the trim around the display tank. Back to work, and more photos to come"¦

<a href="https://ibb.co/e4Op5Q"><img src="https://preview.ibb.co/jMjJzk/IMG_1951.jpg" alt="IMG_1951" border="0"></a>
 
I finished up tonight with cutting two holes through the top of the stand. These holes will be future plumbing holes for the refugium tank that will be next to the display tank hidden behind a cabinet door on the far left. This plumbing will drain into the sump below. The second picture shows the trim wood after I put wood filler in to cover where the nail gun shot nails to secure the trim. The last picture is after I finished gluing and securing all the finish trim around the display tank. I had to plane down one of the pieces of wood to make it fit closer. I am going to get everything stay clamped for 48 hours to ensure everything is secure and dry. After that, I will have a lot of sanding to do Sunday on the whole front and sides of the tank. After I finish sanding, it's time to stain everything. Stay tuned"¦

<a href="https://ibb.co/b50Qek"><img src="https://preview.ibb.co/n1sGkQ/IMG_1956.jpg" alt="IMG_1956" border="0"></a>

<a href="https://ibb.co/kjNSs5"><img src="https://preview.ibb.co/cHrbkQ/IMG_1957.jpg" alt="IMG_1957" border="0"></a>

<a href="https://ibb.co/eCj7s5"><img src="https://preview.ibb.co/de8YX5/IMG_1954.jpg" alt="IMG_1954" border="0"></a>
 
a long time coming...

a long time coming...

I was back at it early this morning. The first two pictures show the trim pieces and edge of the tank where I have filled in the gaps with caulking. I will paint the trim white to match the other baseboards and the wall paint will be painted over the edging next to the tank.

<a href="https://ibb.co/my2Oh5"><img src="https://preview.ibb.co/jQSpN5/IMG_1960.jpg" alt="IMG_1960" border="0"></a>

<a href="https://ibb.co/nN9fUk"><img src="https://preview.ibb.co/b38w25/IMG_1961.jpg" alt="IMG_1961" border="0"></a>

This picture shows the insert pieces of wood for the cabinet doors. I plan on gluing the 3 layer thick pieces of soundboard to these boards so it will kill any sounds coming from the tank. These will sit in the frames and the cabinet doors will cover these from view once they are installed. I can easily remove these when it's time for cleaning and maintenance of the tank. I use the long ruler and clamp it down to act as a straight edge while I am making the cuts.

<a href="https://ibb.co/hkxCaQ"><img src="https://preview.ibb.co/bMtkvQ/IMG_1962.jpg" alt="IMG_1962" border="0"></a>

After all the wood inserts were cut down, the soundboard was trimmed to fit. I then glued everything together, as seen in the next pictures. Used sand and salt to weigh everything down.

<a href="https://ibb.co/dxd79k"><img src="https://preview.ibb.co/iqrih5/IMG_1963.jpg" alt="IMG_1963" border="0"></a>

<a href="https://ibb.co/eFLLUk"><img src="https://preview.ibb.co/nisCaQ/IMG_1964.jpg" alt="IMG_1964" border="0"></a>

<a href="https://ibb.co/bvVb25"><img src="https://preview.ibb.co/n7nOh5/IMG_1965.jpg" alt="IMG_1965" border="0"></a>

This last picture is where we currently stand. I spent 3 hours sanding the tank starting at 100 grain and finishing at 220-grain sandpaper. II made another "œclean room" around the tank so luckily the sawdust was contained. Kind of"¦ I then vacuumed up as much dust as I could and wiped everything down with a wet towel. I put one final application of silicone caulking around the seams inside the tank area that will get the most chance of water and humidity exposure. The tank is now officially ready to be stained. I placed the stainless steel bar above the tank. The lighting will be hung from this bar so it allows me to slide and adjust the lighting as needed. Once it is stained I plan on letting it sit for a few days then I will add RO water to clean out the tank of any debris. Then, I will add the sand and do the same thing a few times to get all debris out before adding salt water.

<a href="https://ibb.co/n1OJFQ"><img src="https://preview.ibb.co/gzj3h5/IMG_1966.jpg" alt="IMG_1966" border="0"></a>
 
Back
Top