My Neptune Apex web interface compatible DIY reef controller

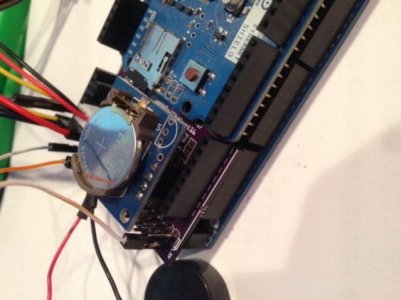
I just finished up adding 2 x 3.5mm outlets for the 4 wave pumps and 1 for the temp probe, and I'm gonna be kinda wild with the rear panel, the original rear panel was full of RCA socket holes, I'm gonna use it anyway....this thing needs some ventilation, that should help with that LOL and the RCA holes are a perfect match to the BNC connector for the pH probe :)
 
some update

some update

Couple pics of what I'm working on. This old UPS box is great because it can easily fit everything inside where the old battery was.
You can see a shot of the custom shield I made. It has a lot of flaws so I hesitate to release it in its current state. Some parts are nice some are scattered.
 

Attachments

  • photodfg.jpg
    photodfg.jpg
    36.9 KB · Views: 1
  • photo.jpg
    photo.jpg
    43.1 KB · Views: 1
  • photo 3.JPG
    photo 3.JPG
    98.6 KB · Views: 1
  • photo 1.jpg
    photo 1.jpg
    47.5 KB · Views: 1
Couple pics of what I'm working on. This old UPS box is great because it can easily fit everything inside where the old battery was.
You can see a shot of the custom shield I made. It has a lot of flaws so I hesitate to release it in its current state. Some parts are nice some are scattered.

looking good, I hate the way they made the original power outlets in those UPS, I like the way you corrected that minor inconvenience :)

where did you find the purple half shield ?
 
I should have mentioned the inconvenience. For those that don't know this UPS has all the outlets tied together per side. The internals don't make it easy to split up so I changed out the outlets completely.
The shield is my own design. If you do the design they are really cheap to have printed. I think I paid $15 for three of these small boards.
 
If you do the design they are really cheap to have printed. I think I paid $15 for three of these small boards.

not bad, and it looks really nice, it makes things so much easier when they are designed specifically for what you need and looks like you have everything you need already right there and nice touch adding the RTC as a plug in module rather than wiring it up

I don't know why Arduino didn't build the RTC into their boards, about everything we wanna do with 'em requires a clock :)
 
doughboy, on the AC side of your relays, did you connect to normally open N/O or normally closed N/C ?

I have mine as N/O but no matter whether I use outlets as is or select inverted, I get the same results, it's working backwards, when I turn on an outlet in the web interface, the outlet goes off, if I turn off the same outlet, outlet turns on...

I'm thinking I need to connect the outlets to the N/C side of the relays, is that what I need to do ?

I went ahead and did it LOL that is what I needed to do, all my relays are working like they should except for the heater relay is staying on, I think I have a bad connecting to that relay somewhere though, I'll figure it out :)
 
it's all working perfectly now, found a broke wire in the DB9 serial cable was the issue with the heater relay, wouldn't you know it would be a factory defect and not something I did wrong....

but due to the lack of confidence in myself with electronics and after going over everything I did and even redoing all of it, I finally decided to test the cable from one to the other and found it was bad, like a dummy, I didn't think to test for continuity from one end of the cable to the other until I had tested everything else twenty thousand times LOL

but now all is perfect, heater relay goes live once the temp drops and back off when the heat rises back to normal, fan relay comes on when the temp rises and back off when the temp drops, I can turn any relay off or on with the click of the mouse :)
 
doughboy, I'm having trouble making my feeder work, 'er well getting it to stop is my problem, do you have a more in-depth wiring diagram of how you have yours connected ?

I'm not fully understanding the sensor wiring, this is a bit more complicated than the one wire connection like Jamie has his in the Jarduino LOL
 
I've had the Chauvet running on my tank for a few days now just watching the temp and the WP25s run with it, and I can say that the wave action is flat out awesome.....

the only thing I'm seeing that I have a question about is the temp, I have the Ferduino monitoring the temp as well as my old AC. Jr, both the Ac Jr and the Ferduino show my temp to be 77.5 and 77.7

the Chauvet is showing 79.5, about 2 degrees more than the other 2, I assume that it is a faulty probe but it is at least working and since this is a sealed probe and I can't easily change out the DS18B20, is there any way to correct this reading or a way to calibrate these sensors ?
 
Last edited:
oh and there was something I was extremely pleased to find out this morning, we had some severe storming last night and it knocked out our web service as well as the cable TV I assume, what I was pleased to find out was even though we had no web service, I could still control the Chauvet with just the network :)
 
doughboy, I'm having trouble making my feeder work, 'er well getting it to stop is my problem, do you have a more in-depth wiring diagram of how you have yours connected ?

I'm not fully understanding the sensor wiring, this is a bit more complicated than the one wire connection like Jamie has his in the Jarduino LOL

you can test the feeder using somethng like this

Code:
     pinMode(feedOutPin,OUTPUT);
     pinMode(feedInPin,INPUT);
     digitalWrite(feedOutPin, LOW); 
     digitalWrite(feedInPin,HIGH);
     delay(3000);
     while(digitalRead(feedInPin)==LOW);
     digitalWrite(feedOutPin,HIGH);
feedOutPin is 49
feedInPin is A10

The idea is, set output pin low (inverse logic) to power the motor.
Then continuously read the input pin until it goes from low to high. It is high if drum is in Home position.

If the simple program works, then you know the feeder connections are fine. The code in chauvet16 uses pin change interrupt to detect the home position.
 
I've had the Chauvet running on my tank for a few days now just watching the temp and the WP25s run with it, and I can say that the wave action is flat out awesome.....

the only thing I'm seeing that I have a question about is the temp, I have the Ferduino monitoring the temp as well as my old AC. Jr, both the Ac Jr and the Ferduino show my temp to be 77.5 and 77.7

the Chauvet is showing 79.5, about 2 degrees more than the other 2, I assume that it is a faulty probe but it is at least working and since this is a sealed probe and I can't easily change out the DS18B20, is there any way to correct this reading or a way to calibrate these sensors ?

if you have a spare arduino, you can use the ds18b20 test program to see what reading you get. It should not be any different from what you are getting in chauvet16 program.

anyway, if you know the difference, you can always subtract it in the code in getTemp() function.
 
you can test the feeder using somethng like this

Code:
     pinMode(feedOutPin,OUTPUT);
     pinMode(feedInPin,INPUT);
     digitalWrite(feedOutPin, LOW); 
     digitalWrite(feedInPin,HIGH);
     delay(3000);
     while(digitalRead(feedInPin)==LOW);
     digitalWrite(feedOutPin,HIGH);
feedOutPin is 49
feedInPin is A10

The idea is, set output pin low (inverse logic) to power the motor.
Then continuously read the input pin until it goes from low to high. It is high if drum is in Home position.

If the simple program works, then you know the feeder connections are fine. The code in chauvet16 uses pin change interrupt to detect the home position.

if I'm understanding your wiring diagram correctly, you have one of the white drum sensor wires connected to Arduino ground, the other white wire connects to pin A10, no other electronic components involved there ?
 
right. Just 3 wires. +5v to power motor, return line for home sensor, and gnd.
This is possible because motor can be operated on 5v power via a pnp transistor circuit.

my initial designed required 4 lines, but was able to simplify to use only 3 wires to work with stereo jack connector. the feeder has 4 lines, but 2 of them are ground, so you can connect them together.

for the home sensor line to work, I use the arduino pin internal pullup to provide the power for this line, hence the feeder init code will enable pullups.

this enables pullup

digitalWrite(feedInPin,HIGH);

this
Code:
#define feedInPin A10
pinMode(feedInPin,INPUT);
digitalWrite(feedInPin,HIGH);
is equivalent to this
Code:
  DDRK &= ~_BV(PK2);
  PORTK |= _BV(PK2);
 
Last edited:
I'm a whole lot closer now, it is actually stopping but not exactly in the same spot each time, I assume that is just the slack in my feeder, the lobe on the cam shaft is not exactly a perfect fit to the micro switch in there so I think that is the problem with the inconsistency...the problem I had before was a bad connection to the sensor wire....

now for the programming aspect, I still need to figure it out, I need a simple feed now button and a feed at 8am, 2pm, and 8pm automatically button
 
mine stops at precisely home position. That is the beauty of using pin change interrupt. The arduino could be in the middle of serving a web page when the home position is reached and it will interrupt the main loop to stop the feeder motor.

you can configure a button in the Feed section.
Feed is actually a Neptune Apex terminology. It really should be a macro, i.e. programmed series of steps as one.

I configure Feed A to just run the feeder. I use it to manually feed as needed.
Then I configured Feed B to feed at 3pm every other day.
I believe the macro and actions in the config.h is what I use. You can just change the days and time and the pump you want to turn off.

well, one time I think I have it, then back to running all the time again, I've checked all my wiring several times, I'm pretty sure everything is correct this time.....

I can reboot the controller and the feeder starts running and it don't stop until I click on feed A, then it stops, but when I click feed A again, it don't start back, and it's not stopping in the home position when it does stop so the sensor isn't doing anything that I can tell......I clearly don't have something configured correctly....

on a more positive note, the sonar works great, but it may give me a fit when I actually mount it to the ATO reservoir LOL
 
mine stops at precisely home position. That is the beauty of using pin change interrupt. The arduino could be in the middle of serving a web page when the home position is reached and it will interrupt the main loop to stop the feeder motor.

you can configure a button in the Feed section.
Feed is actually a Neptune Apex terminology. It really should be a macro, i.e. programmed series of steps as one.

I configure Feed A to just run the feeder. I use it to manually feed as needed.
Then I configured Feed B to feed at 3pm every other day.
I believe the macro and actions in the config.h is what I use. You can just change the days and time and the pump you want to turn off.

I finally gave up working with the feeder and started using an LED, the LED responds just like the feeder is doing so it is definitely something I have configured wrong and I just can't figure it out :)
 
Back
Top