euromomtx
New member
I was trying to decide if I should go with painted background, adhesive vinyl or gel-ed on paper background when I realized neither one of them seemed all that appealing.
I sort of liked the black vinyl backing option the best since it would bring out the colors nicely but my temporary tank has a black back and it makes things seem so boxed in.
Then I came across this picture:
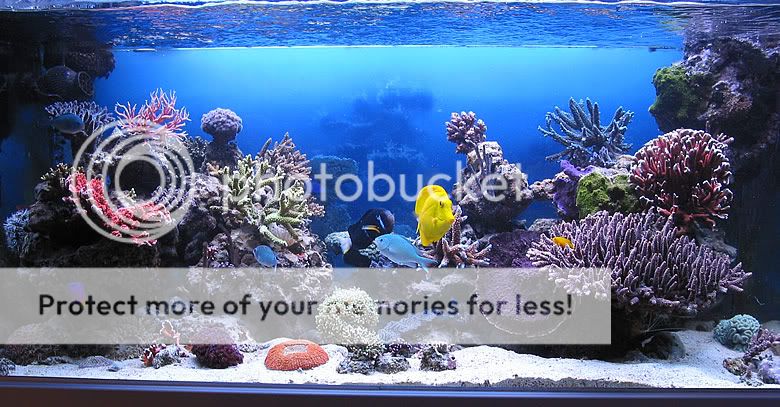
I knew right away that that was the winner. I love the illusion of depth this background gives.
Aaron who posted this on RC also had a schematic to go with it but no further info:
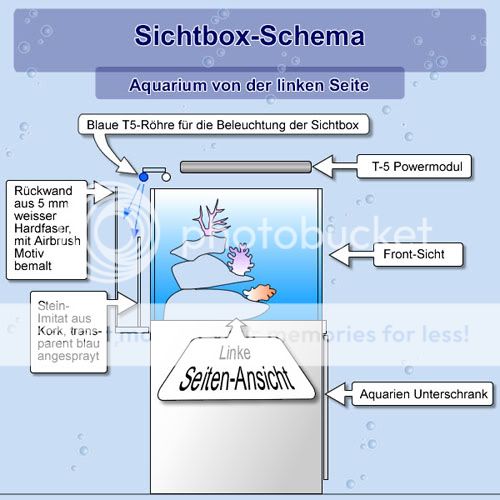
The schematic explains that the back portion is painted/airbrushed hardfiber board. He has rock models made out of cork in the foreground that he painted transparent blue and a blue T5 bulb above it.
That's it.
Somehow I didn't think I would have the skills to paint well enough to create that 'hazy in the distance' illusions so I decided to use a modified approach.
I am making a more traditional shadowbox with a frame, background and acrylic viewing panel in front.
My fake rocks in the distance will be thin slivers of spray painted pukani and paper.
Initially I thought frosted plexiglass would be the answer but was worried the frosting would render it too milky/white.
So the final winner ended up being tinted acrylic that I 'frosted' myself.
Here are some pictures of the test phase:

You can see one side is clear and the other side is treated with superfine steel wool. The steel wool side is definitely more convincing and hides the detail on my crummy painted rocks much better

here's a little detail of how the frame will be constructed so that the 1/8" acrylic panel can just slide in. If I get tired of the color I could replace it later.
The top board of the frame won't be screwed on. I want to be able to lift it off and replace the bulb, etc.
I think with a spray painted background and the pretty blue acrylic different colors of T-5 bulbs may give very different looks.
I'll try it out and take pics of course. I am imagining actinics to end up looking more deepsea in this arrangement, etc.
The box is for my Caribbean inspired 215g DSB tank.
Next up: pictures of the box, background, etc...")
I sort of liked the black vinyl backing option the best since it would bring out the colors nicely but my temporary tank has a black back and it makes things seem so boxed in.
Then I came across this picture:
I knew right away that that was the winner. I love the illusion of depth this background gives.
Aaron who posted this on RC also had a schematic to go with it but no further info:
The schematic explains that the back portion is painted/airbrushed hardfiber board. He has rock models made out of cork in the foreground that he painted transparent blue and a blue T5 bulb above it.
That's it.
Somehow I didn't think I would have the skills to paint well enough to create that 'hazy in the distance' illusions so I decided to use a modified approach.
I am making a more traditional shadowbox with a frame, background and acrylic viewing panel in front.
My fake rocks in the distance will be thin slivers of spray painted pukani and paper.
Initially I thought frosted plexiglass would be the answer but was worried the frosting would render it too milky/white.
So the final winner ended up being tinted acrylic that I 'frosted' myself.
Here are some pictures of the test phase:
You can see one side is clear and the other side is treated with superfine steel wool. The steel wool side is definitely more convincing and hides the detail on my crummy painted rocks much better
here's a little detail of how the frame will be constructed so that the 1/8" acrylic panel can just slide in. If I get tired of the color I could replace it later.
The top board of the frame won't be screwed on. I want to be able to lift it off and replace the bulb, etc.
I think with a spray painted background and the pretty blue acrylic different colors of T-5 bulbs may give very different looks.
I'll try it out and take pics of course. I am imagining actinics to end up looking more deepsea in this arrangement, etc.
The box is for my Caribbean inspired 215g DSB tank.
Next up: pictures of the box, background, etc...


