My Shadowbox Background Project

this is what I was wanting to try to do as the far background pic. Something more subtle of course...but for the most part I want a rippled effect...plus it would be neat to make it replaceable...so I could change it out for a new one. I'm still woring out he best material.

CIMG0334.jpg


this is just a quick 5 min. thing I did. The bigger one would be more intense and done with all transparent paint.
 
That's very, very cool Dave!
It will be neat to see what the all painted approach will look like with water infront.
Definitely skip the acrylic sheet since it would just mess up the definition of the water ripples.
How soon are you going to do the actual project?
 
but it needs to look murky. So I think I will still need some kind of sheet to layer more transparent blue onto. After all I want the surface to look far away. If it's too defined it will appear closer. I'm hopeing to get my stuff up and running by jan. So between now and then I should be starting.
 
Hm that might be a challenge to get just right with the ripples.
It's perfect for the rocks since they look just as murky underwater.

But the water ripples (in real life) always look kind of crisp to me... maybe sand the bottom of the sheet more heavily and ease up on the sanding as you get closer to the top preserve that crisp ripple look?
 
again sorry that I haven't read every page yet...i don't know what is sanded. I was really thining of just using candy colors (paint) to slowly layer transparent blues and violets to create depth. And also use many layers of acrylic. Plus I know of a technique where you etch metal to create areas that reflect the light really neatly once candy colors are applied. Again, I'll read through the thread more. I'm hoping to get the paint and some spare acrylic/glass to run some tests.
 
Oh I got ya.
I used a blue acrylic sheet in front of my painted rocks. The blue acrylic is sanded/frosted to give it that hazy look.
It makes it very forgiving as far as how perfect the objects you want to stick behind it goes - you're just looking for shadings and shapes rather than having to focus so much on artistic quality.
I can see that the person that did the background in the picture on the first page didn't use that acrylic diffuser sheet and did it all with painting but I was trying to create a way that is easy for people to achieve that 'in the water' look without having to worry about being able to paint an illusion at all.
The distance between the backboard and the frosted acrylic creates that hazy space where a few rocks or other objects can be placed.
Easy peasy :)
 
hmmm...after having read through all of this now I think that the only point I would make, which is now after the fact, is that when you first turned it all on you mentioned that the rocks were not lit up very much. You claim that it's all ok now, and I agree, it looks great. But I was only wanting to comment that when I read the build up of the original pictures web blog, I believe that he added the extra T5 WHITE bulb at the very back of the glass shining through the water and towards the back for that very reason. Because it needed a little more light to not create the wrong shadows, and to help light the more foreground stuff from the front...making it more natural. This is an important thing to remember about the perspective for when others do this (myself included); in the ocean the light would not be coming from just the tank light area...it would be lit by the sun in ALL AREAS at once...but the light is diffused by the water causing the blue hazy effect that we see...But all in all it's really all lit at once. So it's a real trick to try and not paint background stuff (or light it as such) to make it appear that the main light (sun) source is JUST the aquarium lights.

I'm not saying any of this because I don't like what you've done. I love it...looks very Caribbean. I'm merely like you and like to think out loud at times. and being a painter I am trying to do samples to make this look right for when I attempt it.

My biggest concern is getting my glass polished again...I bought a used tank and it's not the absolute cleanest thing. But I will manage something. (then I gotta keep it clean, and it's a tall tank)

Again I love this and can't wait to see more of them.
 
Nice work.........the only problem I see is that in a very short time your gorgonians are going to block the background from view.

You may have wanted to setup up the background rocks higher up or in areas that won't be blocked by the rock/corals like the original pic shows.
 
Yes the light... I agree Dave. I'd say the lighting turned out to be the most challenging part.
I never could find any more info on the original project. I think it would have been very helpful to know how and why he did certain things.
If you happen to find a link to that info please do post it! :)

Ed, the top of the shadowbox opens and I can move the fake rocks or put new ones in it. I am not going to bother with it right now because I really want to see what the foreground rocks look like in a few months when they're grown over and no longer white so I can match them better in whatever I decide to adjust with the background.

No hurry... time to watch it grow :)
 
Congrat's on being voted August's Thread of the month winner :celeb3:.

Not only will this thread be stickied, but the winner will be annouced in Reefkeeping Blog. :beer:
 
Lets see it with livestock! This thread is AWESOME!! Great build. Im thinking about trying something similar with mine now, since its in a corner, and i have a ton of room behind it, but thinking about making the shadowbox more of a triangle, so that i use all the room behind the tank.
 
Thanks :)

Nice idea pimpala about the triangle!

I have a new bulb coming -GE 3000k to see if how I like a more greenish hue instead of blue.

And my Cardinals already moved into the tank. Jawfish should be arriving next week.
I want to take it slow.
A few gorgonians might be added soon too.

So new pics next week when there's more to see ;)
 
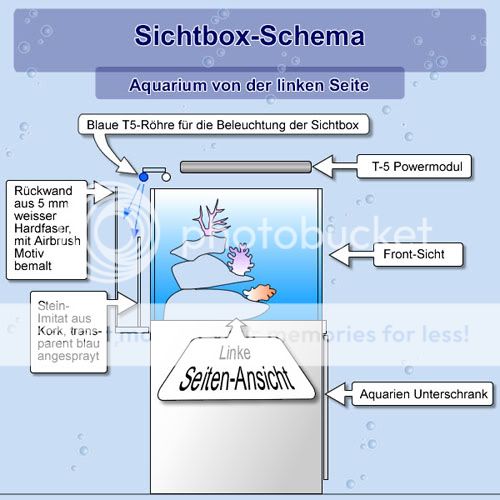
Aaron who posted this on RC also had a schematic to go with it but no further info:
uwe4.jpg

Great thread! :thumbsup: Those pictures are from this German site: http://www.u-page.info/pages/aqua/aqua_tipps.htm (bottom of page). More can be found from the menu on http://www.u-page.info/.

Some other ideas I'm pondering:

- What will a really dark blue background (for a deep water illusion) look like if illuminated from behind? Will the background light make it look too bright?

- How about using a "black light" fluorescent tube in the background box?

- How about using PVC or similar plastic films instead of acrylic? Would it save money?
 
Fantastic! Thanks so much for the link. :)
I am German too so I will enjoy reading through this!

I was considering the plastic film but the acrylic ended up being about the same price. plastic film may come in more colors though!
 
You're welcome! I've searched a lot for background boxes like this, but it seems not too many are using them except jellyfish tanks in public aquariums.

Fresh water tanks with background lights: http://www.cau-aqua.net/index.php?option=com_content&task=view&id=53&Itemid=40&lang=en and http://williamaquascaping.blogspot.com/2008/12/using-colored-posters-as-lighted.html

TOTMs: http://reefkeeping.com/issues/2005-11/totm/index.php (with solid gradient background, no background box) http://www.reefkeeping.com/issues/2005-12/totm/index.php (seems the equipment room behind the tank is painted blue)
 
Back
Top