MikesReef83
New member
I'm putting a 1" to 3/4" reducer above and below my 3/4" bulkhead on my 90. This way the only restriction is the bulkhead itself and not the piping.
yeah, that's what I was thinking. What is the flow rate for a maximized 3/4 inch though? Is that information available? Will be about 35 - 40 inches of draft.
Look over the thread for more details but basically you use one drain under the sump water and adjusted by a preferably gate valve to create a complete syphon. The other drain is left slightly above the waterline but below the upper tank surface as an emergency drain if the primary needs help. If the secondary kicks in you need to assess and make adjustments.Herbie = Both drains below sump's water line?
So this is incorrect?
It's a big thread - every now & then we need a re cap or summary.
So this is incorrect?
It's a big thread - every now & then we need a re cap or summary.
Would just like to say that I've been successfully using the herbie method for the last 4 years and it has worked flawlessly and silently the entire time. I'm going to switch over to a bean as that is what the new tank I bought is setup for but it's been really nice not hearin the gurgle I used to have from my durso.
I hiiiiighly recommend this method for anyone that has a two hole reef ready tank.
This is a good re cap.You missed the top half of the picture...
In short:
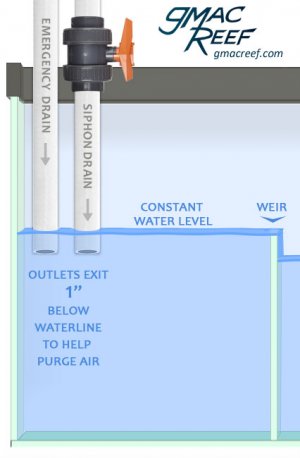
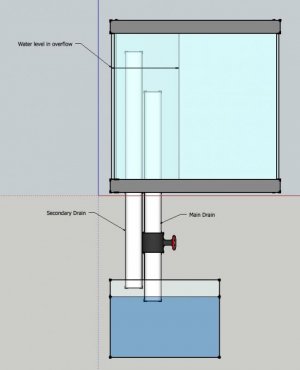
Main drain: Top and bottom are submerged. A [gate] valve is used on this so the flow through this pipe exactly matches the return pump flow. Herbie's original description had an extension with multiple perforations on it to prevent snails from clogging it. The bottom of this pipe should be near the surface of the sump water to allow it to efficiently purge air on startup.
Secondary (Emergency) Drain: This is above the surface of the water in the overflow. Ideally, the bottom will be above the water level in the sump, but this is somewhat less critical. The only time this kicks in is if the main drain clogs and cannot handle all the flow. Because of the design, water flowing in the backup drain will be noisy and alert you to the problem. Also note that this should be the same size or larger than your main drain.
Note - many people use a slightly bastardized version of this and run a small volume down the secondary drain. This makes the system easier to adjust but significantly less safe; when running it this manner, the main drain cannot handle all the flow and anything that clogs the secondary drain will cause a flood. In addition, since the secondary drain is at the surface instead of above it is much more prone to getting blocked by critters.
2 reasons: the noise that you mentioned and also to prevent anything from crawling/growing/accumulating from below. If only the bottom end is submerged, I readily admit that the likelihood of that happening is quite small, so keeping the end of the emergency drain above water is not a huge deal, IMHO.1) Why shouldn't both drains be slightly submerged below sump's water line? Is the purpose of keeping the emergency drain above the sump's water line only to cause noise & alert the reefer to a problem?
2) Why shouldn't a strainer be used on emergency drain too? This would ensure nothing is inside the drain (snail).
Good stuff.2 reasons: the noise that you mentioned and also to prevent anything from crawling/growing/accumulating from below. If only the bottom end is submerged, I readily admit that the likelihood of that happening is quite small, so keeping the end of the emergency drain above water is not a huge deal, IMHO.
Strainers generally serve to collect things (that is their purpose, after all,) and restrict flow. If the emergency drain is above the water level as pictured, a strainer should be completely unnecessary and would only serve to restrict flow.
If you are running a low flow through the emergency drain, then it would serve to prevent critters from crawling in, but would also collect algae and restrict flow, potentially to the point that the emergency drain couldn't handle the full flow if the primary became clogged; another reason why running water through the backup is risky.