The Foam/rock Projects Here Thread

My first thought is that the rock wasn't prepared (bleach bath followed by acid bath) but it's curious that it too so long for their to be a problem. Also interesting how the foam sucked up the water. Does this mean the foam broke down over time? Did the foam act like a giant sponge not only for water but all the nasty bacteria and junk we normally find in undisturbed sand beds?
I too wonder if it can be sealed.
There are also commercially available rock walls ala Universal Rocks. I wonder how theirs differs.
 
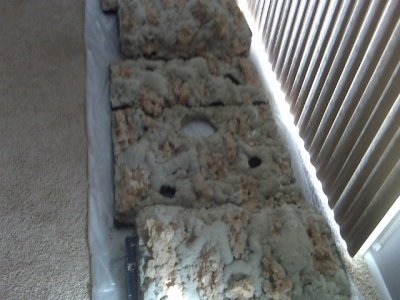
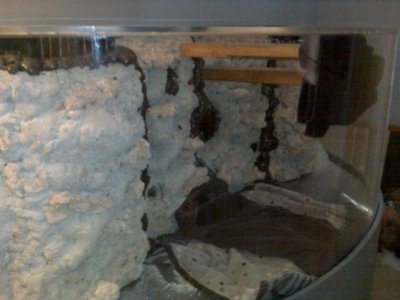
From my experience with the foam/rock wall, even coating the backside of the egg-crate with epoxy is not going to stop water from getting in, esp. if you "utilize" the wall for it's intended purpose; by this I mean, poke frag plugs into it to start cultures on the wall, etc... That is one source of the water getting in, the other source is simply the rocks attached to the egg-crate... I didn't coat my rockwork at all when I built the wall, only the foam portions, granted the edge of the rockwork did get coated with the epoxy but the rocks are porous, they have holes in them, etc.

The bottom line is; in order to completely water seal the wall would be extremely challenging to say the least, even coating the back with multiple coats of epoxy didn't fair too well.

Keep in mind this was a concern BEFORE I built the wall, and others (myself included) did the extra work try and minimize the water logging effect, but like I said, after 4 years of "being used" it simply became completely water logged even with the extra effort being applied. I am not saying it is impossible to make it completely water tight, but it would be very tedious and time consuming... plus, once you would start to add frag's and such, you might as well just throw out all that extra work... the water WILL get in as soon as you poke that plug into the wall...

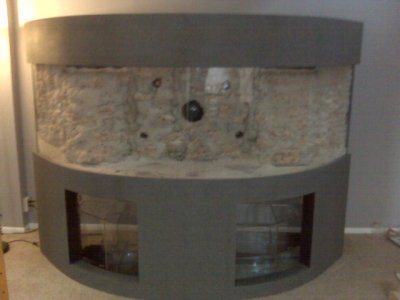
That being said, the real Q really is how much does that affect the reef environment over time. As mentioned, I had amazing success with this tank, but, it only stayed up and running for 4 years and did eventually crash.
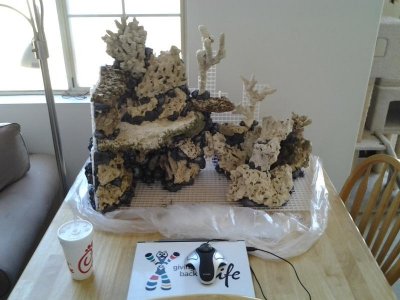
 
My first thought is that the rock wasn't prepared (bleach bath followed by acid bath) but it's curious that it too so long for their to be a problem. Also interesting how the foam sucked up the water. Does this mean the foam broke down over time? Did the foam act like a giant sponge not only for water but all the nasty bacteria and junk we normally find in undisturbed sand beds?
I too wonder if it can be sealed.
There are also commercially available rock walls ala Universal Rocks. I wonder how theirs differs.

The foam did not break down at all. I used the Touch n' Foam Landscape BLACK foam...

It super absorbed the water much like a sponge would, but like i said, it didnt break down at all [I had very intense HID lighting & Fluorescent over it, no break down]
 
Last edited:
Ya, sorry... i was thinking more breaking down internally.
Either way, we know it sucked up water. I guess the question is, can it be sealed to prevent this.
Which brings another thought... did you coat everything with epoxy like people seem to be doing?
Or do people only do that on the non-uv safe stuff?

The short answer to your Q: No, IMO there is absolutely no way to make it 100% water tight; as I said, simply poking a frag plug into the wall opens up an area for water to get in... The dry side of the foam seems to be fairly water impervious in itself--even without the epoxy--but spray some of that stuff once, let it dry and then poke a hole in it, you will see how the foam is layered, and how easy it would be for water to enter in. Even if you DIDNT plug frags into the wall, I would say its safe to assume that water is going to get in somewhere, somehow (burrowing critters, etc)...

And as I mentioned, extra effort was applied for this build to try and minimize this, which means we used a TON of epoxy :) I used Max ACR - which is a very hard drying aquarium construction 2-part epoxy resin and let it cure for over 2 weeks before we started to fill the tank.
 
Just for reference, here is a shot of the tank before it crashed...
 

Attachments

  • 100_0223(rc).jpg
    100_0223(rc).jpg
    80.7 KB · Views: 17
Last edited:
Here are some pics from the build......
 

Attachments

  • IMG00035rc.jpg
    IMG00035rc.jpg
    85.6 KB · Views: 15
  • IMG00039rc.jpg
    IMG00039rc.jpg
    85.1 KB · Views: 16
  • IMG00065rc.jpg
    IMG00065rc.jpg
    63.8 KB · Views: 17
  • IMG00071rc.jpg
    IMG00071rc.jpg
    49.6 KB · Views: 16
Last edited:
Some pics of the wall after tearing it out

These pieces were the end pieces and were the only part of the wall that didnt get siliconed in, they were glued in, which came right off when pulling on the pieces, the pieces that were silconed in; well lets just say my garbage man really hated me last month :)
 

Attachments

  • img_1688rc.jpg
    img_1688rc.jpg
    64.9 KB · Views: 13
  • img_1691rc.jpg
    img_1691rc.jpg
    73.1 KB · Views: 18
  • img_1692rc.jpg
    img_1692rc.jpg
    59 KB · Views: 18
Last edited:
I have epoxied/sanded my rock wall including the backside (egg crate/foam). It seems to be pretty hard. I can't see where anything could burrow into the foam where the surface has 3 coats of epoxy. I am planning to apply 2 more coats of epoxy to all the exposed foam (front and back). Is the base rock porous enough to allow water into the foam where it contacts the rock? I will not be applying much silicone to attach to the back tank wall since my rock wall is very heavy and will not float.
 
Here is a pic of the tunnel work behind my rock wall. This post is a test of my new photobucket account.

<a href="http://s1073.photobucket.com/albums/w390/NeptunesTender/?action=view&current=2012-06-25225122.jpg" target="_blank"><img src="http://i1073.photobucket.com/albums/w390/NeptunesTender/2012-06-25225122.jpg" border="0" alt="Rockwall 1"></a>
 
AE:

Those rocks are really natural looking and your friend is lucky to have you do the work.

I have done DIY cement rocks serveral times but if I set up another tank I was thinking of going this method.

So just to recap your method:

1. Outline where you don't want the foam to expand by building a rock salt barrier.
2. Spray on, if thinner rock pack the salt on.
3. If thicker, let it expand, spray another layer on and pack it into the second.

Any other tips?
Is there one brand of foam that you feel works better than another?

Thanks :D 
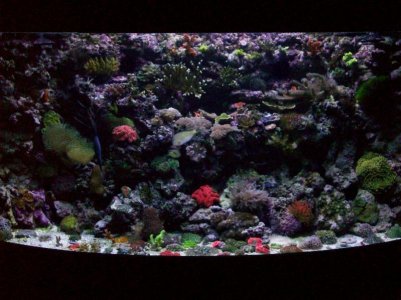
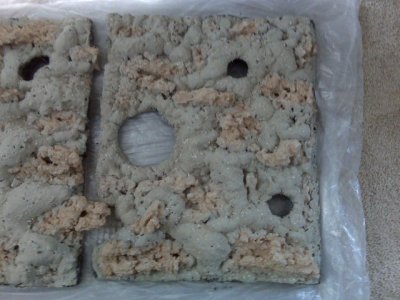
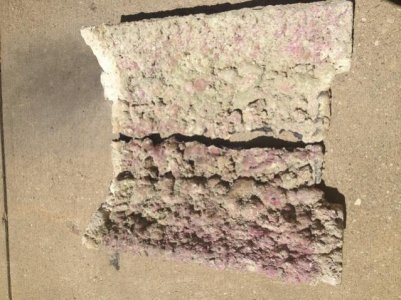
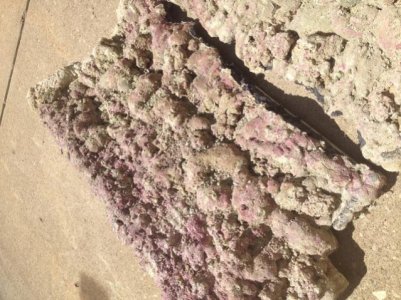
Its messy but its fun, always cool to see what structures you get once all the rock salt is gone :D

To add to the tips you got already on there, I would just have fun with it. I started premaking flat pieces with egg crate by cutting a flat shape I wanted and covering one side with a single layer of foam and rock salting on top of that. The single layer drys pretty quick (20 minutes) and then you can flip it over and foam and texture the other side.

Once I had a bunch of pieces like this you can start to stack them together and foam in the gaps and them texture the filled gaps. Made some pretty cool structures with this technique. Lots of pillars with tons of ledges. Great for a center piece in a cube tank. Then just adhered it with foam to the bottom of the tank and textured the foam that squirted out.

Question for AE, do you leave the foam rock black to be covered in Coralline algae or do you cover it with sand?

I do neither :D

I use a 1 part expoxy paint that is used to coat garage floors. It never comes off the foam and you can give the foam a two tone look very easily with the black foam and a grey coloration to look like the native rock found on the Oregon coast. I played around with tinting the white base epoxy paint with purples and greens to make a more "tropical" looking rock, but I dont have any tropical tanks just coldwater marine tanks now so I never finished it.
 
Hey guys, I decided not to do a foam rock wall so now i have 8 cans of foam just sitting here. It's the Touch N Foam Landscape. UV resistant. PM me. I'd like to get rid of it all at once.
 
Hello,

Your tunnels will be cool when finished:) How do you do the opening's laying flat won't they get closed off with foam?

When you start foaming when do you add the salt for best look and deepest penatration? Anyone:)
 
For my tunnels I cut a hole in th pipe or cut the end off, then stack my rocks in such a way you cant see the pipe from any angle from the front glass. Then I removed the rocks, being careful to remember how they were stacked. Then pack the tube and the cave area with damp sand, restack the rocks, and foam inbetween them. While the foam is still expanding I would then pile damp sand ontop of the entire area, which I found to keep the foam from expandind and make it quite hard. Wait thirty minutes or so and vacume all the sand out with a dedicated shop vac, so I could reuse the sand. Also using arragonite sand in this way puts the first coat of sand on the foam, if it is applied while the foam is still tacky. I will post a few picks of the near finishe wall in a bit.

Hope this helps,
Ed
 
So from inspiration from this thread I put this together this weekend and am currently trimming the foam and adding epoxy and sand for a cleaner look. That is my wifes laptop in the fore ground for size. It is super heavy and I am curious how I am going to get it in the tank. I wanted it to be free standing and the pond foam worked out pretty well even though I went a bit crazy with it.
 

Attachments

  • 2012-07-20 16.31.09.jpg
    2012-07-20 16.31.09.jpg
    59.7 KB · Views: 19
Here is a pic of the back
<a href="http://s1073.photobucket.com/albums/w390/NeptunesTender/?action=view&current=cavepic.jpg" target="_blank"><img src="http://i1073.photobucket.com/albums/w390/NeptunesTender/cavepic.jpg" border="0" alt="cave pic"></a>

and one detailing the cave and tunnel network
<a href="http://s1073.photobucket.com/albums/w390/NeptunesTender/?action=view&current=cavenetworkjpg-1.jpg" target="_blank"><img src="http://i1073.photobucket.com/albums/w390/NeptunesTender/cavenetworkjpg-1.jpg" border="0" alt="Photobucket"></a>
 
You guy's are doing some great stuff with your foam walls. I have been going back and fourth for a year about foaming. If done right it gives such a better looking reef to me:)
Reading most everyones builds help make the choice easy!
I will be building mine on 5 panels of pvc structure covered in egg create. Frames are built now just stuck on which rock Pukani or Macro:)
Thanks for sharing everyone!!!

Not a good picture of my 300 but gives the idea of fram work.
IMG_0277.jpg
 
Aquatron, just a thought but I used reefrocks.net for most of my rockwall. Steve there is great as he will hand select the size you need. Plus the price with free sand the deal cant be beat. If you plan to use epoxy and sand, having a large quantity of sand makes the project easyer IMO.

Either way glad to see someone else joining the rockwall movement. Much agreed that a rockwall can add to the realism of the reef aquarium.

Good luck, and keep us posted with pics,
Ed
 
Just noticed a bad link on my second pic above. Here it is again, cave tunnel detail
<a href="http://s1073.photobucket.com/albums/w390/NeptunesTender/?action=view&current=cavenetwork.jpg" target="_blank"><img src="http://i1073.photobucket.com/albums/w390/NeptunesTender/cavenetwork.jpg" border="0" alt="cavenetwork"></a>
 
Back
Top