Toofrigginswt's Custom 125 Gallon Tank Build

Build looks very good so far, keep up the nice work.

As for the GFCI plug, for the majority of home circuits it will be 15 amps. If you go to your panel just find the breaker that controls that plug, it will be clearly marked for the number amps that the circuit provides.

NEVER change a breaker to higher amperage rating (e.g. 15 amps to 20 amps) without knowing what gauge wire is feeding ALL circuits. The breaker is there to protect the wire from catching fire in the event of an overload. Don't listen to some hump at Lowes or Home Depot when they say to "upgrade" the breaker, that is idiocy.

As for a dedicated circuit for the tank, that can very easy or extremely challenging depending on where the tank is located, how the home is constructed, if there are open slots on the main panel, etc, etc. I would have a qualified electrician take a look and get multiple quotes for the work. If you are comfortable with your uncle doing it, go for it, you will never regret having the peace of mind that provides. I have two dedicated 20 amps circuits for my fish room, overkill? Probably yes, however I never have to worry about what comes on when.

Thank you so much for the detailed explanation. My uncle still hasn't come by yet. I guess I'll have to wait until he's free or I'll just hire someone.

Sent from my HTC One XL using Tapatalk 2
 
No problem. I think sometimes that people take the word of hardware store employees as gospel when really it should be taken with a grain of salt. The building code exists for a reason, if the wire was rated for 20 amps they would have had to use a 20 amp breaker. My main concern is the folks that don't know any better (my parents for example) who would never dream of coming on a forum and ask the simple question.
/end rant
 
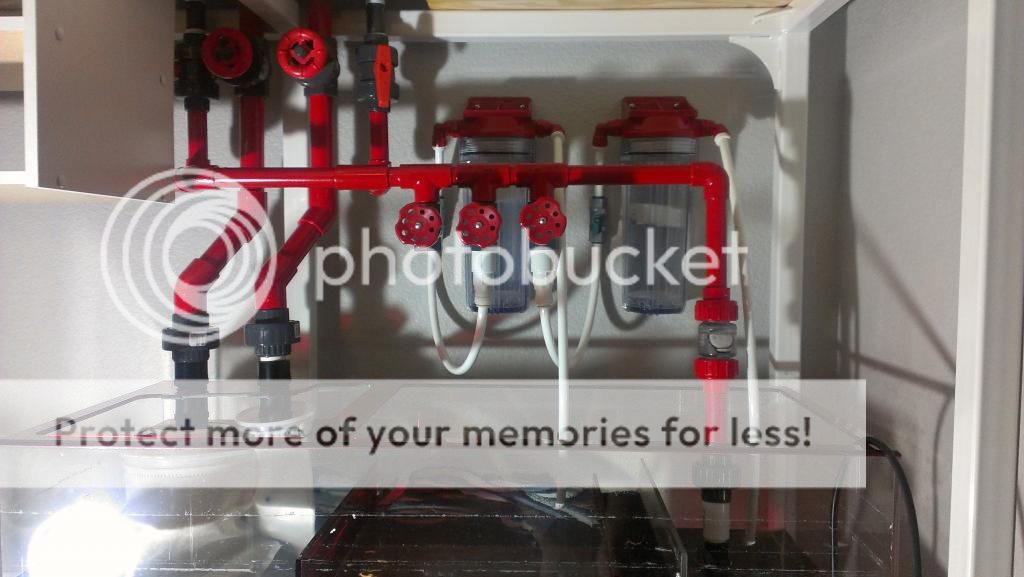
Got my reactors mounted and running.

IMAG1036.jpg
 
very nice setup,,super clean..lots of time and patience ,,good job

r u not worried about the chemicals in the paint??
 
How easy access are those reactors? Just something to think about when it comes time to change them. If you're like me, and hopefully you're not, I tend to procrastinate changing media in the reactors because they're tucked in the back corner of my system.
 
very nice setup,,super clean..lots of time and patience ,,good job

r u not worried about the chemicals in the paint??

Thanks! I am definitely worried about the chemicals in the paint. However, from what I've read here on RC, I've seen a lot of people paint their plumbing and overflow boxes that are fully submerged in the display using Krylon Fusion and haven't had a problem. Most people actually paint their plumbing black using this paint. Just to be on the safe side, everything I painted is external and doesn't touch the water. The majority of the return line was glued before the spray paint. All of the joining parts were either taped off before hand or stripped of paint during assembly.

How easy access are those reactors? Just something to think about when it comes time to change them. If you're like me, and hopefully you're not, I tend to procrastinate changing media in the reactors because they're tucked in the back corner of my system.

I thought about that when I chose the spot to put the reactors. I have to admit the location I have the reactors are less than ideal. I really wish there was another spot for them but my left side has already been reserved for my ATO Reservoir, Chiller, and dosing containers. I can still pull out the reactors but I just have to be a little more careful. Luckily I'll only have to do it once a month :)
 
Those reactors are going to be a pain to take out especially when you have them behind the manifold. You will end up bumping on the plumbing when you do maintenance and over time it will loosen whatever bulkhead the plumbing is attached to. It would have been better to get 2 reactors with a hang on clip like a nextreef so you could hang them in front of your sump for easy access and disconnect.
 
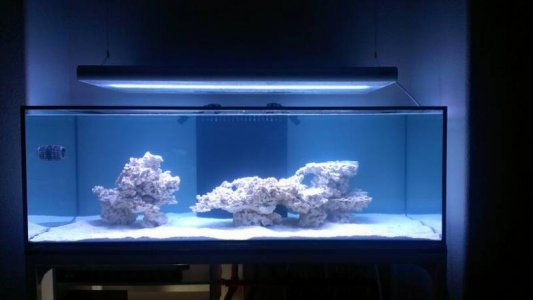
Just mounted my lights. I ended up using just the ATI hanging kit. I only have two bulbs installed right now.

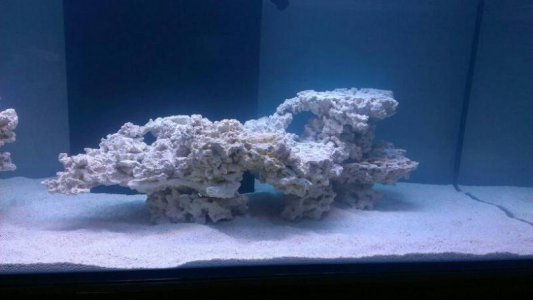
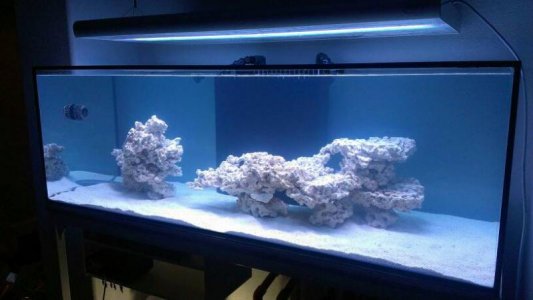
This is my first attempt at the aquascaping for this tank. Not sure if I like it or not. What do you guys think? I want the right side to be lower so my sps can have room to grow tall.

I still have to cut some of my overflow teeth to lower my return lines in the tank. I'll probably do that tomorrow.
 

Attachments

  • uploadfromtaptalk1354939668306.jpg
    uploadfromtaptalk1354939668306.jpg
    31.8 KB · Views: 10
  • uploadfromtaptalk1354939764719.jpg
    uploadfromtaptalk1354939764719.jpg
    36.6 KB · Views: 9
  • uploadfromtaptalk1354939816508.jpg
    uploadfromtaptalk1354939816508.jpg
    39.9 KB · Views: 8
Last edited:
No problem. I think sometimes that people take the word of hardware store employees as gospel when really it should be taken with a grain of salt. The building code exists for a reason, if the wire was rated for 20 amps they would have had to use a 20 amp breaker. My main concern is the folks that don't know any better (my parents for example) who would never dream of coming on a forum and ask the simple question.
/end rant

Actually, you can upsize the wiring for things like voltage drop, ambient temp, and various other debating for wiring but the breaker will still trip at 20A/15A load which is actually 80% of the circuit breaker rating (16A/12A).

An easy way to tell is that standard residential wiring is yellow sheathing for 15A (14awg) and white for 20A (12awg).

Check the wiring and if it is #12 then you can upgrade your circuit breaker to 20A. I guess my professional opinion would be to get someone to investgriate this for you since there are most likely other devices on this circuit and its probably 15A circuit (if I was a builder, I wouldn't add cost to give you that on a house if I was not required by code to do so).

It's not that difficult to run a circuit but it would depend on the location and routing method. Also, you probably don't want to get electrocuted.
 
Just bought a pair of tank raised picasso clowns. I forgot to wipe the glass before I took the shot but this was the best photo I could take with my camera phone.

IMAG1161_BURST013_zpsc1e8093b.jpg
 
Your build is awesome and very similar to mine. I love what you did with your plumbing :)

Quick question, is the shelving you have your doser sitting on just screwed into your plywood on top of the stand in this picture? Just curious as I would like to do something similar to this.
zy7aqu9u.jpg
 
Your build is awesome and very similar to mine. I love what you did with your plumbing :)

Quick question, is the shelving you have your doser sitting on just screwed into your plywood on top of the stand in this picture? Just curious as I would like to do something similar to this.


Thanks! That shelving is actually a shoe rack that I bought from a hardware store. I flipped it upside down and used brackets to mount it directly to the plywood. I used 3/4" screws so that the tip of the nail wouldn't screw pass the plywood. Since the brackets were metal, I sprayed it with rustoleum paint so it doesn't rust from the salt creep.


I like the rock work.

Thanks! My girlfriend thinks my rock work look like a poodle chasing and aligator. lol...
 
Thanks! That shelving is actually a shoe rack that I bought from a hardware store. I flipped it upside down and used brackets to mount it directly to the plywood. I used 3/4" screws so that the tip of the nail wouldn't screw pass the plywood. Since the brackets were metal, I sprayed it with rustoleum paint so it doesn't rust from the salt creep.


Thanks! My girlfriend thinks my rock work look like a poodle chasing and aligator. lol...

Good to know! Thanks!

And now that you mention it.. i kinda see that too.. lol:fun2:
 
Back
Top