Who wants a cheap, simple, Arduino-based LED controller?

Hello there,
Happy holidays to all present and future participants to this thread.

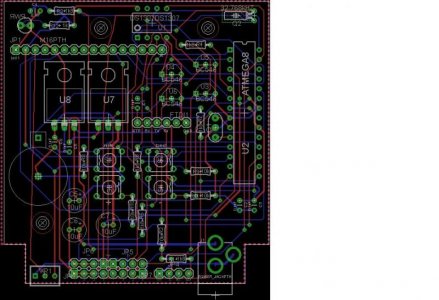
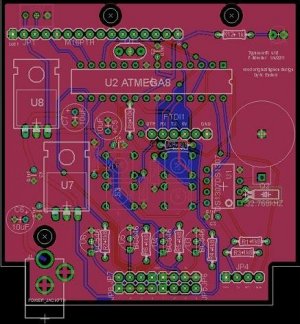
I have submitted a rearranged typhon board using eagle and I was hoping someone could please critique it for me.

The buttons and LED will be mounted on the bottom and the FTD1 header is going to attach directly to the usb bub. All external connections will be made at the bottom of this board.

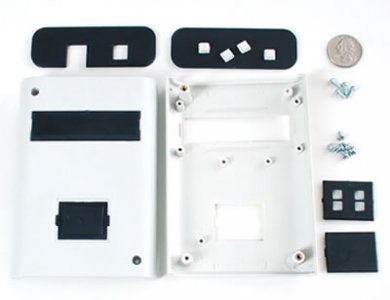
I will be placing this board in the arduiniocase as in the picture.

Thanks in advance:)

Paul
 

Attachments

  • typhonrefitv5.zip
    typhonrefitv5.zip
    11.7 KB · Views: 3
  • typhonrefitv5.jpg
    typhonrefitv5.jpg
    72.1 KB · Views: 3
  • arduinocase_MED.jpg
    arduinocase_MED.jpg
    13.2 KB · Views: 3
Paul,

There are a lot of little things about that layout that make me cringe. It would probably work but it would still make me cringe.

To start with, I would try a little harder to get "related" components near each other - especially, when related to timing or stabilizing power (i.e. crystals and caps). Look at the datasheet for the DS1307 for suggestions on layout related to it's crystal. For capacitors, try to place them near the IC they "belong" to, and try to orient them so the power lines they're on run straight through them as they go to the next IC, instead of having them off on long legs or branches.

Also, go ahead and put a ground plane on the top and bottom of the board. It cuts down on routing complexity.
 
Thank you DWZM,
I did try getting all components to follow your board design but the traces crossed like crazy.

I guess not having the ground planes in place would cause the crossing problems.

Please correct me if I am wrong here, I created polygons for both top and bottom and named them GND....should that not have created the ground planes?


Thanks,
Paul
 
Can someone PM me if they want to sell something that is built already? I just want to plug and play. Im really slow in electronics. Tnx.
 
Hello there,
I believe my typhonrefit is ready to send to itead.

DWZM, I added ground planes and tried to keep the components as close to your design as possible.
Could you please give it a once over?

I test fit this design using a perf board cut to exact dimensions and everything looks like it will fit together as planed.

Thank you,
Paul
 

Attachments

  • typhonrefitv10.zip
    typhonrefitv10.zip
    10.8 KB · Views: 3
  • typhonrefitv10 w-gnd planes.jpg
    typhonrefitv10 w-gnd planes.jpg
    86.6 KB · Views: 3
Ok after reading 18 pages im lost. It would be alot more easier if there was a definite "shopping list" of things to buy, and a picture or diagram on where to put them. Ive built a Led fixture before and I can DIY but seems everyone keeps goin in different directions on what to buy and where to put it and they seem to not be right from what other members point out. All i want is a something I can control a Led fixture. If someone could just make this idiot-proof without all the Techy-lingo alot more people like me would take on the project.
 
Dizzle, what you're asking for pretty much exists. There's a BOM (bill of materials) on the google code with with Mouser part numbers. Just plug those in and order. If something is out of stock, just use Mouser's search tools to find an equivalent part. It would be a horrible nightmare for someone to try to keep the BOM updated every time something when in or out of stock at Mouser so you're gonna have to do a LITTLE searching on your own.

Besides the Mouser components, you need:

1) A bootloaded AVR. Mouser actually carries these too if you search, or buy from an Arduino-oriented hobby vendor.
2) An LCD. Get from the hobby vendor you get your AVR from.
3) Pin headers. Same as #2.
4) A PCB. Get from one of the PCB makers mentioned in the thread.

If you can build an LED fixture and know how to solder on PCBs, this should be all the info you need. If you have specific questions please ask and someone will surely try to help you.
 
Hi folks,
I seem to have ran into a problem while uploading software via usb bub, it give me this error:
Binary sketch size: 15328 bytes (of a 30720 byte maximum)
avrdude: stk500_getsync(): not in sync: resp=0x00
avrdude: stk500_disable(): protocol error, expect=0x14, resp=0x51

Any idea what that means?
And better yet how to correct it
Thanks for any input

I think i found the problem: i had wrong serial port selected,
Now just to make sure, which board should be selected :0 sorry for the noob questions
 
Last edited:
If you pick any board that uses an FTDI chip (i.e. a Duemilanove) you should be fine. Don't pick the UNO if there's a separate entry for it as it uses a different USB chip and I'm not sure if it'll work.

Edit - perhaps this is obvious, but I'd try uploading something simple like the blink or fade sketch to test communication and board operation before uploading the firmware - just to make sure things work. Troubleshooting a low-level hardware or communication problem when trying to upload complicated firmware can be tough.
 
Thanks DWZM, i picked the second board from the list Duelmilanove or Nano with ATmega328.
And the good news is...IT WORKS!
I'm sooo happy to assemble this thing with out a hitch.
Now only the LED array to make and do the real test!

Awesome Project DWZM!! I can't wait for the moonlight add on.
Thanks so much for designing this board.
 
For those people who already finished the project. Can you give me a ball park of how much it will cost? I saw on another forum that its around $60.00. Is this accurate?

Thanks
 
If you either already have or don't need the USB-TTL bit, and you find a way to get a PCB for cheap, you can easily be out the door around $30 or less. If you do a bargain hacked phone cable for USB-TTL, add another $2. If you want a "real" FTDI USB-TTL, add another $15. I don't think this should cost more than $45 even starting from scratch.
 
I paid 32 for parts from mouser , than another 5 for the board from one of the good folks here , USB bub programmer was 15 - I wish I had the know how to make the 2 dollar type, than add shipping for all of those which was another 10-15. So in my case total was around 67, shipping and programmer account for almost haf the cost
 
Has anyone found buttons with menu, select , + and - already printed on them?
I found just plain ones without any writing.
 
I've ordered all the parts from mouser. Will this microcontroller from digikey work atmega328p-pu-nd? Also can I get an explanation on how to order the pin headers or a part number? Thanks in advance!!
 
iangibby, you need an AVR with the Arduino bootloader already burnt on it. I recently heard that Mouser has started stocking these so search for that. Or, get one from a hobby vendor (i.e. sparkfun, modern device, etc.)
 
Back
Top