Wooden External Overflow Box?

SkyReef

New member
Can it be done? Making an external overflow box out of wood covered with epoxy? I have tried and tried to make an external, glass overflow box, but mishap after mishap has set back many months now. In short, I'm sick and tired of working with glass. Wood is so much more forgiving. This morning, I clumsily dropped a panel of glass, setting me back a week and 100 dollars. Could I build an overflow box out of wood covered with many layers of waterproof epoxy, like how they build wooden aquariums? Will silicone sealant adhere the wood/epoxy box to the glass tank? Thanks for sharing your advice and thoughts.
 
Last edited:
have you try to use acrylic?

it may work with wood...try looking at ppl who built wood tanks....sure u get all the info you will need

good luck

http://www.jonolavsakvarium.com/eng_diy/2200litre/2200litres.html

Thanks for your response, sp0k. Acrylic does not truly bond acrylic to glass. My tank is glass. Hence, the overflow box cannot be acrylic. My next thought was that, if they build wood/epoxy tanks with a glass front, somehow the adhesion of glass to wood/epoxy is accomplished. It would be so cool not to ever have to specially order glass, but to just size, cut, and drill wood. Then you just apply many coats of epoxy to waterproof it. Then just adhere it to the back of a glass tank.
 
I have a plexiglass overflow glued with clear silicone to my 35 gallon fish only tank. Has been there for the last 5 years, no problem. That's inside the tank for the outside one just make a u shape on the top of the overflow that will hang over the glass.
 
3 Excerpts from the 1990s: Builders of Wood Aquarims Describe Bonding Glass To Wood

3 Excerpts from the 1990s: Builders of Wood Aquarims Describe Bonding Glass To Wood

A discussion of bonding glass to wood/epoxy is given in an ancient thread from the 1990s, in connection with building wood/glass aquariums.

Excerpt 1: K. Rogers

The following excerpt was taken from a thread post entitled: Wood and Glass Tank Building Questions by krogers-at-javelin.sim.es.com. It was published Fri, 31 Jan 92 by the Newsgroup: alt.aquaria at: http://www.thekrib.com/TankHardware/wood-tank.html. The excerpt reads:

>Sealing glass/?/wood seams?

GE Silicon II Rubber. I used 3 tubes of the 10oz calking size on the whole tank. One tube sufficed to glue the glass down to the wood. Run a bead along all seams just to insure against the paint cracking for whatever reason.

Excerpt 2: Mark Leone

The second excerpt is taken from another post in the same thread, authored by de by Mark Leone, <mleone-at-cs.cmu.edu> Computer Science, Carnegie Mellon University, Pittsburgh, PA. Mark Leone clarifies that the silicone's sealing must be done from glass to epoxy, not from glass to the bare wood in the following excerpt:

>Sealing glass/?/wood seams?

Silicone will bond glass to enamel, but not glass to bare wood. I don't know whether it will bond to fiberglass. Good luck!

Excerpt 3: Joseph J. De Rosa

Finally, the third post I selected from the same thread is written by sonny-at-cbnewsf.cb.att.com (joseph.j.de rosa), on 1 Jul 1991, and published in the Newsgroup: rec.aquaria,sci.aquaria,alt.aquaria.

Joseph writes:

Sorry, but I forgot to mention a detail or two. The tanks I have built were painted with epoxy paint (3-4 coats if possible). dark colors look better than light colors. Brown or black look best, IMHO. I think that the paint I used was dry in 24 hours, but I waited a week. The tanks were sealed with regular silicone sealant that was aquarium safe. I don't bother trying to save those last few pennies on cheaper silicone since I'll only be using a few tubes of it. Be sure to get MORE than you need, since it will definitly ruin your day if you run out in the middle. Seal all the edges, and if you have a front-piece of plywood with a hole in it, put a THICK, SMOOTH layer of silicone on it. Be sure to stand the tank on it's face for this part. Lay the glass in, then put weights on it to squeeze out the excess. I don't think you can put too much weight on it, but you Don't want to break the glass ;-)

Leave the tank alone until everything has dried for a few days. Set it up where it will be, and fill it and watch for leaks. If you did it correctly, there won't be any. Otherwise...

These posts are intriguing. However, I imagine that there is a world of difference between adhereing a window to the inside of a wood box (aquarium) and hanging a wooden box onto a glass aquarium. I suspect the structural dynamics are significantly different, requiring more structural support beneath the overflow box, propping it up. Thoughts, anyone?
 
I have a plexiglass overflow glued with clear silicone to my 35 gallon fish only tank. Has been there for the last 5 years, no problem. That's inside the tank for the outside one just make a u shape on the top of the overflow that will hang over the glass.

Thanks, Lazhar. I'm trying to visualize what you describe. Can you post a picture? It's a glass tank, correct?
 
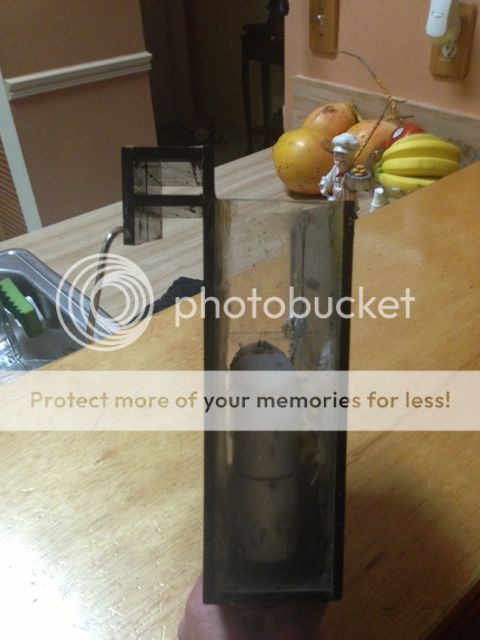
securedownload_zps3fde1338.jpg

That one I hung on my 55 tank for seven years and made it from old pexiglass and pvc. Hope I can help you, and yes they are both glass tanks.
 
Last edited:
securedownload_zps3fde1338.jpg

That one I hung on my 55 tank for seven years and made it from old pexiglass and pvc. Hope I can help you, and yes they are both glass tanks.

Thanks for your response and picture, Lazhar. So this is an HOB Overflow? But does it use pass-through holes drilled into the back wall of the aquarium, to pass water to the box, or are you using an over-the-top vacuum hose? I can't tell from the isolated picture how it functioned in your system. Maybe you could explain it or show a front-view picture, in addition to the profile picture that you have showed.

My concern is leakage that might occur in a wooden/epoxy, external overflow box that is adhered to the back wall of an aquarium with silicone sealant, principally at the junction of the box to the wall of the aquarium. The excerpts from wooden aquarium makers, above, suggest that the silicone would work, if adhering to the expoxy on the wood.

In your setup, it looks like the junction of the overflow box occurs from an over-the-top hanger. As the box I will be using does not have a "fourth wall" and will be adhered from the edge of the sides and floor of the box to the back wall of the aquarium, I won't be able to extend a "fourth wall" up to the top of the tank to have as an overflow hanger, as depicted in your photo. I would need to attach it some other way, using your design. However, I suspect that without a "fourth wall," I would simply need to go back to Plan A: adhereing the edges of the box, minus a "fourth wall," to the back glass of the aquarium. Any thoughts on using wood, coated with epoxy, for the box and adhering it this way? Thanks.
 
Last edited:
You could always make a complete wood box without the top and just attach the box to the tank with a bulkhead with a gasket on both sides. This way, you are not depending on a sealant to adhere the wood to the glass tank and keep a complete seal at the same time. Just make sure the box is completely sealed with at least silicone.
 
You could always make a complete wood box without the top and just attach the box to the tank with a bulkhead with a gasket on both sides. This way, you are not depending on a sealant to adhere the wood to the glass tank and keep a complete seal at the same time. Just make sure the box is completely sealed with at least silicone.

Hi, Cymonous. Thanks for your response and insight. I think you suggest a great idea. The "fourth wall" added, making a complete box, would add more structure and strength to the external overflow box. Ordinarily, doing this very thing with a glass overflow box is much more difficult, given the difficulty of accurately aligning with the double-set of holes positioned in the back wall of the tank and the receiving "fourth wall" of the overflow box.

Yet your idea is very good because it is much easier to drill holes in wood than in glass, and if a slight misalignment occurs, then one could just chuck the wood panel and start again. As stated above, wood is so much more forgiving than glass.

But I am concerned: are you confident that the five (5) bulkheads are strong enough to support the weight of the entire 48"-long overflow box on the 75-gallon tank? The overflow box measures 48" long, 5" deep (front to back) and 8" tall. I'm having trouble trusting in that, but I am naive on the strength of bulkheads as hanging support structures. I also don't know what, if any, buckling pressure it would put on the webbing around the glass holes. Nor do I know whether the downward pull on the bulkheads caused by supporting the overflow box hanging on it, would cause warping, wracking, or movement of the bulkheads, thereby compromsing the integrity of the bulkhead seal. This could present a danger of leakage around the pass-through junction of the bulkhead and the glass holes. I'm sure the engineers and fabricators could weigh in here, on this issue. Hello, engineers and fabricators: Your thoughts?

But I really like your idea, and I may cancel my order for the broken panel of glass, and just start building a wooden overflow box this weekend.

Alternatively, by adding the "fourth wall" to the external overflow box and using a double-set of holes at the tank-glass-wood-wall junction, I could slide the bulkheads through, for support as you say, and I could also devise some other, additional support system below the overflow box. This would alleviate some of the downward pull on the bulkheads that support the hanging overflow box.

Or, I could just silicone up the entire flat side of the "fourth" wall of the wood box, adhering it to the glass wall of the tank, which would add much more strength than siliconing it without the fourth wall, i.e., adhering only the edges of the sides and floor of the box to the tank.

Have you actually used a "fourth wall"-overflow box and secured it with bulkheads? If so, did you encounter any warping, shifting, or movement of the bulkheads? Did you encounter any structrual problems or leakage? Also, when fabricating the box, I suspect you coat every panel with epoxy (several coats) and then assemble all the panels of the box with silicone? So there is silicone as a structural seam. Then, later, you applied silicone in the inside corners to protect the structural seam, akin to how it is done with a glass overflow box. Is that how you did it? Thanks for your advice.
 
Last edited:
Quick Update: I just canceled my order for the glass panel that was to serve as the replacement panel for the drilled, glass floor of the external overflow box that I stupidly broke yesterday. The glass shop agreed that wood is more forgiving than glass and was somewhat humored by the cancellation of my custom-glass order.

Admittedly, I am just not skilled enough at this level of my development to work efficiently with glass. Due to my slow pace of work with glass, I grow careless, distracted, and impatient. This leads to mistakes. My impatience is compounded by my frustration at the truth that there is no "undo" button on mistakes made with glass. Conversely, my line of work deals with malleable thoughts, writing, and analysis. When I make a mistake in a document, I just hit the "undo" button. I am just too weighed down with delays everytime I make a mistake with glass, relying on others to supply my correction. Working with wood is as close as I will get to having an "undo" button on fabricating aquarium components. Working with PVC is like this, too. Make a PVC mistake? No problem, just cut again and "weld" the pieces together with PVC glue. With wood, I can just throw out a mistake and cut and drill another piece--quickly and cheaply--with no outside shop to call, to pay steep costs to, and to wait on for the delivery of the replacement product. I like this idea.

Long story short: I'm going for it. I am going to build an external overflow box for my BeanAnimal Silent-and-Safe Overflow System, on my 75-gallon aquarium, out of wood, coated with epoxy. I think this may actually be fun. A heck of a lot more fun than I've had so far, working with glass on the overflow box. I'll keep everyone posted on the progress of my fabrication.

I just need to figure out the best way to adhere the box to the tank. So far, I like Cymonous' idea of using a "fourth wall" and dispensing with silicone to attach it. Thanks, Cymonous and everyone for their ideas and advice.
 
Last edited:
The way wood tanks are made the glass is inside of the wood with the water pushing it out. The wood overlaps the glass all the way around and the silicone acts more as a gasket. If you simply attached it to the front of a wood box the way you would the front of a normal aquarium, it would not hold.

That being said, the external box you are talking about has far less pressure on it than the front of a large aquarium, but it is something to think about moving forward.
 
I have not built my own overflow box, but I have worked with bulkheads. They are strong and having 5 of them to hold up your box should be sufficient. Just make sure you have a gasket on the inside part of the box at least for each bulkhead. Instead of silicone, you could use a different adhesive to glue the box to the back of the tank to add on additional strength for support. (Note: Doing this will make it very difficult to remove though)

When you build your box, use wood glue and screws to make strong joints. I would recommend to pre-drill your holes to help prevent wood splitting.
 
The way wood tanks are made the glass is inside of the wood with the water pushing it out. The wood overlaps the glass all the way around and the silicone acts more as a gasket. If you simply attached it to the front of a wood box the way you would the front of a normal aquarium, it would not hold.

That being said, the external box you are talking about has far less pressure on it than the front of a large aquarium, but it is something to think about moving forward.

Excellent point, UserName. Thank you for your response. I agree with you, and suggested that such might be a consideration in Thread No. 5, above:

However, I imagine that there is a world of difference between adhereing a window to the inside of a wood box (aquarium) and hanging a wooden box onto a glass aquarium. I suspect the structural dynamics are significantly different, requiring more structural support beneath the overflow box, propping it up.

Perhaps it could be supported from below and have the bulkheads pass through the "fourth wall," as Cymonous suggests. That way, there would be less concern about the role of silicone. Yet, your water-pressure concerns are valid here. I would be dealing with the ability of silicone to hold the box together. Or I could use another method to hold the box together, including dowels, biscuits, glue, and probably not metal screws if they could become corroded if any portion leaked.

Your structural thoughts on holding the box together, with no need to use silicone to adhere the box to the tank, given the advent of a "fourth wall"? Thanks.
 
What if it was made like a glass holes overflow box that sat on the outside? A bulkhead would pass through the glass and through the wood wall with gaskets between the glass/wood and in the inside of the tank. That would hold the box on the tank without needing silicone. I would do it with multiple holes (like 3) and have elbows on the inside of the tank.

You would still need to make a wood box with 4 walls and a bottom and epoxy the entire thing well enough that it didn't leak.
 
I have not built my own overflow box, but I have worked with bulkheads. They are strong and having 5 of them to hold up your box should be sufficient. Just make sure you have a gasket on the inside part of the box at least for each bulkhead. Instead of silicone, you could use a different adhesive to glue the box to the back of the tank to add on additional strength for support. (Note: Doing this will make it very difficult to remove though)

When you build your box, use wood glue and screws to make strong joints. I would recommend to pre-drill your holes to help prevent wood splitting.

Thanks, Cymonous. Very helpful. With the gaskets, though, I was under the impression that they had to be on the inside of the internal overflow box (through which the water passes to the external overflow box in a BeanAnimal setup), to prevent leakage from the tank. But I guess I could have two gaskets, one on the inside of each overflow box (internal and external). Would that work? Or would that cause problems with the screw-nut on the threaded end of the gasket? I think I read something about that once, too: it was recommended that the gasket not be on the screw-nut side of the bulkhead for that reason. Thanks.
 
The gasket is only a measure for just in case your water level inside your box reaches back to the bulkhead. If you use rubber gaskets, they won't affect the nut or the threads on the bulkhead. You can use a gasket on both sides of the box, but depending on the thickness of your glass, gaskets, and wood for the box, you may run out of thread on your bulkheads.
 
I still think you are better off working with acrylic, it may cost you more up front but will last longer, it will be easier to glue, and look cleaner. You can also make it with four walls and glue with silicone one whole side to the tank. The one I showed you worked with a U pipe to transfer the water to the outside. But drilling the tank is better, no problems with air getting in there. Why does it need to be so big? Four feet long seens pretty big.
 
Thanks, Cymonous. Very helpful. With the gaskets, though, I was under the impression that they had to be on the inside of the internal overflow box (through which the water passes to the external overflow box in a BeanAnimal setup), to prevent leakage from the tank. But I guess I could have two gaskets, one on the inside of each overflow box (internal and external). Would that work? Or would that cause problems with the screw-nut on the threaded end of the gasket? I think I read something about that once, too: it was recommended that the gasket not be on the screw-nut side of the bulkhead for that reason. Thanks.

You can also use silicone on the treads, it will make it permanent but it will hold the water.
 
If you are going to put anything on threads, you should use plumber's tape. It is meant to seal threads and does not make it permanent.
 
Back
Top