- Forum
- More Forums
- Reef Club Forums
- West Region-Reef Club Forums
- Greater San Francisco Bay Area Reef Forum
You are using an out of date browser. It may not display this or other websites correctly.
You should upgrade or use an alternative browser.
You should upgrade or use an alternative browser.
150 gallon build thread...avoid my mistakes
- Thread starter nanoguy
- Start date
nanoguy
Premium Member
Thanks! Good to be back in the mix of things!Welcome back! My tank has the same 48" x 30" footprint, but mine is only 20" tall. I wish I had gone with 24" tall but the price almost doubled due to the thicker glass. Looking forward to seeing your tank full of water.
nanoguy
Premium Member
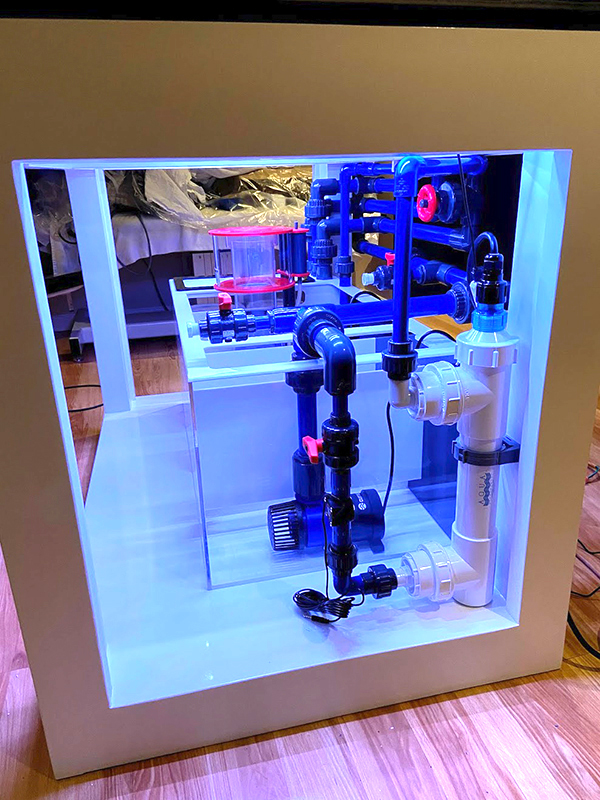
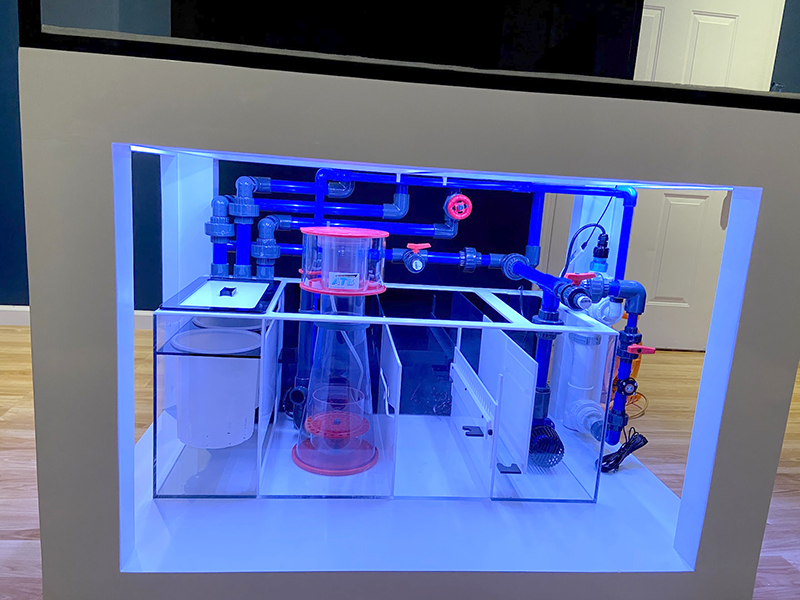
Rewind a bit from the last pic...here is the completed plumbing. This was my first time hard plumbing a tank.. I experienced some serious sticker shock when it came to the cost of the parts...not cheap.
I strongly suggest using some big box store PVC pipes to do the test fitting. It's cheap and will save you the headache of having to order more pipes when you screw up...trust me on this. Loosely fit the "test" pipes into the fittings and run it to where you "think" will work for you. You don't need to press it all the way... it will be difficult to remove if you do...just enough to hold it in place. Once everything is in place and you are happy with the results, measure the length of the actual pipe (the length of the pipe between the the two connections) and add the depth of the each connector to that measurement for the final cut (union, T's, elbows, etc). I used a straightened out paper clip to get the exact depth of each type of connector on my setup...just stick the paperclip in the connector up to the little stop groove inside and measure the paper clip. With my 1" unions/elbows, the average depth of each was just a tad over 1"...write this down for reference...it will come in handy. Take the length of the measured pipe and add the measurements from the connections (x2...one for each side)...time to cut the good stuff and glue it in place. Make sure to push it in as far as you can, give it a slight twist, and hold it there for at least 15-20 seconds for the glue to set...if you don't, the pipe and connector will slowly start to separate as the PVC starts to expand in the connector. I suggest ordering more fittings/pipes then you think you need. It sucks having to order more when you're short and having to wait for the delivery. You can always return what you don't use. By the way, use clear PVC glue and Primer. I had to order the clear primer online but the clear glue is readily available at the big box stores.
***HOT TIP*** You can actually remove glued in PVC/connectors. This will require the use of a heat gun and some aluminum foil. Search YT...tons of videos on how to do it. I had to do this a hand full of times. You will have to cut a new pipe but can save the connections.
nanoguy
Premium Member
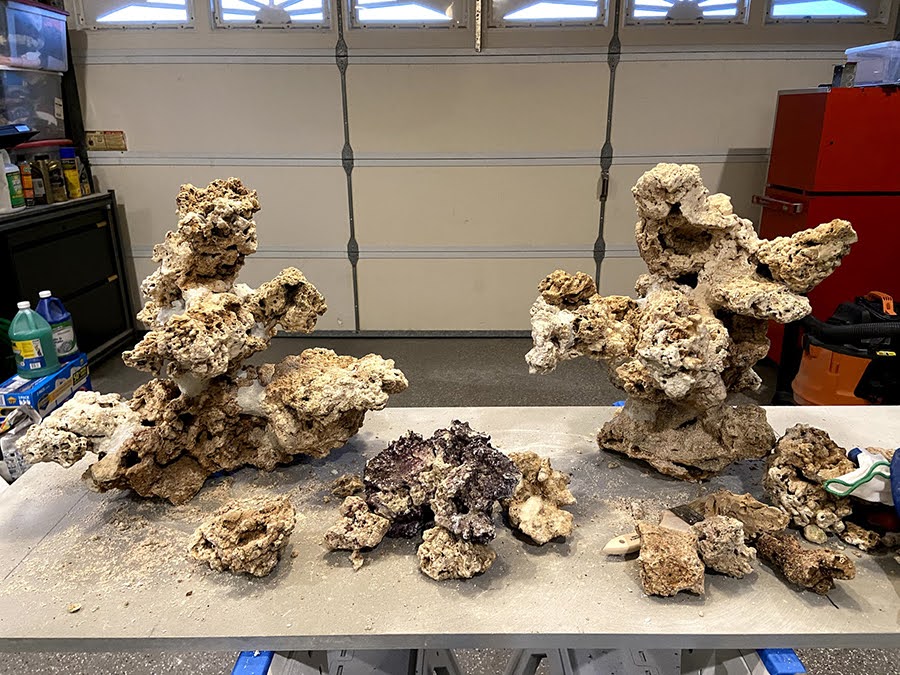
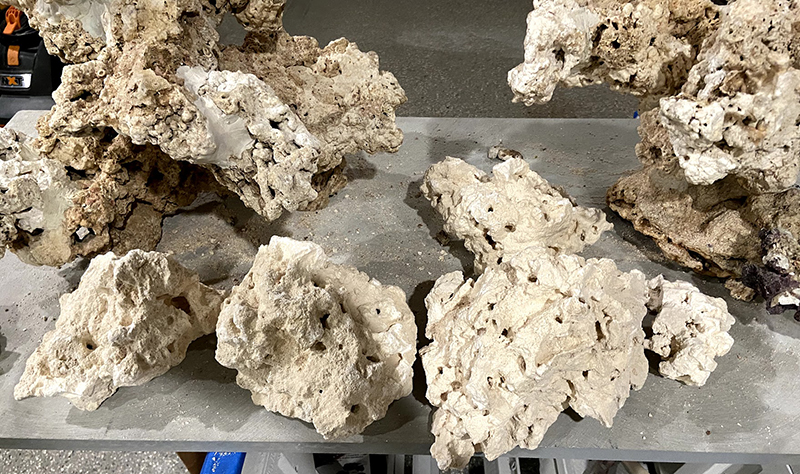
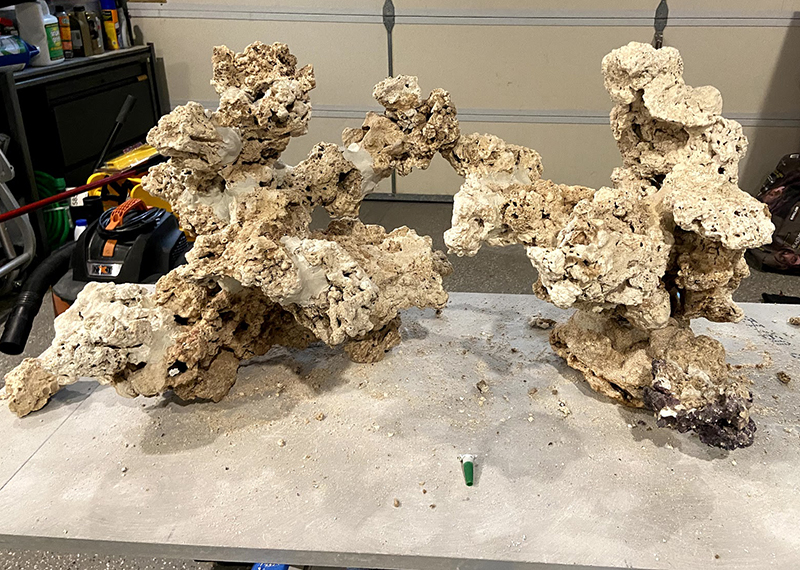
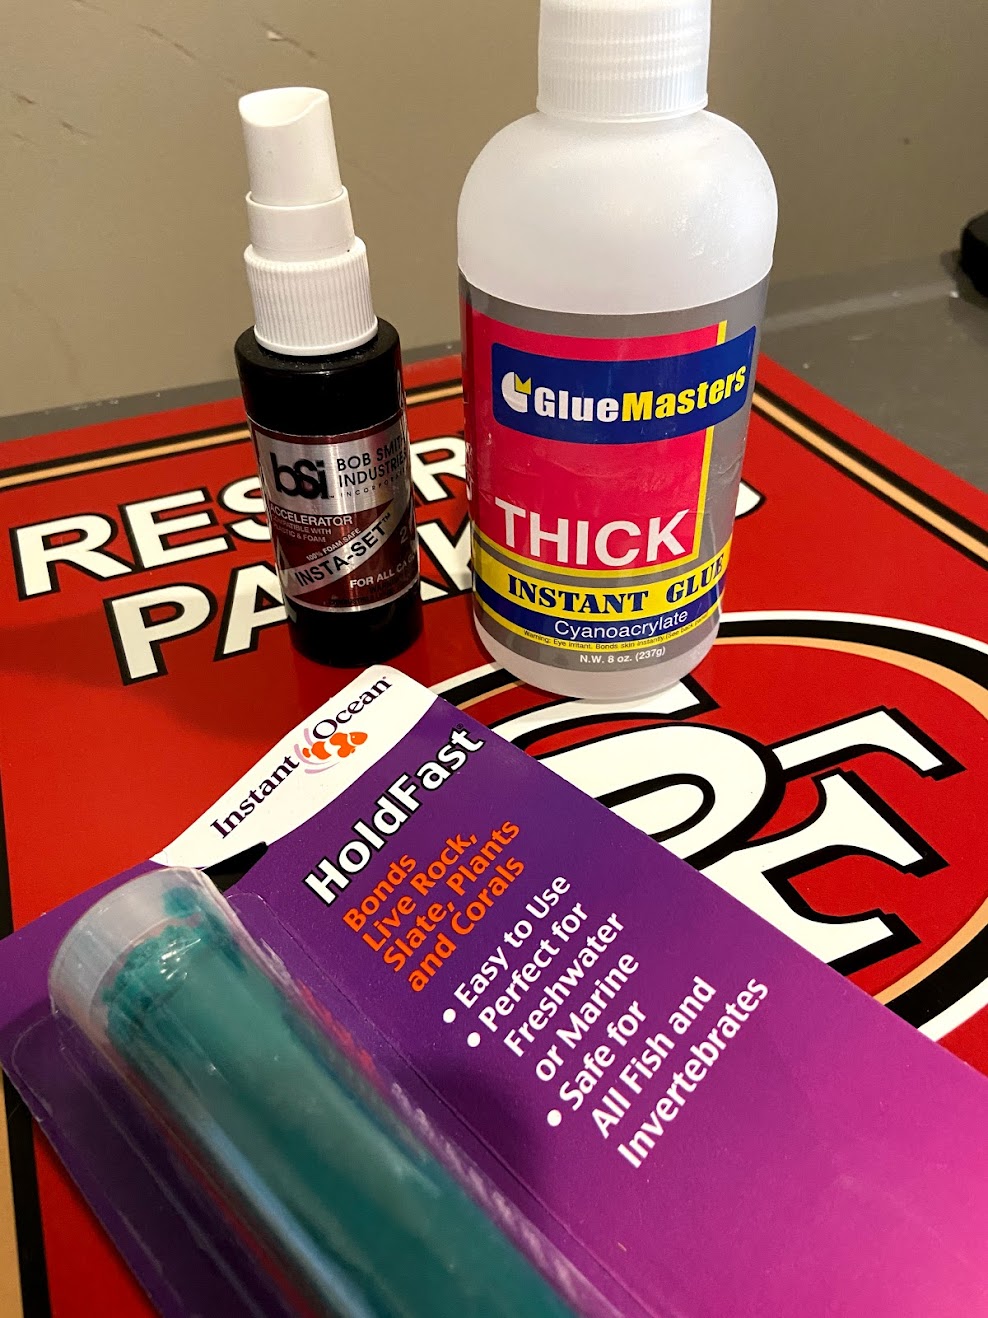
Here are some pics of the aquascape when I was working on it in my garage. I marked off the dimensions of my tank on my work surface...helps with visualizing the layout. Keep a tape measure handy to measure the height...make sure you account the growth of your corals. It's good to have an idea of what you want to grow and placement as you are piecing it together. I had a hand full of rocks from my previous setup but not enough so I purchased 25lbs of dry Marco rocks from MarineDepot...chiseled it up and started piecing them together. I used some super glue I purchased on Amazon and some underwater two part putty. I had a bottle of super glue accelerator laying around so I didn't need to purchase that. The stuff is not that cheap for such a small bottle but it really helps with the task at hand. I read that mixing baking soda and water has the same effect. Maybe someone can chime in on this. I pieced together my aquascape in two sections...gotta make sure I can lift it into the tank.
nanoguy
Premium Member
I've always been an SPS guy. My original plans for the setup was to do a fish/LPS tank. As the build started to progress, the SPS bug bit me again...so SPS dominated tank it will be.What types of corals are you planning to keep?
nanoguy
Premium Member
Thanks! I'm running an Eflux 6011. It is rated a tad over 3000 gph. I already water tested the tank last week and it's more then enough. From the looks of it with the pump running at 100%, I'm guessing I'm probably pushing around 1000-1200 gph with all the 90's I have plumbed. I'll get a better number when I have the tank up and running.Plumbing looks done very well with a lot of thought in mind.
Will return pump be enough?
Sent from my iPhone using Tapatalk Pro
nanoguy
Premium Member
Very nice aquascape.
Sent from my SM-G975U using Tapatalk
Thanks Pedro!
I've always been an SPS guy. My original plans for the setup was to do a fish/LPS tank. As the build started to progress, the SPS bug bit me again...so SPS dominated tank it will be.
Good answer!
Then I'll add this bit of advice: When I did my aquascape (which you can see here in my build thread from a few years ago), I completely underestimated how much of the aquascape becomes dominated by growing SPS corals in a few years. Thus I spent too much time thinking about the look of the aquascape as I was making it and not enough about what it would look like when it had lots of giant corals growing all over it. Thus what I really should have optimized for, which I didn't, was surface area to put SPS corals where there I could also drive a lot of flow. By this metric it looks to me like you've done a very good job as it looks like a lot of open space and a lot of surface area. It also looks to me like a good amount of rock. The only minor nitpick I might have is just that some of the rocks come decently close to the surface, and I think it could be annoying in a few years when some of your high PAR show pieces run out of upward room. I don't think it is the biggest deal in the world, but if it were me I'd have the top of the rocks be 1-2" lower than they are now. In the future when your corals start growing you are never going to want less vertical space for them to grow into.
Also on the topic of aquascape I'll broach a somewhat contentious topic, but for me at least the *biggest* mistake I made on my current SPS build was putting sand in the tank. Given enough flow it doesn't stay where you want it, it attracts detritus, is impossible/annoying to clean and gives safe harbor to things you don't want (dinos, cyano). It isn't a cut and dry issue, and there are "pros" to having sand, but when I made my tank I didn't even consider the idea of not having sand. I thought a sandless tank would look sterile and ugly, but once again I overlooked that given enough time, it will be covered in coralline algae and corals and actually looks awesome, and is much easier to maintain.
aikenreefkeeper
Member
Nice build. I am following along.
nanoguy
Premium Member
Thanks for the great suggestions Dan. I took several rough measurements of the peaks on the aquascape last night. I'm probably averaging around 4.5"-5.75" from the surface of the water depending on which peak (+/- .5"). It's really difficult to gauge even with a tape measure without water in the tank. I was originally shooting for around 7" from the surface of the water but it didn't quite work out that way...rocks will fit how they want to fit plus I was going off the 24" tank height not considering the actually water level. It shouldn't be too hard for me to cut it down once I finally get it filled. I'm still deciding on going bare bottom or put in a sand bed. I have 7 bags of Arag-alive sitting in my garage that I got for a good price...still debating on whether I want it in the tank. I'm toying with the idea of having a secondary remote sump on the other side of the wall (garage) and putting the sand in that. I'm still waiting for some hardware to come in and hope to finalize everything over the next couple of weeks.Good answer!
Then I'll add this bit of advice: When I did my aquascape (which you can see here in my build thread from a few years ago), I completely underestimated how much of the aquascape becomes dominated by growing SPS corals in a few years. Thus I spent too much time thinking about the look of the aquascape as I was making it and not enough about what it would look like when it had lots of giant corals growing all over it. Thus what I really should have optimized for, which I didn't, was surface area to put SPS corals where there I could also drive a lot of flow. By this metric it looks to me like you've done a very good job as it looks like a lot of open space and a lot of surface area. It also looks to me like a good amount of rock. The only minor nitpick I might have is just that some of the rocks come decently close to the surface, and I think it could be annoying in a few years when some of your high PAR show pieces run out of upward room. I don't think it is the biggest deal in the world, but if it were me I'd have the top of the rocks be 1-2" lower than they are now. In the future when your corals start growing you are never going to want less vertical space for them to grow into.
Also on the topic of aquascape I'll broach a somewhat contentious topic, but for me at least the *biggest* mistake I made on my current SPS build was putting sand in the tank. Given enough flow it doesn't stay where you want it, it attracts detritus, is impossible/annoying to clean and gives safe harbor to things you don't want (dinos, cyano). It isn't a cut and dry issue, and there are "pros" to having sand, but when I made my tank I didn't even consider the idea of not having sand. I thought a sandless tank would look sterile and ugly, but once again I overlooked that given enough time, it will be covered in coralline algae and corals and actually looks awesome, and is much easier to maintain.
Thanks for the great suggestions Dan. I took several rough measurements of the peaks on the aquascape last night. I'm probably averaging around 4.5"-5.75" from the surface of the water depending on which peak (+/- .5"). It's really difficult to gauge even with a tape measure without water in the tank. I was originally shooting for around 7" from the surface of the water but it didn't quite work out that way...rocks will fit how they want to fit plus I was going off the 24" tank height not considering the actually water level. It shouldn't be too hard for me to cut it down once I finally get it filled. I'm still deciding on going bare bottom or put in a sand bed. I have 7 bags of Arag-alive sitting in my garage that I got for a good price...still debating on whether I want it in the tank. I'm toying with the idea of having a secondary remote sump on the other side of the wall (garage) and putting the sand in that. I'm still waiting for some hardware to come in and hope to finalize everything over the next couple of weeks.
Again, personal decision and it there are "pros" and "cons" to both ways. I also put sand in my sump early on, and then I took it out. The sand in the sump was much better at accumulating detritus than the sandbed in the tank because there was less random flow so the detritus all settled in there consistently. A bare bottom sump is an easy to clean sump in the same way that a bare bottom tank is an easy to clean tank.
Here is a very long video from the BRS guys about the topic where they dissect every dimension of it. I think the general view they have, which I agree with, is a sandbed helps give your tank stability early on, but then over time decreases stability because the sandbed will end up being the most hospitable place in your tank for the things you don't want because it is difficult and time consuming to clean.
But there are lots of successful tanks with sandbeds, and a lot of types of livestock you can only keep if you have a sandbed, so there are certainly good reasons to go either way. I would just make sure to think about it and make an informed decision, because I can tell you from experience removing a sandbed from your tank is not a fun process. Easier to make up your mind earlier rather than later.
nanoguy
Premium Member
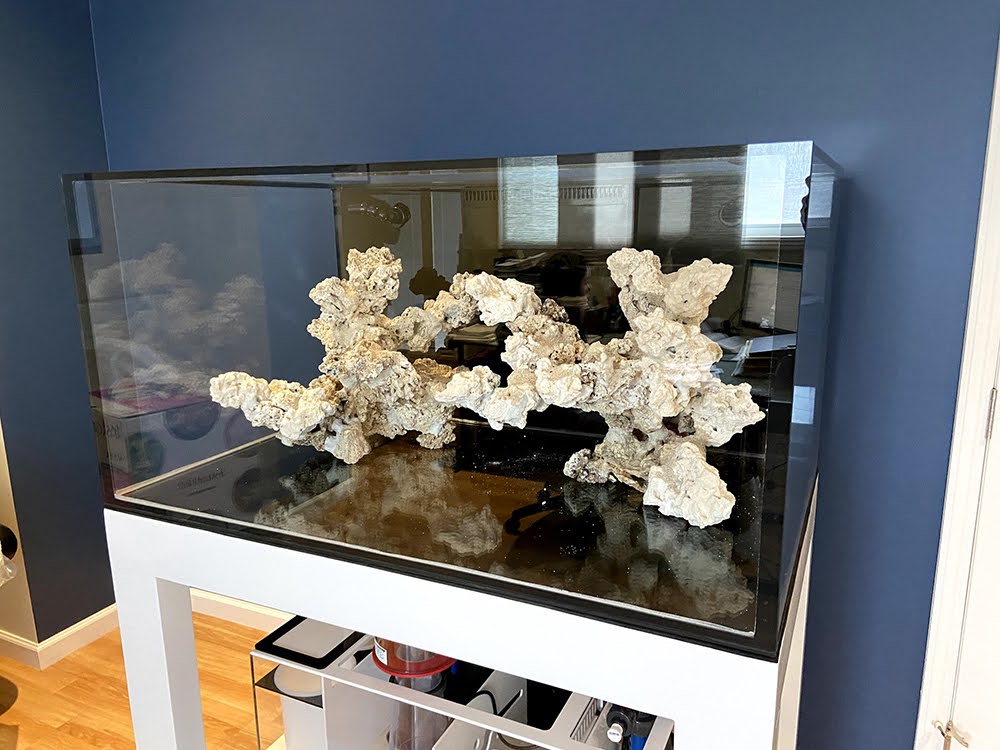
Just posting a couple of pics of the setup as it currently sits. I'm waiting on my new overflow from Exotic Marines and my light rack from 80/20. I decided to replace the synergy overflow that came with the tank. It was quite loud with the amount of water I'm moving through the system. The noise is coming from the skimmer box inside the tank. I messed around with it when I was water testing the system. Installing a strip of enkamat behind the weir helped with the noise but that's another thing to maintain I don't want to deal with. The other option was to drastically reduce the flow rate of my return pump...not happening. Maybe it's operator error IDK. I have some opinions on the issue...PM me if you want more info. Hopefully I can get this thing fully operational in the next 2-3 weeks.

I still have to paint the panels...just waiting for warmer weather.

80/20 light rack design


I still have to paint the panels...just waiting for warmer weather.
80/20 light rack design
africangrey
Active member
Does the exotic marine's overflow box has the same hole distant as the one from Synergy. I also have the same overflow and not happy with the sound that came from inner box and the salt creep from the lid of the out box. Are you going through the hassle of re-plumb the whole thing, what a pain.
nanoguy
Premium Member
Does the exotic marine's overflow box has the same hole distant as the one from Synergy. I also have the same overflow and not happy with the sound that came from inner box and the salt creep from the lid of the out box. Are you going through the hassle of re-plumb the whole thing, what a pain.
I was told by Taylor of Exotic Marines that the bulk head placement/position matches the Synergy unit. The only difference is the thickness of the external box. With that said, it will not be a direct plug and play replacement. He told me that a small modification to adjust for the thickness of the box will be required. I'm hoping I can just loosen up the unions going into my sump and adjust for the difference...keeping my fingers crossed. I ordered my overflow 2 weeks ago. I'm hoping I'll get it within the next couple of weeks. I'll PM you more info when I get it installed. Give the enkamat a try in the meantime. It really does help with softening up the water falling sound into the external box. Let me know if you need a piece...I got you.
africangrey
Active member
for some reason none of the pictures are available anymore.
mav3rick478
Premium Member
How much of a drop is there between the water going through the weir and the level in the box? I have a corner overflow and I know it's not exactly the same but the theory should be the same, to keep the noise down you have to minimize the drop to be no more than a couple of inches. So my secondary pipe is about an inch below the weir and my main drain is about an inch below that.
Sent from my Pixel 4 XL using Tapatalk
Sent from my Pixel 4 XL using Tapatalk
Similar threads
- Replies
- 3
- Views
- 331
- Replies
- 7
- Views
- 305
- Replies
- 6
- Views
- 4K
- Replies
- 0
- Views
- 189