You are using an out of date browser. It may not display this or other websites correctly.
You should upgrade or use an alternative browser.
You should upgrade or use an alternative browser.
Algae Scrubber Basics
- Thread starter srusso
- Start date
Dustin1300
Reefaholic
My ATS Build (Part 1)
My ATS Build (Part 1)
First off, I want to thank the contributors for the well documented thread. I'm currently doing a pilot test with a basic ATS but will likely do a bucket style/3D ATS with LEDs at a later date once my full system is up and running.
Current system info:
- Taking rock/live sand out of the picture, 285 gallons. Later will be adding a 600 gallon DT and large sump so will have 1000+ gallons total. (So you can understand why I want to cut down on water changes") ) Tank is new and just cycling but nitrates are through the roof because of dosing ammonia for fishless cycle. We'll tell soon enough how fast the ATS works!
) Tank is new and just cycling but nitrates are through the roof because of dosing ammonia for fishless cycle. We'll tell soon enough how fast the ATS works!
ATS Info:
- 18" X 12" screen totaling 216 square inches (Current volume of system is 285 gallons so this is a little undersized but is a bit of a pilot test for me)
- 4 X 23 watt CFL 2700k bulbs with full metal reflectors
- ~4 inches away from screen
- Not yet measured the GPH but plan on doing that in morning as well as get all the wires organized and Apex programmed for 16 hours on, 8 hours off for the lighting
I'll go ahead and include what I did in my build thread so others might benefit from some of the recommendations.
In the theme of my other plumbing, I went ahead and continued using SCH 80 plumbing only for aesthetic reasons really. I only had to pick up a 1" Union in my latest BRS order to get this thing rolling. That being said, I first needed to mark a straight line which was easily made by lining up another piece of PVC so I had a straight edge as a guide.

Only problem was the SCH 80 being so dark and not seeing the line. After making the first long cut, I went ahead and taped it off so I could actually see how wide to cut it on the final pass.

Here's the straightest cut I could make and when cutting with the dremel, it helped to angle the pipe away from me.

I noticed when I was cleaning up the cuts that the inside had a large amount of 'melted' plastic. To help ensure that algae does not clog/build up inside the pipe, I took a 3/4" pex and slid it up/down inside the pipe to make the inside smooth.

The next and last step of the actual ATS build was getting the screen scuffed up really well. Hole saw up and down every which way for a good 15 minutes seems to have roughed it up really well. I taped off the top 1" to ensure it remained smooth to keep algae from climbing up into the pipe.

Finally the finished product. Simply 1" pipe, elbow, union, elbow barb, adapter, cap, and screen.

My ATS Build (Part 1)
First off, I want to thank the contributors for the well documented thread. I'm currently doing a pilot test with a basic ATS but will likely do a bucket style/3D ATS with LEDs at a later date once my full system is up and running.
Current system info:
- Taking rock/live sand out of the picture, 285 gallons. Later will be adding a 600 gallon DT and large sump so will have 1000+ gallons total. (So you can understand why I want to cut down on water changes
) Tank is new and just cycling but nitrates are through the roof because of dosing ammonia for fishless cycle. We'll tell soon enough how fast the ATS works!ATS Info:
- 18" X 12" screen totaling 216 square inches (Current volume of system is 285 gallons so this is a little undersized but is a bit of a pilot test for me)
- 4 X 23 watt CFL 2700k bulbs with full metal reflectors
- ~4 inches away from screen
- Not yet measured the GPH but plan on doing that in morning as well as get all the wires organized and Apex programmed for 16 hours on, 8 hours off for the lighting
I'll go ahead and include what I did in my build thread so others might benefit from some of the recommendations.
In the theme of my other plumbing, I went ahead and continued using SCH 80 plumbing only for aesthetic reasons really. I only had to pick up a 1" Union in my latest BRS order to get this thing rolling. That being said, I first needed to mark a straight line which was easily made by lining up another piece of PVC so I had a straight edge as a guide.
Only problem was the SCH 80 being so dark and not seeing the line. After making the first long cut, I went ahead and taped it off so I could actually see how wide to cut it on the final pass.
Here's the straightest cut I could make and when cutting with the dremel, it helped to angle the pipe away from me.
I noticed when I was cleaning up the cuts that the inside had a large amount of 'melted' plastic. To help ensure that algae does not clog/build up inside the pipe, I took a 3/4" pex and slid it up/down inside the pipe to make the inside smooth.
The next and last step of the actual ATS build was getting the screen scuffed up really well. Hole saw up and down every which way for a good 15 minutes seems to have roughed it up really well. I taped off the top 1" to ensure it remained smooth to keep algae from climbing up into the pipe.
Finally the finished product. Simply 1" pipe, elbow, union, elbow barb, adapter, cap, and screen.
Dustin1300
Reefaholic
My ATS Build (Part 2)
My ATS Build (Part 2)
To secure the piping, I put two 1" metal clamps into the concrete wall and then tied the system into the manifold I currently have. I'll likely add a pipe holder to the end if needed but at this point might need something to keep splashing from coming out of the sump.

Opposite side view w/o lighting:

Lighting off/attached but wiring not yet organized.

Lighting on:

Lighting up the whole sump!

Share the feedback with me
My ATS Build (Part 2)
To secure the piping, I put two 1" metal clamps into the concrete wall and then tied the system into the manifold I currently have. I'll likely add a pipe holder to the end if needed but at this point might need something to keep splashing from coming out of the sump.
Opposite side view w/o lighting:
Lighting off/attached but wiring not yet organized.
Lighting on:
Lighting up the whole sump!
Share the feedback with me
Dustin1300
Reefaholic
My ATS Build (Part 1)
My ATS Build (Part 1)
First off, I want to thank the contributors for the well documented thread. I'm currently doing a pilot test with a basic ATS but will likely do a bucket style/3D ATS with LEDs at a later date once my full system is up and running.
Current system info:
- Taking rock/live sand out of the picture, 285 gallons. Later will be adding a 600 gallon DT and large sump so will have 1000+ gallons total. (So you can understand why I want to cut down on water changes) Tank is new and just cycling but nitrates are through the roof because of dosing ammonia for fishless cycle. We'll tell soon enough how fast the ATS works!
ATS Info:
- 18" X 12" screen totaling 216 square inches (Current volume of system is 285 gallons so this is a little undersized but is a bit of a pilot test for me)
- 4 X 23 watt CFL 2700k bulbs with full metal reflectors
- ~4 inches away from screen
- Not yet measured the GPH but plan on doing that in morning as well as get all the wires organized and Apex programmed for 16 hours on, 8 hours off for the lighting
I'll go ahead and include what I did in my build thread so others might benefit from some of the recommendations.
In the theme of my other plumbing, I went ahead and continued using SCH 80 plumbing only for aesthetic reasons really. I only had to pick up a 1" Union in my latest BRS order to get this thing rolling. That being said, I first needed to mark a straight line which was easily made by lining up another piece of PVC so I had a straight edge as a guide.
Only problem was the SCH 80 being so dark and not seeing the line. After making the first long cut, I went ahead and taped it off so I could actually see how wide to cut it on the final pass.
Here's the straightest cut I could make and when cutting with the dremel, it helped to angle the pipe away from me.
I noticed when I was cleaning up the cuts that the inside had a large amount of 'melted' plastic. To help ensure that algae does not clog/build up inside the pipe, I took a 3/4" pex and slid it up/down inside the pipe to make the inside smooth.
The next and last step of the actual ATS build was getting the screen scuffed up really well. Hole saw up and down every which way for a good 15 minutes seems to have roughed it up really well. I taped off the top 1" to ensure it remained smooth to keep algae from climbing up into the pipe.
Finally the finished product. Simply 1" pipe, elbow, union, elbow barb, adapter, cap, and screen.
My ATS Build (Part 1)
First off, I want to thank the contributors for the well documented thread. I'm currently doing a pilot test with a basic ATS but will likely do a bucket style/3D ATS with LEDs at a later date once my full system is up and running.
Current system info:
- Taking rock/live sand out of the picture, 285 gallons. Later will be adding a 600 gallon DT and large sump so will have 1000+ gallons total. (So you can understand why I want to cut down on water changes
) Tank is new and just cycling but nitrates are through the roof because of dosing ammonia for fishless cycle. We'll tell soon enough how fast the ATS works!ATS Info:
- 18" X 12" screen totaling 216 square inches (Current volume of system is 285 gallons so this is a little undersized but is a bit of a pilot test for me)
- 4 X 23 watt CFL 2700k bulbs with full metal reflectors
- ~4 inches away from screen
- Not yet measured the GPH but plan on doing that in morning as well as get all the wires organized and Apex programmed for 16 hours on, 8 hours off for the lighting
I'll go ahead and include what I did in my build thread so others might benefit from some of the recommendations.
In the theme of my other plumbing, I went ahead and continued using SCH 80 plumbing only for aesthetic reasons really. I only had to pick up a 1" Union in my latest BRS order to get this thing rolling. That being said, I first needed to mark a straight line which was easily made by lining up another piece of PVC so I had a straight edge as a guide.
Only problem was the SCH 80 being so dark and not seeing the line. After making the first long cut, I went ahead and taped it off so I could actually see how wide to cut it on the final pass.
Here's the straightest cut I could make and when cutting with the dremel, it helped to angle the pipe away from me.
I noticed when I was cleaning up the cuts that the inside had a large amount of 'melted' plastic. To help ensure that algae does not clog/build up inside the pipe, I took a 3/4" pex and slid it up/down inside the pipe to make the inside smooth.
The next and last step of the actual ATS build was getting the screen scuffed up really well. Hole saw up and down every which way for a good 15 minutes seems to have roughed it up really well. I taped off the top 1" to ensure it remained smooth to keep algae from climbing up into the pipe.
Finally the finished product. Simply 1" pipe, elbow, union, elbow barb, adapter, cap, and screen.
Floyd R Turbo
Either busy or sleeping
...posted on your thread...
Dustin1300
Reefaholic
...posted on your thread...
Thanks! I'm going to try to read up on all the new recommendations from lately that I did not follow. It's a learning experience and a trial so I can make modifications as suggested. Maybe I'll save this ATS for when the full system is up and going.:worried:
srusso
Active member
Thanks! I'm going to try to read up on all the new recommendations from lately that I did not follow. It's a learning experience and a trial so I can make modifications as suggested. Maybe I'll save this ATS for when the full system is up and going.:worried:
It's a great build, let it run. Do it's thing, no reason to tank it down just yet if the tank is cycling... It will help, a lot! Nice work :thumbsup:
Dustin1300
Reefaholic
Thanks and I likely will let it do its thing for a while. I'll do some further research and start to come up with a some plans for a new ATS and get you guy's consult with drawings beforehand. Just was a bit anxious to get one going and start to bring down my trates rather than doing so many water changes!
Today I'll likely be adding support at end, using saran wrap, and adding a splash guard on the end of the pipe. Not yet sure what I'll do with the splash guard but I'll come up with something and it will likely be acrylic.
***Sorry about the double post above...Saw that this morning and now can't edit.
Bnortz
New member
Hey guys I've had my ATS up and running for about a month now and I'm starting to get some growth. Floyd suggested I get the flood lights with built in reflectors opposed to the spiral CFLs with dome reflectors since my screen's so small. I just put those on today and the bulbs were instantly getting splashed so I tried the saran wrap method to prevent this.
Let me know if this looks alright. Should I be worried about any melting?

Let me know if this looks alright. Should I be worried about any melting?
JohnnyB in SD
New member
Hey guys I've had my ATS up and running for about a month now and I'm starting to get some growth. Floyd suggested I get the flood lights with built in reflectors opposed to the spiral CFLs with dome reflectors since my screen's so small. I just put those on today and the bulbs were instantly getting splashed so I tried the saran wrap method to prevent this.
Let me know if this looks alright. Should I be worried about any melting?
Ideally, you want the bottom edge of screen submerged to minimize noise & splashing, instead of the water falling so far.
Lengthen or lower the screen, bring the water level up, or possibly try making the saran warp long enough to submerge into the water.
Bnortz
New member
Ideally, you want the bottom edge of screen submerged to minimize noise & splashing, instead of the water falling so far.
Lengthen or lower the screen, bring the water level up, or possibly try making the saran warp long enough to submerge into the water.
Can't raise the water level high enough the way the thing is plumbed. Don't really wanna start over with a new screen either to make it longer. I don't think making the Satan wrap submerged will do anything but I'll try. Thanks though. So the Saran wrap will be okay and won't melt or anything?
Dustin1300
Reefaholic
Bnortz, I put saran wrap on first thing this morning and I've currently got 4X23 Watt CFLs pointed at it and I've had no issues with the wrap heating up. I'd guess that the heat is being transferred to the cooler water constantly flowing on the other side of the saran wrap
srusso
Active member
Oh and any suggestions on how to minimize splashing noise? I can hear this thing from upstairs and it's getting annoying.
Bring the water level up to the bottom of the screen. Almost no sound comes from my scrubber.
srusso
Active member
Can't raise the water level high enough the way the thing is plumbed. Don't really wanna start over with a new screen either to make it longer. I don't think making the Satan wrap submerged will do anything but I'll try. Thanks though. So the Saran wrap will be okay and won't melt or anything?
No melting on mine, not even a little. I wouldn't even say it got warm....
You will need to rebuild, do worry most have to rebuild their first try... you don't want that sound to drive you nuts...
Dustin1300
Reefaholic
Made some modifications to my build today. Added saran wrap, splash guard, and support on the end of pipe. Easy and seems to have cut down on any splashing I was getting outside of sump.
Piece cut and hole cut to slip on end of ATS end cap:

Hung and in place:

Piece cut and hole cut to slip on end of ATS end cap:
Hung and in place:
davidgnome
New member
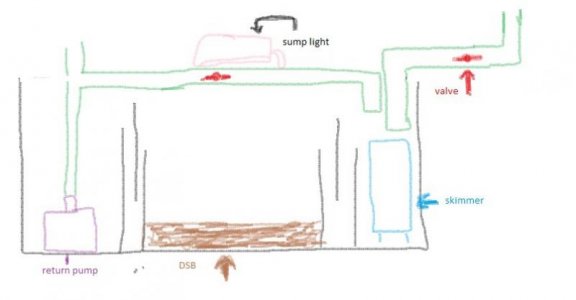
Ok im guessing im the only person who read most of all these pages and still hasnt a clue as to how to make one of these..lol..alot of info but maybe i ask too much for practical pictures because i do not get what im thinking about doing?? SO heres a crummy pic of my sump i just drew..any advice on where i would put one of these, and how to even make one? is the cutting the 1/8inch in the pipe just for the purpose of holding the piece of plastic that algae will grow on? or does water flow in that pipe and come out where you saw the line in it and it goes over the screening? is that the purpose of it..and for a 90 gal, with 29 gal sump what would be my deminsions of this thing, and can i put a hydra circ pump in the sump hitting it? or could it come off my return pump going back to sump hanging over my DSB in the pictures
Attachments
davidgnome
New member
That previous message seemed like i was saying you guys didnt supply pictures..What i meant was how can someone who has never done this doit? could i instead of making one that is say 10 by 10, make one that is 15 by 5 since the deeper in length it is the more likely it will be sitting in my water..where as if its longer it will be less likely to touch my water. is this possible to doit that way? and use my return pump ?
Dustin1300
Reefaholic
You should be able to build an ATS with the pictures outlined. A good recent summary is on posts on 3251-3264 thanks to Bud.
Similar threads
- Replies
- 9
- Views
- 299
- Replies
- 0
- Views
- 345