Algae Scrubber Basics

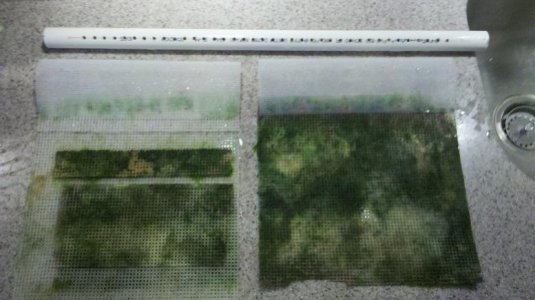
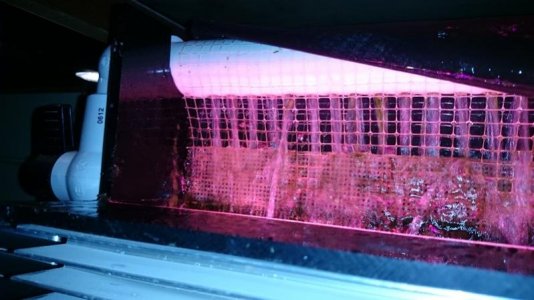
Once you get a fully mature screen, the algae will tend to want to grow into the slot/screen junction. When that happens it will divert flow to an area of less growth, which will then grow faster, diverting the flow away from it, etc...eventually the flow will be pretty balanced out. I don't know that I would spend a ton of time worrying about it right now, see if the issue persists. Unless of course, you happen to have bad OCD and a lot of free time.

hmmm I am working on keeping the OCD beasts at bay ...

my second biggest pain is the spurting from the ends... basically, it turns at the T and then goes to the ends. The closest end to the T (yes I'm offset) ends up creating an "open pipe" flow down that PVC leg. I blocked it up with epoxy, so now it spurts out and runs down the leg instead of the screen.
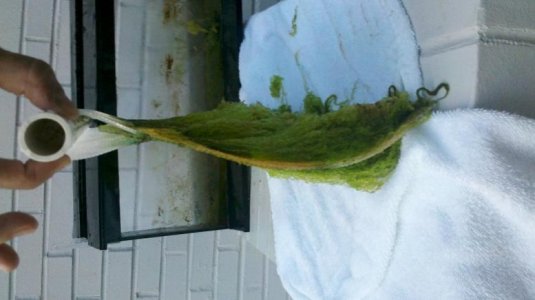
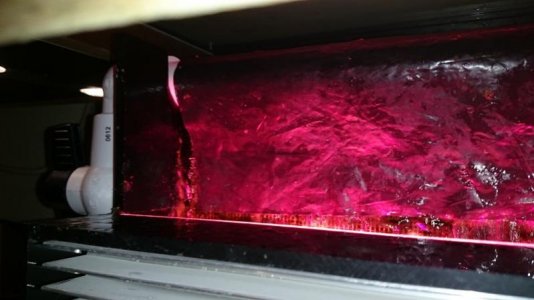
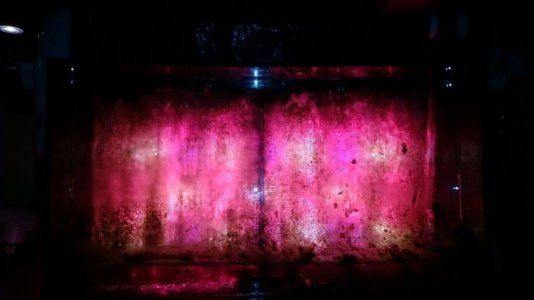
 
Sounds like too much flow, it's either due to slot pinching (long slot) or not a wide enough slot (so the hydraulics are pushing flow to the ends and it's "dumping")
 
why would it melt? The LEDs are barely warm since they're on a large metal sheet with a fan. The highest recorded temperature (check a few pages back) was about 100F...
 
<iframe width="560" height="315" src="https://www.youtube.com/embed/5r0jX1FvaNE" frameborder="0" allowfullscreen></iframe>

what do you think?
 
I hang my screen from the pipe using a loop of screen material, and drill holes in the pipe instead of a slot. Then I cover the loop with black plastic (from a contractor garbage bag), which serves as a light blocker, spray reducer, and also helps further smooth the flow. I find this system gives a nice even flow over the screen. This is a pic of my older implementation with a 3/4" pipe. My current one has a 20" long, 1" pipe with two 10"x10" screen sections. The scrubber is fed by a Jebao 8000 pump running full out, so lots of flow.
 

Attachments

  • v2-hang.jpg
    v2-hang.jpg
    37.9 KB · Views: 1
  • v2-pipe.jpg
    v2-pipe.jpg
    51.5 KB · Views: 1
It is difficult to show because it is in an enclosed box squeezed inside the cabinet and the lighting isn't camera friendly But here you can see the water flowing out of the holes. It is not entirely uniform direction-wise, but with the black plastic in place it gets smoothed out. It is pretty uniform in terms of volume all the way across the length of the pipe, which was a problem I had with a slot. These pictures are without the cover that goes over top of the scrubber cabinet so that it is fully enclosed.

The spray-bar pipe is just friction fit into the elbow on the left, with a cap on the right end. To remove the screens for cleaning, I just slide the pipe out to the right. To re-install the screens, I just thread the pipe back through the loop of screen material. This version uses 1/4" screen material for the loops, but the plastic mesh works fine as well.
 

Attachments

  • DSC_0015_resize.jpg
    DSC_0015_resize.jpg
    54.2 KB · Views: 1
  • DSC_0022_resize.jpg
    DSC_0022_resize.jpg
    54 KB · Views: 1
  • DSC_0023_resize.jpg
    DSC_0023_resize.jpg
    42.3 KB · Views: 1
  • DSC_0017_resize.jpg
    DSC_0017_resize.jpg
    34.4 KB · Views: 1
Last edited:
Ok. I get it.

Only issue is that my waterfall is gravity fed so I need to avoid backpressure from drilled holes as much as possible.

I'm going to adapt using your concepts though
 
I have roughly 1/4" holes (maybe 5/16) drilled every half inch. I started smaller, then enlarged them until I got a the right volume of flow, even across the length, with low enough velocity that the water mostly "fell" rather than "sprayed" from the holes.

I also figured that the 20" schedule 40 pipe with holes will be much less likely to sag versus if it had a slot running the whole length.
 
It's not really sagging.

Ok. I have a new concept... I'm going to invert the slit.

So, I'm going to a slit on top of a 1" pipe. That pushes water up first creating a chamber "flooding" effect in the 2" pipe around it. Then the slit in that pipe carries the water down.

Then I'm changing the screen so that it wraps around the 1" internal PVC to grab the flow all around.
 
Maybe I should make a video of it. The 7020 rigid strip is really a good LED form factor. My biggest learning is that stacking a lot of them drives a lot of current at 12V.

I'm putting together a 500W fixture and that's 42A!!! So the LED isn't hot, but the 12 gauge wire feeding it is. I know I need to move to the 8 gauge, but I just haven't gotten around it.
 
how long can a scrubber screen go "dry"? This is 24 hrs

<a href="http://s1062.photobucket.com/user/karimwassef/media/DB3F3E12-ECC5-489B-85C9-887B9DFEE122_zpsufcyerhd.jpg.html" target="_blank"><img src="http://i1062.photobucket.com/albums/t496/karimwassef/DB3F3E12-ECC5-489B-85C9-887B9DFEE122_zpsufcyerhd.jpg" border="0" alt=" photo DB3F3E12-ECC5-489B-85C9-887B9DFEE122_zpsufcyerhd.jpg"/></a>

<a href="http://s1062.photobucket.com/user/karimwassef/media/C87A6630-EC29-4ABD-BE6B-BD71CF5E1588_zps1bunfdxc.jpg.html" target="_blank"><img src="http://i1062.photobucket.com/albums/t496/karimwassef/C87A6630-EC29-4ABD-BE6B-BD71CF5E1588_zps1bunfdxc.jpg" border="0" alt=" photo C87A6630-EC29-4ABD-BE6B-BD71CF5E1588_zps1bunfdxc.jpg"/></a>

<a href="http://s1062.photobucket.com/user/karimwassef/media/FEE0C1FD-833D-453F-9AF4-2DCA131A9D36_zpsxq0dfwih.jpg.html" target="_blank"><img src="http://i1062.photobucket.com/albums/t496/karimwassef/FEE0C1FD-833D-453F-9AF4-2DCA131A9D36_zpsxq0dfwih.jpg" border="0" alt=" photo FEE0C1FD-833D-453F-9AF4-2DCA131A9D36_zpsxq0dfwih.jpg"/></a>

and what should I do to re-use it?

It's turned into a really solid coating... I can't scrape it off dry. I can rehydrate and scrape?

It's still green and I think it'll come back alive if I put it in water?
 
Last edited:
on an aside. here is the progress on my other scrubbers - here's my in-sump floating ATS, Xenia scrubber and Chaeto cage:

<a href="http://s1062.photobucket.com/user/karimwassef/media/109DC849-647B-411A-BBC4-60A413B8DA20_zpsyqiw9vjy.jpg.html" target="_blank"><img src="http://i1062.photobucket.com/albums/t496/karimwassef/109DC849-647B-411A-BBC4-60A413B8DA20_zpsyqiw9vjy.jpg" border="0" alt=" photo 109DC849-647B-411A-BBC4-60A413B8DA20_zpsyqiw9vjy.jpg"/></a>

<a href="http://s1062.photobucket.com/user/karimwassef/media/B59E09BB-660D-4B7A-B04A-481281DCC763_zpsssj0xftg.jpg.html" target="_blank"><img src="http://i1062.photobucket.com/albums/t496/karimwassef/B59E09BB-660D-4B7A-B04A-481281DCC763_zpsssj0xftg.jpg" border="0" alt=" photo B59E09BB-660D-4B7A-B04A-481281DCC763_zpsssj0xftg.jpg"/></a>

<a href="http://s1062.photobucket.com/user/karimwassef/media/0754A083-684A-4267-8C9F-ED776197BF61_zpsxzkrnxpn.jpg.html" target="_blank"><img src="http://i1062.photobucket.com/albums/t496/karimwassef/0754A083-684A-4267-8C9F-ED776197BF61_zpsxzkrnxpn.jpg" border="0" alt=" photo 0754A083-684A-4267-8C9F-ED776197BF61_zpsxzkrnxpn.jpg"/></a>

<a href="http://s1062.photobucket.com/user/karimwassef/media/BACD6092-4EB4-43CB-84B8-B6F1D8448B61_zps7dinx7jq.jpg.html" target="_blank"><img src="http://i1062.photobucket.com/albums/t496/karimwassef/BACD6092-4EB4-43CB-84B8-B6F1D8448B61_zps7dinx7jq.jpg" border="0" alt=" photo BACD6092-4EB4-43CB-84B8-B6F1D8448B61_zps7dinx7jq.jpg"/></a>
 
ok. rebuild happening

Here's the new design. it's odd shaped to fit the contours of the tank/space/fixtures around it.

<a href="http://s1062.photobucket.com/user/karimwassef/media/1E28958D-8397-4E4D-800B-673FFDBBE53D_zpsmhziulgl.jpg.html" target="_blank"><img src="http://i1062.photobucket.com/albums/t496/karimwassef/1E28958D-8397-4E4D-800B-673FFDBBE53D_zpsmhziulgl.jpg" border="0" alt=" photo 1E28958D-8397-4E4D-800B-673FFDBBE53D_zpsmhziulgl.jpg"/></a>

The hashed marker on the top of the top-pipe is where the water will flood up and down around the 1" pipe.

Then, the 2" pipe goes around it and will have a slit on the bottom. The idea is to get the water to go all the way down the arms before heading to the slit

<a href="http://s1062.photobucket.com/user/karimwassef/media/F500548F-3696-4991-9ED8-536F0B17CF9E_zpse7kplglb.jpg.html" target="_blank"><img src="http://i1062.photobucket.com/albums/t496/karimwassef/F500548F-3696-4991-9ED8-536F0B17CF9E_zpse7kplglb.jpg" border="0" alt=" photo F500548F-3696-4991-9ED8-536F0B17CF9E_zpse7kplglb.jpg"/></a>

ok - not so pretty, but I think it shows how the pieces fit together for assembly

<a href="http://s1062.photobucket.com/user/karimwassef/media/90013718-46C2-4F1F-B69C-D677AD9BA194_zps5yamgns6.jpg.html" target="_blank"><img src="http://i1062.photobucket.com/albums/t496/karimwassef/90013718-46C2-4F1F-B69C-D677AD9BA194_zps5yamgns6.jpg" border="0" alt=" photo 90013718-46C2-4F1F-B69C-D677AD9BA194_zps5yamgns6.jpg"/></a>

<a href="http://s1062.photobucket.com/user/karimwassef/media/328BC749-F137-46E4-BCAD-006B48EA9070_zpsxlr4gpmg.jpg.html" target="_blank"><img src="http://i1062.photobucket.com/albums/t496/karimwassef/328BC749-F137-46E4-BCAD-006B48EA9070_zpsxlr4gpmg.jpg" border="0" alt=" photo 328BC749-F137-46E4-BCAD-006B48EA9070_zpsxlr4gpmg.jpg"/></a>
 
Back
Top