algea scrubber

This is really sweet looking.

Yes, it does look awesome doesn't it!


How is it going?

It's not. Tiny details => FAIL.

It allowed water to spatter and dribble down the light-window which caused the window to obscure, making it a service hog.

Also turf has NO interest in adhering to an acrylic screen.

So in an effort to increase my knowledge I routed one face off of it and made it into a horizontal skimmer. I learned a lot about growing in horizontals with it.

I'm in the designing phase of a new Flooded unit using the information I learned from that unit.
 
A "standard" ATS has a hanging surface and water runs down it. You have to do fresh water washing weekly or the PODs will cut the underside which drops lots of the turf into the water stream.

Well the FATS sounds like a good tweak since the pods consuming the thin later of algae and sloughing it off seem like a "con" for the ATS.


Out competed 1)because you can't reasonably light cheato since it's a relatively large and self-obscuring structure. 2) Because it doesn't have billions of growth origins to work from - being a macro means it has to grow just where the structure allows. 3) Again, due to its structure it has less surface area available for nutrient take-up as compared to a filamentous hair algae.


All good reasons why micros would beat out macros. Be that as it may, fact remains that in my fuge I had some GHA, yet my cheato did grow. I did have to harvest cheato even if it was't very often. Yet my GHA never amounted to much. So on paper, the GHA should have choked it out regardless. You would even think that with all the fuges in use that GHA or other micros would be a much bigger problem than they seem to be.

And yes a big stinky cup of poo is a "Con" for skimmers. I could not even clean mine when the wife was home. :)
 
I was under the impression that the reason chaeto is so trendy now is because it is considered very uninvasive, as compared to previously-common macros like caulerpa, and of course even less prolific than so many of the "problem" microalgaes.

Two tanks ago, my chaeto was growing great, but then the last tank there was simply nothing I could do to prevent a pesky microalgae from growing all over it and choking it out.

By nature of their simplicity, it appears that microalgaes will always be more dynamic and prolific than macroalgaes, and I would be very surprised if an ATS device could ever be converted to somehow harbor chaeto or any other macroalgae for a better effect.

Cheato is a very hearty grower. It's against the law to put it in the sewer in California. Other locales have very huge problems with Cheato.

By you argument above, it would seem that macros would never even have been allowed to come to be. Yet macros can be just as hardy and aggressive. It would also seem that the use of macros in fuges would never have come to be either that they would always be taken over. Yet they are not. And not all fuges are slow flow, plenty grow more cheato be giving much more flow and use powerful lighting..

Seems that the micros that populate scrubbers are those that do best in those conditions. And I can concede that perhaps overall, it may very well be that scrubbers and those micros are a superior way to export nutrients compared to macros in a fuge.
 
A skimmer and an ATS compete for the same nutrients. If they are both well designed and of adequate capacity, there will be too much cleaning. The algae scrubber will suffer.

Building trust in a new fangled piece of equipments is difficult and different for everyone. Obviously, staying with the skimmer is a good option. On the other hand, if you want to try switching, I would simply suggest that you wait until your nutrients drop to zero and then cut back on the hours that you run the skimmer a little at a time.

What I did was to wait until the nutrients fell to zero and then I just turned off the skimmer for a few days and did a lot of testing. I never turned it on again and eventually, I even stopped testing.

What ever you decide to do will be the right thing for you as long as you test to verify that you didn't forget something. Of course that is just my opinion.
 
I know that I am late in responding in both of these last two posts but I thought that I would catch up now with a small point.

I hate to be a purist but a "œStandard Algal Turf Scrubber" is a trade marked and patented device from the 90's. The original patents have run out and I only sight them because the ATS is described as have light, turbulence and flow. A "œTrue ATS" (the patent holders would say) has all thread components and is the most efficient way to grow algae by as much as 50% or more.

The double sided scrubber is a new development. It makes up for the lack of efficiency of adding turbulence by doubling the screen surface area. The FATS is a cool new development of a new idea.
 
Kcress, I'm a little confused about how the water level in the bottom of the FATS rises over time. Is it because the algae growth clogs the effluent port? Sorry if I'm just not clear on how the water level just "rises".

Also why are pods bad?
 
Not so much 'clogs the the outlet' as just slows the water's path to the outlet.

Think of it like a box with water coming in one side and draining out the other. Now stuff a wad of cotton in the middle of the box. Likely all the same water will exit but it will get deeper before it exits. Look at the Youtube video I linked up above. You can see what I mean.

Pods are ravenous eaters of filamentous algae. They are a menace to a classic ATS. As to your D tank they are an outstanding addition. They're a valuable food source.
 
wow... it's been a while since I have looked at any ATS and now there is a FATS... any one have any pics of a working FATS? I am not sure I can vision it being flooded. So it is in completely underwater (the screens)? Pics would be great.
 
2nd Generation DIY Build

2nd Generation DIY Build

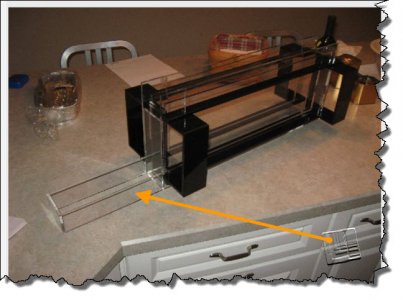
I spent some time on CAD working out a revised design, and along with a couple ideas from others on RC I solidified a re-design last week. Over the weekend, my Dad and I built this new 2-piece ATS box that will replace the old one:

IMG_9072.jpg


IMG_9077.jpg


IMG_9073.jpg


It has a frame for holding the lights made out of black acrylic, and the standoffs will be held in place on the outside versus the inside, that way the screw heads are out of the way. It also has a black strip that acts as a light blocker to keep light from getting around the reflectors better. I left the ends open for ventilation, I will probably add fans on one end of each side. The inner box has black on the bottom and sides, also to block light to the sump and outside of the device.

The inner box will house the screen, it is watertight and has holes drilled in the corners that match up with open sections in the base for drain tube connections.

IMG_9076.jpg


Instead of going with modified (hacksawed) bulkheads like in my original design, I came up with a more compact and flexible design, I used a combination of a male/female screw-on PVC connector (for 1" pipe) and rubber sink faucet o-rings, then used a table router to custom cut the hole so that it tightens down and provides a perfect watertight fit

IMG_9074.jpg


IMG_9075.jpg


There are 2 of these, one in each corner of the box. The screen will actually hang down to within 1/2" of the bottom of the box, and since the drain is off to the side and 1" above the bottom, the water will not cascade down and directly into the drain.

My idea here is that this will:

1) reduce or drastically eliminate microbubbles

2) reduce the chance of clogging or the pipe (which has not happened, but other have experienced it)

3) allow option of different heights of internal tubing to control the water level in the box.

Allowing the screen to become completely flooded provides for 3D growth of the algae (like I am seeing at the very bottom of the current design) and having a 2nd drain 1/2 way up the box would allow for buildup of algae and a secondary maximum water level. I considered cutting a slot out of one side of the box as an emergency measure, but that can be added later if it seems to be needed. I don't think it will.

I obviously have to add all the light fixtures and wiring, but should have it up and running in the new box by this weekend.
 
I use a high end CAD package (NX) at work and I also use it at home as well. Never the less, sometimes I try to wing it. The CAD designs always come out twice and good.

What kind of CAD are you using? How are you cutting all this stuff up. It sure looks clean and neat. Good job!
 
Impressive design. What is the clear acrylic to the left used for? Does that flip up over the top or something like that?

attachment.php
 

Attachments

  • 11-29-2010 1-38-37 PM.jpg
    11-29-2010 1-38-37 PM.jpg
    60.5 KB · Views: 32
I use a high end CAD package (NX) at work and I also use it at home as well. Never the less, sometimes I try to wing it. The CAD designs always come out twice and good.

What kind of CAD are you using? How are you cutting all this stuff up. It sure looks clean and neat. Good job!

AutoCAD 2008. We used a Ryobi table saw with the acrylic cutting blade for the rough cut, then a table jointer to shave off 1/32" off each side to make it perfectly flat and even. My Dad makes acrylic display cases and stands for antiques, so he's got the process down pat. I think we used about 1/4 of a 4x4 sheet of black and and about the same of clear.

Impressive design. What is the clear acrylic to the left used for? Does that flip up over the top or something like that?

attachment.php

That spans across the 40B sump. I still have to cut and attach the end pieces so that it sits on the rim like the old one here:

IMG_8710.jpg
 
I disconnect the pipe the same way, then lift the pipe and box out and slide it out the side. The frame has ends on it, the side in the middle goes up to the pipe, and on the far right side is only goes up about 4", so I can lift the box partway out and then slide it out the side, keeping the screen in the box while I go to clean it.
 
I'm trying to see how the pipe is held centralized... Am I seeing a hole for the pipe on the left side in the very first picture? If yes, what holds it on the right side? Got a semicircle cutout or something? Or will it just sit there on its own if one side is constrained?

Thanks.
 
The pipe lays on top of the inner box, on the top of the black end pieces. The long sides of the box are 1/2 the diameter of the pipe higher than the ends. This keeps the spray from escaping (pipe slot is under pressure). I will probably add a 1/2" wide strip of 1/4" or 3/16" along the top edge of the inner box to completely "hug" the pipe. I left it off on purpose for now.

The frame (outer piece) does not have any contact with the pipe.
 
Back
Top