DIY Stands Template and Calculator

So here is what my dad and I built over the weekend. We still need to put trim on it and stain it but Im pretty happy with what we ended up with. Its the same basic skeleton as the template but is 38" tall with the plywood. We used 1/2' birch for the skin, and the doors we found at builders supply for $12 each.
Sorry for the terrible picture but I didnt bring my camera home and it was taken on my iphone.

img0043y.jpg
 
Laminated Beams vs Constuction Grade Lumber

Laminated Beams vs Constuction Grade Lumber

I am planning a stand for a 120 gallon 48" x 24" X 24". I was reading that building laminated beams out of plywood will give me the strength need to span the 48" width without the need of a center post.

Could someone enlighten me on this type of construction?

I believe that in addition to spanning the 48" width, I can get pieces that are square.

Look at the template provided on the first page and you will see that it has no center post. I just built a stand for my 120 and used 2x6's for the top frame and 2x4's for the rest. The lumber for the frame was a whooping $19 at home depot... Also try pming rocketengineer as he is very helpful.
 
I'm fairly new to the forum and in the process of constructing a stand via these plans. I'm not much of a woodworker but the plans made it look easy. Its for a 75 gallon RR tank that we recently purchased used. Before I get too far I'm running into one issue. The bulkheads are not going to clear one of the green screw strips. Is there anything I can do to get around this? I'm using 2x4's for everything. Can the screw strip be placed on the outside? I'm not to concerned with looks but I want it to be strong, obviously. Thank you for an help
 
I'm fairly new to the forum and in the process of constructing a stand via these plans. I'm not much of a woodworker but the plans made it look easy. Its for a 75 gallon RR tank that we recently purchased used. Before I get too far I'm running into one issue. The bulkheads are not going to clear one of the green screw strips. Is there anything I can do to get around this? I'm using 2x4's for everything. Can the screw strip be placed on the outside? I'm not to concerned with looks but I want it to be strong, obviously. Thank you for an help

yeah, you can put it on the outside in the back...same difference. it is just attached to the leg & then to the top/bottom framerails to keep the leg in place.

you could also pocket drill the leg to attach them to the framerails. you just need the jig that you can get fome home depot (this)

here is a clickable thumbnail pic of how i pocket drilled the legs of mine to attach to the framerails (in the red circle highlights). just make sure if you do this to use a screw that has a FLAT BACK where the threads are & not a v-shaped deck screw as the v-shape will split the wood causing it to fail :eek2:

 
Last edited:
Thank you very much. I'll probably put it on the back as I am really tight on money for this build and am not that great with wood. We're merging 2 29 gallon tanks into the 75 gallon. I'll be sure to post pictures when all is said and done
 
This six foot stand had my 275 pounds on it in the center standing on one rail and not one bit of deflection showed with a laser level. And that was before all the corner braces were added front and back.

danontank.jpg


This stand and the other ones behind it I built at the same time don't look as beefy as the "4 by 12" stands, but they are more durable and more dependable than most if not all of the "over-engineered" designs. Over-engineered is more likely to be "under-thought".
 
james3370, that is exactly what I am doing for the stand for my 75g upgrade. Pocket screws are one way to totally avoid the screw strips but are a little more involved.

ceige, that looks like a great example of the template. If you could, please post additional pics.

Rhodophyta, while I appreciate that a plywood stand is possible, it may be outside the abilities of certain individuals. Also, if I understand your design, you rabbet the plywood panel between boards. To me, this is a more advanced technique then the spirit of this thread. Now, for my own personal tank, I am employing a mortise and tenon method for joining both the legs to the frames and the frame pieces to each other. While I respect that your design has several advantages over the one I present here, please be courteous of the fact that some of us do not have the tools, skills, or space to produce a stand such as your own and find the design presented in this thread to be within their abilities and meets their needs. If you would be so kind as to post a link to a template which employs these more advanced woodworking methods to arrive at stands such as you show in the picture, I will be happy to distribute it as well as my own when asked for a template to work from. There are multiple ways to arrive at an acceptable stand. Each to their own preference and abilities.

RocketEngineer
 
Rhodophyta, while I appreciate that a plywood stand is possible, it may be outside the abilities of certain individuals. Also, if I understand your design, you rabbet the plywood panel between boards. To me, this is a more advanced technique then the spirit of this thread. Now, for my own personal tank, I am employing a mortise and tenon method for joining both the legs to the frames and the frame pieces to each other. While I respect that your design has several advantages over the one I present here, please be courteous of the fact that some of us do not have the tools, skills, or space to produce a stand such as your own and find the design presented in this thread to be within their abilities and meets their needs.RocketEngineer
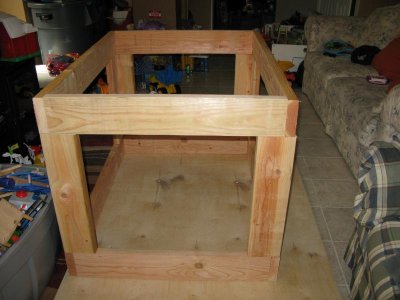
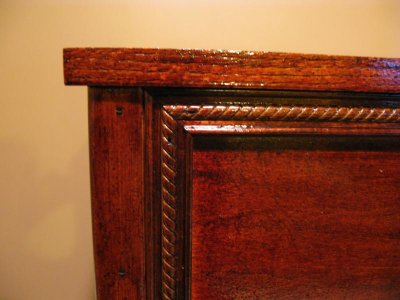
This is not a plywood stand, which is certainly an OK way to build, but framing the plywood edges in solid wood pieces makes a stronger, straighter composite stand than either solid wood or plywood alone.

The tools, skills, and space to produce a rabbet or flush recess are simpler than those needed to produce a mortise and tenon. Both, in solid wood, are ancient woodworking techniques. All you need for a flush recess in the legs is a hand saw or a circular saw, two passes at right angles to each other. Mortise and tenon requires three tools - the saw, a chisel, and a drill - and many more cuts.

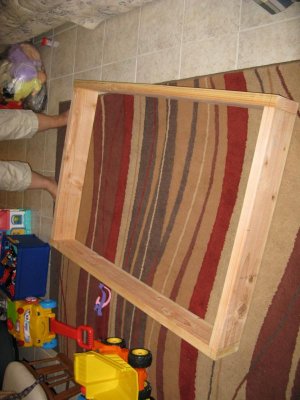
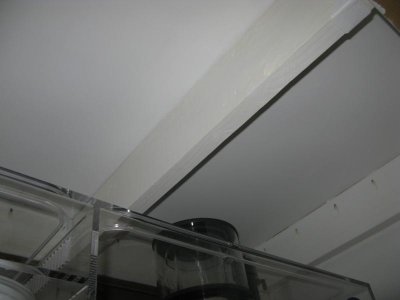
On the shelves, it is even simpler. What looks like a rabbet is made by gluing boards together with one dropped down to create the groove with no sawing or cutting at all. If you have never done a flush recess, it may be daunting to think about, but doing it is amazingly simple. It is well worth stepping out of the comfort zone of butting boards together to learn how to do it.

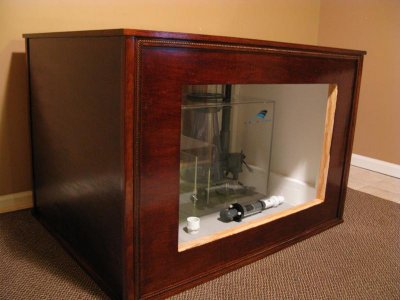
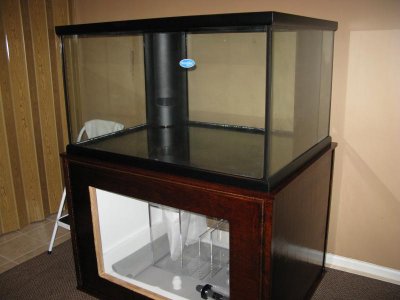
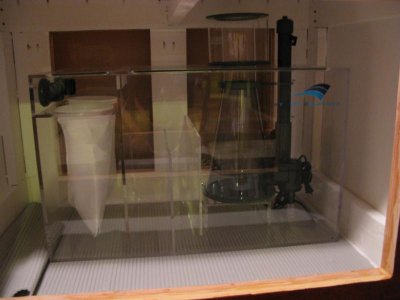
Another advantage of the composite stand besides strength and durability is that it takes up less wall space and has fewer obstructions and more working room around the tank relative to other designs. It is very flexible since you can either make it a double stand, triple stand, or "skin" it to create a cabinet style stand with space inside for a sump. Either way the design has a recess above the bottom shelf perfect for completely out-of-the-way twist bulb lighting for the bottom tank or a sump.


If you would be so kind as to post a link to a template which employs these more advanced woodworking methods to arrive at stands such as you show in the picture, I will be happy to distribute it as well as my own when asked for a template to work from. There are multiple ways to arrive at an acceptable stand. Each to their own preference and abilities.

RocketEngineer

I have no template, but I did write a math-free article demonstrating the techniques and leaving the stand size calculations to be customized by the builder. It is not so much an advanced technique as it is simply letting each kind of wood do what it is best at.

http://www.cichlid-forum.com/articles/diy_stand2.php

The materials list and cuts can be calculated with pencil and paper, or using a drafting program like autocad. Someone with your computer skills would probably create a programmed template that would produce the cutting dimensions and materials list for each size of tank.
 
My friend built a stand for me, but didn't quite follow the plans I gave him.

IMG_0174.jpg


IMG_0172.jpg


The studs that will be supporting the bottom rim of the tank are screwed into the 2x4s and the outer frame, but are NOT directly supported from beneath. This is for a 75 gallon tank. Will it hold or should I add some 2x4s to brace the studs where the tank bottom will rest?

Thank you for your feedback.

Better than two by fours, would be some plywood panels inside the back and ends of the stand from top to bottom and then cut some (separate) openings where you need them for wires and tubing.

Also quite adequate would be to put a few layers of fiberglass over the inside of this stand. That would maintain the openess it has. You should really paint the inside and bottom anyway, so fiberglassing it would accomplish both sealing it and beefing it up.
 
this is the stand I built using the formula. I used 2x6 and covered in 1/2" ply for the sides. I made this for a Marineland 200DD, it is 32" high
 

Attachments

  • IMG_2101.jpg
    IMG_2101.jpg
    55.8 KB · Views: 12
  • IMG_2098.jpg
    IMG_2098.jpg
    44.4 KB · Views: 8
  • IMG_2100.jpg
    IMG_2100.jpg
    62.2 KB · Views: 9
  • IMG_0184.jpg
    IMG_0184.jpg
    53.5 KB · Views: 8
  • IMG_0199.jpg
    IMG_0199.jpg
    46 KB · Views: 7
The bottom and top are 3/4"ply, makes it very sturdy. The inside is just the frame painted with white latex paint for outdoor use,have used it before for this application and its great. A very simple design, the last shot is of the tank being filled took two and a half days

By the way I also used a kreg jig, great product makes the build easier.
 

Attachments

  • IMG_0387.jpg
    IMG_0387.jpg
    56.2 KB · Views: 10
  • IMG_0182.jpg
    IMG_0182.jpg
    54.8 KB · Views: 8
  • IMG_0197.jpg
    IMG_0197.jpg
    25.1 KB · Views: 8
  • IMG_0187.jpg
    IMG_0187.jpg
    40.4 KB · Views: 8
I have a question.

If I want to skin the stand with half-inch hardwood (oak lumber) instead of plywood, can I have the edges of the stand sit on the oak hardwood (as well as the 2x4 frame) or does the oak hardwood have to "stick out" past the edge of the tank?
 
I have a question.

If I want to skin the stand with half-inch hardwood (oak lumber) instead of plywood, can I have the edges of the stand sit on the oak hardwood (as well as the 2x4 frame) or does the oak hardwood have to "stick out" past the edge of the tank?
Most people like to conceal the fakey looking plastic frame, but it's the choice of the stand designer. If you prefer the flush look of having the stand right under the tank edge, over hiding the cheapest feature of most glass tanks, go for it. :hammer: You can always add a frame strip at the top and the bottom of the stand if you change your mind later, or if the plastic frame gets damaged and you need to hide it.
 
Back
Top